Tuesday, June 30, 2020

Kushal Das: Introducing dns-tor-proxy, a new way to do all of your DNS calls over Tor

dns-tor-proxy is a small DNS server which you can run in your local system along with the Tor process. It will use the SOCKS5 proxy provided from Tor, and route all of your DNS queries over encrypted connections via Tor.

By default the tool will use 1.1.1.1 (from Cloudflare) as the upstream server, but as the network calls will happen over Tor, this will provide you better privacy than using directly.

In this first release I am only providing source packages, maybe in future I will add binaries so that people can download and use them directly.

Demo

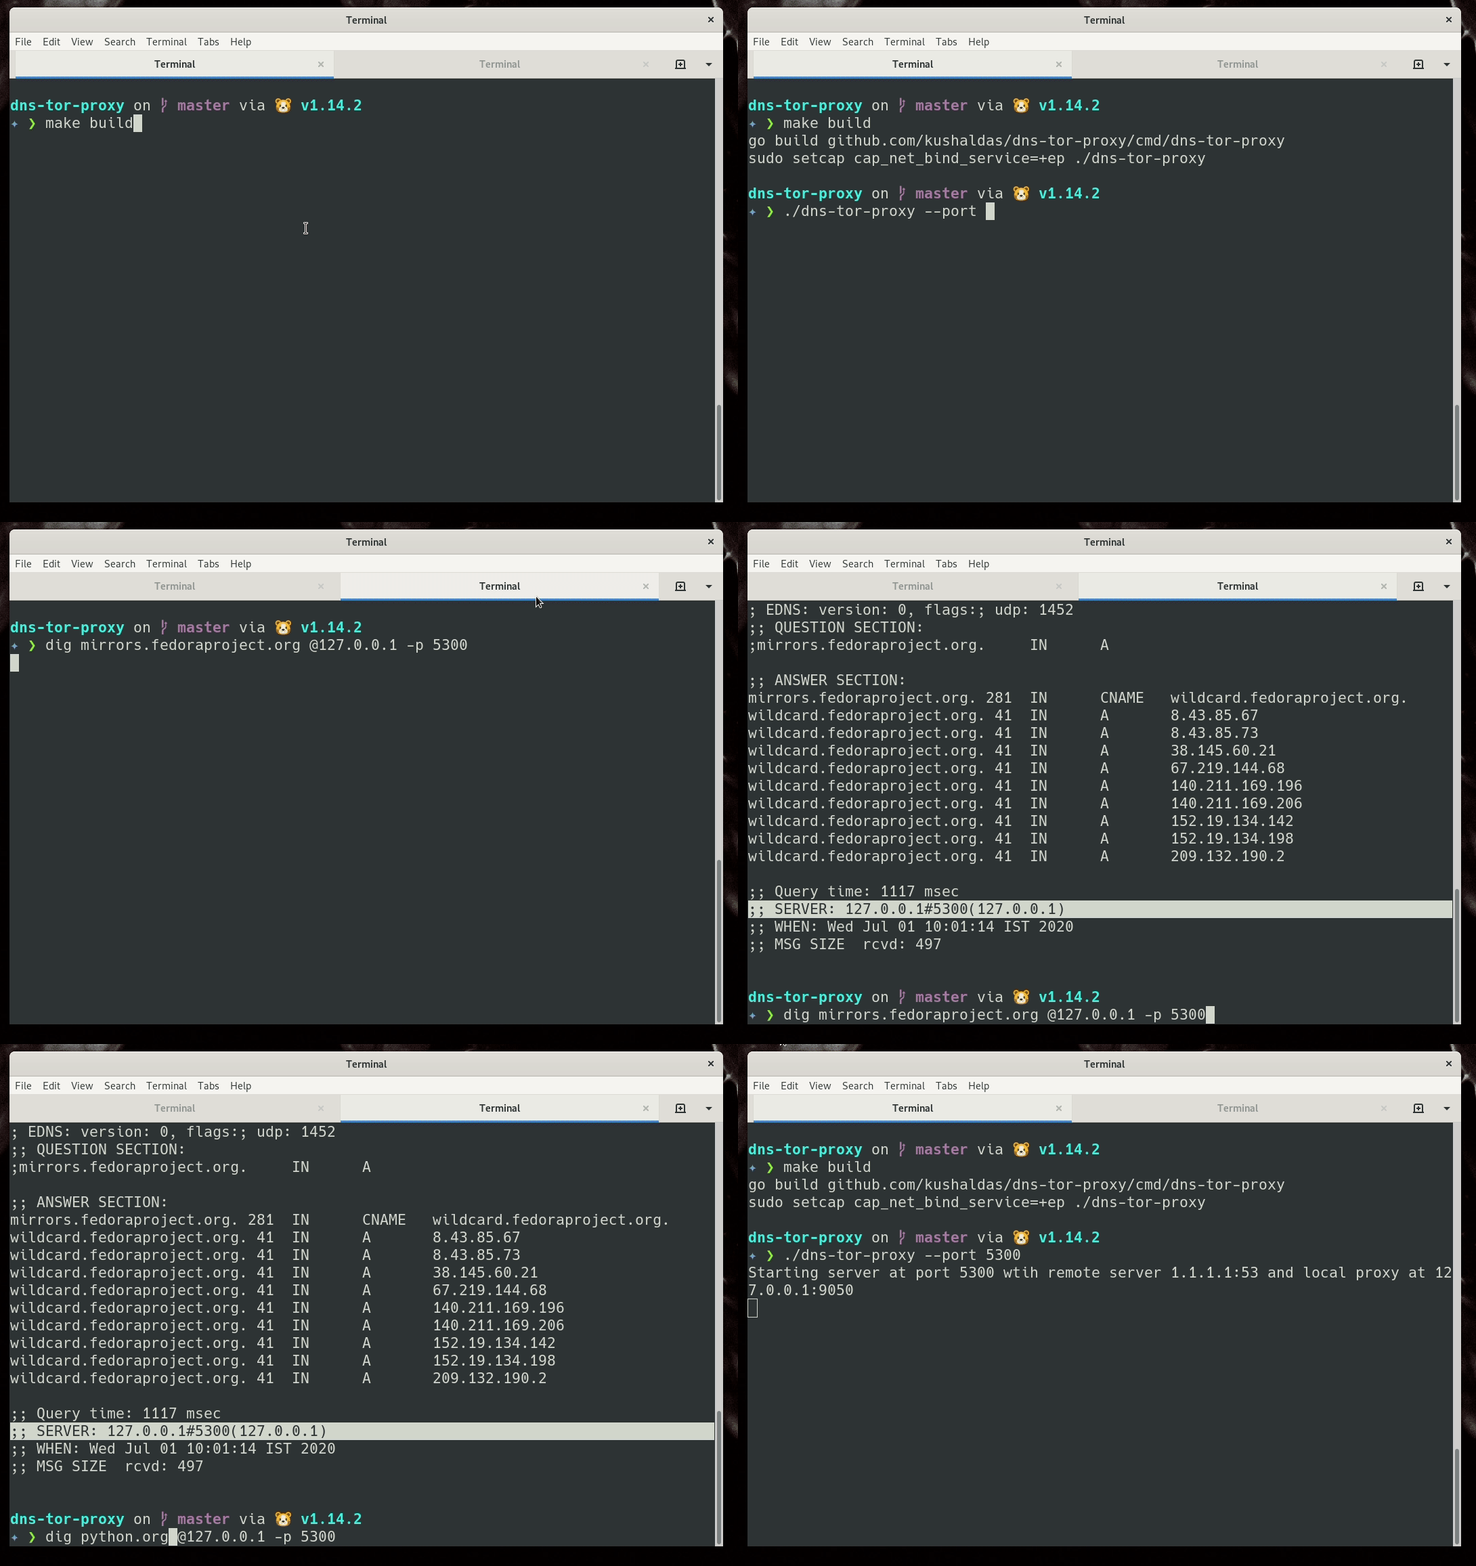
In the following demo I am building the tool, running it at port 5300, and then using dig to find the IP addresses for mirrors.fedoraproject.org and python.org.

demo of dns tor proxy

The -h flag will show you all the available configurable options.

./dns-tor-proxy -h

Usage of ./dns-tor-proxy:
  -h, --help            Prints the help message and exists.
      --port int        Port on which the tool will listen. (default 53)
      --proxy string    The Tor SOCKS5 proxy to connect locally,  IP:PORT format. (default "127.0.0.1:9050")
      --server string   The DNS server to connect IP:PORT format. (default "1.1.1.1:53")
  -v, --version         Prints the version and exists.
Make sure that your Tor process is running and has a SOCKS proxy enabled.


from Planet Python
via read more

IslandT: Create various graph and chart for Earning Software with Python

Hello and welcome back, in this chapter we will continue to develop the previous earning application which shows the shoe and shirt sales figure from the input database.

If you want to understand what is going on, then do read the previous post about this topic. In this chapter, I am going to improve the previous application by including a combo box that allows the user to select the type of graph or chart he or she wants to view.

This is the updated version of the user interface program.

import tkinter as tk
from tkinter import ttk

from Input import Input

win = tk.Tk()

win.title("Earn Great")

def submit(cc): # commit the data into earning table
    if(cc=="Shoe"):
        sub_mit.submit(shoe_type.get(), earning.get(), location.get(), cc)
    elif(cc=='Shirt'):
        sub_mit.submit(shirt_type.get(), earning.get(), location.get(), cc)
    else:
        print("You need to enter a value!")

#create label frame for the shoe ui
shoe_frame= ttk.Labelframe(win, text ="Shoe Sale")
shoe_frame.grid(column=0, row=0, padx=4, pady=4, sticky='w')
# create combo box for the shoe type
shoe_type = tk.StringVar()
shoe_combo = ttk.Combobox(shoe_frame, width=9, textvariable = shoe_type)
shoe_combo['values']  = ('Baby Girl', 'Baby Boy', 'Boy', 'Girl', 'Man', 'Woman')
shoe_combo.current(0)
shoe_combo.grid(column=0, row=0)
# create the submit button for shoe type
action_shoe = ttk.Button(shoe_frame, text="submit", command= lambda: submit("Shoe"))
action_shoe.grid(column=1, row=0)

#create label frame for the shirt ui
shirt_frame= ttk.Labelframe(win, text ="Shirt Sale")
shirt_frame.grid(column=0, row=1, padx=4, pady=4, sticky='w')
# create combo box for the shirt type
shirt_type = tk.StringVar()
shirt_combo = ttk.Combobox(shirt_frame, width=16, textvariable = shirt_type)
shirt_combo['values']  = ('T-Shirt', 'School Uniform', 'Baby Cloth', 'Jacket', 'Blouse', 'Pajamas')
shirt_combo.current(0)
shirt_combo.grid(column=0, row=0)
# create the submit button for shirt type
action_shirt = ttk.Button(shirt_frame, text="submit", command= lambda: submit("Shirt"))
action_shirt.grid(column=1, row=0)

#create label frame for the earning ui
earning_frame= ttk.Labelframe(win, text ="Earning")
earning_frame.grid(column=1, row=0, padx=4, pady=4, sticky='w')

# create combo box for the shoe earning
earning = tk.StringVar()
earn_combo = ttk.Combobox(earning_frame, width=9, textvariable = earning)
earn_combo['values']  = ('1.00', '2.00', '3.00', '4.00', '5.00', '6.00', '7.00', '8.00', '9.00', '10.00')
earn_combo.current(0)
earn_combo.grid(column=0, row=0)

#create label frame for the location ui
location_frame= ttk.Labelframe(win, text ="Location")
location_frame.grid(column=1, row=1, padx=4, pady=4, sticky='w')

# create combo box for the sale location
location = tk.StringVar()
location_combo = ttk.Combobox(location_frame, width=13, textvariable = location)
location_combo['values']  = ('Down Town', 'Market', 'Bus Station', 'Beach', 'Tea House')
location_combo.current(0)
location_combo.grid(column=0, row=0)


def plot(cc): # plotting the bar chart of total sales
    sub_mit.plot(location.get(), cc, month.get(), plot_type.get())

#create label frame for the plot graph ui
plot_frame= ttk.Labelframe(win, text ="Plotting Graph Select Date")
plot_frame.grid(column=0, row=2, padx=4, pady=4, sticky='w')

# create the plot button for shoe type
action_pshoe = ttk.Button(plot_frame, text="Shoe", command= lambda: plot("Shoe"))
action_pshoe.grid(column=1, row=0)
# create the plot button for shirt type
action_pshirt = ttk.Button(plot_frame, text="Shirt", command= lambda: plot("Shirt"))
action_pshirt.grid(column=2, row=0)
# create the plot button for all items
action_p_loc = ttk.Button(plot_frame, text="All Goods", command= lambda: plot("All Items"))
action_p_loc.grid(column=3, row=0)

# create combo box for the sale's month
month = tk.StringVar()
month_combo = ttk.Combobox(plot_frame, width=3, textvariable = month)
month_combo['values']  = ('01', '02', '03', '04', '05', '06', '07', '08', '09', '10', '11', '12')
month_combo.current(0)
month_combo.grid(column=4, row=0)

# create combo box for the plot type
plot_type = tk.StringVar()
month_combo = ttk.Combobox(plot_frame, width=7, textvariable = plot_type)
month_combo['values']  = ('line', 'bar', 'barh', 'hist', 'box', 'area', 'pie')
month_combo.current(0)
month_combo.grid(column=5, row=0)

win.resizable(0,0)

sub_mit = Input()
sub_mit.setting()

win.mainloop()

This is the updated part for the input class.

import sqlite3
import pandas as pd
import matplotlib.pyplot as plt

class Input:
    def __init__(self):
        pass

    def setting(self):

        conn = sqlite3.connect('daily_earning.db')
        print("Opened database successfully")
        try:
            conn.execute('''CREATE TABLE DAILY_EARNING_CHART
                 (ID INTEGER PRIMARY KEY AUTOINCREMENT,
                 DESCRIPTION    TEXT (50)   NOT NULL,
                 EARNING    TEXT  NOT NULL,
                 TYPE TEXT NOT NULL,
                 LOCATION TEXT NOT NULL,
                 TIME   TEXT NOT NULL);''')
        except:
            pass

        conn.close()

    def submit(self,description, earning, location, cc): # Insert values into earning table

        self.description = description
        self.earning = earning
        self.location = location
        self.cc = cc
        try:
            sqliteConnection = sqlite3.connect('daily_earning.db')
            cursor = sqliteConnection.cursor()
            print("Successfully Connected to SQLite")
            sqlite_insert_query = "INSERT INTO DAILY_EARNING_CHART (DESCRIPTION,EARNING,TYPE, LOCATION, TIME) VALUES ('" + self.description + "','"+ self.earning +  "','" + self.cc +  "','" + self.location + "',datetime('now', 'localtime'))"
            count = cursor.execute(sqlite_insert_query)
            sqliteConnection.commit()
            print("Record inserted successfully into DAILY_EARNING_CHART table", cursor.rowcount)
            cursor.close()

        except sqlite3.Error as error:
            print("Failed to insert earning data into sqlite table", error)
        finally:
            if (sqliteConnection):
                sqliteConnection.close()

    def plot(self, location, cc, month, plot_type): # plotting the bar chart
        plt.clf() #this is uses to clear the previous graph plot
        # dictionary uses to print out the month within header of the graph
        monthdict = {'01':'January', '02':'Febuary', '03':'March', '04':'April', '05':'May', '06' : 'June', '07':'July', '08':'August', '09':'September', '10':'October', '11':'November', '12':'December'}
        try:
            shoe_dict = {'Baby Girl' : 0.00, 'Baby Boy' : 0.00, 'Boy':0.00, 'Girl':0.00, 'Man':0.00, 'Woman':0.00}
            shirt_dict = {'T-Shirt':0.00, 'School Uniform':0.00, 'Baby Cloth':0.00, 'Jacket':0.00, 'Blouse':0.00, 'Pajamas':0.00}
            sqliteConnection = sqlite3.connect('daily_earning.db')
            cursor = sqliteConnection.cursor()
            print("Successfully Connected to SQLite")
            if cc=='All Items':
                cursor.execute("SELECT * FROM DAILY_EARNING_CHART WHERE LOCATION=?", (location,))
            else:
                cursor.execute("SELECT * FROM DAILY_EARNING_CHART WHERE TYPE=? AND LOCATION=?", (cc, location))
            rows = cursor.fetchall()

            for row in rows:
                if(row[5].split('-')[1]) == month:

                    if cc=="Shoe":
                        shoe_dict[row[1]] += float(row[2])
                    elif cc=="Shirt":
                        shirt_dict[row[1]] += float(row[2])
                    elif cc=="All Items":
                        if row[1] in shoe_dict:
                            shoe_dict[row[1]] += float(row[2])
                        else:
                            shirt_dict[row[1]] += float(row[2])
            # dictionary for the graph axis
            label_x = []
            label_y = []

            if cc=="Shoe":
                for key, value in shoe_dict.items():
                    label_x.append(key)
                    label_y.append(value)
            elif cc=="Shirt":
                for key, value in shirt_dict.items():
                    label_x.append(key)
                    label_y.append(value)
            else:
                for key, value in shirt_dict.items():
                    label_x.append(key)
                    label_y.append(value)
                for key, value in shoe_dict.items():
                    label_x.append(key)
                    label_y.append(value)
            # begin plotting the bar chart
            s = pd.Series(index=label_x, data=label_y)
            if(plot_type!="pie"):
                s.plot(label="Goods Sale vs Month", use_index=True, color="green", legend=True, kind=plot_type, title = cc + " Sales for " + monthdict[month] +  " at " + location)
            else:
                s.plot(label="Goods Sale vs Month", use_index=True, legend=True,  kind=plot_type, title=cc + " Sales for " + monthdict[month] + " at " + location)
            plt.show()

        except sqlite3.Error as error:
            print("Failed to plot earning data", error)
        finally:
            if (sqliteConnection):
                sqliteConnection.close()

Now we can select any chart or graph we wish to see from the month of sales database.

Select a plot type from the user interface above
The Pie Chart of the goods sale

More will come, as I am going to keep on working on the above program by including more features into it. One of the features I am working on is the feature that allows me to create a column from the database for future goods.


from Planet Python
via read more

Python Engineering at Microsoft: Announcing Pylance: Fast, feature-rich language support for Python in Visual Studio Code

We are excited to announce Pylance, our fast and feature-rich language support for Python! Pylance is available today in the Visual Studio Code marketplace.

Pylance depends on our core Python extension and builds upon that experience, for those of you who have already installed it.


Optimized performance

Pylance is a new language server for Python, which uses the Language Server Protocol to communicate with VS Code.

The name Pylance serves as a nod to Monty Python’s Lancelot, who is the first knight to answer the bridgekeeper’s questions in the Holy Grail.

To deliver an improved user experience, we’ve created Pylance as a brand-new language server based on Microsoft’s Pyright static type checking tool. Pylance leverages type stubs (.pyi files) and lazy type inferencing to provide a highly-performant development experience. Pylance supercharges your Python IntelliSense experience with rich type information, helping you write better code, faster. The Pylance extension is also shipped with a collection of type stubs for popular modules to provide fast and accurate auto-completions and type checking.

In 2018, the Python team at Microsoft released the Python Language Server, bringing Visual Studio’s rich Python IntelliSense support to Visual Studio Code. Since our initial release, the Python community has provided us with invaluable feedback about how we can make the user experience of our Python Language Server even better. Over the past several months, we have evaluated how we can make the language server more performant and empower you to write your best code.

Today, we are happy to announce the outcome of this work as the new Pylance language server.

Alongside its performance, there are a few great features that Pylance offers.


Type Information

Type information is now available in function signatures and when hovering on symbols, providing you with helpful information to ensure that you are correctly invoking functions, to improve the quality of the code you write.

Image type information


Auto-Imports

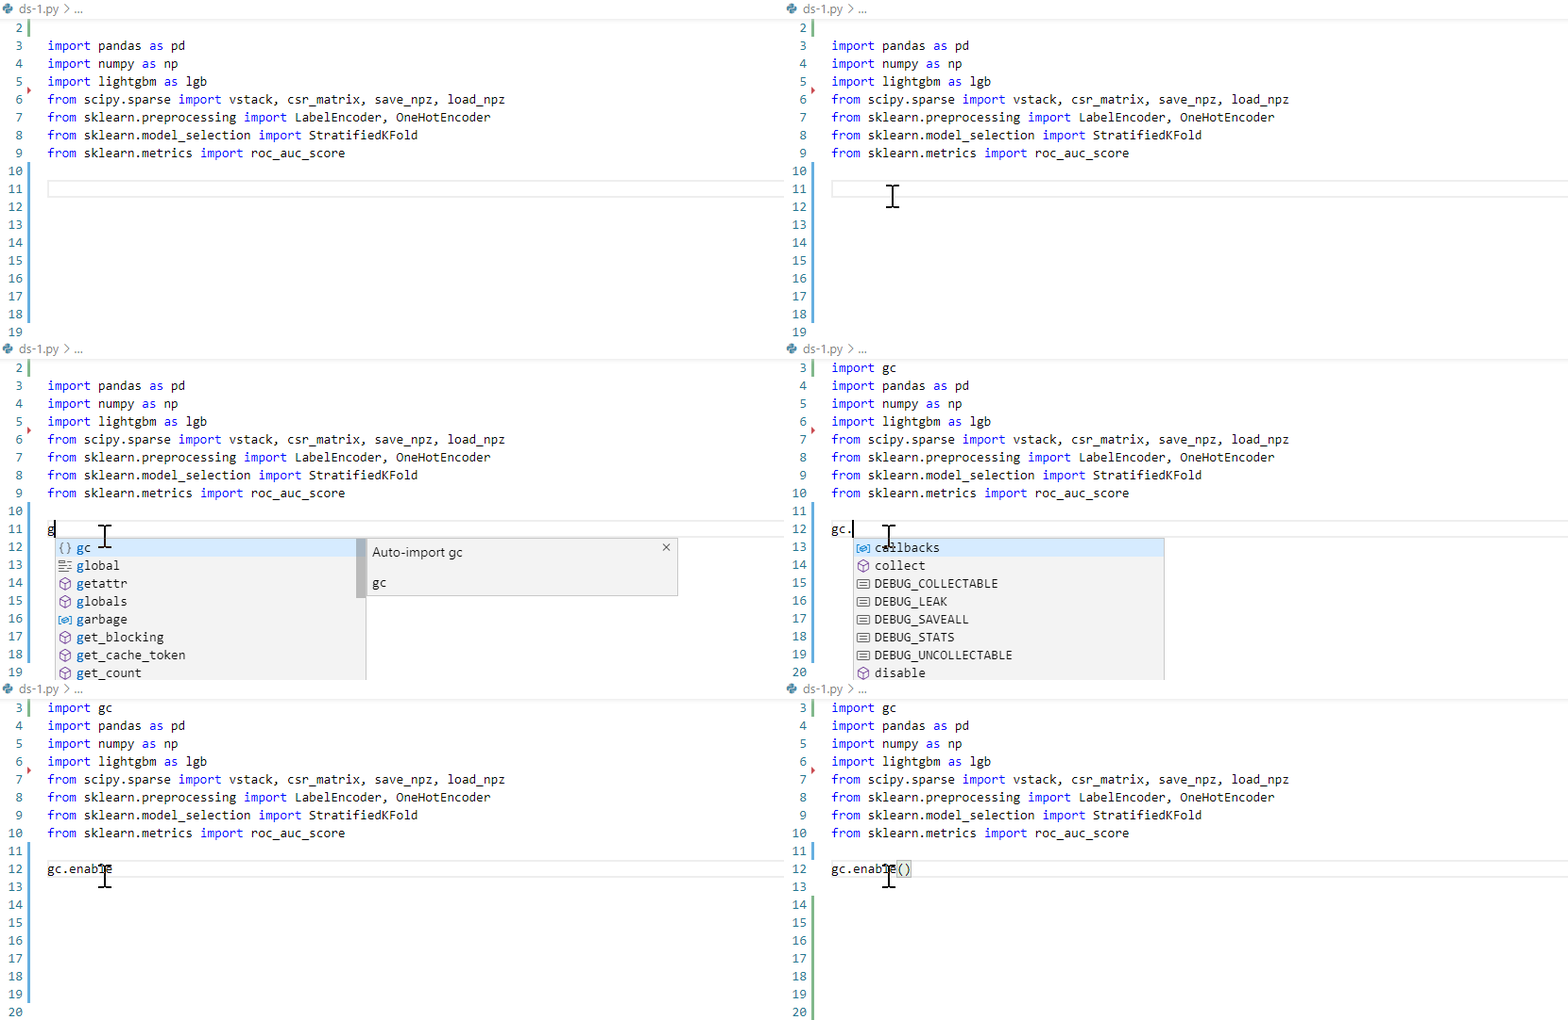
One of our most requested features is finally here! With auto-imports, you are now able to get smart import suggestions in your completions list for installed and standard library modules.

Image auto imports


Type Checking Diagnostics

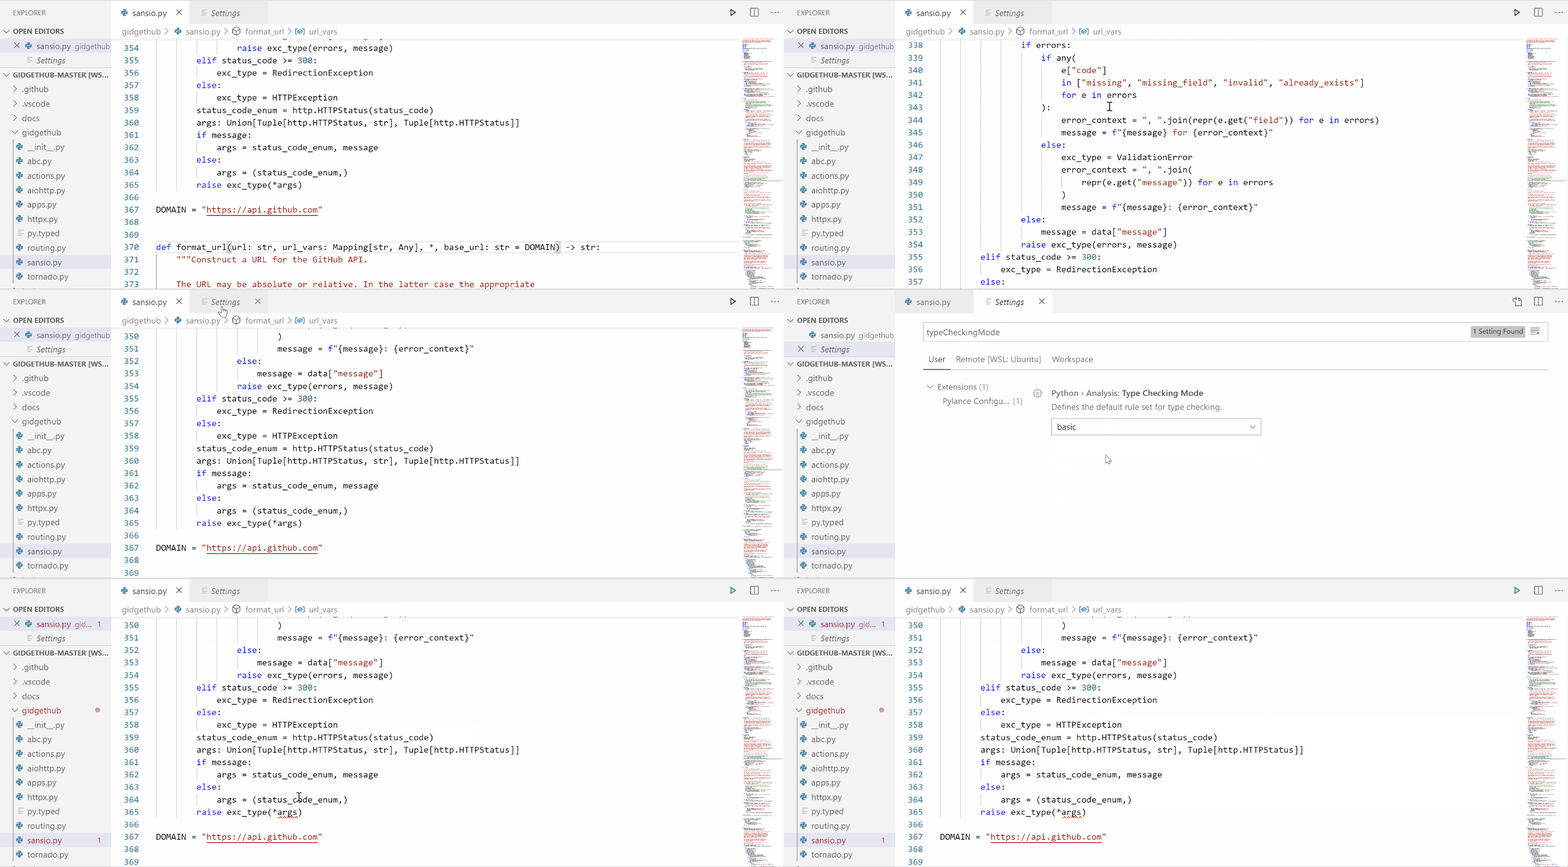
If you are excited about types in Python, you can try out Pylance’s type checking mode by setting python.analysis.typeCheckingMode to basic or strict. This setting uses Pyright’s type checking to apply either a basic or comprehensive set of rules over your codebase, respectively. The diagnostics produced from this mode can help improve the quality of your code and help you find edge cases more easily.

Image typecheckingmode setting final


Multi-Root Workspace Support

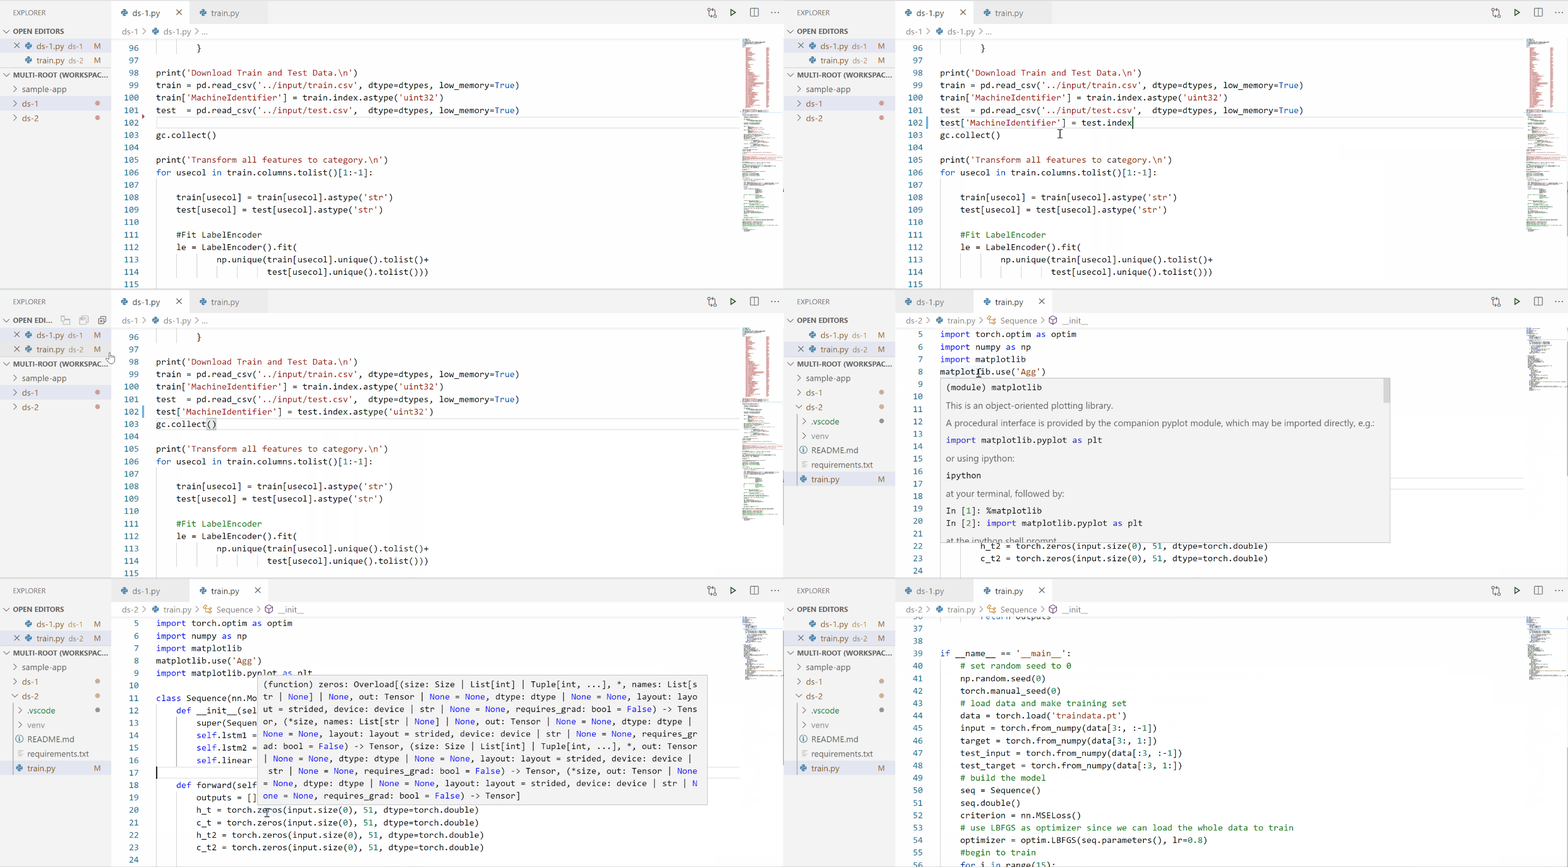
Pylance natively supports multi-root workspaces, meaning that you can open multiple folders in the same Visual Studio Code session and have Pylance functionality in each folder.

Image multiroot final


Using the Pylance Language Server with the Python Extension

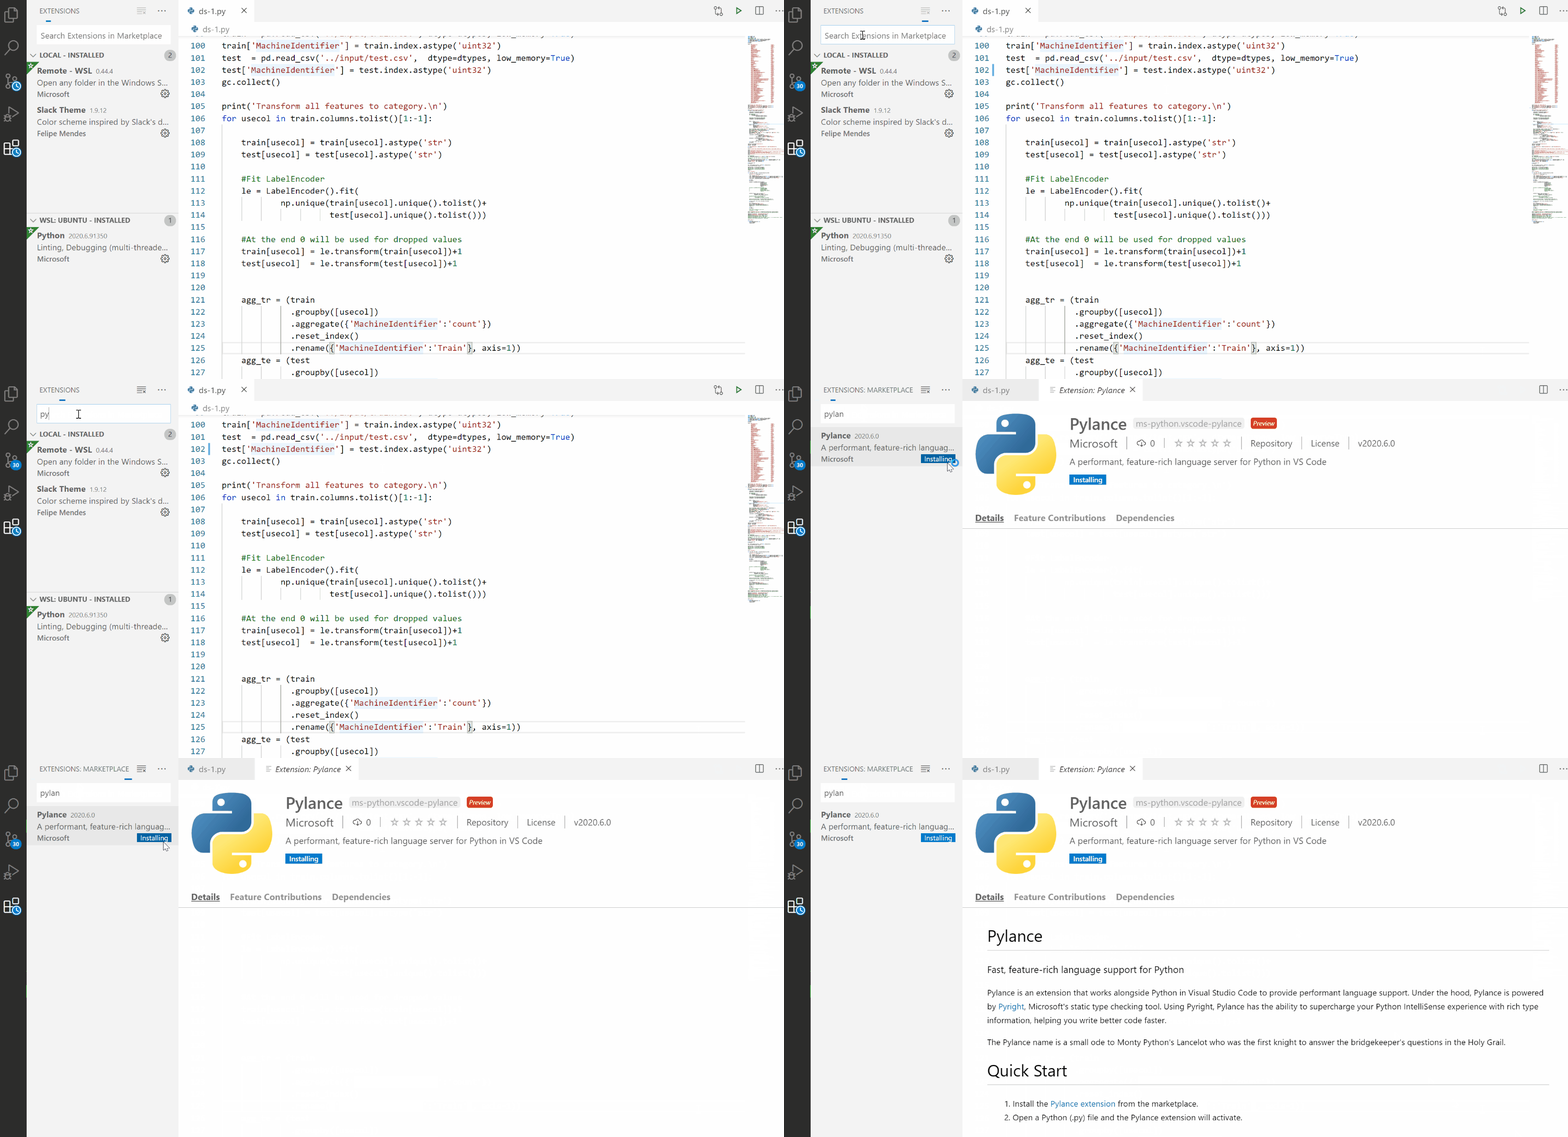
The new Pylance extension is complementary to the Python extension for VS Code that you know and love. If you have the Python extension installed, you can try out Pylance by downloading the extension straight from the Visual Studio Code marketplace. Upon installation, the Python extension will recognize that you’ve installed Pylance and prompt you to select it as your language server. If you are not already using the Python extension in VS Code, installing Pylance will fetch that extension as well.

Image download smaller


Note: If you are a Pyright extension user in VS Code, you’ll want to uninstall Pyright when installing Pylance. All Pyright functionality is included in Pylance. By having both extensions installed, you may encounter installation conflicts and see duplicative diagnostics (e.g., errors, warnings) surface in your code.

The future of the Microsoft Python Language Server

Pylance represents a drastic improvement for the Python experience in Visual Studio Code, to which our team has dedicated months of work. The new, free language server offers increased performance and many more features. Because of that, our team’s focus will shift to Pylance to continue evolving it.

In the short-term, you will still be able to use the Microsoft Python Language Server as your choice of language server when writing Python in Visual Studio Code.

Our long-term plan is to transition our Microsoft Python Language Server users over to Pylance and eventually deprecate and remove the old language server as a supported option.


Feedback

If you have any questions, comments, or feedback on your experience, please reach out to us on GitHub.

The post Announcing Pylance: Fast, feature-rich language support for Python in Visual Studio Code appeared first on Python.


from Planet Python
via read more

Quansight Labs Blog: Creating a Portable Python Environment from Imports

Python environments provide sandboxes in which packages can be added. Conda helps us deal with the requirements and dependencies of those packages. Occasionally we find ourselves working in a constrained remote machine which can make development challenging. Suppose we wanted to take our exact dev environment on the remote machine and recreate it on our local machine. While conda relieves the package dependency challenge, it can be hard to reproduce the exact same environment.

Read more… (3 min remaining to read)


from Planet Python
via read more

Creating a Portable Python Environment from Imports

Python environments provide sandboxes in which packages can be added. Conda helps us deal with the requirements and dependencies of those packages. Occasionally we find ourselves working in a constrained remote machine which can make development challenging. Suppose we wanted to take our exact dev environment on the remote machine and recreate it on our local machine. While conda relieves the package dependency challenge, it can be hard to reproduce the exact same environment.

Read more… (3 min remaining to read)


from Planet SciPy
read more

PSF GSoC students blogs: Week 5 Checkin!

Hello everyone,

This week I worked on the PR.
The code was not exactly python ready. So I along with my mentors worked on making the code ready for use in python. Giving PUBLISHED access to exposed functions and members and especially, debugging while compiling the code was challenging. I was stuck many times while compiling the code to make it python ready.

Now we can access the recast tools from python environment. This feature especially amazes me. This is the first time I have worked on something where I am writing library in C++, but using it in Python. This felt so good after being successfully done. I wrote sample codes for debugging in both python and C++, but believe me, the experience of using python to call C++ libraries felt so good. It was so easy and smooth.

After doing this, I wrote test file in python for the functions coded till now. Also, I wrote a sample code in python to add to the panda3d repository and to explain how does it work.

Next task is to implement the query functions. Will complete this week probably. Till then, stay safe !


from Planet Python
via read more

PyCoder’s Weekly: Issue #427 (June 30, 2020)

#427 – JUNE 30, 2020
View in Browser »

The PyCoder’s Weekly Logo


PEP 622: Structural Pattern Matching

This PEP proposes adding pattern matching—a sort of enhanced switch statement—to the Python language. Read the PEP at the link above and follow the discussion on Reddit.
PYTHON.ORG

Clinging to Memory: How Python Function Calls Can Increase Your Memory Usage

One of the advantages Python has over a language like C is that you don’t have to worry about how memeory is freed up during program execution. But sometimes Python’s memory management doesn’t work the way you’d expect.
ITAMAR TURNER-TRAURING

Launch Your Data Science Career With Springboard

alt

Learn foundational skills in Python programming and statistics. With an expert data science mentor in your corner, in just 4-6 weeks, you’ll be able to use Python to complete real-world coding exercises and be prepared to take the Data Science Career Track – complete with a job guarantee →
SPRINGBOARD sponsor

Python’s reduce(): From Functional to Pythonic Style

In this step-by-step tutorial, you’ll learn how Python’s reduce() works and how to use it effectively in your programs. You’ll also learn some more modern, efficient, and Pythonic ways to gently replace reduce() in your programs.
REAL PYTHON

What Is the Core of the Python Programming Language?

What makes Python… Python? Is it the language semantics? A set of features? What could you strip away and still have something you’d call Python? Everyone needs a little programming language existentialism now and then.
BRETT CANNON

Python Pattern Matching: Guards and Or-Patterns Might Not Interact in the Way You Expect

There’s an implementation of PEP 622 that you can try out here. But it has some potentially confusing effects.
NICK ROBERTS

Boston Dynamics Now Sells a Robot Dog to the Public, And You Can Program It With Python

It only took 28 year, but now you can have your very own robot dog. If you can stomach the price tag, that is. But hey, it’s got a Python SDK!
RON AMADEO

How to Trick a Neural Network in Python 3

Is that a corgi or a goldfish?
ALVIN WAN

Discussions

What Is the Purpose of Floating Point Index in Pandas?

Considering issues like floating-point representation error, is it ever a good idea to use a float as an index?
STACK OVERFLOW

Why Is math.sqrt Massively Slower Than Exponentiation?

Is it, though? The square root of 2 might not be a good value for timing comparisons.
STACK OVERFLOW

Python Jobs

Senior Python Engineer (Remote)

Gorgias

Quantitative Analyst (Washington, DC)

Convergenz

Python Developer (Remote)

Wallero

Senior Python / Django Developer (Philadelphia, PA, USA)

Syrinx Consulting Corporation

More Python Jobs >>>

Articles & Tutorials

The Python heapq Module: Using Heaps and Priority Queues

Explore the heap and priority queue data structures. You’ll learn what kinds of problems heaps and priority queues are useful for and how you can use the Python heapq module to solve them.
REAL PYTHON

Speeding Up Function Calls With Just One Line in Python

The lru_cache decorator allows you to take advantage of memoization to optimize function calls.
HACKEREGG.GITHUB.IO

The Cloud Python Developers Love

alt

DigitalOcean is the cloud provider that makes it easy for developers to deploy and scale their applications. From Flask and Django apps to JupyterHub Notebook servers, DigitalOcean enables Python developers to focus their energy on creating software →
DIGITALOCEAN sponsor

Unicode in Python: Working With Character Encodings

In this course, you’ll get a Python-centric introduction to character encodings and Unicode. Handling character encodings and numbering systems can at times seem painful and complicated, but this guide is here to help with easy-to-follow Python examples.
REAL PYTHON

PEP 620: Hide Implementation Details From the C API

Author Victor Stinner argues that Python’s C API is too close to the CPython implementation, which limits available optimizations and hinders the addition of new features. PEP 622 proposes hiding implementation details from the C API.
PYTHON.ORG

Python Regular Expressions, Views vs Copies in Pandas, and More

Have you wanted to learn Regular Expressions in Python, but don’t know where to start? Have you stumbled into the dreaded pink SettingWithCopyWarning in Pandas? Then check out this episode of the Real Python Podcast.
REAL PYTHON podcast

Testing Python Code That Makes HTTP Requests

The Dependency Inversion Principle helps you design code that is more extensible and easier to test. You can use it to test code that makes HTTP requests without using mocks.
ROMAN TOMJAK

Red Hat Enterprise Linux 8.2 Brings Faster Python 3.8 Run Speeds

Red Hat explains how they compiled CPython with GCC’s -fno-semantic-interposition flag to get run time speed improvements up to 30% faster than normal.
TOMAS OROSAVA

Mutable Defaults: Contrarian View on Mutable Default Arguments

Should you use mutable objects for default function arguments? Conventional wisdom says no, but has the risk been overstated?
A. COADY opinion

Street Lanes Finder: Detecting Street Lanes for Self-Driving Cars [2019)

Learn how to use OpenCV to detect street lanes in an image of a road.
GREG SURMA

Projects & Code

Events

FlaskCon (Online)

July 4 to July 6, 2020
FLASKCON.COM

SciPy 2020 (Online)

July 6 to July 13, 2020
SCIPY.ORG


Happy Pythoning!
This was PyCoder’s Weekly Issue #427.
View in Browser »

alt

[ Subscribe to 🐍 PyCoder’s Weekly 💌 – Get the best Python news, articles, and tutorials delivered to your inbox once a week >> Click here to learn more ]


from Planet Python
via read more

Mike Driscoll: Python 101 – Launching Subprocesses with Python

There are times when you are writing an application and you need to run another application. For example, you may need to open Microsoft Notepad on Windows for some reason. Or if you are on Linux, you might want to run grep. Python has support for launching external applications via the subprocess module.

The subprocess module has been a part of Python since Python 2.4. Before that you needed to use the os module. You will find that the subprocess module is quite capable and straightforward to use.

In this article you will learn how to use:

  • The subprocess.run() Function
  • The subprocess.Popen() Class
  • The subprocess.Popen.communicate() Function
  • Reading and Writing with stdin and stdout

Let’s get started!

The subprocess.run() Function

The run() function was added in Python 3.5. The run() function is the recommended method of using subprocess.

It can often be generally helpful to look at the definition of a function, to better understand how it works:

subprocess.run(args, *, stdin=None, input=None, stdout=None, stderr=None,
    capture_output=False, shell=False, cwd=None, timeout=None, check=False, 
    encoding=None, errors=None, text=None, env=None, universal_newlines=None)

You do not need to know what all of these arguments do to use run() effectively. In fact, most of the time you can probably get away with only knowing what goes in as the first argument and whether or not to enable shell. The rest of the arguments are helpful for very specific use-cases.

Let’s try running a common Linux / Mac command, ls. The ls command is used to list the files in a directory. By default, it will list the files in the directory you are currently in.

To run it with subprocess, you would do the following:

>>> import subprocess
>>> subprocess.run(['ls'])
filename
CompletedProcess(args=['ls'], returncode=0)

You can also set shell=True, which will run the command through the shell itself. Most of the time, you will not need to do this, but can be useful if you need more control over the process and want to access shell pipes and wildcards.

But what if you want to keep the output from a command so you can use it later on? Let’s find out how you would do that next!

Getting the Output

Quite often you will want to get the output from an external process and then do something with that data. To get output from run() you can set the capture_output argument to True:

>>> subprocess.run(['ls', '-l'], capture_output=True)
CompletedProcess(args=['ls', '-l'], returncode=0, 
    stdout=b'total 40\n-rw-r--r--@ 1 michael  staff  17083 Apr 15 13:17 some_file\n', 
    stderr=b'')

Now this isn’t too helpful as you didn’t save the returned output to a variable. Go ahead and update the code so that you do and then you’ll be able to access stdout.

 >>> output = subprocess.run(['ls', '-l'], capture_output=True)
>>> output.stdout
b'total 40\n-rw-r--r--@ 1 michael  staff  17083 Apr 15 13:17 some_file\n'

The output is a CompletedProcess class instance, which lets you access the args that you passed in, the returncode as well as stdout and stderr.

You will learn about the returncode in a moment. The stderr is where most programs print their error messages to, while stdout is for informational messages.

If you are interested, you can play around with this code and discover what if currently in those attributes, if anything:

output = subprocess.run(['ls', '-l'], capture_output=True)
print(output.returncode)
print(output.stdout)
print(out.stderr)

Let’s move on and learn about Popen next.

The subprocess.Popen() Class

The subprocess.Popen() class has been around since the subprocess module itself was added. It has been updated several times in Python 3. If you are interested in learning about some of those changes, you can read about them here:

You can think of Popen as the low-level version of run(). If you have an unusual use-case that run() cannot handle, then you should be using Popen instead.

For now, let’s look at how you would run the command in the previous section with Popen:

>>> import subprocess
>>> subprocess.Popen(['ls', '-l'])
<subprocess.Popen object at 0x10f88bdf0>
>>> total 40
-rw-r--r--@ 1 michael  staff  17083 Apr 15 13:17 some_file

>>>

The syntax is almost identical except that you are using Popen instead of run().

Here is how you might get the return code from the external process:

>>> process = subprocess.Popen(['ls', '-l'])
>>> total 40
-rw-r--r--@ 1 michael  staff  17083 Apr 15 13:17 some_file

>>> return_code = process.wait()
>>> return_code
0
>>>

A return_code of 0 means that the program finished successfully. If you open up a program with a user interface, such as Microsoft Notepad, you will need to switch back to your REPL or IDLE session to add the process.wait() line. The reason for this is that Notepad will appear over the top of your program.

If you do not add the process.wait() call to your script, then you won’t be able to catch the return code after manually closing any user interface program you may have started up via subprocess.

You can use your process handle to access the process id via the pid attribute. You can also kill (SIGKILL) the process by calling process.kill() or terminate (SIGTERM) it via process.terminate().

The subprocess.Popen.communicate() Function

There are times when you need to communicate with the process that you have spawned. You can use the Popen.communicate() method to send data to the process as well as extract data.

For this section, you will only use communicate() to extract data. Let’s use communicate() to get information using the ifconfig command, which you can use to get information about your computer’s network card on Linux or Mac. On Windows, you would use ipconfig. Note that there is a one-letter difference in this command, depending on your Operating System.

Here’s the code:

>>> import subprocess
>>> cmd = ['ifconfig']
>>> process = subprocess.Popen(cmd, 
                               stdout=subprocess.PIPE,
                               encoding='utf-8')
>>> data = process.communicate()
>>> print(data[0])
lo0: flags=8049<UP,LOOPBACK,RUNNING,MULTICAST> mtu 16384
    options=1203<RXCSUM,TXCSUM,TXSTATUS,SW_TIMESTAMP>
    inet 127.0.0.1 netmask 0xff000000 
    inet6 ::1 prefixlen 128 
    inet6 fe80::1%lo0 prefixlen 64 scopeid 0x1 
    nd6 options=201<PERFORMNUD,DAD>
gif0: flags=8010<POINTOPOINT,MULTICAST> mtu 1280
stf0: flags=0<> mtu 1280
XHC20: flags=0<> mtu 0
# -------- truncated --------

This code is set up a little differently than the last one. Let’s go over each piece in more detail.

The first thing to note is that you set the stdout parameter to a subprocess.PIPE. That allows you to capture anything that the process sends to stdout. You also set the encoding to utf-8. The reason you do that is to make the output a little easier to read, since the subprocess.Popen call returns bytes by default rather than strings.

The next step is to call communicate() which will capture the data from the process and return it. The communicate() method returns both stdout and stderr, so you will get a tuple. You didn’t capture stderr here, so that will be None.

Finally, you print out the data. The string is fairly long, so the output is truncated here.

Let’s move on and learn how you might read and write with subprocess!

Reading and Writing with stdin and stdout

Let’s pretend that your task for today is to write a Python program that checks the currently running processes on your Linux server and prints out the ones that are running with Python.

You can get a list of currently running processes using ps -ef. Normally you would use that command and “pipe” it to grep, another Linux command-line utility, for searching strings files.

Here is the complete Linux command you could use:

ps -ef | grep python

However, you want to translate that command into Python using the subprocess module.

Here is one way you can do that:

import subprocess

cmd = ['ps', '-ef']
ps = subprocess.Popen(cmd, stdout=subprocess.PIPE)

cmd = ['grep', 'python']
grep = subprocess.Popen(cmd, stdin=ps.stdout, stdout=subprocess.PIPE,
                        encoding='utf-8')

ps.stdout.close()
output, _ = grep.communicate()
python_processes = output.split('\n')
print(python_processes)

This code recreates the ps -ef command and uses subprocess.Popen to call it. You capture the output from the command using subprocess.PIPE. Then you also create the grep command.

For the grep command you set its stdin to be the output of the ps command. You also capture the stdout of the grep command and set the encoding to utf-8 as before.

This effectively gets the output from the ps command and “pipes” or feeds it into the grep command. Next, you close() the ps command’s stdout and use the grep command’s communicate() method to get output from grep.

To finish it up, you split the output on the newline (\n), which gives you a list of strings that should be a listing of all your active Python processes. If you don’t have any active Python processes running right now, the output will be an empty list.

You can always run ps -ef yourself and find something else to search for other than python and try that instead.

Wrapping Up

The subprocess module is quite versatile and gives you a rich interface to work with external processes.

In this article, you learned about:

  • The subprocess.run() Function
  • The subprocess.Popen() Class
  • The subprocess.Popen.communicate() Function
  • Reading and Writing with stdin and stdout

There is more to the subprocess module than what is covered here. However, you should now be able to use subprocess correctly. Go ahead and give it a try!

The post Python 101 – Launching Subprocesses with Python appeared first on The Mouse Vs. The Python.


from Planet Python
via read more

PSF GSoC students blogs: Week 4 Check-in

What did you do this week?

I started a PR that adds multimethods for array manipulation routines. I'll name the multimethods according to the NumPy docs sectioning:

Basic operations

  • copyto

Changing number of dimensions

  • expand_dims
  • squeeze

Changing kind of array

  • asfarray
  • asfortranarray
  • asarray_chkfinite
  • require

Joining arrays

  • dstack

Splitting arrays

  • split
  • array_split
  • dsplit
  • hsplit
  • vsplit

As mentioned in my last blog post, this week I also started reviewing a PR that implements metaclasses from which classes in unumpy instantiate. They are used to override these classes with ones from the backend being used through a property method called overriden_class. Currently only the NumPy backend has this method but I've been trying to implement it in other backends as well.

What is coming up next?

The current PR should last one more week since I'll continue to add more multimethods for array manipulation routines. I will also be working on adding overriden_class to other backends as I've been doing this past week.

Did you get stuck anywhere?

I think the only place I got stuck was trying to implement overriden_class for other backends. To be more specific, I tried implementing it in the Dask backend first and foremost, however, this backend is different since it uses another backend internally. From my understanding this causes that some classes might have to be overridden by the inner backend and others by Dask itself. With that said, I might need help later on with this issue. In general, I feel that this metaclasses feature has been the most challenging part of my project so far. Although this wasn't initially included in my proposal and can be considered extra work I welcome the challenge and hope that my mentors keep entrusting me more of these features. Also, given that the semester is almost ending I start having more free time on my hands to tackle these problems which is what I want.


from Planet Python
via read more

Real Python: Unicode in Python: Working With Character Encodings

Python’s Unicode support is strong and robust, but it takes some time to master. There are many ways of encoding text into binary data, and in this course you’ll learn a bit of the history of encodings. You’ll also spend time learning the intricacies of Unicode, UTF-8, and how to use them when programming Python. You’ll practice with multiple examples and see how smooth working with text and binary data in Python can be!

By the end of this course, you’ll know:

  • What an encoding is
  • What ASCII is
  • How binary displays as octal and hex values
  • How UTF-8 encodes a code point
  • How to combine code points into a single glyph
  • Which built-in functions can help you

[ Improve Your Python With 🐍 Python Tricks 💌 – Get a short & sweet Python Trick delivered to your inbox every couple of days. >> Click here to learn more and see examples ]


from Planet Python
via read more

Python Insider: Python 3.8.4rc1 is now ready for testing

Python 3.8.4rc1 is the release candidate of the fourth maintenance release of Python 3.8. Go get it here:
https://www.python.org/downloads/release/python-384rc1/

Assuming no critical problems are found prior to 2020-07-13, the scheduled release date for 3.8.4, no code changes are planned between this release candidate and the final release.
That being said, please keep in mind that this is a pre-release and as such its main purpose is testing.
Maintenance releases for the 3.8 series will continue at regular bi-monthly intervals, with 3.8.5 planned for mid-September 2020.

What’s new?

The Python 3.8 series is the newest feature release of the Python language, and it contains many new features and optimizations. See the “What’s New in Python 3.8” document for more information about features included in the 3.8 series.

This is the first bugfix release that is considerably smaller than the previous three. There’s 20% less changes at 130 commits than the average of previous three releases. Detailed information about all changes made in version 3.8.4 specifically can be found in its change log.

We hope you enjoy Python 3.8!

Thanks to all of the many volunteers who help make Python Development and these releases possible! Please consider supporting our efforts by volunteering yourself or through organization contributions to the Python Software Foundation.


Your friendly release team,
Ned Deily @nad
Steve Dower @steve.dower
Łukasz Langa @ambv


from Planet Python
via read more

Matt Layman: Episode 6 - Where Does the Data Go?

On this episode, we will learn about storing data and how Django manages data using models. Listen at djangoriffs.com. Last Episode On the last episode, we saw Django forms and how to interact with users to collect data. Setting Up A relational database is like a collection of spreadsheets. Each spreadsheet is actually called a table. A table has a set of columns to track different pieces of data. Each row in the table would represent a related group.

from Planet Python
via read more

Python 3.8.4rc1 is now ready for testing

Python 3.8.4rc1 is the release candidate of the fourth maintenance release of Python 3.8. Go get it here:
https://www.python.org/downloads/release/python-384rc1/

Assuming no critical problems are found prior to 2020-07-13, the scheduled release date for 3.8.4, no code changes are planned between this release candidate and the final release.
That being said, please keep in mind that this is a pre-release and as such its main purpose is testing.
Maintenance releases for the 3.8 series will continue at regular bi-monthly intervals, with 3.8.5 planned for mid-September 2020.

What’s new?

The Python 3.8 series is the newest feature release of the Python language, and it contains many new features and optimizations. See the “What’s New in Python 3.8” document for more information about features included in the 3.8 series.

This is the first bugfix release that is considerably smaller than the previous three. There’s 20% less changes at 130 commits than the average of previous three releases. Detailed information about all changes made in version 3.8.4 specifically can be found in its change log.

We hope you enjoy Python 3.8!

Thanks to all of the many volunteers who help make Python Development and these releases possible! Please consider supporting our efforts by volunteering yourself or through organization contributions to the Python Software Foundation.


Your friendly release team,
Ned Deily @nad
Steve Dower @steve.dower
Łukasz Langa @ambv


from Python Insider
read more

Unicode in Python: Working With Character Encodings

Python’s Unicode support is strong and robust, but it takes some time to master. There are many ways of encoding text into binary data, and in this course you’ll learn a bit of the history of encodings. You’ll also spend time learning the intricacies of Unicode, UTF-8, and how to use them when programming Python. You’ll practice with multiple examples and see how smooth working with text and binary data in Python can be!

By the end of this course, you’ll know:

  • What an encoding is
  • What ASCII is
  • How binary displays as octal and hex values
  • How UTF-8 encodes a code point
  • How to combine code points into a single glyph
  • Which built-in functions can help you

[ Improve Your Python With 🐍 Python Tricks 💌 – Get a short & sweet Python Trick delivered to your inbox every couple of days. >> Click here to learn more and see examples ]


from Real Python
read more

Monday, June 29, 2020

PSF GSoC students blogs: Weekly Check In - 4

What did I do till now?

Last week I was working on

  • Writing tests for HTTP2ClientProtocol
  • Add support for large number of requests over a single connection

I finished both of the tasks above. I added inline docstrings for most of the methods. Still working on public documentation!

What's coming up next?

Next week I plan to

  • Start working on H2ConnectionPool and H2ClientFactory which are responsible for handlng multiple connections to different authorities. Present implementation is capable of handling large number of request over single connection to only one authority.
  • Finish the public documentation of HTTP2ClientProtocol

Did I get stuck anywhere?

I am very new to writing tests using TwistedTrial so was having minor bugs while setting up the testing environment and writing tests. Apart from this there was no major blockers during the last week 😁


from Planet Python
via read more

Podcast.__init__: Build Your Own Domain Specific Language in Python With textX

Programming languages are a powerful tool and can be used to create all manner of applications, however sometimes their syntax is more cumbersome than necessary. For some industries or subject areas there is already an agreed upon set of concepts that can be used to express your logic. For those cases you can create a Domain Specific Language, or DSL to make it easier to write programs that can express the necessary logic with a custom syntax. In this episode Igor Dejanović shares his work on textX and how you can use it to build your own DSLs with Python. He explains his motivations for creating it, how it compares to other tools in the Python ecosystem for building parsers, and how you can use it to build your own custom languages.

Summary

Programming languages are a powerful tool and can be used to create all manner of applications, however sometimes their syntax is more cumbersome than necessary. For some industries or subject areas there is already an agreed upon set of concepts that can be used to express your logic. For those cases you can create a Domain Specific Language, or DSL to make it easier to write programs that can express the necessary logic with a custom syntax. In this episode Igor Dejanović shares his work on textX and how you can use it to build your own DSLs with Python. He explains his motivations for creating it, how it compares to other tools in the Python ecosystem for building parsers, and how you can use it to build your own custom languages.

Announcements

  • Hello and welcome to Podcast.__init__, the podcast about Python and the people who make it great.
  • When you’re ready to launch your next app or want to try a project you hear about on the show, you’ll need somewhere to deploy it, so take a look at our friends over at Linode. With the launch of their managed Kubernetes platform it’s easy to get started with the next generation of deployment and scaling, powered by the battle tested Linode platform, including simple pricing, node balancers, 40Gbit networking, dedicated CPU and GPU instances, and worldwide data centers. Go to pythonpodcast.com/linode and get a $60 credit to try out a Kubernetes cluster of your own. And don’t forget to thank them for their continued support of this show!
  • You listen to this show to learn and stay up to date with the ways that Python is being used, including the latest in machine learning and data analysis. For more opportunities to stay up to date, gain new skills, and learn from your peers there are a growing number of virtual events that you can attend from the comfort and safety of your home. Go to pythonpodcast.com/conferences to check out the upcoming events being offered by our partners and get registered today!
  • Your host as usual is Tobias Macey and today I’m interviewing Igor Dejanović about textX, a meta-language for building domain specific languges in Python

Interview

  • Introductions
  • How did you get introduced to Python?
  • Can you start by describing what a domain specific language is and some examples of when you might need one?
  • What is textX and what was your motivation for creating it?
  • There are a number of other libraries in the Python ecosystem for building parsers, and for creating DSLs. What are the features of textX that might lead someone to choose it over the other options?
  • What are some of the challenges that face language designers when constructing the syntax of their DSL?
  • Beyond being able to parse and process an arbitrary syntax, there are other concerns for consumers of the definition in terms of tooling. How does textX provide support to those end users?
  • How is textX implemented?
    • How has the design or goals of textX changed since you first began working on it?
  • What is the workflow for someone using textX to build their own DSL?
    • Once they have defined the grammar, how do they distribute the generated interpreter for others to use?
  • What are some of the common challenges that users of textX face when trying to define their DSL?
  • What are some of the cases where a PEG parser is unable to unambiguously process a defined grammar?
  • What are some of the most interesting/innovative/unexpected ways that you have seen textX used?
  • What have you found to be the most interesting, unexpected, or challenging lessons that you have learned while building and maintaining textX and its associated projects?
  • While preparing for this interview I noticed that you have another parser library in the form of Parglare. How has your experience working with textX informed your designs of that project?
    • What lessons have you taken back from Parglare into textX?
  • When is textX the wrong choice, and someone might be better served by another DSL library, different style of parser, or just hand-crafting a simple parser with a regex?
  • What do you have planned for the future of textX?

Keep In Touch

Picks

Closing Announcements

  • Thank you for listening! Don’t forget to check out our other show, the Data Engineering Podcast for the latest on modern data management.
  • Visit the site to subscribe to the show, sign up for the mailing list, and read the show notes.
  • If you’ve learned something or tried out a project from the show then tell us about it! Email hosts@podcastinit.com) with your story.
  • To help other people find the show please leave a review on iTunes and tell your friends and co-workers
  • Join the community in the new Zulip chat workspace at pythonpodcast.com/chat

Links

The intro and outro music is from Requiem for a Fish The Freak Fandango Orchestra / CC BY-SA


from Planet Python
via read more

Red Hat Developers: How to write an ABI compliance checker using Libabigail

I’ve previously written about the challenges of ensuring forward compatibility for application binary interfaces (ABIs) exposed by native shared libraries. This article introduces the other side of the equation: How to verify ABI backward compatibility for upstream projects.

If you’ve read my previous article, you’ve already been introduced to Libabigail, a static-code analysis and instrumentation library for constructing, manipulating, serializing, and de-serializing ABI-relevant artifacts.

In this article, I’ll show you how to build a Python-based checker that uses Libabigail to verify the backward compatibility of ABIs in a shared library. For this case, we’ll focus on ABIs for shared libraries in the executable and linkable format (ELF) binary format that runs on Linux-based operating systems.

Note: This tutorial assumes that you have Libabigail and its associated command-line tools, abidw and abidiff installed and set up in your development environment. See the Libabigail documentation for a guide to getting and installing Libabigail.

Ensuring backward compatibility

If we state that the ABI of a newer version of a shared library is backward compatible, we’re assuring our users that ABI changes in the newer version of the library won’t affect applications linked against older versions. This means application functionality won’t change or be disrupted in any way, even for users who update to the newer version of the library without recompiling their application.

To make such a statement with confidence, we need a way to compare the ABI of the newer library version against the older one. Knowing what the ABI changes are, we’ll then be able to determine whether any change is likely to break backward compatibility.

The example project: libslicksoft.so

For the sake of this article, let’s assume I’m the release manager for a free software project named SlickSoftware. I have convinced you (my fellow hacker) that the ABI of our library, libslicksoft.so, should be backward compatible with older versions, at least for now.  In order to ensure backward compatibility, we’ll write an ABI-checking program that we can run at any point in the development cycle. The checker will help us ensure that the ABI for the current version of libslicksoft.so remains compatible with the ABI of a previous version, the baseline ABI. Once we’ve written the checker, we’ll also be able to use it for future projects.

Here’s the layout of the slick-software/lib directory, which contains SlickSoftware’s source code:

+ slick-software/
|
+ lib/
|    |
|    + file1.c
|    |
|    + Makefile
|
+ include/
|        |
|        + public-header.h
|
+ abi-ref/

Let’s start by setting up our example project.

Step 1: Create a shared library

To create a shared library, we visit the slick-software/lib directory and type make. We’ll call the new shared library slick-software/lib/libslicksoft.so.

Step 2: Create a representation of the reference ABI

Our next step is to create a representation of the ABI for our shared library, slick-software/lib/libslicksoft.so. Once we’ve done that, we’ll save it in the slick-software/abi-ref/ directory, which is currently empty.

The ABI representation will serve as a reference ABI. We’ll compare the ABI of all subsequent versions of libslicksoft.so against it. In theory, we could just save a copy of libslicksoft.so and use the binary itself for ABI comparisons.  We’ve chosen not to do that because, like many developers, we don’t like storing binaries in revision-control software. Luckily Libabigail allows us to save a textual representation of the ABI.

Creating the ABI representation

To generate a textual representation of an ELF binary’s ABI, all we have to do is open your favorite command-line interpreter and enter the following:

$ abidw slick-software/lib/libslicksoft.so > slick-software/abi-ref/libslicksoft.so.abi

Automating the creation process

We can automate this process by adding a rule at the end of slick-software/lib/Makefile. In the future, we’ll just type make abi-ref whenever we want to generate a textual representation of the ABI libslicksoft.so.abi file.

Here’s the content of that Makefile:

$cat slick-software/lib/Makefile SRCS:=file1.c
HEADER_FILE:=../include/public-header.h
SHARED_LIB:=libslicksoft.so
SHARED_LIB_SONAME=libslicksoft
ABI_REF_DIR=../abi-ref
ABI_REF=$(ABI_REF_DIR)/$(SHARED_LIB).abi
CFLAGS:=-Wall -g -I../include
LDFLAGS:=-shared -Wl,-soname=$(SHARED_LIB_SONAME)
ABIDW:= /usr/bin/abidw
ABIDIFF= /usr/bin/abidiff

OBJS:=$(subst .c,.o,$(SRCS))

all: $(SHARED_LIB)

%.o:%.c $(HEADER_FILE)
        $(CC) -c $(CFLAGS) -o $@ $<

$(SHARED_LIB): $(OBJS)
        $(CC) $(LDFLAGS) -o $@ $<

clean:
        rm -f *.o $(SHARED_LIB) $(ABI_REF)

abi-ref: $(SHARED_LIB)
        $(ABIDW) $< > $(ABI_REF)

Step 3: Compare ABI changes

Now that we have a reference ABI, we just need to compare newer versions of libslicksoft.so against it and analyze the changes. We can use Libabigail’s abidiff program to compare the two library versions. Here’s the command to invoke abidiff:

abidiff baseline.abi path/to/new-binary

This command line compares the ABIs of new-binary against the baseline.abi. It produces a report about the potential ABI changes, then returns a status code that tells us about the different kinds of ABI changes detected. By analyzing the status code, which is represented as a bitmap, we’ll be able to tell if any of the ABI changes are likely to break backward compatibility.

The Python-based ABI diff checker

Our next task is to write a program that invokes abidiff to perform the ABI check. We’ll call it check-abi and place it in the new slick-software/tools directory.

I’ve been told Python is cool, so I want to try it out with this new checker. I am far from being a Python expert, but hey, what can go wrong?

Step 1: Spec the ABI checker

To start, let’s walk through this Python-based ABI checker we want to write. We’ll run it like this:

$ check-abi baseline.abi slicksoft.so

The checker should be simple. If there are no ABI issues it will exit with a zero (0) status code. If it finds a backward-compatibility issue, it will return a non-zero status code and a useful message.

Step 2: Import dependencies

We’re writing the check-abi program as a script in Python 3. The first thing we’ll do is import the packages we need for this program:

#!/usr/bin/env python3

import argparse
import subprocess
import sys

Step 3: Define a parser

Next, we’ll need a function that parses command-line arguments. Let’s define it without bothering too much about the content for now:

def parse_command_line():
    """Parse the command line arguments.

       check-abi expects the path to the new binary and a path to the
       baseline ABI to compare against.  It can also optionaly take
       the path to the abidiff program to use.
    """
# ...

Step 4: Write the main function

In this case, I’ve already written the main function, so let’s take a look:

def main():
    # Get the configuration of this program from the command line
    # arguments. The configuration ends up being a variable named
    # config, which has three properties:
    #
    #   config.abidiff: this is the path to the abidiff program
    #
    #   config.baseline_abi: this is the path to the baseline
    #                        ABI. It's the reference ABI that was
    #                        previously stored and that we need to
    #                        compare the ABI of the new binary
    #                        against.
    #
    #   config.new_abi: this is the path to the new binary which ABI
    #                   is to be compared against the baseline
    #                   referred to by config.baseline_abi.
    #
    config = parse_command_line()

    # Execute the abidiff program to compare the new ABI against the
    # baseline.
    completed_process = subprocess.run([config.abidiff,
                                        "--no-added-syms",
                                        config.baseline_abi,
                                        config.new_abi],
                                       universal_newlines = True,
                                       stdout = subprocess.PIPE,
                                       stderr = subprocess.STDOUT)

    if completed_process.returncode != 0:
        # Let's define the values of the bits of the "return code"
        # returned by abidiff.  Depending on which bit is set, we know
        # what happened in terms of ABI verification.  These bits are
        # documented at
        # https://sourceware.org/libabigail/manual/abidiff.html#return-values.
        ABIDIFF_ERROR_BIT = 1
        ABI_CHANGE_BIT = 4
        ABI_INCOMPATIBLE_CHANGE_BIT = 8

        if completed_process.returncode & ABIDIFF_ERROR_BIT:
            print("An unexpected error happened while running abidiff:n")
            return 0
        elif completed_process.returncode & ABI_INCOMPATIBLE_CHANGE_BIT:
            # If this bit is set, it means we detected an ABI change
            # that breaks backwards ABI compatibility, for sure.
            print("An incompatible ABI change was detected:n")
        elif completed_process.returncode & ABI_CHANGE_BIT:
            # If this bit is set, (and ABI_INCOMPATIBLE_CHANGE_BIT is
            # not set) then it means there was an ABI change that
            # COULD potentially break ABI backward compatibility.  To
            # be sure if this change is problematic or not, a human
            # review is necessary
            print("An ABI change that needs human review was detected:n")

        print("%s" % completed_process.stdout)
        return completed_process.returncode

    return 0;

Notes about the code

The code is heavily commented to make it easier for future programmers to understand. Here are two important highlights. First, notice how check-abi invokes abidiff with the --no-added-syms option. That option tells abidiff that added functions, global variables, and publicly defined ELF symbols (aka added ABI artifacts) should not be reported. This lets us focus our attention on ABI artifacts that have been changed or removed.

Second, notice how we’ve set the checker to analyze the return code generated by abidiff. You can see this detail in the if statement starting here:

if completed_process.returncode != 0:

If the first bit of that return code is set (bit value 1) then it means abidiff encountered a plumbing error while executing. In that case, check-abi will print an error message but it won’t report an ABI issue.

If the fourth bit of the return code is set (bit value 8) then it means an ABI change breaks backward compatibility with the older library version. In that case, check-abi will print a meaningful message and a detailed report of the change. Recall that in this case, the checker produces a non-zero return code.

If only the third bit of the return code is set (bit value 4), and the fourth bit mentioned above is not, then it means abidiff detected an ABI change that could potentially break backward compatibility. In this case, a human review of the change is necessary. The checker will print a meaningful message and a detailed report for someone to review.

Note: If you are interested, you can find the complete details of the return code generated by abidiff here.

Source code for the check-abi program

Here’s the complete source code for the check-abi program:

#!/usr/bin/env python3

import argparse
import subprocess
import sys

def parse_command_line():
    """Parse the command line arguments.

       check-abi expects the path to the new binary and a path to the
       baseline ABI to compare against.  It can also optionaly take
       the path to the abidiff program to use.
    """

    parser = argparse.ArgumentParser(description="Compare the ABI of a binary "
                                                 "against a baseline")
    parser.add_argument("baseline_abi",
                        help = "the path to a baseline ABI to compare against")
    parser.add_argument("new_abi",
                        help = "the path to the ABI to compare "
                               "against the baseline")
    parser.add_argument("-a",
                        "--abidiff",
                        required = False,
                        default="/home/dodji/git/libabigail/master/build/tools/abidiff")

    return parser.parse_args()


def main():
    # Get the configuration of this program from the command line
    # arguments. The configuration ends up being a variable named
    # config, which has three properties:
    #
    #   config.abidiff: this is the path to the abidiff program
    #
    #   config.baseline_abi: this is the path to the baseline
    #                        ABI. It's the reference ABI that was
    #                        previously stored and that we need to
    #                        compare the ABI of the new binary
    #                        against.
    #
    #   config.new_abi: this is the path to the new binary which ABI
    #                   is to be compared against the baseline
    #                   referred to by config.baseline_abi.
    #
    config = parse_command_line()

    # Execute the abidiff program to compare the new ABI against the
    # baseline.
    completed_process = subprocess.run([config.abidiff,
                                        "--no-added-syms",
                                        config.baseline_abi,
                                        config.new_abi],
                                       universal_newlines = True,
                                       stdout = subprocess.PIPE,
                                       stderr = subprocess.STDOUT)

    if completed_process.returncode != 0:
        # Let's define the values of the bits of the "return code"
        # returned by abidiff.  Depending on which bit is set, we know
        # what happened in terms of ABI verification.  These bits are
        # documented at
        # https://sourceware.org/libabigail/manual/abidiff.html#return-values.
        ABIDIFF_ERROR_BIT = 1
        ABI_CHANGE_BIT = 4
        ABI_INCOMPATIBLE_CHANGE_BIT = 8

        if completed_process.returncode & ABIDIFF_ERROR_BIT:
            print("An unexpected error happened while running abidiff:n")
            return 0
        elif completed_process.returncode & ABI_INCOMPATIBLE_CHANGE_BIT:
            # If this bit is set, it means we detected an ABI change
            # that breaks backwards ABI compatibility, for sure.
            print("An incompatible ABI change was detected:n")
        elif completed_process.returncode & ABI_CHANGE_BIT:
            # If this bit is set, (and ABI_INCOMPATIBLE_CHANGE_BIT is
            # not set) then it means there was an ABI change that
            # COULD potentially break ABI backward compatibility.  To
            # be sure if this change is problematic or not, a human
            # review is necessary
            print("An ABI change that needs human review was detected:n")

        print("%s" % completed_process.stdout)
        return completed_process.returncode

    return 0;

if __name__ == "__main__":
    sys.exit(main())

Using check-abi from the Makefile

We’re done with our basic checker, but we could add a feature or two. For instance, wouldn’t it be nice if we could invoke our shiny new check-abi program from the slick-software/lib directory? Then we could enter a simple make command anytime we needed to do an ABI verification.

We can set this feature up by adding a rule at the end of the slick-software/lib/Makefile:

abi-check: $(SHARED_LIB)
        $(CHECK_ABI) $(ABI_REF) $(SHARED_LIB) || echo "ABI compatibility issue detected!"

Of course, we also need to define the variable CHECK_ABI at the beginning of the Makefile:

CHECK_ABI=../tools/check-abi

Here’s the complete Makefile with these changes:

SRCS:=file1.c
HEADER_FILE:=../include/public-header.h
SHARED_LIB:=libslicksoft.so
SHARED_LIB_SONAME=libslicksoft
ABI_REF_DIR=../abi-ref
ABI_REF=$(ABI_REF_DIR)/$(SHARED_LIB).abi
CFLAGS:=-Wall -g -I../include
LDFLAGS:=-shared -Wl,-soname=$(SHARED_LIB_SONAME)
ABIDW:=/usr/bin/abidw
ABIDIFF=/usr/bin/abidiff
CHECK_ABI=../tools/check-abi

OBJS:=$(subst .c,.o,$(SRCS))

all: $(SHARED_LIB)

%.o:%.c $(HEADER_FILE)
        $(CC) -c $(CFLAGS) -o $@ $<

$(SHARED_LIB): $(OBJS)
        $(CC) $(LDFLAGS) -o $@ $<

clean:
        rm -f *.o $(SHARED_LIB) $(ABI_REF)

abi-ref: $(SHARED_LIB)
        $(ABIDW) $< > $(ABI_REF)

abi-check: $(SHARED_LIB)
        $(CHECK_ABI) $(ABI_REF) $(SHARED_LIB) || echo "ABI compatibility issue detected!"

Run the checker

We’re nearly done, but let’s test our new checker with a simple ABI check for backward compatibility. First, I will make a few changes to the slick-software library, so I have differences to check.

Next, I visit the slick-software/lib directory and run make abi-check. Here’s what’s I get back:

$ make abi-check
../tools/check-abi ../abi-ref/libslicksoft.so.abi libslicksoft.so || echo "ABI compatibility issue detected!"
An incompatible ABI change was detected:

Functions changes summary: 1 Removed, 0 Changed, 0 Added function
Variables changes summary: 0 Removed, 0 Changed, 0 Added variable

1 Removed function:

  'function void function_1()'    {function_1}

ABI compatibility issue detected!
$

The ABI checker is reporting one compatibility issue, with a removed function. I guess I should put function_1() back in to avoid breaking the ABI.

Conclusion

In this article, I showed you how to write a basic ABI verifier for shared libraries in your upstream projects. To keep this project simple, I left out other features that you might want to add to the checker yourself. For instance, Libabigail has mechanisms for handling false positives, which are common in real-world projects. Also, we are constantly improving this tool for the quality of the analysis it can do. If anything about Libabigail doesn’t work as you would like, please let us know on the Libabigail mailing list.

Happy hacking, and may all of your ABI incompatibilities be spotted.

Share

The post How to write an ABI compliance checker using Libabigail appeared first on Red Hat Developer.


from Planet Python
via read more
Red Hat Developers: Alertmanager Watchdog monitoring with Nagios passive checks

After installing a fresh Red Hat OpenShift cluster, go to Monitoring -> Alerting. There, you will find a Watchdog alert, which sends messages to let you know that Alertmanager is not only still running, but is also emitting other signals for alerts you might be interested in. You can hook into Watchdog alerts with an external monitoring system, which in turn can tell you that alerting in your OpenShift cluster is working.

“You need a check to check if your check checks out.”

How do you do this? Before we can configure Alertmanager for sending out Watchdog alerts, we need something on the receiving side, which is in our case Nagios. Follow me on this journey to get Alertmanager’s Watchdog alerting against Nagios with a passive check.

Set up Nagios

OpenShift is probably not the first infrastructure element you have running under your supervision. That is why we start to capture a message from OpenShift with a self-made (actually from the Python 3 website and adjusted) Python HTTP receiving server, just to learn how to configure alert manager and to possibly modify the received alert message.

Also, you probably already have Nagios, Checkmk, Zabbix, or something else for external monitoring and running alerts. For this journey, I chose to use Nagios because it is a simple precooked and pre-setup option via yum install nagios. Nagios normally only does active checks. An active check means that Nagios is the initiator of a check configured by you. To know if the OpenShift Alertmanager is working, we need a passive check in Nagios.

So, let’s go and let our already existing monitoring system receive something from Alertmanager. Start by installing Nagios and the needed plugins:

$ yum -y install nagios nagios-plugins-ping nagios-plugins-ssh nagios-plugins-http nagios-plugins-swap nagios-plugins-users nagios-plugins-load nagios-plugins-disk nagios-plugins-procs nagios-plugins-dummy

Let’s be more secure and change the provided default password for the Nagios administrator, using htpasswd:

$ htpasswd -b /etc/nagios/passwd nagiosadmin <very_secret_password_you_created>

Note: If you also want to change the admin’s username nagiosadmin to something else, don’t forget to change it also in /etc/nagios/cgi.cfg.

Now, we can enable and start Nagios for the first time:

$ systemctl enable nagios
$ systemctl start nagios

Do not forget that every time you modify your configuration files, you should run a sanity check on them. It is important to do this before you (re)start Nagios Core since it will not start if your configuration contains errors. Use the following to check your Nagios configuration:

$ /sbin/nagios -v /etc/nagios/nagios.cfg
$ systemctl reload nagios
$ systemctl status -l nagios

Dump HTTP POST content to a file

Before we start configuring, we first need an HTTP POST receiver program in order to receive a message from the Alertmanager via a webhook configuration. Alertmanager sends out a JSON message to an HTTP endpoint. To do that, I created a very basic python program to dump all data received via POST into a file:

#!/usr/bin/env python3

from http.server import HTTPServer, BaseHTTPRequestHandler
from io import BytesIO

class SimpleHTTPRequestHandler(BaseHTTPRequestHandler):

def do_GET(self):
self.send_response(200)
self.end_headers()
self.wfile.write(b'Hello, world!')

def do_POST(self):
content_length = int(self.headers['Content-Length'])
body = self.rfile.read(content_length)
self.send_response(200)
self.end_headers()
response = BytesIO()
response.write(b'This is POST request. ')
response.write(b'Received: ')
response.write(body)
self.wfile.write(response.getvalue())
dump_json = open('/tmp/content.json','w')
dump_json.write(body.decode('utf-8'))
dump_json.close()

httpd = HTTPServer(('localhost', 8000), SimpleHTTPRequestHandler)
httpd.serve_forever()

The above program definitely needs some rework. Both the location and format of the output in the file have to be changed for Nagios.

Configure Nagios for a passive check

Now that this rudimentary receive program is in place, let’s configure the passive checks in Nagios. I added a dummy command to the file /etc/nagios/objects/commands.cfg. That is what I understood from the Nagios documentation, but it is not really clear to me whether that is the right place and the right information. In the end, this process worked for me. But keep following, the purpose at the end is Alertmanager showing up in Nagios.

Add the following to the end of the commands.cfg file:

define command {
command_name check_dummy
command_line $USER1$/check_dummy $ARG1$ $ARG2$
}

Then add this to the server’s service object .cfg file:

define service {
use generic-service
host_name box.example.com
service_description OCPALERTMANAGER
notifications_enabled 0
passive_checks_enabled 1
check_interval 15 ; 1.5 times watchdog alerting time
check_freshness 1
check_command check_dummy!2 "Alertmanager FAIL"
}

It would be nice if we could check that this is working via curl, but first, we have to change the sample Python program. It writes to a file by default, and for this example, it must write to a Nagios command_file.

This is the adjusted Python program to write to the command_file with the right service_description:

#!/usr/bin/env python3

from http.server import HTTPServer, BaseHTTPRequestHandler
from io import BytesIO
import time;

class SimpleHTTPRequestHandler(BaseHTTPRequestHandler):

def do_GET(self):
self.send_response(200)
self.end_headers()
self.wfile.write(b'Hello, world!')

def do_POST(self):
content_length = int(self.headers['Content-Length'])
body = self.rfile.read(content_length)
self.send_response(200)
self.end_headers()
response = BytesIO()
response.write(b'This is POST request. ')
response.write(b'Received: ')
response.write(body)
self.wfile.write(response.getvalue())
msg_string = "[{}] PROCESS_SERVICE_CHECK_RESULT;{};{};{};{}"
datetime = time.time()
hostname = "box.example.com"
servicedesc = "OCPALERTMANAGER"
severity = 0
comment = "OK - Alertmanager Watchdog\n"
cmdFile = open('/var/spool/nagios/cmd/nagios.cmd','w')
cmdFile.write(msg_string.format(datetime, hostname, servicedesc, severity, comment))
cmdFile.close()

httpd = HTTPServer(('localhost', 8000), SimpleHTTPRequestHandler)
httpd.serve_forever()

And with a little curl, we can check that the Python program has a connection with the command_file and that Nagios can read it:

$ curl localhost:8000 -d OK -X POST

Now we only have to trigger the POST action. All of the information sent to Nagios is hard-coded in this Python program. Hard coding this kind of information is really not the best practice, but it got me going for now. At this point, we have an endpoint (SimpleHTTPRequestHandler) to which we can connect Alertmanager via a webhook to an external monitoring system—in this case, Nagios with an HTTP helper program.

Configure the webhook in Alertmanager

To configure the Alertmanager’s Watchdog, we have to adjust the secret alertmanager.yml. To get that file out of OpenShift, use the following command:

$ oc -n openshift-monitoring get secret alertmanager-main --template='' |base64 -d > alertmanager.yaml

global:
  resolve_timeout: 5m
route:
  group_wait: 30s
  group_interval: 5m
  repeat_interval: 12h
  receiver: 'default'
  routes:
  - match:
      alertname: 'Watchdog'
    repeat_interval: 5m
    receiver: 'watchdog'
receivers:
- name: 'default'
- name: 'watchdog'
  webhook_configs:
  - url: 'http://nagios.example.com:8000/'

Note: On the Prometheus web page, you can see the possible alert endpoints. As I found out with webhook_config, you should name that file in plural form (webhook_configs) in alertmanager.yml. Also, check out the example provided on the Prometheus GitHub.

To get our new fresh configuration back into OpenShift, execute the following command:

$ oc -n openshift-monitoring create secret generic alertmanager-main --from-file=alertmanager.yaml --dry-run -o=yaml | oc -n openshift-monitoring replace secret --filename=-

In the end, you will see something similar received by Nagios. Actually, this is the message the Watchdog sends, via webhook_config, to Nagios:

{"receiver":"watchdog",
"status":"firing",
"alerts":[
{"status":"firing",
"labels":
{"alertname":"Watchdog",
"prometheus":"openshift-monitoring/k8s",
"severity":"none"},
"annotations":
{"message":"This is an alert meant to ensure that the entire alerting pipeline is functional.\nThis alert is always firing, therefore it should always be firing in Alertmanager\nand always fire against a receiver. There are integrations with various notification\nmechanisms that send a notification when this alert is not firing. For example the\n\"DeadMansSnitch\" integration in PagerDuty.\n"},
"startsAt":"2020-03-26T10:57:30.163677339Z",
"endsAt":"0001-01-01T00:00:00Z",
"generatorURL":"https://prometheus-k8s-openshift-monitoring.apps.box.example.com/graph?g0.expr=vector%281%29\u0026g0.tab=1",
"fingerprint":"e25963d69425c836"}],
"groupLabels":{},
"commonLabels":
{"alertname":"Watchdog",
"prometheus":"openshift-monitoring/k8s",
"severity":"none"},
"commonAnnotations":
{"message":"This is an alert meant to ensure that the entire alerting pipeline is functional.\nThis alert is always firing, therefore it should always be firing in Alertmanager\nand always fire against a receiver. There are integrations with various notification\nmechanisms that send a notification when this alert is not firing. For example the\n\"DeadMansSnitch\" integration in PagerDuty.\n"},
"externalURL":"https://alertmanager-main-openshift-monitoring.apps.box.example.com",
"version":"4",
"groupKey":"{}/{alertname=\"Watchdog\"}:{}"}

In the end, if all went well you see in Nagios the services overview a nice green ‘OCPALERTMANEGER’ service

If you want to catch up with Nagios passive checks, read more at Nagios Core Passive Checks.

Thanks for joining me on this journey!


Share

The post Alertmanager Watchdog monitoring with Nagios passive checks appeared first on Red Hat Developer.


from Planet Python
via read more

TestDriven.io: Working with Static and Media Files in Django

This article looks at how to work with static and media files in a Django project, locally and in production. from Planet Python via read...