Showing posts with label python – Red Hat Developer Blog. Show all posts

Monday, June 3, 2019

How to build a Raspberry Pi photo booth

The Coderland booth at the recent Red Hat Summit was all about serverless computing as implemented in the Compile Driver. If you haven’t gone through that example (you really should), that code creates a souvenir photo by superimposing the Coderland logo, a date stamp, and a message on top of an image from a webcam. We thought it would be fun to build a Raspberry Pi version for the booth so we could offer attendees a free souvenir. Here’s a look at the finished product:
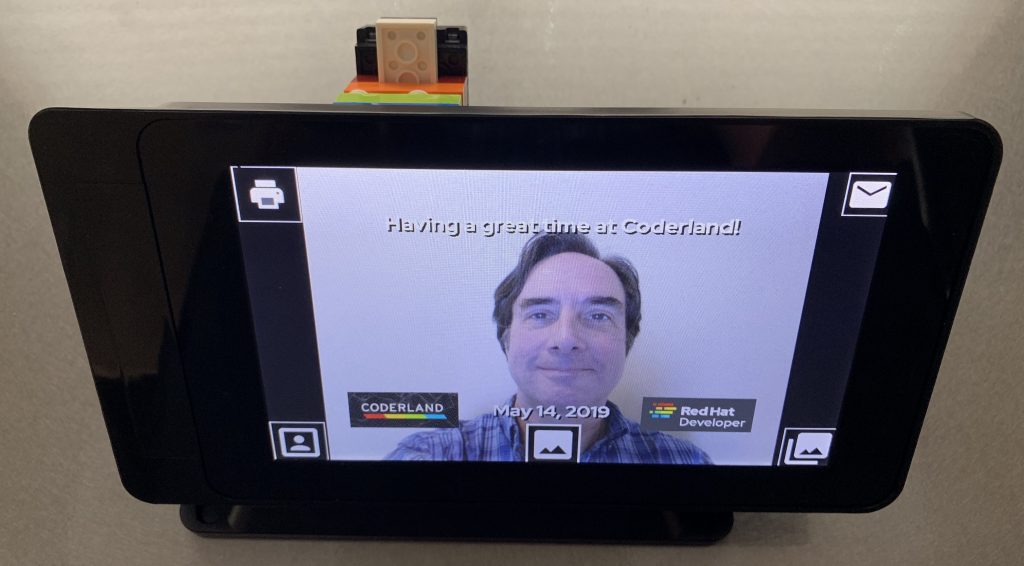
Front of the photo booth

The case shown here incorporates the Raspberry Pi, a touchscreen, and a camera. As you can see, this setup produces results similar to the Java code inside the Compile Driver.

Parts list

Here’s what I used to build everything:

With these things combined, we had a handheld photo booth to take pictures of attendees in front of a backdrop that made it look like they were riding the Compile Driver. A nice ending to a conversation about serverless computing. We also had people stop by the booth to ask “what is that thing?” Whatever you do with it, people love the Raspberry Pi.

Assembling the hardware

The first task was assembling the case. Fortunately, the folks at Smarticase provide a YouTube video that covers everything. You bolt the touch screen into the case, then attach the Raspberry Pi. An extra-long camera cable is included to connect the two. The Pi can be fastened directly to the case or held in place with a bracket. I went with the bracket approach because that makes it easy to take the Pi out and change its SD card. Finally, the case includes a small bracket to hold the camera module. This is attached to the case with Lego bricks:
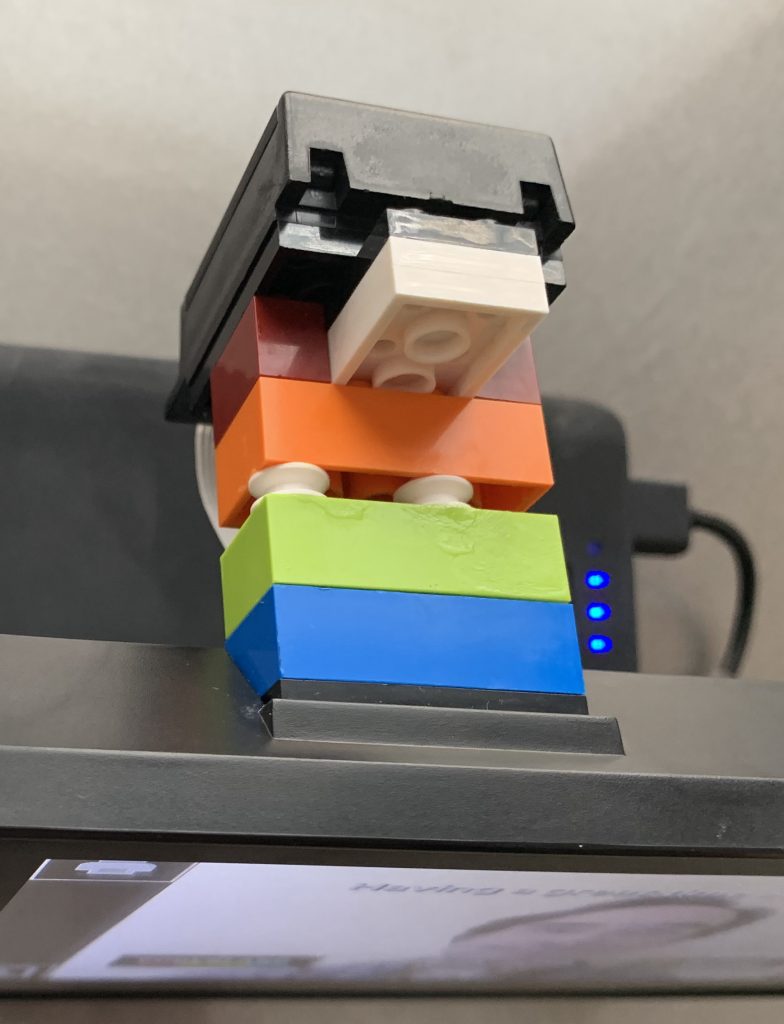
Camera attached with Legos

A minor Lego hack: I needed to reverse the direction of the studs on the blocks so that the camera faced away from the screen. (Turns out the nubby things on top of a brick are called studs and the holes on the bottom are called tubes. You learn something every day.) Thanks to this post from The Brick Blogger, I found a straightforward way to do it. I took some Lego wheels, removed the rubber tire portions, then used the wheels to connect the two bricks. To make sure this stayed in place, I superglued everything together:
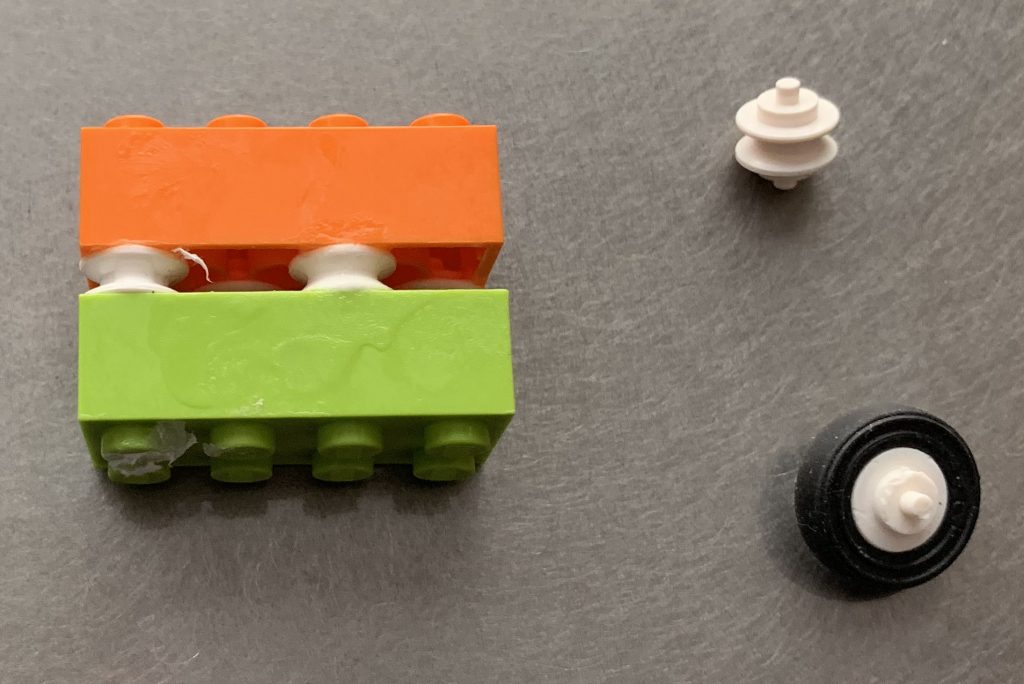
Lego hack

Software

With the hardware built, I installed the latest Raspbian to a new SD card. The card I used was 32GB, although an 8GB card (if you can find one that small) would have plenty of space. Next, I cloned the repo TouchSelfie-extended, a fork of another photo booth project. There are quite a few RPi photo booths out there, but this one was the best match for what we needed. Speaking of which, I should probably mention our requirements. We needed the photo booth to:

  • Take pictures and overlay various things on those images.
  • Let people email their photos to themselves.
  • Display a privacy notice to let people know how we use their information (spoiler: we don’t).
  • Use the portable photo printer to create souvenir pictures.

As you’d expect for Raspberry Pi software, the TouchSelfie-extended package is written in Python. Once you’ve cloned the repo, run the setup.py script to enable the options you want, such as emailing, printing, or uploading the photos you take.

Setting up the overlay image

The setup.py script automates some of the configuration, but there are other values you need to set in the file configuration.json. To overlay an image on the photos you take, specify a value for logo_file:

"logo_file": "/home/pi/Documents/TouchSelfie-extended/scripts/Summit Wednesday Overlay.png",

With this value set, the package superimposes the file Summit Wednesday Overlay.png on top of the photo.

Confession: The overlay image included the greeting, a hardcoded date, and the Coderland and Red Hat Developer program logos. The original Java version generated those things separately, but your author doesn’t have the Python skills to work such (Image)Magick.

It took a while to figure out the constraints, but it turns out you can’t store any EXIF data in the PNG file you want to use as the overlay. Here are the GIMP settings that work:
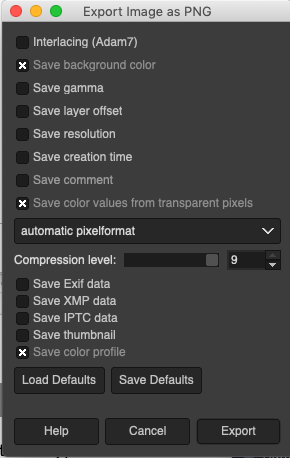
GIMP options that work

Enabling email

To enable email, I had to jump through some Google/OAuth hoops to get the credentials that allowed the code to send images via my Gmail account. Those are stored in a file named google_credentials.dat. The rest of the email setup involved straightforward changes to the configuration file:

"email_body": "We're glad you stopped by the booth at Red Hat Summit 2019. Here's your souvenir photo - Enjoy!\n", 
"email_subject": "Thanks for visiting Coderland!", 
"enable_email": true, 
"gmail_user": "xxxxxxxxxxxxxxxxxx@gmail.com",

Creating a privacy notice

With email set up, we needed a privacy notice that let attendees know that their data would only be used to send the photo. I added a Tk Label to the existing Tk Checkbox widget. I also changed the logic so that the photo was not sent unless the user clicked the checkbox. The onscreen keyboard looked like this:
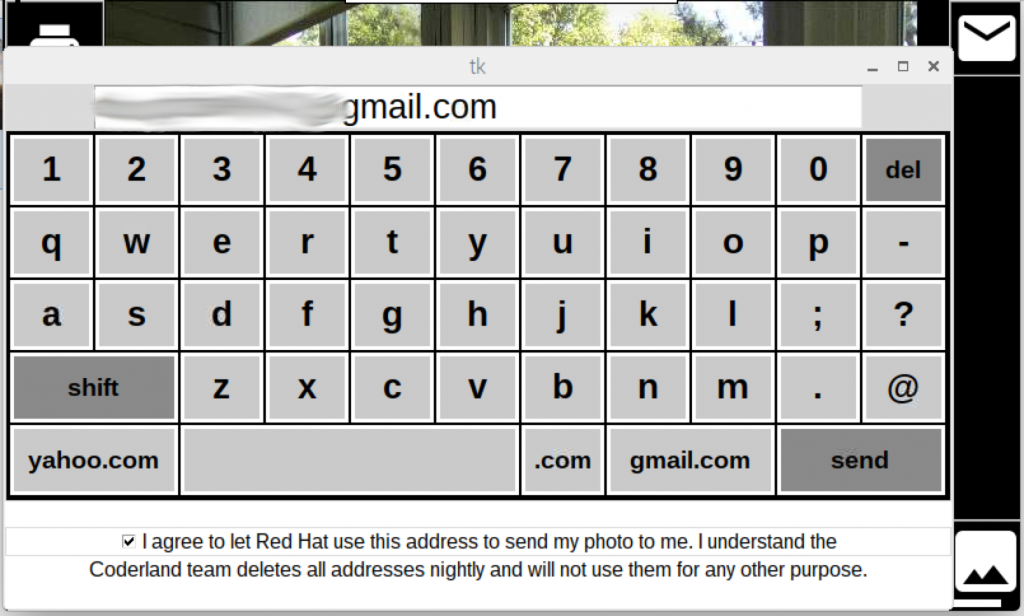
Onscreen keyboard with privacy notice

If an attendee typed their email address with the onscreen keyboard, clicked the checkbox, and clicked send, the photo made its way to their inbox. (No doubt shared with all their friends and loved ones upon arrival.)

Configuring the printer

Getting the printer working required setting up CUPS on the Raspberry Pi. Once set up, the CUPS admin console found the printer on our wireless network:
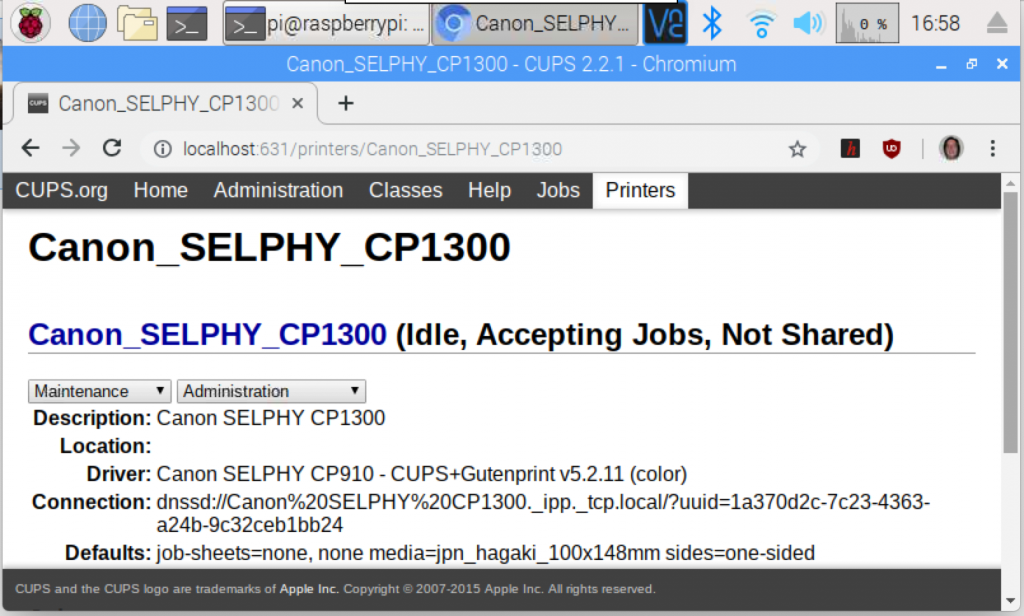
CUPS console on the RPi

I couldn’t get the print command built in to the original code to work, so I just replaced it with a system call to lp:

printCommand = 'lp -o raw -o media=postcard -d Canon_SELPHY_CP1300 ' + self.last_picture_filename;
os.popen(printCommand);

The hassle here was that specifying the paper size with media=postcard is completely undocumented. The values a4, letter, and legal are the only ones mentioned in the lp man page. The images from the Raspberry Pi wouldn’t print correctly until I found the postcard setting in the source code of another printer driver. Just one of those unexpected productivity killers that pop up in every project.

The finished product

The final photo booth opens with this interface:

The basic photo booth interface

The middle button on the bottom takes the photo. The printer and envelope icons print and email the modified picture, as you would expect. The first image in this post shows you what the interface looks like once you’ve taken a picture. (FWIW, the buttons in the lower corners allow you to take a collage of photos or generate an animated GIF, but neither of those are printable. A more ambitious programmer would have removed them.)

Summary

As with any Raspberry Pi project, there’s an element of astonishment that such small, inexpensive hardware can do something so cool. Total cost for the entire rig, including the printer and power brick, was around US $265 before taxes and shipping. It was fun to have this in the booth at Red Hat Summit, but you could have lots of fun with this at more personal events like parties and weddings. If you build one, let us know how it goes. And send us a picture!

Share

The post How to build a Raspberry Pi photo booth appeared first on Red Hat Developer Blog.


from python – Red Hat Developer Blog
read more

Tuesday, May 14, 2019

Use the Kubernetes Python client from your running Red Hat OpenShift pods

Red Hat OpenShift is part of the Cloud Native Computing Foundation (CNCF) Certified Program, ensuring portability and interoperability for your container workloads. This also allows you to use Kubernetes tools to interact with an OpenShift cluster, like kubectl, and you can rest assured that all the APIs you know and love are right there at your fingertips.

The Kubernetes Python client is another great tool for interacting with an OpenShift cluster, allowing you to perform actions on Kubernetes resources with Python code. It also has applications within a cluster. We can configure a Python application running on OpenShift to consume the OpenShift API, and list and create resources. We could then create containerized batch jobs from the running application, or a custom service monitor, for example. It sounds a bit like “OpenShift inception,” using the OpenShift API from services created using the OpenShift API.

In this article, we’ll create a Flask application running on OpenShift. This application will use the Kubernetes Python client to interact with the OpenShift API, list other pods in the project, and display them back to the user.

You’ll need a couple of things to follow along:

  • An OpenShift cluster
  • A working knowledge of Python

Let’s get started!

Setup

I’ve created a template to alleviate a lot of the boilerplate, so let’s clone it down:

git clone https://github.com/shaneboulden/openshift-client-demo
cd openshift-client-demo

You can create a new app on your OpenShift cluster using the provided template and see the application running:

oc new-app openshift_deploy/ocd.yaml

If you do an oc get routes, you’ll be able to see the route that’s been created. For now, if you select the Pods menu item you’ll just get some placeholder text. We’ll fix this shortly 🙂

pods_placeholder

Configure the Kubernetes Python client

Listing pods is trivial once we have our client configured, and, fortunately, we can use a little Kubernetes Python client magic to configure this easily with the correct service account token.

Usually, we’d configure a Kubernetes client using a kubeconfig file, which has the required token and hostname to create API requests. The Kubernetes Python client also provides a method load_incluster_config(), which replaces the kubeconfig file in a running pod, instead using the available environment variables and mount points to find the service account token and build API URLs from the information available within the pod.

There’s another huge benefit to using load_incluster_config()—our code is now portable. We can take this same application to any Kubernetes cluster, assume nothing about hostnames or network addresses, and easily construct API requests using this awesome little method.

Let’s configure our application to use the load_incluster_config() method. First, we need to import the client and config objects, you can verify this in the ocd.py file:

from kubernetes import client, config

We can now use that magic method to configure the client:

config.load_incluster_config()
v1 = client.CoreV1Api()

That’s it! This is all of the code we need to be able to interact with the OpenShift API from running pods.

Use the Kubernetes Downward API

I’m going to introduce something new here, and yes, it’s another “OpenShift-inception” concept. We’re going to use the list_namespaced_pod method to list pod details; you can find all of the methods available in the documentation. To use this method, we need to pass the current namespace (project) to the Kubernetes client object. But wait, how do we get the namespace for our pod, from inside the running pod?

This is where another awesome Kubernetes API comes into play. It’s called the Downward API and allows us to access metadata about our pod from inside the running pod. To expose information from the Downward API to our pod, we can use environment variables. If you look at the template, you’ll see the following in the ‘env’ section:

- name: POD_NAMESPACE
  valueFrom:
    fieldRef:
      apiVersion: v1
      fieldPath: metadata.namespace

Bring it all together

Now let’s get back to our /pods route in the ocd.py file. The last thing we need to do is to pass the namespace of the app to the Kubernetes client. We have our environment variable configured to use the downward API already, so let’s pass it in:

pods = v1.list_namespaced_pod(namespace=os.environ["POD_NAMESPACE"])

Ensure you’re in the top-level project directory (i.e., you can see the README) and start a build from the local directory:

oc start-build openshift-client-demo --from-dir=.

When you next visit the route and select the Pods menu, you’ll be able to see all of the pods for the current namespace:

pods

I hope you’ve enjoyed this short introduction to the Kubernetes Python client. If you want to explore a little deeper, you can look at creating resources. There’s an example here that looks at creating containerized batch jobs from API POSTs.

Share

The post Use the Kubernetes Python client from your running Red Hat OpenShift pods appeared first on Red Hat Developer Blog.


from python – Red Hat Developer Blog
read more

Tuesday, May 7, 2019

What, no Python in Red Hat Enterprise Linux 8?

TL;DR Of course we have Python! You just need to specify whether you want Python 3 or 2 as we didn’t want to set a default. Give yum install python3 and/or yum install python2 a try. Or, if you want to see what packages we recommend, use yum install @python36 or yum install @python27. Read on for why.

For prior versions of Red Hat Enterprise Linux, and most Linux distributions, users have been locked to the system version of Python unless they got away from the system’s package manager. Although this can be true for a lot of tools (Ruby, Node, Perl, PHP), the Python use case is more complicated because so many Linux tools (like yum) rely on Python. To improve the experience for Red Hat Enterprise Linux 8 users, we have moved the Python used by the system “off to the side” and introduced the concept of Application Streams based on Modularity.

Through Application Streams, in combination with Python’s ability to be parallel installed, we can now make multiple versions of Python available and easily installable, from the standard repositories, into the standard locations. No extra things to learn or manage. Now, users can choose what version of Python they want to run in any given userspace and it simply works. For more info, see Introducing Application Streams in RHEL 8.

To be honest, the system maintainers also get some advantages of not being locked to an aging version of Python for our system tools. With users not relying on a particular version of Python coming with the system installation, we have the freedom to take advantage of new language features, performance improvements, and all the other goodness a developer gets when tracking near the upstream version.

However, this has resulted in a dilemma. When a user sits down at a fresh installation of Red Hat Enterprise Linux 8, they will naturally expect that /usr/bin/pythonwill run some version of Python. If you follow the recommendation in Python Enhancement Proposal (PEP) 394, that will be Python 2. However, at some point, a new PEP will likely want to change that recommendation to Python 3, probably during the typically *10* year life of Red Hat Enterprise Linux 8. To put this in perspective, consider that Red Hat Enterprise Linux 7 was released in 2014, and will be supported until 2024!

So, what do we do? Well, if we follow the current recommendation, we make some present-day users happy. However, when the Python community shifts to recommending Python 3 as the default, we will make new users unhappy.

As a result, we came to the tough conclusion: don’t provide a default, unversioned Python at all. Ideally, people will get used to explicitly typing python3 or python2. However, those that want an unversioned command can choose from the beginning which version of Python they actually want. So, yum install python results in a 404.

However, we do try to make it as easy as possible to get Python 2 or 3 (or both) on to your system. We recommend using yum install @python36or yum install @python27 to take advantage of the recommended set of packages to install. If all you really need is *just* the Python binaries, you can use yum install python3 or yum install python2.

We have also set up the alternatives infrastructure so that when you install either (or both) you can easily make /usr/bin/python point to the right place using alternatives --config python. However, as we explained above, and aligned with the Python PEP, we don’t recommend relying on /usr/bin/python being the correct Python for your application.

Note: the same issue arises for Python wrapper scripts like pip. Installing Python 3 will put pip3 in your path, but not unversioned pip. With Python modules like pip, venv, and virtualenv, you can avoid confusion and get the right version by running those as a module: python3 -m pip and avoiding the wrapper scripts. Using Python virtual environments is a best practice that also avoids the issues with version ambiguity, see How to install Python 3 on Red Hat Enterprise Linux 7 for virtual environment details and advice.

To conclude, yes, Python is included in Red Hat Enterprise Linux 8. And, it will be even better than in the past. If you want more details, refer to the How To Guide on Red Hat Developers.

And if you haven’t downloaded Red Hat Enterprise Linux 8 yet, go to developers.redhat.com/rhel8 now.

Additional Information

Share

The post What, no Python in Red Hat Enterprise Linux 8? appeared first on Red Hat Developer Blog.


from python – Red Hat Developer Blog
read more
Red Hat Enterprise Linux 8 now generally available

I think Red Hat Enterprise Linux 8 is the most developer-friendly Red Hat Enterprise Linux that we’ve delivered, and I hope you agree. Let’s get down to business, or rather coding, so you can see for yourself. You can read the Red Hat corporate press release.

For this article, I’ll quickly recap Red Hat Enterprise Linux 8 features (architecture, containers), introduce the very new and cool Red Hat Universal Base Image (UBI), and provide a handy list of developer resources to get you started on Red Hat Enterprise Linux 8.

TL;DR

Download RHEL 8 now

Download RHEL 8 image

Red Hat Enterprise Linux 8 architecture

To simplify your development experience, Red Hat Enterprise Linux 8 has three pre-enabled repositories:

  • BaseOS —“mostly” has operating system content
  • Application Streams (AppStream) — most developer tools will be here
  • CodeReady Builder — additional libraries and developer tools

Content in BaseOS is intended to provide the core set of the underlying operating system functionality that provides the foundation for all installations. This content is available in the traditional RPM format. For a list of BaseOS packages, see RHEL 8 Package Manifest.

Application Streams, essentially the next generation of Software Collections, are intended to provide additional functionality beyond what is available in BaseOS. This content set includes additional user space applications, runtime languages, databases, web servers, etc. that support a variety of workloads and use cases. The net for you is to simply use the component and version that you want. Once there’s market demand, newer stable versions of components will be added.

Linux containers

Linux containers are a critical component of cloud-native development and microservices, so Red Hat’s lightweight, open standards-based container toolkit is now fully supported and included with Red Hat Enterprise Linux 8. Built with enterprise IT security needs in mind, Buildah (building containers), Podman (running containers), and Skopeo (sharing/finding containers) help developers find, run, build and share containerized applications more quickly and efficiently—thanks to the distributed and, importantly, daemonless nature of the tools.

Introducing Universal Base Image

Derived from Red Hat Enterprise Linux, the Red Hat Universal Base Image (UBI) provides a freely redistributable, enterprise-grade base container image on which developers can build and deliver their applications. This means you can containerize your app in UBI, and deploy it anywhere. Of course, it will be more secure and Red Hat supported when deployed on Red Hat Enterprise Linux, but now you have options. There are separate UBI 7 and UBI 8 versions for Red Hat Enterprise Linux 7 and 8, respectively. Read more about them in the Red Hat Universal Base Image introduction.

Red Hat Enterprise Linux 8 developer resources

Over the past few months, we have produced a number of how-to documents specifically for Red Hat Enterprise Linux 8. Here’s a list in case you missed them:

Red Hat Developer Subscriptions

Red Hat Developer members have been enjoying no-cost developer subscriptions for 3+ years now, and RHEL 8 is now automatically part of that. If your company wants developer support, there are several Red Hat Enterprise Linux Developer Subscriptions options with Red Hat support, too.

RHEL 8 Documentation

Share

The post Red Hat Enterprise Linux 8 now generally available appeared first on Red Hat Developer Blog.


from python – Red Hat Developer Blog
read more

TestDriven.io: Working with Static and Media Files in Django

This article looks at how to work with static and media files in a Django project, locally and in production. from Planet Python via read...