PNP problem stands for Perspective N – points problem. It is a commonly known problem in computer vision. In this problem, we have to estimate the pose of a camera when the 2D projections of 3D points are given. In addition, we have to determine the distance between the camera and the set of points in the coordinate system. We use OpenCV solvepnp() to estimate the orientation of a 3D object in a 2D image.
What is OpenCV?
OpenCV stands for Open Source Computer Vision Library. OpenCV is an open-source library in python which is used for computer vision. The main use of OpenCV is to process real-time images and videos for recognition and detection. It has various applications, such as self-driving cars, medical analysis, facial recognition, anomaly detection, object detection, etc.
The main purpose of OpenCV is used to identify and recognize objects based on real-time images and videos. It is done by estimating the orientation and position of the object concerning the coordinate system. The PNP problem solved for OpenCV solvepnp() is actually a pose estimation problem.
What is Pose Estimation?
Pose estimation is determining the position and orientation of an object. These two characteristics are the pose of a given object. For example, we use pose estimation to determine the pose of a person by identifying the key body points. This helps us in real-time tracking of the moment of a person.
The poses will change as and when the object moves concerning the camera. The main idea is to estimate the pose given the location of N 3D points and their respective 2D projections. Pose estimation through OpenCV solvepnp has applications in sports analysis, video surveillance, and driver assistance.
Types of motions in a 3D image
There are mainly two types of motions possible in case of a 3D image:
Translational motion
Translational motion occurs when a given object is moving uniformly in a given direction. The coordinates of the object change from a given point to another. Translational motion can occur in either of the three directions
Rotational motion
Rotational motion occurs around a circular path. It can also be rotated around a particularly given axis – either x, y, or z.
OpenCV solvePnP Function
OpenCV library contains two main functions for pose estimation. The two methods are solvePnP() and solvePnPRansac(). Here, we will be looking into the function solvePnP().
The syntax for solvePnP() function is:
cv2.solvePnP(objectPoints, imagePoints, cameraMatrix, distCoeffs[, rvec[, tvec[, useExtrinsicGuess[, flags]]]]) → retval, rvec, tvec
Parameters of solvePnp() Function in Python:
objectPoints: It is an array of object points. objectPoints can either be a matrix or a vector of N 3D points.
imagePoints: It is an array of image points. imagePoints can either be a matrix or a vector of N 2D points.
cameraMatrix: It is a 3 by 3 cameramatrix taken as an input.
distCoeffs: It is a vector that consists of distortion coefficients. Unless the distortion is huge in the camera being used, we can assign NULL value to this.
rvec: It is an output rotation vector
tvec: It is an output translation vector
useExtrinsicGuess: If the value of useExtrinsicGuess is set to 0, it will use rvec and tvec values for initial calculations as rotation and translation vectors.
flag: It specifies the method for solving the PnP problem.
We require both 2D and 3D object points. The 2D object points are of (x,y) format and the 3D object points are of (x,y,z) type. For example, if OpenCV solvepnp is used for face estimation, we need 2D and 3D points for facial characteristics such as eyes, mouth, nose, and chin.
We need to estimate 2D and 3D coordinate points for foot, elbow, shoulder, torso, hip, and knee for human pose detection. For obtaining the 3D model, we do not need the complete 3D model. Instead, we need the 3D coordinates of the required features.
Pose Estimation using OpenCV solvePnP
OpenCV solvePnP is mainly used for pose estimation. If we have the coordinates of the key features of a face, we can use them to track a person’s activity by observing their gestures.
It is widely used for video monitoring a person using artificial intelligence, especially in online examinations, to prevent malpractice. Motion Tracking, Augmented Reality, and training robots are some other applications of solvePnP in pose estimation.
We shall understand it using an example.
First, we shall import the numpy and cv2 libraries and import the cv2_imshow function.
import cv2
import numpy as np
from google.colab.patches import cv2_imshow
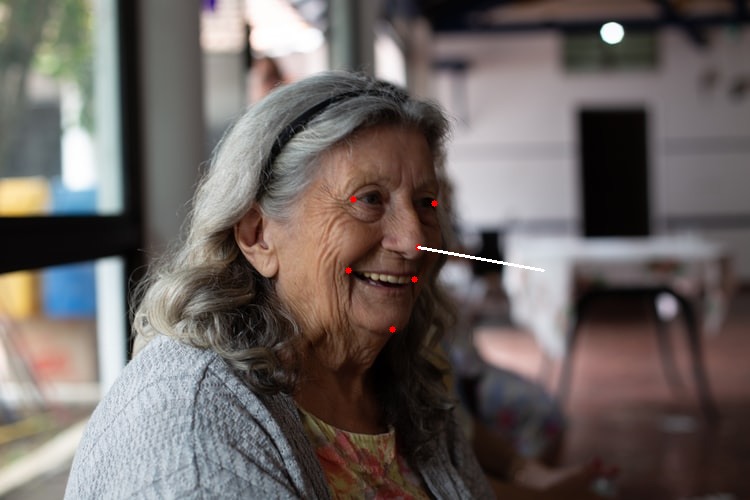
Now, we shall read the image using imread function() present in cv2. The image is:
 Image credits :Photo by Tatiana Zanon on Unsplash
img = cv2.imread("image.jpg")
size = img.shape
We will pass the coordinates of the face features. Here, six coordinates will be passed – left mouth corner, right mouth corner, left eye corner, right eye corner, chin, and nose tip. In addition, we will pass the coordinates for both 2D and 3D image points.
points_2D = np.array([
                        (418, 247),  # Nose tip

                        (392, 329),  # Chin

                        (353, 199),  # Left eye corner

                        (434, 203),  # Right eye corner

                        (348, 270),  # Left mouth

                        (414, 279)   # Right mouth

                      ], dtype="double")


points_3D = np.array([

                      (0.0, 0.0, 0.0),       #Nose tip

                      (0.0, -330.0, -65.0),  #Chin

                      (-225.0, 170.0, -135.0),#Left eye corner

                      (225.0, 170.0, -135.0), #Right eye corner

                      (-150.0, -150.0, -125.0),#Left mouth

                      (150.0, -150.0, -125.0) #Right mouth


                     ])
distcoeffs will be passed a null value because the distortion in the camera is less
dist_coeffs = np.zeros((4,1))
Now we will pass values into cv2.solvePnP() function. After that, we will use projectPoints to draw a line indicating the person’s direction.
success, rotation_vector, translation_vector = cv2.solvePnP(points_3D, points_2D, camera_matrix, dist_coeffs, flags=0)


nose_end_point2D, jacobian = cv2.projectPoints(np.array([(0.0, 0.0, 1000.0)]), rotation_vector, translation_vector, camera_matrix, dist_coeffs)
In order to plot the points, we will use the function cv2.circle().
for p in points_2D:
  cv2.circle(img, (int(p[0]), int(p[1])), 3, (0,0,255), -1)
Now, we will use cv2.line() function to pass two points – point1 and point2 as the start point and the endpoint. Then we will use cv2_imshow() to plot the final image.
point1 = ( int(points_2D[0][0]), int(points_2D[0][1]))

point2 = ( int(nose_end_point2D[0][0][0]), int(nose_end_point2D[0][0][1]))

cv2.line(img, point1, point2, (255,255,255), 2)


# Display image

cv2_imshow(img)
As seen, the line in the below image points towards the direction where the person’s face is pointing.
FAQ’s
Q. What is OpenCV recoverPose?
A. OpenCV recoverPose is used to obtain the camera’s rotation and translation from the given matrix and object points from the image.
Q. What is OpenCV calib3d?
A. OpenCV calib3d is used to obtain information about 3D image characteristics from a given 2D image.
That was all for OpenCV solvePnP. If you have anything to share, we would love to hear you in the comments.
Till then, Keep Learning!
The post Understanding OpenCV solvePnP in Python appeared first on Python Pool.
from Planet Python
via read more


No comments:
Post a Comment