Wednesday, May 1, 2019

Stack Abuse: Analysis of Black Friday Shopping Trends via Machine Learning

Introduction

Wikipedia defines Black Friday as an informal name for the Friday following Thanksgiving Day in the United States, which is celebrated on the fourth Thursday of November. [Black Friday is] regarded as the beginning of America's Christmas shopping season [...].

In this article, we will try to explore different trends from the Black Friday shopping dataset. We will extract useful information that will answer questions such as: what gender shops more on Black Friday? Do the occupations of the people have any impact on sales? Which age group is the highest spender?

In the end, we will create a simple machine learning algorithm that predicts the amount of money that a person is likely to spend on Black Friday depending on features such as gender, age, and occupation.

The dataset that we will use in this article includes 550,000 observations about Black Friday, which are made in a retail store. The file can be downloaded at the following Kaggle link: Black Friday Case Study.

Data Analysis

The first step is to import the libraries that we will need in this section:

import pandas as pd  
import numpy as np  
import matplotlib as pyplot  
%matplotlib inline
import seaborn as sns  

Next, we need to import our data.

data = pd.read_csv('E:/Datasets/BlackFriday.csv')  

Let's see some basic information about our data!

data.info()  

Output:

<class 'pandas.core.frame.DataFrame'>  
RangeIndex: 537577 entries, 0 to 537576  
Data columns (total 12 columns):  
User_ID                       537577 non-null int64  
Product_ID                    537577 non-null object  
Gender                        537577 non-null object  
Age                           537577 non-null object  
Occupation                    537577 non-null int64  
City_Category                 537577 non-null object  
Stay_In_Current_City_Years    537577 non-null object  
Marital_Status                537577 non-null int64  
Product_Category_1            537577 non-null int64  
Product_Category_2            370591 non-null float64  
Product_Category_3            164278 non-null float64  
Purchase                      537577 non-null int64  
dtypes: float64(2), int64(5), object(5)  
memory usage: 49.2+ MB  

Looking at the data, we can conclude that our set possesses 12 different parameters: 7 numerical (integer and float) and 5 object variables. Furthermore, the dataset contains two short type variables: Product_Category_2 and Product_Category_3. We will see later how to handle this problem.

Ok, now we have a general picture of the data, let's print information about first five customers (first five rows of our DataFrame):

data.head()  
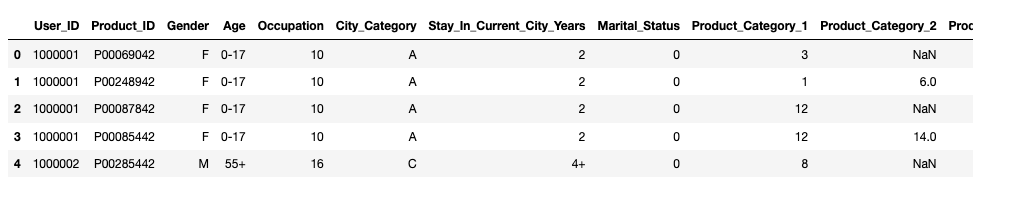
The first question I want to ask from the beginning of this study, is it true that female customers are highly dominant in comparison to male customers? We will use the seaborn library and the countplot function to plot the number of male and female customers.

sns.countplot(data['Gender'])  
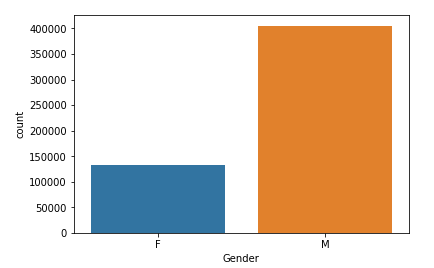
Wow! The graph shows that there are almost 3 times more male customers than female customers! Why is that? Maybe male visitors are more likely to go out and buy something for their ladies when more deals are present.

Let's explore the Gender category a bit more. We want to see now distribution of gender variable, but taking into consideration the Age category. Once again countplot function will be used, but now with defined hue parameter.

sns.countplot(data['Age'], hue=data['Gender'])  
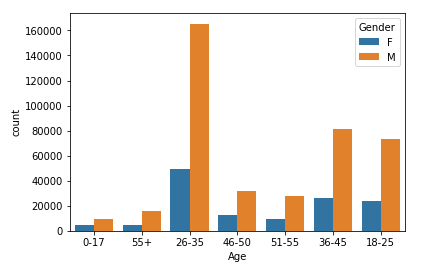
From the figure above, we can easily conclude that the highest number of customers belong to the age group between 26 and 35, for both genders. Younger and older population are far less represented on Black Friday. Based on these results, the retail store should sell most of the products that target people in their late twenties to early thirties. To increase profits, the number of products targeting people around their thirties can be increased while the number of products that target the older or younger population can be reduced.

Next, we will use the describe function to analyze our categories, in terms of mean values, min and max values, standard deviations, etc...

data.describe()  
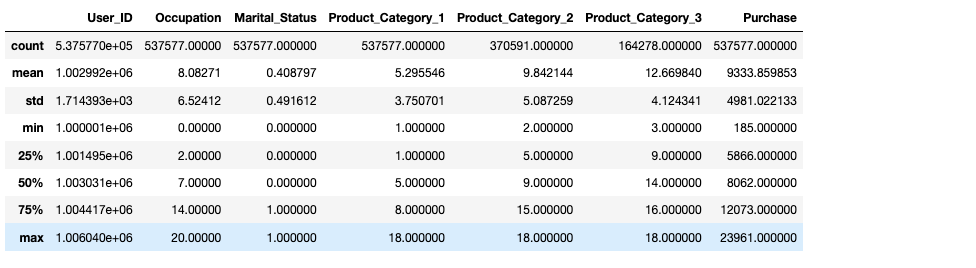
Further, below we analyze the User_ID column using the nunique method. From this we can conclude that in this specific retail store, during Black Friday, 5,891 different customers have bought something from the store. Also, from Product_ID category we can extract information that 3,623 different products are sold.

data['User_ID'].nunique()  

Output:

5891  

data['User_ID'].nunique()  

Output:

3623  

Now let's explore the Occupation category. The Occupation number is the ID number of occupation type of each customer. We can see that around 20 different occupations exist. But let's perform exact analysis. First, we need to create the function which will extract all unique elements from one column (to extract all different occupations).

We will use the unique function for that, from the numpy Python library.

def unique(column):  
    x = np.array(column)
    print(np.unique(x))

print("The unique ID numbers of customers occupations:")  
unique(data['Occupation'])  

Output:

The unique ID numbers of costumers occupations:  
[ 0  1  2  3  4  5  6  7  8  9 10 11 12 13 14 15 16 17 18 19 20]

As we can see, 21 different occupation ID's are registered during the shopping day.

The Occupation number could represent different professions of customers: for example, number 1 could be an engineer, number 2 - a doctor, number 3 an artist, etc.

It would be also interesting to see how much money each costumer group (grouped by occupation ID) spent. To do that, we can use a for loop and sum the spent money for each individual occupation ID:

occupations_id = list(range(0, 21))  
spent_money = []  
for oid in occupations_id:  
    spent_money.append(data[data['Occupation'] == oid]['Purchase'].sum())

spent_money  

Output:

[625814811,
 414552829,
 233275393,
 160428450,
 657530393,
 112525355,
 185065697,
 549282744,
 14594599,
 53619309,
 114273954,
 105437359,
 300672105,
 71135744,
 255594745,
 116540026,
 234442330,
 387240355,
 60249706,
 73115489,
 292276985]

We have created the list spent_money, which includes summed quantities of dollars for the Occupations IDs - from 0 to 20. It may seem odd in the results that hundreds of millions of dollars are spent. But, keep in mind that our dataset includes 500,000 observations, so this is actually very likely. Or maybe the retail store is actually a big shopping mall. Another explanation for the huge sums of money spent by each occupation is that this data may represent the transactions for multiple Black Friday nights, and not just one.

Now, we have information about how much money is spent per occupation category. Let's now graphically plot this information.

import matplotlib.pyplot as plt; plt.rcdefaults()  
import matplotlib.pyplot as plt

objects = ('0', '1', '2', '3', '4', '5','6','7','8','9','10', '11','12', '13', '14', '15', '16', '17', '18', '19', '20')  
y_pos = np.arange(len(objects))

plt.bar(y_pos, spent_money, align='center', alpha=0.5)  
plt.xticks(y_pos, objects)  
plt.ylabel('Money spent')  
plt.title('Occupation ID')

plt.show()  
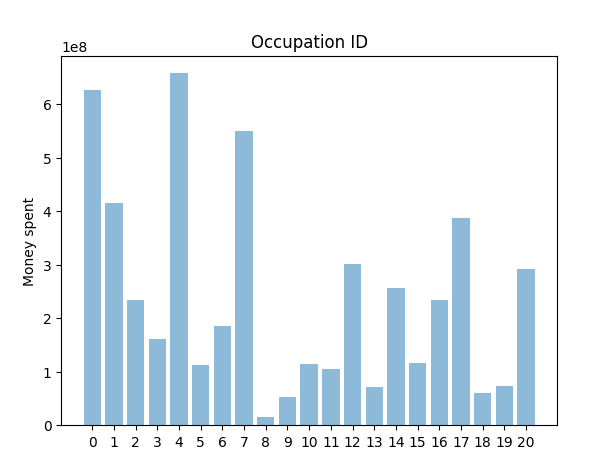
It can be easily observed that people having occupations 0 and 4 spent the most money during Black Friday sales. On the other hand, the people belonging to the occupations with ID 18, 19, and especially occupation 8, have spent the least amount of money. It can imply that these groups are the poorest ones, or contrary, the richest people who don't like to shop in that kind of retail stores. We have a deficiency with information to answer that question, and because of that, we would stop here with the analysis of the Occupation category.

City_Category variable is the next one. This category gives us information about cities from which our customers are. First, let's see how many different cities do we have.

data['City_Category'].nunique()  

Output:

3  

Now, it will be interesting to see in percentages, what is the ratio of customers from each city. This information will be presented in the form of a colored pie chart. We can do so in 5 lines of code. Almighty Python, thank you! :)

explode = (0.1, 0, 0)  
fig1, ax1 = plt.subplots(figsize=(11,6))  
ax1.pie(data['City_Category'].value_counts(), explode=explode, labels=data['City_Category'].unique(), autopct='%1.1f%%')  
plt.legend()  
plt.show()  
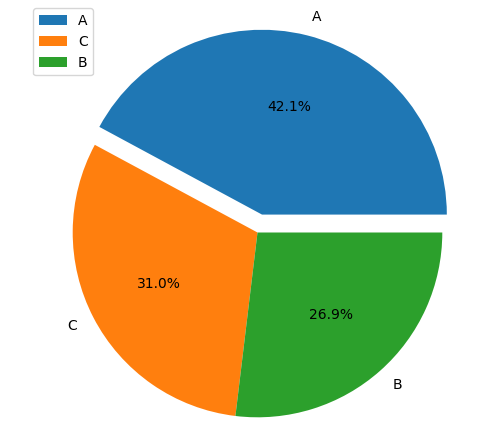
It is evident from the pie chart that all the three cities are almost equally represented in the retail store during Black Fridays. Maybe the store is somewhere between these three cities, is easily accessible and has good road connections from these cities.

Data Preprocessing for ML Algorithms

We have covered until now a few basic techniques for analyzing raw data. Before we can apply machine learning algorithms to our dataset, we need to convert it into a certain form that machine learning algorithms can operate on. The task of the learning algorithms will be to predict the value of the Purchase variable, given customer information as input.

The first thing that we need to do is deal with missing data in columns Product_Category_2 and Product_Category_3. We have only 30% of data inside Product_Category_3 and 69% of data inside Product_Category_2. 30% of real data is a small ratio, we could fill missing values inside this category with the mean of the existing values, but that means that 70% of data will be artificial, which could ruin our future machine learning model. The best alternative for this problem is to drop this column from further analysis. We will use drop function to do that:

data = data.drop(['Product_Category_3'], axis=1)  

The column Product_Category_2 posses around 30% of missing data. Here it makes sense to fill missing values and use this column for fitting a machine learning model. We will solve this problem by inserting a mean value of the existing values in this column to the missing fields:

data['Product_Category_2'].fillna((data['Product_Category_2'].mean()), inplace=True)  

Let's now check our data frame again:

data.info()  

Output:

<class 'pandas.core.frame.DataFrame'>  
RangeIndex: 537577 entries, 0 to 537576  
Data columns (total 11 columns):  
User_ID                       537577 non-null int64  
Product_ID                    537577 non-null object  
Gender                        537577 non-null object  
Age                           537577 non-null object  
Occupation                    537577 non-null int64  
City_Category                 537577 non-null object  
Stay_In_Current_City_Years    537577 non-null object  
Marital_Status                537577 non-null int64  
Product_Category_1            537577 non-null int64  
Product_Category_2            537577 non-null float64  
Purchase                      537577 non-null int64  
dtypes: float64(1), int64(5), object(5)  
memory usage: 45.1+ MB  

The problem of missing values is solved. Next, we will remove the columns that do not help in the prediction.

User_ID is is the number assigned automatically to each customer, and it is not useful for prediction purposes.

The Product_ID column contains information about the product purchased. It is not a feature of the customer. Therefore, we will remove that too.

data = data.drop(['User_ID','Product_ID'], axis=1)  
data.info()  

Output:

<class 'pandas.core.frame.DataFrame'>  
RangeIndex: 537577 entries, 0 to 537576  
Data columns (total 9 columns):  
Gender                        537577 non-null object  
Age                           537577 non-null object  
Occupation                    537577 non-null int64  
City_Category                 537577 non-null object  
Stay_In_Current_City_Years    537577 non-null object  
Marital_Status                537577 non-null int64  
Product_Category_1            537577 non-null int64  
Product_Category_2            537577 non-null float64  
Purchase                      537577 non-null int64  
dtypes: float64(1), int64(4), object(4)  
memory usage: 36.9+ MB  

Our final selection is based on 9 columns - one variable we want to predict (the Purchase column) and 8 variables which we will use for training our machine learning model.

As we can see from the info table, we are dealing with 4 categorical columns. However, basic machine learning models are capable of processing numerical values. Therefore, we need to convert the categorical columns to numeric ones.

We can use a get_dummies Python function which converts categorical values to one-hot encoded vectors. How does it work? We have 3 cities in our dataset: A, B, and C. Let's say that a customer is from city B. The get_dummies function will return a one-hot encoded vector for that record which looks like this: [0 1 0]. For a costumer from city A: [1 0 0] and from C: [0 0 1]. In short, for each city a new column is created, which is filled with all zeros except for the rows where the customer belongs to that particular city. Such rows will contain 1.

The following script creates one-hot encoded vectors for Gender, Age, City, and Stay_In_Current_City_Years column.

df_Gender = pd.get_dummies(data['Gender'])  
df_Age = pd.get_dummies(data['Age'])  
df_City_Category = pd.get_dummies(data['City_Category'])  
df_Stay_In_Current_City_Years = pd.get_dummies(data['Stay_In_Current_City_Years'])

data_final = pd.concat([data, df_Gender, df_Age, df_City_Category, df_Stay_In_Current_City_Years], axis=1)

data_final.head()  

In the following screenshot, the newly created dummy columns are presented. As you can see, all categorical variables are transformed into numerical. So, if a customer is between 0 and 17 years old (for example), only that column value will be equal to 1, other, other age group columns will have a value of 0. Similarly, if it is a male customer, the column named 'M' will be equal to 1 and column 'F' will be 0.
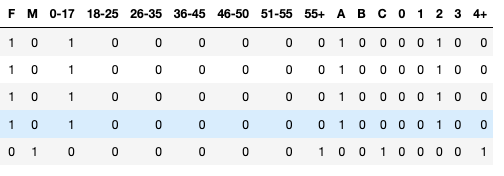
Now we have the data which can be easily used to train a machine learning model.

Predicting the Amount Spent

In this article, we will use one of the simplest machine learning models, i.e. the linear regression model, to predict the amount spent by the customer on Black Friday.

Linear regression represents a very simple method for supervised learning and it is an effective tool for predicting quantitative responses. You can find basic information about it right here: Linear Regression in Python

This model, like most of the supervised machine learning algorithms, makes a prediction based on the input features. The predicted output values are used for comparisons with desired outputs and an error is calculated. The error signal is propagated back through the model and model parameters are updating in a way to minimize the error. Finally, the model is considered to be fully trained if the error is small enough. This is a very basic explanation and we are going to analyze all these processes in details in future articles.

Enough with the theory, let's build a real ML system! First, we need to create input and output vectors for our model:

X = data_final[['Occupation', 'Marital_Status', 'Product_Category_2', 'F', 'M', '0-17', '18-25', '26-35', '36-45', '46-50', '51-55', '55+', 'A', 'B', 'C', '0', '1', '2', '3', '4+']]  
y = data_final['Purchase']  

Now, we will import the train_test_split function to divide all our data into two sets: training and testing set. The training set will be used to fit our model. Training data is always used for learning, adjusting parameters of a model and minimizing an error on the output. The rest of the data (the Test set) will be used to evaluate performances.

The script below splits our dataset into 60% training set and 40% test set:

from sklearn.model_selection import train_test_split

X_train, X_test, y_train, y_test = train_test_split(X, y, test_size=0.4)  

Now it is time to import our Linear Regression model and train it on our training set:

from sklearn.linear_model import LinearRegression

lm = LinearRegression()  
lm.fit(X_train, y_train)  
print(lm.fit(X_train, y_train))  

Output:

LinearRegression(copy_X=True, fit_intercept=True, n_jobs=None,  
         normalize=False)

Congrats people! Our model is trained. We can now print the intercept parameter value and values of all coefficients of our model, after the learning procedure:

print('Intercept parameter:', lm.intercept_)  
coeff_df = pd.DataFrame(lm.coef_, X.columns, columns=['Coefficient'])  
print(coeff_df)  

Output:

Intercept parameter: 11224.23064289564  
                    Coefficient
Occupation             8.110850  
Marital_Status       -79.970182  
Product_Category_2  -215.239359  
F                   -309.477333  
M                    309.477333  
0-17                -439.382101  
18-25               -126.919625  
26-35                 67.617548  
36-45                104.096403  
46-50                 14.953497  
51-55                342.248438  
55+                   37.385839  
A                   -376.683205  
B                   -130.046924  
C                    506.730129  
0                    -46.230577  
1                      4.006429  
2                     32.627696  
3                     11.786731  
4+                    -2.190279  

As you can see, each category of our data set is now defined with one regression coefficient. The training process was looking for the best values of these coefficients during the learning phase. The values presented in the output above are the most optimum values for the coefficients of our machine learning model.

It is time to use the test data as inputs of the model to see how well our model performs.

predictions = lm.predict(X_test)  
print("Predicted purchases (in dollars) for new costumers:", predictions)  

Output:

Predicted purchases (in dollars) for new costumers: [10115.30806914  8422.51807746  9976.05377826 ...  9089.65372668  
  9435.81550922  8806.79394589]

Performance Estimation of ML model

In the end, it is always good to estimate our results by finding the mean absolute error (MAE) and mean squared error (MSE) of our predictions. You can find how to calculate these errors here: How to select the Right Evaluation Metric for Machine Learning Models.

To find these values, we can use methods from the metrics class from sklearn library.

from sklearn import metrics

print('MAE:', metrics.mean_absolute_error(y_test, predictions))  
print('MSE:', metrics.mean_squared_error(y_test, predictions))  

Output:

MAE: 3874.1898429849575  
MSE: 23810661.195583127  

Conclusion

Machine learning can be used for a variety of tasks. In this article, we used a machine learning algorithm to predict the amount that a customer is likely to spend on Black Friday. We also performed exploratory data analysis to find interesting trends from the dataset. For the sake of practice, I will suggest that you try to predict the Product that the customer is more likely to purchase, depending upon his gender, age, and occupation.


from Planet Python
via read more

Real Python: Defining Main Functions in Python

Many programming languages have a special function that is automatically executed when an operating system starts to run a program. This function is usually called main() and must have a specific return type and arguments according to the language standard. On the other hand, the Python interpreter executes scripts starting at the top of the file, and there is no specific function that Python automatically executes.

Nevertheless, having a defined starting point for the execution of a program is useful for understanding how a program works. Python programmers have come up with several conventions to define this starting point.

By the end of this article, you’ll understand:

  • What the special __name__ variable is and how Python defines it
  • Why you would want to use a main() in Python
  • What conventions there are for defining main() in Python
  • What the best-practices are for what code to put into your main()

Free Bonus: Click here to get access to a chapter from Python Tricks: The Book that shows you Python's best practices with simple examples you can apply instantly to write more beautiful + Pythonic code.

A Basic Python main()

In some Python scripts, you may see a function definition and a conditional statement that looks like the example below:

def main():
    print("Hello World!")

if __name__ == "__main__":
    main()

In this code, there is a function called main() that prints the phrase Hello World! when the Python interpreter executes it. There is also a conditional (or if) statement that checks the value of __name__ and compares it to the string "__main__". When the if statement evaluates to True, the Python interpreter executes main(). You can read more about conditional statements in Conditional Statements in Python.

This code pattern is quite common in Python files that you want to be executed as a script and imported in another module. To help understand how this code will execute, you should first understand how the Python interpreter sets __name__ depending on how the code is being executed.

Execution Modes in Python

There are two primary ways that you can instruct the Python interpreter to execute or use code:

  1. You can execute the Python file as a script using the command line.
  2. You can import the code from one Python file into another file or into the interactive interpreter.

You can read a lot more about these approaches in How to Run Your Python Scripts. No matter which way of running your code you’re using, Python defines a special variable called __name__ that contains a string whose value depends on how the code is being used.

We’ll use this example file, saved as execution_methods.py, to explore how the behavior of the code changes depending on the context:

print("This is my file to test Python's execution methods.")
print("The variable __name__ tells me which context this file is running in.")
print("The value of __name__ is:", repr(__name__))

In this file, there are three calls to print() defined. The first two print some introductory phrases. The third print() will first print the phrase The value of __name__ is, and then it will print the representation of the __name__ variable using Python’s built-in repr().

In Python, repr() displays the printable representation of an object. This example uses repr() to emphasize that the value of __name__ is a string. You can read more about repr() in the Python documentation.

You’ll see the words file, module, and script used throughout this article. Practically, there isn’t much difference between them. However, there are slight differences in meaning that emphasize the purpose of a piece of code:

  1. File: Typically, a Python file is any file that contains code. Most Python files have the extension .py.

  2. Script: A Python script is a file that you intend to execute from the command line to accomplish a task.

  3. Module: A Python module is a file that you intend to import from within another module or a script, or from the interactive interpreter. You can read more about modules in the Python documentation.

This distinction is also discussed in How to Run Your Python Scripts.

Executing From the Command Line

In this approach, you want to execute your Python script from the command line.

When you execute a script, you will not be able to interactively define the code that the Python interpreter is executing. The details of how you can execute Python from your command line are not that important for the purpose of this article, but you can expand the box below to read more about the differences between the command line on Windows, Linux, and macOS.

The way that you tell the computer to execute code from the command line is slightly different depending on your operating system.

On Linux and macOS, the command line typically looks like the example below:

eleanor@realpython:~/Documents$

The part before the dollar sign ($) may look different, depending on your username and your computer’s name. The commands that you type will go after the $. On Linux or macOS, the name of the Python 3 executable is python3, so you should run Python scripts by typing python3 script_name.py after the $.

On Windows, the command prompt typically looks like the example below:

C:\Users\Eleanor\Documents>

The part before the > may look different, depending on your username. The commands that you type will go after the >. On Windows, the name of the Python 3 executable is typically python, so you should run Python scripts by typing python script_name.py after the >.

Regardless of your operating system, the output from the Python scripts that you use in this article will be the same, so only the Linux and macOS style of input is shown in this article, and the input line will start at the $.

Now you should execute the execution_methods.py script from the command line, as shown below:

$ python3 execution_methods.py
This is my file to test Python's execution methods.
The variable __name__ tells me which context this file is running in.
The value of __name__ is: '__main__'

In this example, you can see that __name__ has the value '__main__', where the quote symbols (') tell you that the value has the string type.

Remember that, in Python, there is no difference between strings defined with single quotes (') and double quotes ("). You can read more about defining strings in Basic Data Types in Python.

You will find identical output if you include a shebang line in your script and execute it directly (./execution_methods.py), or use the %run magic in IPython or Jupyter Notebooks.

You may also see Python scripts executed from within packages by adding the -m argument to the command. Most often, you will see this recommended when you’re using pip: python3 -m pip install package_name.

Adding the -m argument runs the code in the __main__.py module of a package. You can find more information about the __main__.py file in How to Publish an Open-Source Python Package to PyPI.

In all three of these cases, __name__ has the same value: the string '__main__'.

Technical detail: The Python documentation defines specifically when __name__ will have the value '__main__':

A module’s __name__ is set equal to '__main__' when read from standard input, a script, or from an interactive prompt. (Source)

__name__ is stored in the global namespace of the module along with the __doc__, __package__, and other attributes. You can read more about these attributes in the Python Data Model documentation and, specifically for modules and packages, in the Python Import documentation.

Importing Into a Module or the Interactive Interpreter

Now let’s take a look at the second way that the Python interpreter will execute your code: imports. When you are developing a module or script, you will most likely want to take advantage of modules that someone else has already built, which you can do with the import keyword.

During the import process, Python executes the statements defined in the specified module (but only the first time you import a module). To demonstrate the results of importing your execution_methods.py file, start the interactive Python interpreter and then import your execution_methods.py file:

>>>
>>> import execution_methods
This is my file to test Python's execution methods.
The variable __name__ tells me which context this file is running in.
The value of __name__ is: 'execution_methods'

In this code output, you can see that the Python interpreter executes the three calls to print(). The first two lines of output are exactly the same as when you executed the file as a script on the command line because there are no variables in either of the first two lines. However, there is a difference in the output from the third print().

When the Python interpreter imports code, the value of __name__ is set to be the same as the name of the module that is being imported. You can see this in the third line of output above. __name__ has the value 'execution_methods', which is the name of the .py file that Python is importing from.

Note that if you import the module again without quitting Python, there will be no output.

Note: For more information on how importing works in Python, check out the official documentation as well as Absolute vs Relative Imports in Python.

Best Practices for Python Main Functions

Now that you can see the differences in how Python handles its different execution modes, it’s useful for you to know some best practices to use. These will apply whenever you want to write code that you can run as a script and import in another module or an interactive session.

You will learn about four best practices to make sure that your code can serve a dual purpose:

  1. Put most code into a function or class.
  2. Use __name__ to control execution of your code.
  3. Create a function called main() to contain the code you want to run.
  4. Call other functions from main().

Put Most Code Into a Function or Class

Remember that the Python interpreter executes all the code in a module when it imports the module. Sometimes the code you write will have side effects that you want the user to control, such as:

  • Running a computation that takes a long time
  • Writing to a file on the disk
  • Printing information that would clutter the user’s terminal

In these cases, you want the user to control triggering the execution of this code, rather than letting the Python interpreter execute the code when it imports your module.

Therefore, the best practice is to include most code inside a function or a class. This is because when the Python interpreter encounters the def or class keywords, it only stores those definitions for later use and doesn’t actually execute them until you tell it to.

Save the code below to a file called best_practices.py to demonstrate this idea:

 1 from time import sleep
 2 
 3 print("This is my file to demonstrate best practices.")
 4 
 5 def process_data(data):
 6     print("Beginning data processing...")
 7     modified_data = data + " that has been modified"
 8     sleep(3)
 9     print("Data processing finished.")
10     return modified_data

In this code, you first import sleep() from the time module.

sleep() pauses the interpreter for however many seconds you give as an argument and will produce a function that takes a long time to run for this example. Next, you use print() to print a sentence describing the purpose of this code.

Then, you define a function called process_data() that does five things:

  1. Prints some output to tell the user that the data processing is starting
  2. Modifies the input data
  3. Pauses the execution for three seconds using sleep()
  4. Prints some output to tell the user that the processing is finished
  5. Returns the modified data

Execute the Best Practices File on the Command Line

Now, what will happen when you execute this file as a script on the command line?

The Python interpreter will execute the from time import sleep and print() lines that are outside the function definition, then it will create the definition of the function called process_data(). Then, the script will exit without doing anything further, because the script does not have any code that executes process_data().

The code block below shows the result of running this file as a script:

$ python3 best_practices.py
This is my file to demonstrate best practices.

The output that we can see here is the result of the first print(). Notice that importing from time and defining process_data() produce no output. Specifically, the outputs of the calls to print() that are inside the definition of process_data() are not printed!

Import the Best Practices File in Another Module or the Interactive Interpreter

When you import this file in an interactive session (or another module), the Python interpreter will perform exactly the same steps as when it executes file as a script.

Once the Python interpreter imports the file, you can use any variables, classes, or functions defined in the module you’ve imported. To demonstrate this, we will use the interactive Python interpreter. Start the interactive interpreter and then type import best_practices:

>>>
>>> import best_practices
This is my file to demonstrate best practices.

The only output from importing the best_practices.py file is from the first print() call defined outside process_data(). Importing from time and defining process_data() produce no output, just like when you executed the code from the command line.

Use __name__ to Control the Execution of Your Code

What if you want process_data() to execute when you run the script from the command line but not when the Python interpreter imports the file?

You can use __name__ to determine the execution context and conditionally run process_data() only when __name__ is equal to "__main__". Add the code below to the bottom of your best_practices.py file:

11 if __name__ == "__main__":
12     data = "My data read from the Web"
13     print(data)
14     modified_data = process_data(data)
15     print(modified_data)

In this code, you’ve added a conditional statement that checks the value of __name__. This conditional will evaluate to True when __name__ is equal to the string "__main__". Remember that the special value of "__main__" for the __name__ variable means the Python interpreter is executing your script and not importing it.

Inside the conditional block, you have added four lines of code (lines 12, 13, 14, and 15):

  • Lines 12 and 13: You are creating a variable data that stores the data you’ve acquired from the Web and printing it.
  • Line 14: You are processing the data.
  • Line 15: You are printing the modified data.

Now, run your best_practices.py script from the command line to see how the output will change:

$ python3 best_practices.py
This is my file to demonstrate best practices.
My data read from the Web
Beginning data processing...
Data processing finished.
My data read from the Web that has been modified

First, the output shows the result of the print() call outside of process_data().

After that, the value of data is printed. This happened because the variable __name__ has the value "__main__" when the Python interpreter executes the file as a script, so the conditional statement evaluated to True.

Next, your script called process_data() and passed data in for modification. When process_data() executes, it prints some status messages to the output. Finally, the value of modified_data is printed.

Now you should check what happens when you import the best_practices.py file from the interactive interpreter (or another module). The example below demonstrates this situation:

>>>
>>> import best_practices
This is my file to demonstrate best practices.

Notice that you get the same behavior as before you added the conditional statement to the end of the file! This is because the __name__ variable had the value "best_practices", so Python did not execute the code inside the block, including process_data(), because the conditional statement evaluated to False.

Create a Function Called main() to Contain the Code You Want to Run

Now you are able to write Python code that can be run from the command line as a script and imported without unwanted side effects. Next, you are going to learn about how to write your code to make it easy for other Python programmers to follow what you mean.

Many languages, such as C, C++, Java, and several others, define a special function that must be called main() that the operating system automatically calls when it executes the compiled program. This function is often called the entry point because it is where execution enters the program.

By contrast, Python does not have a special function that serves as the entry point to a script. You can actually give the entry point function in a Python script any name you want!

Although Python does not assign any significance to a function named main(), the best practice is to name the entry point function main() anyways. That way, any other programmers who read your script immediately know that this function is the starting point of the code that accomplishes the primary task of the script.

In addition, main() should contain any code that you want to run when the Python interpreter executes the file. This is better than putting the code directly into the conditional block because a user can reuse main()if they import your module.

Change the best_practices.py file so that it looks like the code below:

 1 from time import sleep
 2 
 3 print("This is my file to demonstrate best practices.")
 4 
 5 def process_data(data):
 6     print("Beginning data processing...")
 7     modified_data = data + " that has been modified"
 8     sleep(3)
 9     print("Data processing finished.")
10     return modified_data
11 
12 def main():
13     data = "My data read from the Web"
14     print(data)
15     modified_data = process_data(data)
16     print(modified_data)
17 
18 if __name__ == "__main__":
19     main()

In this example, you added the definition of main() that includes the code that was previously inside the conditional block. Then, you changed the conditional block so that it executes main(). If you run this code as a script or import it, you will get the same output as in the previous section.

Call Other Functions From main()

Another common practice in Python is to have main() execute other functions, rather than including the task-accomplishing code in main(). This is especially useful when you can compose your overall task from several smaller sub-tasks that can execute independently.

For example, you may have a script that does the following:

  1. Reads a data file from a source that could be a database, a file on the disk, or a web API
  2. Processes the data
  3. Writes the processed data to another location

If you implement each of these sub-tasks in separate functions, then it is easy for a you (or another user) to re-use a few of the steps and ignore the ones you don’t want. Then you can create a default workflow in main(), and you can have the best of both worlds.

Whether to apply this practice to your code is a judgment call on your part. Splitting the work into several functions makes reuse easier but increases the difficulty for someone else trying to interpret your code because they have to follow several jumps in the flow of the program.

Modify your best_practices.py file so that it looks like the code below:

 1 from time import sleep
 2 
 3 print("This is my file to demonstrate best practices.")
 4 
 5 def process_data(data):
 6     print("Beginning data processing...")
 7     modified_data = data + " that has been modified"
 8     sleep(3)
 9     print("Data processing finished.")
10     return modified_data
11 
12 def read_data_from_web():
13     print("Reading data from the Web")
14     data = "Data from the web"
15     return data
16 
17 def write_data_to_database(data):
18     print("Writing data to a database")
19     print(data)
20 
21 def main():
22     data = read_data_from_web()
23     modified_data = process_data(data)
24     write_data_to_database(modified_data)
25 
26 if __name__ == "__main__":
27     main()

In this example code, the first 10 lines of the file have the same content that they had before. The second function definition on line 12 creates and returns some sample data, and the third function definition on line 17 simulates writing the modified data to a database.

On line 21, main() is defined. In this example, you have modified main() so that it calls the data reading, data processing, and data writing functions in turn.

First, the data is created from read_data_from_web(). This data is passed to process_data(), which returns the modified_data. Finally, modified_data is passed into write_data_to_database().

The last two lines of the script are the conditional block that checks __name__ and runs main() if the if statement is True.

Now, you can run the whole processing pipeline from the command line, as shown below:

$ python3 best_practices.py
This is my file to demonstrate best practices.
Reading data from the Web
Beginning data processing...
Data processing finished.
Writing processed data to a database
Data from the web that has been modified

In the output from this execution, you can see that the Python interpreter executed main(), which executed read_data_from_web(), process_data(), and write_data_to_database(). However, you can also import the best_practices.py file and re-use process_data() for a different input data source, as shown below:

>>>
>>> import best_practices as bp
This is my file to demonstrate best practices.
>>> data = "Data from a file"
>>> modified_data = bp.process_data(data)
Beginning data processing...
Data processing finished.
>>> bp.write_data_to_database(modified_data)
Writing processed data to a database
Data from a file that has been modified

In this example, you imported best_practices and shortened the name to bp for this code.

The import process caused the Python interpreter to execute all of the lines of code in the best_practices.py file, so the output shows the line explaining the purpose of the file.

Then, you stored data from a file in data instead of reading the data from the Web. Then, you reused process_data()and write_data_to_database() from the best_practices.py file. In this case, you took advantage of reusing your code instead of defining all of the logic in main().

Summary of Python Main Function Best Practices

Here are four key best practices about main() in Python that you just saw:

  1. Put code that takes a long time to run or has other effects on the computer in a function or class, so you can control exactly when that code is executed.

  2. Use the different values of __name__ to determine the context and change the behavior of your code with a conditional statement.

  3. You should name your entry point function main() in order to communicate the intention of the function, even though Python does not assign any special significance to a function named main().

  4. If you want to reuse functionality from your code, define the logic in functions outside main() and call those functions within main().

Conclusion

Congratulations! You now know how to create Python main() functions.

You learned the following:

  • Knowing the value of the __name__ variable is important to write code that serves the dual purpose of executable script and importable module.

  • __name__ takes on different values depending on how you executed your Python file. __name__ will be equal to:

    • "__main__" when the file is executed from the command line or with python -m (to execute a package’s __main__.py file)
    • The name of the module, if the module is being imported
  • Python programmers have developed a set of good practices to use when you want to develop reusable code.

Now you’re ready to go write some awesome Python main() function code!


[ Improve Your Python With 🐍 Python Tricks 💌 – Get a short & sweet Python Trick delivered to your inbox every couple of days. >> Click here to learn more and see examples ]


from Planet Python
via read more

Defining Main Functions in Python

Many programming languages have a special function that is automatically executed when an operating system starts to run a program. This function is usually called main() and must have a specific return type and arguments according to the language standard. On the other hand, the Python interpreter executes scripts starting at the top of the file, and there is no specific function that Python automatically executes.

Nevertheless, having a defined starting point for the execution of a program is useful for understanding how a program works. Python programmers have come up with several conventions to define this starting point.

By the end of this article, you’ll understand:

  • What the special __name__ variable is and how Python defines it
  • Why you would want to use a main() in Python
  • What conventions there are for defining main() in Python
  • What the best-practices are for what code to put into your main()

A Basic Python main()

In some Python scripts, you may see a function definition and a conditional statement that looks like the example below:

def main():
    print("Hello World!")

if __name__ == "__main__":
    main()

In this code, there is a function called main() that prints the phrase Hello World! when the Python interpreter executes it. There is also a conditional (or if) statement that checks the value of __name__ and compares it to the string "__main__". When the if statement evaluates to True, the Python interpreter executes main(). You can read more about conditional statements in Conditional Statements in Python.

This code pattern is quite common in Python files that you want to be executed as a script and imported in another module. To help understand how this code will execute, you should first understand how the Python interpreter sets __name__ depending on how the code is being executed.

Execution Modes in Python

There are two primary ways that you can instruct the Python interpreter to execute or use code:

  1. You can execute the Python file as a script using the command line.
  2. You can import the code from one Python file into another file or into the interactive interpreter.

You can read a lot more about these approaches in How to Run Your Python Scripts. No matter which way of running your code you’re using, Python defines a special variable called __name__ that contains a string whose value depends on how the code is being used.

We’ll use this example file, saved as execution_methods.py, to explore how the behavior of the code changes depending on the context:

print("This is my file to test Python's execution methods.")
print("The variable __name__ tells me which context this file is running in.")
print("The value of __name__ is:", repr(__name__))

In this file, there are three calls to print() defined. The first two print some introductory phrases. The third print() will first print the phrase The value of __name__ is, and then it will print the representation of the __name__ variable using Python’s built-in repr().

In Python, repr() displays the printable representation of an object. This example uses repr() to emphasize that the value of __name__ is a string. You can read more about repr() in the Python documentation.

You’ll see the words file, module, and script used throughout this article. Practically, there isn’t much difference between them. However, there are slight differences in meaning that emphasize the purpose of a piece of code:

  1. File: Typically, a Python file is any file that contains code. Most Python files have the extension .py.

  2. Script: A Python script is a file that you intend to execute from the command line to accomplish a task.

  3. Module: A Python module is a file that you intend to import from within another module or a script, or from the interactive interpreter. You can read more about modules in the Python documentation.

This distinction is also discussed in How to Run Your Python Scripts.

Executing From the Command Line

In this approach, you want to execute your Python script from the command line.

When you execute a script, you will not be able to interactively define the code that the Python interpreter is executing. The details of how you can execute Python from your command line are not that important for the purpose of this article, but you can expand the box below to read more about the differences between the command line on Windows, Linux, and macOS.

The way that you tell the computer to execute code from the command line is slightly different depending on your operating system.

On Linux and macOS, the command line typically looks like the example below:

eleanor@realpython:~/Documents$

The part before the dollar sign ($) may look different, depending on your username and your computer’s name. The commands that you type will go after the $. On Linux or macOS, the name of the Python 3 executable is python3, so you should run Python scripts by typing python3 script_name.py after the $.

On Windows, the command prompt typically looks like the example below:

C:\Users\Eleanor\Documents>

The part before the > may look different, depending on your username. The commands that you type will go after the >. On Windows, the name of the Python 3 executable is typically python, so you should run Python scripts by typing python script_name.py after the >.

Regardless of your operating system, the output from the Python scripts that you use in this article will be the same, so only the Linux and macOS style of input is shown in this article, and the input line will start at the $.

Now you should execute the execution_methods.py script from the command line, as shown below:

$ python3 execution_methods.py
This is my file to test Python's execution methods.
The variable __name__ tells me which context this file is running in.
The value of __name__ is: '__main__'

In this example, you can see that __name__ has the value '__main__', where the quote symbols (') tell you that the value has the string type.

Remember that, in Python, there is no difference between strings defined with single quotes (') and double quotes ("). You can read more about defining strings in Basic Data Types in Python.

You will find identical output if you include a shebang line in your script and execute it directly (./execution_methods.py), or use the %run magic in IPython or Jupyter Notebooks.

You may also see Python scripts executed from within packages by adding the -m argument to the command. Most often, you will see this recommended when you’re using pip: python3 -m pip install package_name.

Adding the -m argument runs the code in the __main__.py module of a package. You can find more information about the __main__.py file in How to Publish an Open-Source Python Package to PyPI.

In all three of these cases, __name__ has the same value: the string '__main__'.

Importing Into a Module or the Interactive Interpreter

Now let’s take a look at the second way that the Python interpreter will execute your code: imports. When you are developing a module or script, you will most likely want to take advantage of modules that someone else has already built, which you can do with the import keyword.

During the import process, Python executes the statements defined in the specified module (but only the first time you import a module). To demonstrate the results of importing your execution_methods.py file, start the interactive Python interpreter and then import your execution_methods.py file:

>>>
>>> import execution_methods
This is my file to test Python's execution methods.
The variable __name__ tells me which context this file is running in.
The value of __name__ is: 'execution_methods'

In this code output, you can see that the Python interpreter executes the three calls to print(). The first two lines of output are exactly the same as when you executed the file as a script on the command line because there are no variables in either of the first two lines. However, there is a difference in the output from the third print().

When the Python interpreter imports code, the value of __name__ is set to be the same as the name of the module that is being imported. You can see this in the third line of output above. __name__ has the value 'execution_methods', which is the name of the .py file that Python is importing from.

Note that if you import the module again without quitting Python, there will be no output.

Best Practices for Python Main Functions

Now that you can see the differences in how Python handles its different execution modes, it’s useful for you to know some best practices to use. These will apply whenever you want to write code that you can run as a script and import in another module or an interactive session.

You will learn about four best practices to make sure that your code can serve a dual purpose:

  1. Put most code into a function or class.
  2. Use __name__ to control execution of your code.
  3. Create a function called main() to contain the code you want to run.
  4. Call other functions from main().

Put Most Code Into a Function or Class

Remember that the Python interpreter executes all the code in a module when it imports the module. Sometimes the code you write will have side effects that you want the user to control, such as:

  • Running a computation that takes a long time
  • Writing to a file on the disk
  • Printing information that would clutter the user’s terminal

In these cases, you want the user to control triggering the execution of this code, rather than letting the Python interpreter execute the code when it imports your module.

Therefore, the best practice is to include most code inside a function or a class. This is because when the Python interpreter encounters the def or class keywords, it only stores those definitions for later use and doesn’t actually execute them until you tell it to.

Save the code below to a file called best_practices.py to demonstrate this idea:

 1 from time import sleep
 2 
 3 print("This is my file to demonstrate best practices.")
 4 
 5 def process_data(data):
 6     print("Beginning data processing...")
 7     modified_data = data + " that has been modified"
 8     sleep(3)
 9     print("Data processing finished.")
10     return modified_data

In this code, you first import sleep() from the time module.

sleep() pauses the interpreter for however many seconds you give as an argument and will produce a function that takes a long time to run for this example. Next, you use print() to print a sentence describing the purpose of this code.

Then, you define a function called process_data() that does five things:

  1. Prints some output to tell the user that the data processing is starting
  2. Modifies the input data
  3. Pauses the execution for three seconds using sleep()
  4. Prints some output to tell the user that the processing is finished
  5. Returns the modified data

Execute the Best Practices File on the Command Line

Now, what will happen when you execute this file as a script on the command line?

The Python interpreter will execute the from time import sleep and print() lines that are outside the function definition, then it will create the definition of the function called process_data(). Then, the script will exit without doing anything further, because the script does not have any code that executes process_data().

The code block below shows the result of running this file as a script:

$ python3 best_practices.py
This is my file to demonstrate best practices.

The output that we can see here is the result of the first print(). Notice that importing from time and defining process_data() produce no output. Specifically, the outputs of the calls to print() that are inside the definition of process_data() are not printed!

Import the Best Practices File in Another Module or the Interactive Interpreter

When you import this file in an interactive session (or another module), the Python interpreter will perform exactly the same steps as when it executes file as a script.

Once the Python interpreter imports the file, you can use any variables, classes, or functions defined in the module you’ve imported. To demonstrate this, we will use the interactive Python interpreter. Start the interactive interpreter and then type import best_practices:

>>>
>>> import best_practices
This is my file to demonstrate best practices.

The only output from importing the best_practices.py file is from the first print() call defined outside process_data(). Importing from time and defining process_data() produce no output, just like when you executed the code from the command line.

Use __name__ to Control the Execution of Your Code

What if you want process_data() to execute when you run the script from the command line but not when the Python interpreter imports the file?

You can use __name__ to determine the execution context and conditionally run process_data() only when __name__ is equal to "__main__". Add the code below to the bottom of your best_practices.py file:

11 if __name__ == "__main__":
12     data = "My data read from the Web"
13     print(data)
14     modified_data = process_data(data)
15     print(modified_data)

In this code, you’ve added a conditional statement that checks the value of __name__. This conditional will evaluate to True when __name__ is equal to the string "__main__". Remember that the special value of "__main__" for the __name__ variable means the Python interpreter is executing your script and not importing it.

Inside the conditional block, you have added four lines of code (lines 12, 13, 14, and 15):

  • Lines 12 and 13: You are creating a variable data that stores the data you’ve acquired from the Web and printing it.
  • Line 14: You are processing the data.
  • Line 15: You are printing the modified data.

Now, run your best_practices.py script from the command line to see how the output will change:

$ python3 best_practices.py
This is my file to demonstrate best practices.
My data read from the Web
Beginning data processing...
Data processing finished.
My data read from the Web that has been modified

First, the output shows the result of the print() call outside of process_data().

After that, the value of data is printed. This happened because the variable __name__ has the value "__main__" when the Python interpreter executes the file as a script, so the conditional statement evaluated to True.

Next, your script called process_data() and passed data in for modification. When process_data() executes, it prints some status messages to the output. Finally, the value of modified_data is printed.

Now you should check what happens when you import the best_practices.py file from the interactive interpreter (or another module). The example below demonstrates this situation:

>>>
>>> import best_practices
This is my file to demonstrate best practices.

Notice that you get the same behavior as before you added the conditional statement to the end of the file! This is because the __name__ variable had the value "best_practices", so Python did not execute the code inside the block, including process_data(), because the conditional statement evaluated to False.

Create a Function Called main() to Contain the Code You Want to Run

Now you are able to write Python code that can be run from the command line as a script and imported without unwanted side effects. Next, you are going to learn about how to write your code to make it easy for other Python programmers to follow what you mean.

Many languages, such as C, C++, Java, and several others, define a special function that must be called main() that the operating system automatically calls when it executes the compiled program. This function is often called the entry point because it is where execution enters the program.

By contrast, Python does not have a special function that serves as the entry point to a script. You can actually give the entry point function in a Python script any name you want!

Although Python does not assign any significance to a function named main(), the best practice is to name the entry point function main() anyways. That way, any other programmers who read your script immediately know that this function is the starting point of the code that accomplishes the primary task of the script.

In addition, main() should contain any code that you want to run when the Python interpreter executes the file. This is better than putting the code directly into the conditional block because a user can reuse main()if they import your module.

Change the best_practices.py file so that it looks like the code below:

 1 from time import sleep
 2 
 3 print("This is my file to demonstrate best practices.")
 4 
 5 def process_data(data):
 6     print("Beginning data processing...")
 7     modified_data = data + " that has been modified"
 8     sleep(3)
 9     print("Data processing finished.")
10     return modified_data
11 
12 def main():
13     data = "My data read from the Web"
14     print(data)
15     modified_data = process_data(data)
16     print(modified_data)
17 
18 if __name__ == "__main__":
19     main()

In this example, you added the definition of main() that includes the code that was previously inside the conditional block. Then, you changed the conditional block so that it executes main(). If you run this code as a script or import it, you will get the same output as in the previous section.

Call Other Functions From main()

Another common practice in Python is to have main() execute other functions, rather than including the task-accomplishing code in main(). This is especially useful when you can compose your overall task from several smaller sub-tasks that can execute independently.

For example, you may have a script that does the following:

  1. Reads a data file from a source that could be a database, a file on the disk, or a web API
  2. Processes the data
  3. Writes the processed data to another location

If you implement each of these sub-tasks in separate functions, then it is easy for a you (or another user) to re-use a few of the steps and ignore the ones you don’t want. Then you can create a default workflow in main(), and you can have the best of both worlds.

Whether to apply this practice to your code is a judgment call on your part. Splitting the work into several functions makes reuse easier but increases the difficulty for someone else trying to interpret your code because they have to follow several jumps in the flow of the program.

Modify your best_practices.py file so that it looks like the code below:

 1 from time import sleep
 2 
 3 print("This is my file to demonstrate best practices.")
 4 
 5 def process_data(data):
 6     print("Beginning data processing...")
 7     modified_data = data + " that has been modified"
 8     sleep(3)
 9     print("Data processing finished.")
10     return modified_data
11 
12 def read_data_from_web():
13     print("Reading data from the Web")
14     data = "Data from the web"
15     return data
16 
17 def write_data_to_database(data):
18     print("Writing data to a database")
19     print(data)
20 
21 def main():
22     data = read_data_from_web()
23     modified_data = process_data(data)
24     write_data_to_database(modified_data)
25 
26 if __name__ == "__main__":
27     main()

In this example code, the first 10 lines of the file have the same content that they had before. The second function definition on line 12 creates and returns some sample data, and the third function definition on line 17 simulates writing the modified data to a database.

On line 21, main() is defined. In this example, you have modified main() so that it calls the data reading, data processing, and data writing functions in turn.

First, the data is created from read_data_from_web(). This data is passed to process_data(), which returns the modified_data. Finally, modified_data is passed into write_data_to_database().

The last two lines of the script are the conditional block that checks __name__ and runs main() if the if statement is True.

Now, you can run the whole processing pipeline from the command line, as shown below:

$ python3 best_practices.py
This is my file to demonstrate best practices.
Reading data from the Web
Beginning data processing...
Data processing finished.
Writing processed data to a database
Data from the web that has been modified

In the output from this execution, you can see that the Python interpreter executed main(), which executed read_data_from_web(), process_data(), and write_data_to_database(). However, you can also import the best_practices.py file and re-use process_data() for a different input data source, as shown below:

>>>
>>> import best_practices as bp
This is my file to demonstrate best practices.
>>> data = "Data from a file"
>>> modified_data = bp.process_data(data)
Beginning data processing...
Data processing finished.
>>> bp.write_data_to_database(modified_data)
Writing processed data to a database
Data from a file that has been modified

In this example, you imported best_practices and shortened the name to bp for this code.

The import process caused the Python interpreter to execute all of the lines of code in the best_practices.py file, so the output shows the line explaining the purpose of the file.

Then, you stored data from a file in data instead of reading the data from the Web. Then, you reused process_data()and write_data_to_database() from the best_practices.py file. In this case, you took advantage of reusing your code instead of defining all of the logic in main().

Summary of Python Main Function Best Practices

Here are four key best practices about main() in Python that you just saw:

  1. Put code that takes a long time to run or has other effects on the computer in a function or class, so you can control exactly when that code is executed.

  2. Use the different values of __name__ to determine the context and change the behavior of your code with a conditional statement.

  3. You should name your entry point function main() in order to communicate the intention of the function, even though Python does not assign any special significance to a function named main().

  4. If you want to reuse functionality from your code, define the logic in functions outside main() and call those functions within main().

Conclusion

Congratulations! You now know how to create Python main() functions.

You learned the following:

  • Knowing the value of the __name__ variable is important to write code that serves the dual purpose of executable script and importable module.

  • __name__ takes on different values depending on how you executed your Python file. __name__ will be equal to:

    • "__main__" when the file is executed from the command line or with python -m (to execute a package’s __main__.py file)
    • The name of the module, if the module is being imported
  • Python programmers have developed a set of good practices to use when you want to develop reusable code.

Now you’re ready to go write some awesome Python main() function code!


[ Improve Your Python With 🐍 Python Tricks 💌 – Get a short & sweet Python Trick delivered to your inbox every couple of days. >> Click here to learn more and see examples ]


from Real Python
read more

Codementor: Beautiful Machine Learning Pipeline with Scikit-Learn

The post is to give a thought how to use scikit-learn API to create a beautiful machine learning pipeline

from Planet Python
via read more

Quansight Labs Blog: uarray: A Generic Override Framework for Methods

uarray: A Generic Override Framework for Methods

uarray is an override framework for methods in Python. In the scientific Python ecosystem, and in other similar places, there has been one recurring problem: That similar tools to do a job have existed, but don't conform to a single, well-defined API. uarray tries to solve this problem in general, but also for the scientific Python ecosystem in particular, by defining APIs independent of their implementations.

Array Libraries in the Scientific Python Ecosystem

When SciPy was created, and Numeric and Numarray unified into NumPy, it jump-started Python's data science community. The ecosystem grew quickly: Academics started moving to SciPy, and the Scikits that popped up made the transition all the more smooth.

However, the scientific Python community also shifted during that time: GPUs and distributed computing emerged. Also, there were old ideas that couldn't really be used with NumPy's API, such as sparse arrays. To solve these problems, various libraries emerged:

  • Dask, for distributed NumPy
  • CuPy, for NumPy on Nvidia-branded GPUs.
  • PyData/Sparse, a project started to make sparse arrays conform to the NumPy API
  • Xnd, which extends the type system and the universal function concept found in NumPy

Read more… (5 min remaining to read)


from Planet Python
via read more

Django Weblog: Django bugfix release: 2.2.1

Today we've issued the 2.2.1 bugfix release.

The release package and checksums are available from our downloads page, as well as from the Python Package Index. The PGP key ID used for this release is Mariusz Felisiak: 2EF56372BA48CD1B.


from Planet Python
via read more

TestDriven.io: Working with Static and Media Files in Django

This article looks at how to work with static and media files in a Django project, locally and in production. from Planet Python via read...