Before my recent career change I described myself as a full stack web developer (hey I built this blog). When I started building web sites professionally the work that a front-end developer did was considered a lesser form of software development, requiring a less academic set of skills than the developers who wrote code to talk to databases and serve APIs.
Now I'm not convinced that was true even back in the day, and it is not even remotely true now (I might go as far to suggest the reverse may be true). Just one of the skills you need for front end development is CSS, the code which defines how a web page looks. There is a lot to learn and to wield CSS well.
So why have I spend the last three months building a CSS parser and renderer in the terminal? Given that my mission is to make building apps in the terminal as easy as a command line interface, it seems counter-productive.
What makes CSS complex in the browser is the sheer number of rules and understanding how they interact with each other. The dialect of CSS I'm building for Textual is simpler because it reflects the leaner capabilities of terminals. Even a beginner could get up to speed in a few hours. If you need to use it at all -- widgets can be shipped with CSS so many applications may not even require the developer to write their own stylesheets.

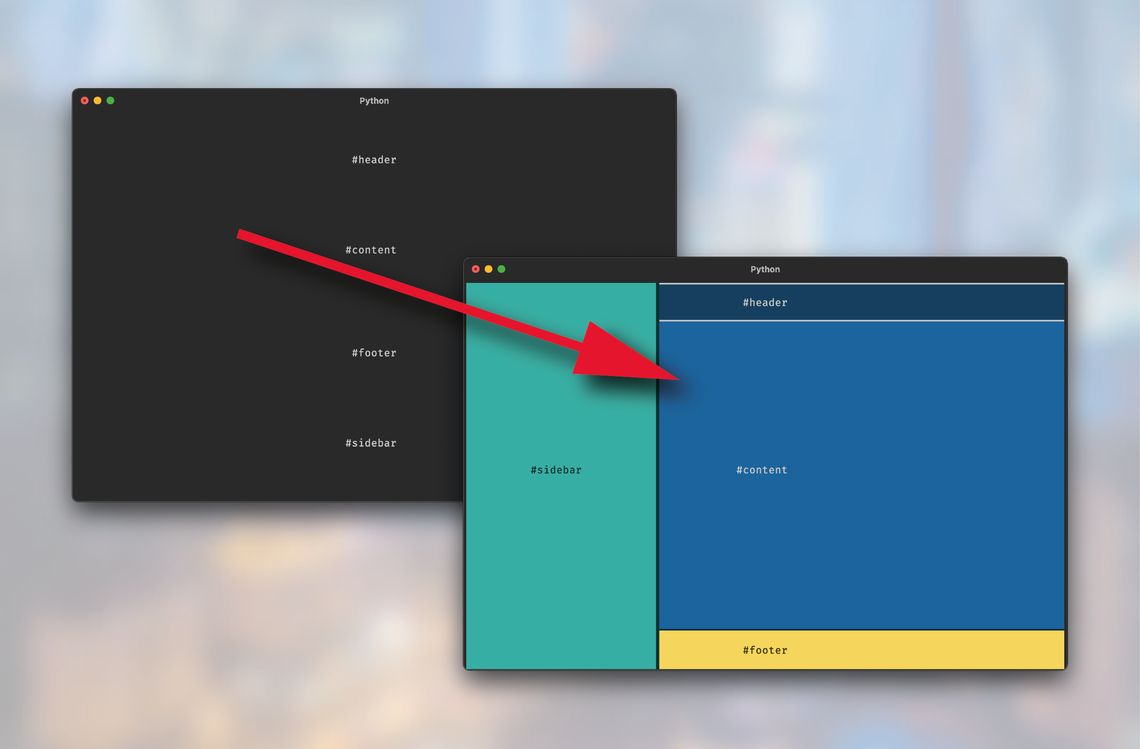
No Python code was used to design this UI (unless you include Textual itself).
The beauty of CSS in Textual is that it takes the settings that define the look and feel out of Python code which can remain lean and testable. It also allows for interfaces to be live edited, i.e. modified without restarting your application. Being able to iterate faster prevents you from getting bogged down in the mechanics of getting things on to the screen. And I'm sure that terminal applications are going to get a lot prettier if developers can easily tweak things.
Here's a simple Textual application styled with CSS which produces the UI above. There's no reference to anything visual in nature here; bind a key and add four widgets, and that's it.
from textual.app import App
from textual.widget import Widget


class BasicApp(App):
    """A basic app demonstrating CSS"""

    def on_load(self):
        """Bind keys here."""
        self.bind("tab", "toggle_class('#sidebar', '-active')")

    def on_mount(self):
        """Build layout here."""
        self.mount(
            header=Widget(),
            content=Widget(),
            footer=Widget(),
            sidebar=Widget(),
        )


BasicApp.run(css_file="basic.css", watch_css=True)
The following CSS defines the layout, colors, borders, and animation. Creating a UI with header, footer, and a content area, plus a side-bar that slides in from the left of the screen:
App > View {
  docks: side=left/1;
}

#sidebar {
  text: #09312e on #3caea3;
  dock: side;
  width: 30;
  offset-x: -100%;
  transition: offset 500ms in_out_cubic;
  border-right: outer #09312e;
}

#sidebar.-active {
  offset-x: 0;
}

#header {
  text: white on #173f5f;
  height: 3;
  border: hkey;
}

#content {
  text: white on #20639b;
  border-bottom: hkey #0f2b41;
}

#footer {
  text: #3a3009 on #f6d55c;
  height: 3;
}
Here's how that UI was built. Starting from an almost blank stylesheet:
Would you like to know more?
This work is currently being done in a branch. If you would like to be one of the first to play with this when it lands, please sign up for the mailing list or follow @willmcgugan.
from Planet Python
via read more
No comments:
Post a Comment