Identifying faces
I was asked by Bob to write a guest article for the PyBites blog, so whilst this isn’t my first blog article, it is my first ever guest blog article of which I’m immensely proud and very pleased to have written for Pybites.
In this article, I will detail how I used the face_recognition and Pillow modules to extract and then identify faces from a bunch of photographs. I want to credit Brad Traversy as this idea was originally taken from a Traversy Media video I had bookmarked a while ago and recently rewatched (link below this article). Using the same functionality I tweaked the scripts to allow input for a directory of photos and eventually, it will be incorporated into my second PDM Django application.
They are very rough and ready scripts for a proof of concept which I demonstrated to Bob during one of our weekly code check-in calls.
I created two scripts, one to extract faces from a bunch of photos and store them as jpeg files in a specified directory. The second script takes a bunch of known faces (I guess these are the control set) and compares them to photographs to identify the faces in random photos. On the whole, it’s very accurate and fast at identifying the know faces.
Extract the faces
The first script was fairly simple to implement. We have a directory of images in which we want to extract all images of faces, we’ll call this directory unknown. The script essentially scans through each photo, identifies the face and stores this face image as a new jpeg in another directory we’ll call ‘extract’. This file is created with the title of the original image, and the face location within the image.
import face_recognition
from PIL import Image
import os

unknown_faces = os.listdir("../frec/unknown/")

for image in unknown_faces:
    image_of_people = face_recognition.load_image_file(f"../frec/unknown/{image}")
    unknown_face_locations = face_recognition.face_locations(image_of_people)

    for face_location in unknown_face_locations:
        top, right, bottom, left = face_location

        face_image = image_of_people[top:bottom, left:right]
        pil_image = Image.fromarray(face_image)
        pil_image.save(f"../frec/extract/{image}_{top}.jpg")
So from an image like this:

You would get two separate images in the extract directory like these:


Having tested this on my own photos, the module is so good it identified a face in a poster within one of my photographs which you will be able to see if you download the code from the repository.
Facial Recognition Time
The second script written does all the clever stuff insofar as it will take the directory of images with unknown faces, compare them to the known faces images and then ‘draw’ on the original image a square around the face with the name of the individual identified, if indeed it identifies a face, otherwise it will draw a square around the face with ‘Unknown Person’ in place of the name.
import face_recognition
import os
from PIL import Image, ImageDraw

unknown_faces = os.listdir("../frec/unknown/")
Bob_image = face_recognition.load_image_file("../frec/known/Bob.jpeg")
Bob_encoding = face_recognition.face_encodings(Bob_image)[0]
Julian_image = face_recognition.load_image_file("../frec/known/Julian.jpeg")
Julian_encoding = face_recognition.face_encodings(Julian_image)[0]

known_face_encodings = [
    Bob_encoding,
    Julian_encoding,
]

known_face_names = [
    "Bob",
    "Julian",
]

for ukface in unknown_faces:
    ukimage = face_recognition.load_image_file(f"../frec/unknown/{ukface}")
    ukface_locations = face_recognition.face_locations(ukimage)
    ukface_encodings = face_recognition.face_encodings(ukimage, ukface_locations)

    # Convert to PIL format
    pil_image = Image.fromarray(ukimage)

    # Set up drawing on image
    draw = ImageDraw.Draw(pil_image)
    for (top, right, bottom, left), ukface_encoding in zip(
        ukface_locations, ukface_encodings
    ):
        matches = face_recognition.compare_faces(known_face_encodings, ukface_encoding)

        name = "Unknown Person"

        if True in matches:
            first_match_index = matches.index(True)
            name = known_face_names[first_match_index]

        # Draw Box
        draw.rectangle(
            ((left - 10, top - 10), (right + 10, bottom + 10)), outline=(227, 236, 75)
        )

        # Draw Label
        text_width, text_height = draw.textsize(name)
        draw.rectangle(
            ((left - 10, bottom - text_height + 2), (right + 10, bottom + 10)),
            fill=(227, 236, 75),
            outline=(227, 236, 75),
        )
        draw.text((left, bottom - text_height + 5), name, fill=(0, 0, 0, 0))

    del draw
    pil_image.save(f"../frec/identified/{ukface}_scanned.jpg")
    #pil_image.show()
I’ve played around with the functionality of the ‘draw.rectangle’ function to try and capture as much of the face as possible inside of the square as originally the face was obscured by the square.
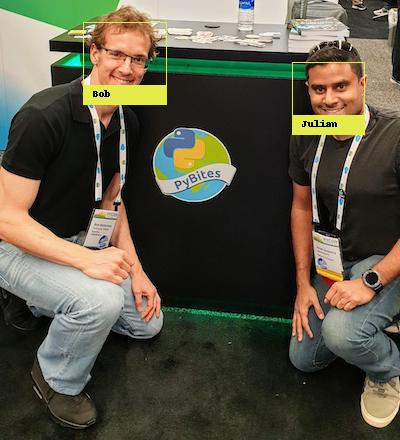
So again from the given image with unknown faces:

Using two different images of Bob and Julian to match against:


You would end up with:

The accuracy, as I said previously, is amazing and you can tweak the values of the face_recognition package to widen or narrow the match. It is also very fast at scanning a directory of images and displaying the results on the screen or saving them to another directory, which would be very easy with a small tweak to the script.
I believe you are also able to take advantage of GPU processing but I was unable to test this in my current environment.
I have expanded the scripts in the repo to contain more examples of known / unkown faces so feel free to download and have a play.
For those of you that are interested in the source material which I modified, please take a look at Brad’s video on YouTube, without that I wouldn’t have found out about the face_recognition module. Hopefully you can adapt this code to suit your own purpose as I did.
I also had to tweak my scripts to increase the chance of a match otherwise Todd Dewey from Ice Road Truckers was being identified as me (I’m not sure who should be more flattered by that!). That’s what the model and num_jitters options are for in the scripts found in the repo.
The docs for the face_recognition module can be found here Face Recognition Docs
The docs for Pillow can be found here Pillow Docs
My repository for these scripts can be found here GitHub
And Brad Traversy’s repo to accompany his video are here GitHub
from Planet Python
via read more
No comments:
Post a Comment