 In just 3 easy steps, we’ll package the spotipy Python library for Conda Forge!
Hey data hackers! We’re all raving fans of Conda Forge — the community-led repository of recipes, build infrastructure and distributions for the conda package manager, right? It’s a rich source of the most useful, updated libraries for Python (and many other languages, including R, Ruby, Lua, Scala, Java, JavaScript, C/ C++, FORTRAN … the list goes on). You may well have found, though, that the library you’re looking for isn’t available in the repo, which is precisely what I found recently when building a machine learning model to predict song popularity, based on its musical attributes. What does one do in such a situation? Package the library yourself, of course! While this may seem a daunting task, we’ll work through 3 simple steps to building a Python package for Conda Forge, and submitting it to the repository.
Why build a package for Conda Forge?
The excellent spotipy library, written and maintained by the similarly awesome data scientist and developer Paul Lamere (Director of the Developer Platform at Spotify), is (well … was) not available in Conda Forge. This library is a Python wrapper for the Spotify API. Recently, I wrote a machine learning model to predict a song’s popularity based on its musical attributes. The data underlying the model were to be pulled from the Spotify API, using the spotipy library. Unfortunately, at the time I went to build the model, the only Python package repo offering spotipy was PyPI (the repo that ‘pip’ installs from). You, like me, may have learned the hard way that it is unadvised to mix packages from both pip and conda in a conda environment. In order to get through my little machine learning project, I downloaded the spotipy source code from PyPI and both built and installed it locally. Wanting to write about the project, though, I realized that this approach is suboptimal for most who want to hackalong with the article, hence the decision to package spotipy myself.
“Enough background, already — let’s build!”
Rightho! Enough background … let’s get started! The good people at Conda Forge provide detailed instructions on how to contribute packages to the repo. We’ll distill, from these detailed instructions, 3 simple steps to follow to build and contribute your Python package to Conda Forge.
- Fork the Conda Forge examples recipes repository at GitHub
- Tailor the example recipe for your package
- Submit a pull request to Conda Forge
Let’s get into it!
1. Fork the Conda Forge examples repository at GitHub
Before we head over to GitHub, be sure that the source code for your package is available for download in a single file. This should be an archive (e.g. tarball, zip, etc …) of some kind. In this case, as we’re packaging spotipy from PyPI, we can confirm that the source code is, indeed, available in a gzipped tarball there. You should confirm, similarly, for the package you plan to build and contribute.
We’ll be working in GitHub for this project. If you’ve never used GitHub before, or need a brief refresher, here’s the great Hello World! documentation they offer.
Okay! Pop over to GitHub and open the ‘staged-recipes’ repository in GitHub Desktop. This will clone the repo to your local machine.
 Clone the repo locally by opening it in GitHub Desktop
In GitHub Desktop, within your newly forked repo, create a new branch from the staged-recipes master branch. Name the new branch as is sensible for your package. In this case, I named the branch ‘spotipy’. To create a new branch, simply click the ‘master’ branch button and type the name of the new branch into the ‘Filter’ text field.
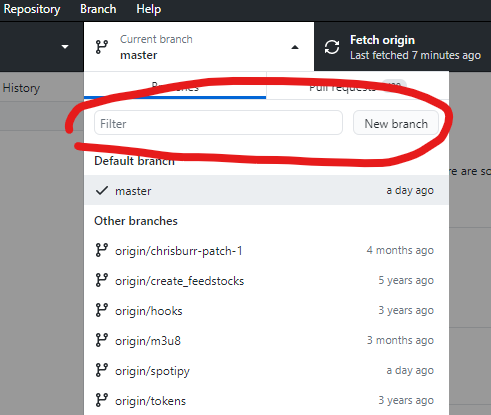 Create a new branch by typing the name of the branch and hitting the ‘New branch’ button
Now we’ll create a new folder in the ‘recipes’ folder, and copy the example recipe into the new folder. To do this, open the files in the repository in your operating system’s file browser.
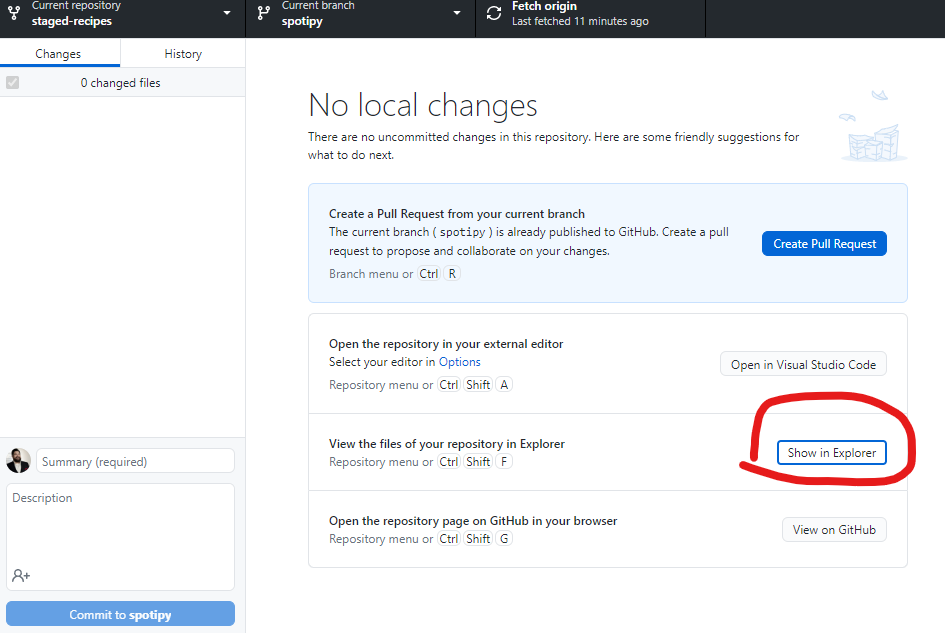 Open the files of the repo within your operating system’s file browser
The newly opened window will look something like this, depending on your operating system (this is Windows 10)
 These are the files of the cloned repository
Navigate to the ‘recipes’ folder (highlighted above) and create a copy of the ‘example’ folder (CTRL + drag the folder in Windows 10), then rename it to reflect your package name. NB this is an important step — don’t just create a folder, copy and rename it so that the example ‘meta.yaml’ file is copied also.
 Copy and rename the ‘example’ folder to your package name
Within your newly created folder, open the meta.yaml file in your favorite text editor, and …
2. Tailor the example recipe for your package
Conda Forge recipes are written in the YAML (YAML Ain’t Markup Language) data serialization language. If you’ve not written YAML before, or need a brief refresher, here’s a great reference. The copy of the example recipe meta.yaml file looks like this
Again, the good people at Conda Forge provide very detailed instructions on how to edit this file — both in the file itself, and in their documentation. Another vital bit of documentation is provided by conda here. Let’s save you the hassle of reading through all of this at the start, though I found myself referencing these docs frequently throughout the process and strongly suggest you come back and do the same.
Pro tip: use the Python ‘grayskull’ package to automatically create a near-perfect meta.yaml file!
I spent ages the first time I did this manually editing the meta.yaml file for my package and iteratively submitting it via a pull request. It turns out that all of that brain damage can be avoided by using the Python packaging tools provided by conda to generate this file. The documentation provided by the Conda team is helpful, though the approach outlined here (i.e. using conda skeleton) did not work for me because, I learned after much banging of my head against the keyboard, conda skeleton needs a major refactoring.
Enter grayskull, which will eventually replace conda skeleton. Grayskull is a tool to generate concise recipes for Conda Forge — precisely the task at hand! We won’t go through the process of creating a new conda environment here. Simply install grayskull from conda forge in a new conda environment as follows:
conda install -c conda-forge grayskullWith grayskull installed, use it to build a meta.yaml (recipe) for your package, by calling it, passing it the repository in which the package presently lives, and the name of the package. In our case:
grayskull pypi spotipyUpon a successful build, you’ll see something like this …
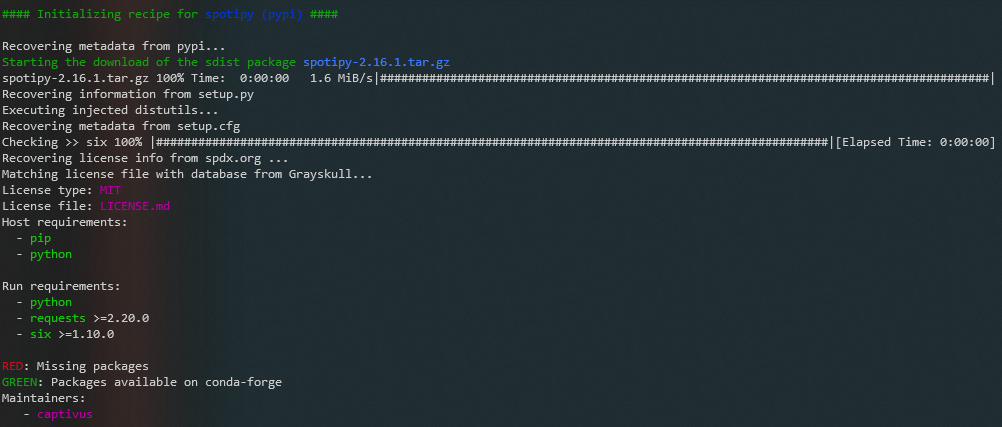 grayskull has successfully built a recipe for the spotipy package
… and there will be a newly created folder with the name of your package. Inside this folder, you’ll find a near-perfect recipe to inform your tailoring of the meta.yaml file you’ve copied in your local clone of the repo above.
At this point, you could either copy and paste the file into your clone of the repo, overwriting the example file above, or edit the example file down using this information as inputs. I suggest the latter, as the recipe that grayskull creates isn’t quite perfect and will likely be rejected during the pull request process without some edits. Importantly, in this case, Conda Forge requires minimum version limits for Python because we’re building to the ‘noarch’ (i.e. operating system non-specific) target. The edits are simple enough, though. In the ‘requirements’ section of the YAML file, add minimum versions to the python lines for both host and run.
… annnnnnnd we’re donezo! The final, pull request-ready recipe meta.yaml file for the spotipy package is as follows.
Note the subtle differences between this file and the one generated by grayskull. Again, I recommend editing the file using the output of grayskull rather than copying and pasting to avoid potential issues during the pull request process.
3. Submit a pull request to Conda Forge
Rightho! We’re almost finished. All that remains is to submit a pull request to the maintainers of Conda Forge. Before we do, we’ll need to commit the changes we’ve made in our local clone of the GitHub.
 Commit the changes to the local repository
Now we’ll push the commit back to GitHub.
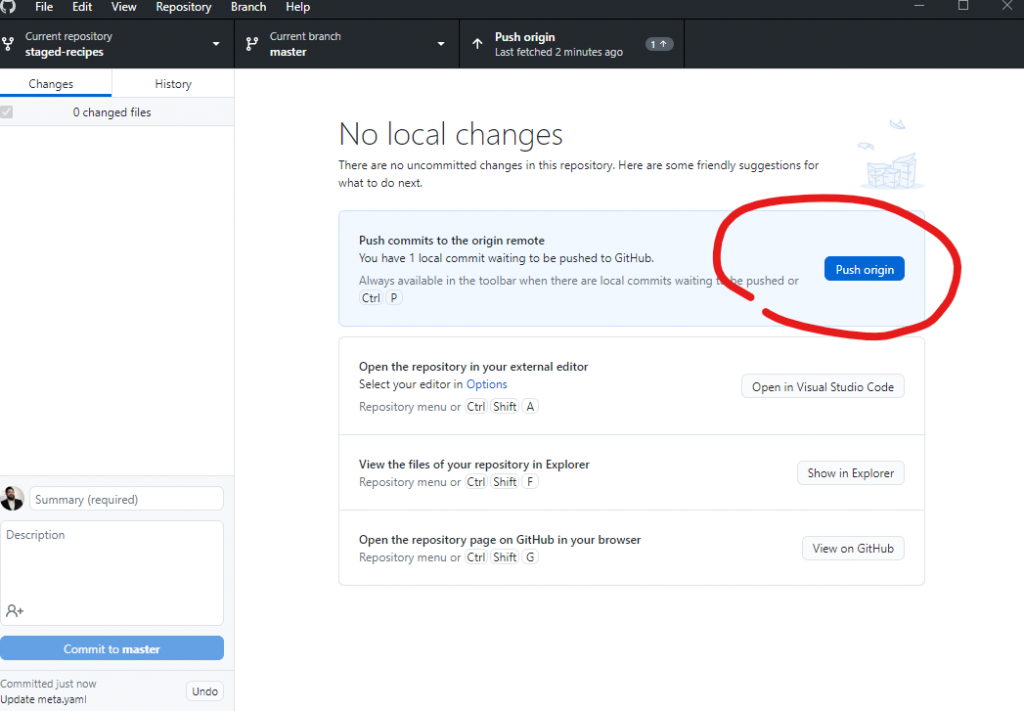 Push the local commit back to GitHub
Excellent! Now it’s time to submit our pull request.
They have a really dope continuous integration (CI) pipeline that automates most of the pull request process! A reviewer from the Conda Forge team will, ultimately, review and approve the request, but there is a heap of great feedback from their automated CI that really speeds the process up.
Important note: do not fully submit a pull request for the spotipy package if you’ve been hacking-along with this article, as it will be rejected as a duplicate (of the package I’ve already contributed).
When we select “Pull request” from the GitHub desktop app, we’re returned to the GitHub website to complete the process. Click the ‘Pull request’ link at the top right of the repo.
 Initiate a pull request to the Conda Forge repo
The next screen shows you compared changes between the original repo we cloned, and the edits we’ve made.
 We can see the changes that were made via commits to the repo
Click the green “Create pull request” button. In the next screen, provide an informative title for the pull request and work carefully through each item of the checklist to confirm that all of the requirements are met.
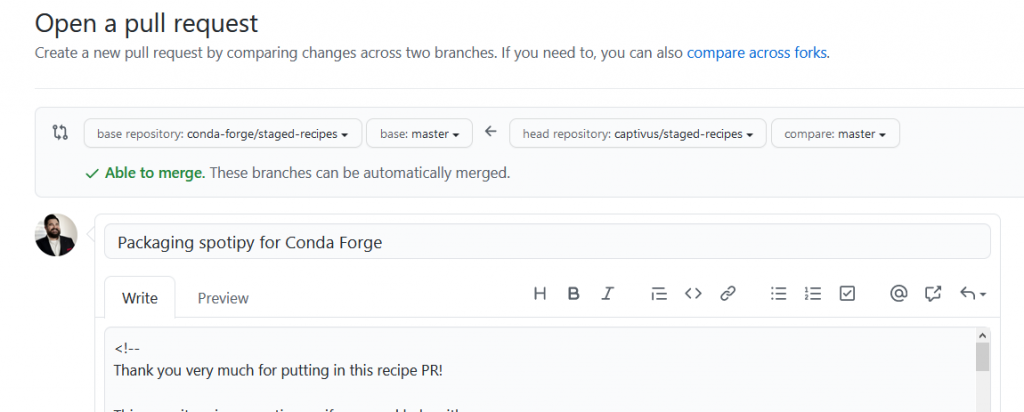 Provide an informative title for the pull request
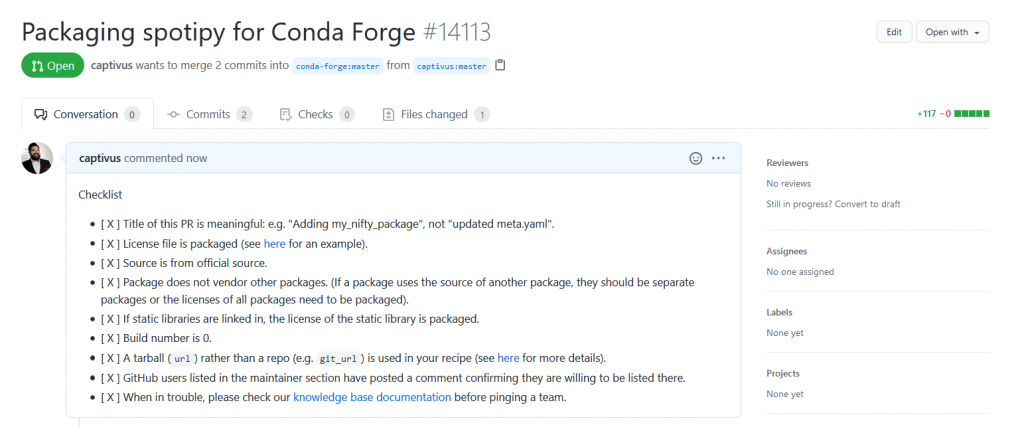 Be sure to work through each of the checklist requirements and confirm they are satisfied
Once the pull request is submitted, the aforementioned slick CI process is kicked off and works through 5 automated steps. These include linting, checking the package builds, then checking that the package builds for each of 3 target operating systems (Linux, OSX and Windows). When these checks successfully complete, you’ll be notified. (This process can take as much as half an hour or so … be patient!)
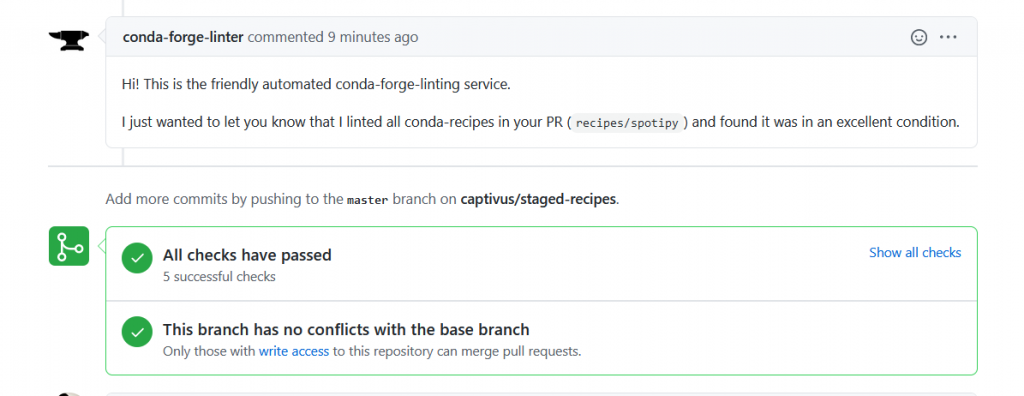 Brilliant! We’ve passed all 5 of the checks that the CI process ran automatically.
Now … we play the waiting game until we hear back from the maintainers with any additional feedback …
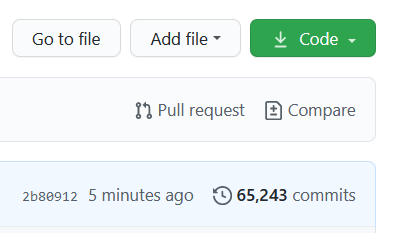
In a little while (a few hours, in this case) the maintainers will respond with either feedback or, if all went well, confirmation that the pull request was merged. Congratulations — you are now a package maintainer for Conda Forge! You’ll receive an email invitation to the Conda Forge organization on GitHub, which must be accepted within 7 days. After accepting, the automated CI process will build the package so that it is available at Conda Forge. Here’s the spotipy package.
 Love it! Here’s the spotipy package now incorporated in the Conda Forge repo!
We can also run a quick search from the shell to confirm that the package is available to install via conda
conda search -c conda-forge spotipy spotipy is ready to install via conda!
… and that’s it! I hope you’ve found this both interesting and accelerating as you make your way into the wonderful world of Python packaging for Conda Forge!
What the huh!? Problems I encountered along the way …
This article comes together in a way that suggests graceful ease of development. As usual, that was certainly not the case. Here are a few things I learned by banging my head against the keyboard during the process of packaging spotipy for Conda Forge.
grayskullwould have saved me heaps of time that was otherwise spent digging through source code trying to figure out how to edit themeta.yamlfile for the package recipe. In addition to digging through the source code, I spent entirely too much time trying to parse the PKG-INFO file it contains into a recipe for Conda Forge. It worked, and I managed to get it packaged, but OMGgrayskullFTW! This article would have been a much longer, more tedious piece without this learning.- The documentation provided by the Conda team on packaging for Conda is outdated and doesn’t work. My first foray into packaging was a frustrating failure as a result, leaving hours spent without the outcome I expected (though I learned a lot). I even ended up posting to the anaconda.org mailing list looking for help, which never came. Perhaps one day, if I muster the motivation, I’ll edit the docs and submit a pull request to update the broken bits.
- As always, reading the documentation is particularly helpful. Despite the hackalong provided in this article, I strongly recommend reading the docs I’ve linked to in order to better understand the packaging process.
Screencast forthcoming!
Stay tuned for a video walkthrough of this article!
from Planet Python
via read more


No comments:
Post a Comment