The Django framework comes with a powerful administrative tool called admin. You can use it out of the box to quickly add, delete, or edit any database model from a web interface. But with a little extra code, you can customize the Django admin to take your admin capabilities to the next level.
In this tutorial, you’ll learn how to:
- Add attribute columns in the model object list
- Link between model objects
- Add filters to the model object list
- Make model object lists searchable
- Modify the object edit forms
- Override Django admin templates
Free Bonus: Click here to get access to a free Django Learning Resources Guide (PDF) that shows you tips and tricks as well as common pitfalls to avoid when building Python + Django web applications.
Prerequisites
To get the most out of this tutorial, you’ll need some familiarity with Django, particularly model objects. As Django isn’t part of the standard Python library, it’s best if you also have some knowledge of pip and pyenv (or an equivalent virtual environment tool). To learn more about these topics, check out the following resources:
- Get Started With Django Part 1: Build a Portfolio App
- What is Pip? A Guide for New Pythonistas
- Managing Multiple Python Versions With pyenv
- What Virtual Environments Are Good For
You may also be interested in one of the many available Django tutorials.
The code snippets in this tutorial were tested against Django 3.0.7. All the concepts predate Django 2.0, so they should work in whatever version you’re using, but minor differences may exist.
Setting Up the Django Admin
The Django admin provides a web-based interface for creating and managing database model objects. To see it in action, you’ll first need a Django project and some object models. Install Django inside a clean virtual environment:
$ python -m pip install django
$ django-admin startproject School
$ cd School
$ ./manage.py startapp core
$ ./manage.py migrate
$ ./manage.py createsuperuser
Username: admin
Email address: admin@example.com
Password:
Password (again):
You first create a new Django project named School with an app called core. Then you migrate the authentication tables and create an administrator. Access to the Django admin screens is restricted to users with staff or superuser flags, so you use the createsuperuser management command to create a superuser.
You also need to modify School/settings.py to include the new app named core:
# School/settings.py
# ...

INSTALLED_APPS = [
    "django.contrib.admin",
    "django.contrib.auth",
    "django.contrib.contenttypes",
    "django.contrib.sessions",
    "django.contrib.messages",
    "django.contrib.staticfiles",
    "core",    # Add this line
]
The core app directory will start with the following files inside:
core/
│
├── migrations/
│   └── __init__.py
│
├── __init__.py
├── admin.py
├── apps.py
├── models.py
├── tests.py
└── views.py
You’re interested in two of these files:
models.pydefines your database models.admin.pyregisters your models with the Django admin.
To demonstrate the outcome when you customize the Django admin, you’ll need some models. Edit core/models.py:
from django.core.validators import MinValueValidator, MaxValueValidator
from django.db import models

class Person(models.Model):
    last_name = models.TextField()
    first_name = models.TextField()
    courses = models.ManyToManyField("Course", blank=True)

    class Meta:
        verbose_name_plural = "People"

class Course(models.Model):
    name = models.TextField()
    year = models.IntegerField()

    class Meta:
        unique_together = ("name", "year", )

class Grade(models.Model):
    person = models.ForeignKey(Person, on_delete=models.CASCADE)
    grade = models.PositiveSmallIntegerField(
        validators=[MinValueValidator(0), MaxValueValidator(100)])
    course = models.ForeignKey(Course, on_delete=models.CASCADE)
These models represent students taking courses at a school. A Course has a name and a year in which it was offered. A Person has a first and last name and can take zero or more courses. A Grade contains a percentage score that a Person received on a Course.
Here’s a model diagram showing the relationships between the objects:
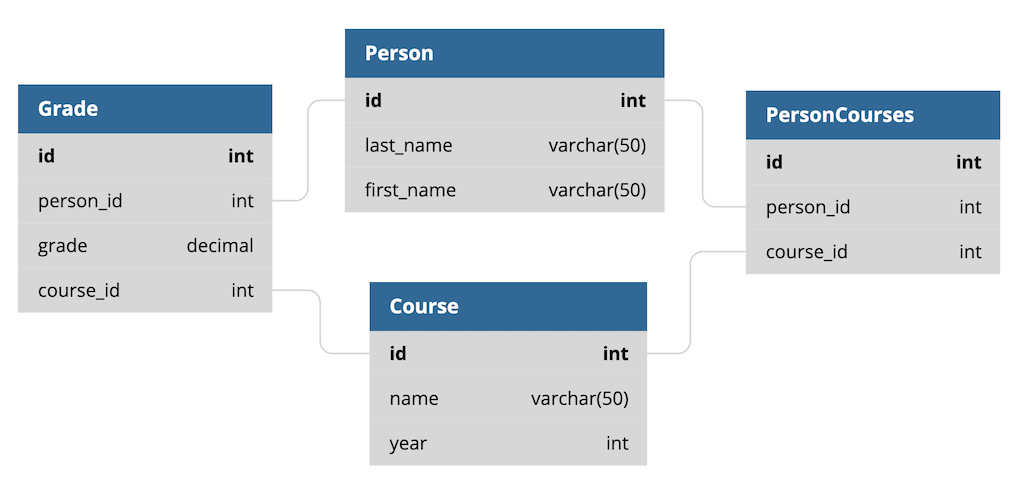
The underlying table names in the database are slightly different from this, but they’re related to the models shown above.
Read the full article at https://realpython.com/customize-django-admin-python/ »
[ Improve Your Python With 🐍 Python Tricks 💌 – Get a short & sweet Python Trick delivered to your inbox every couple of days. >> Click here to learn more and see examples ]
from Planet Python
via read more


No comments:
Post a Comment