The Raspberry Pi is one of the leading physical computing boards on the market. From hobbyists building DIY projects to students learning to program for the first time, people use the Raspberry Pi every day to interact with the world around them. Python comes built in on the Raspberry Pi, so you can take your skills and start building your own Raspberry Pi projects today.
In this tutorial, you’ll learn to:
- Set up a new Raspberry Pi
- Run Python on the Raspberry Pi using the Mu editor or remotely over SSH
- Read input from physical sensors connected to the Raspberry Pi
- Send output to external components using Python
- Create unique projects with Python on the Raspberry Pi
Let’s get started!
Free Download: Get a sample chapter from Python Tricks: The Book that shows you Python's best practices with simple examples you can apply instantly to write more beautiful + Pythonic code.
Getting to Know the Raspberry Pi
The Raspberry Pi is a single-board computer developed by the Raspberry Pi Foundation, a UK-based charity organization. Originally designed to provide young people with an affordable computing option to learn how to program, it has developed a massive following in the maker and DIY communities because of its compact size, full Linux environment, and general-purpose input–output (GPIO) pins.
With all the features and capabilities that are packed into this small board, there’s no shortage of projects and use cases for the Raspberry Pi.
Some example projects include the following:
- Line-following robot
- Home weather station
- Retro gaming machine
- Real-time object detection camera
- Minecraft server
- Button-controlled music box
- Media center
- Remote experiments on the International Space Station
If you can think of a project that would benefit from having a credit card–sized computer attached to it, then someone has probably used a Raspberry Pi to do it. The Raspberry Pi is a fantastic way to bring your Python project ideas to life.
Raspberry Pi Board Overview
The Raspberry Pi comes in a variety of form factors for different use cases. In this tutorial, you’ll be looking at the most recent version, the Raspberry Pi 4.
Below is the board layout of the Raspberry Pi 4. While this layout is slightly different from previous models of the Raspberry Pi, most of the connections are the same. The setup described in the next section should be the same for both a Raspberry Pi 3 and a Raspberry Pi 4:
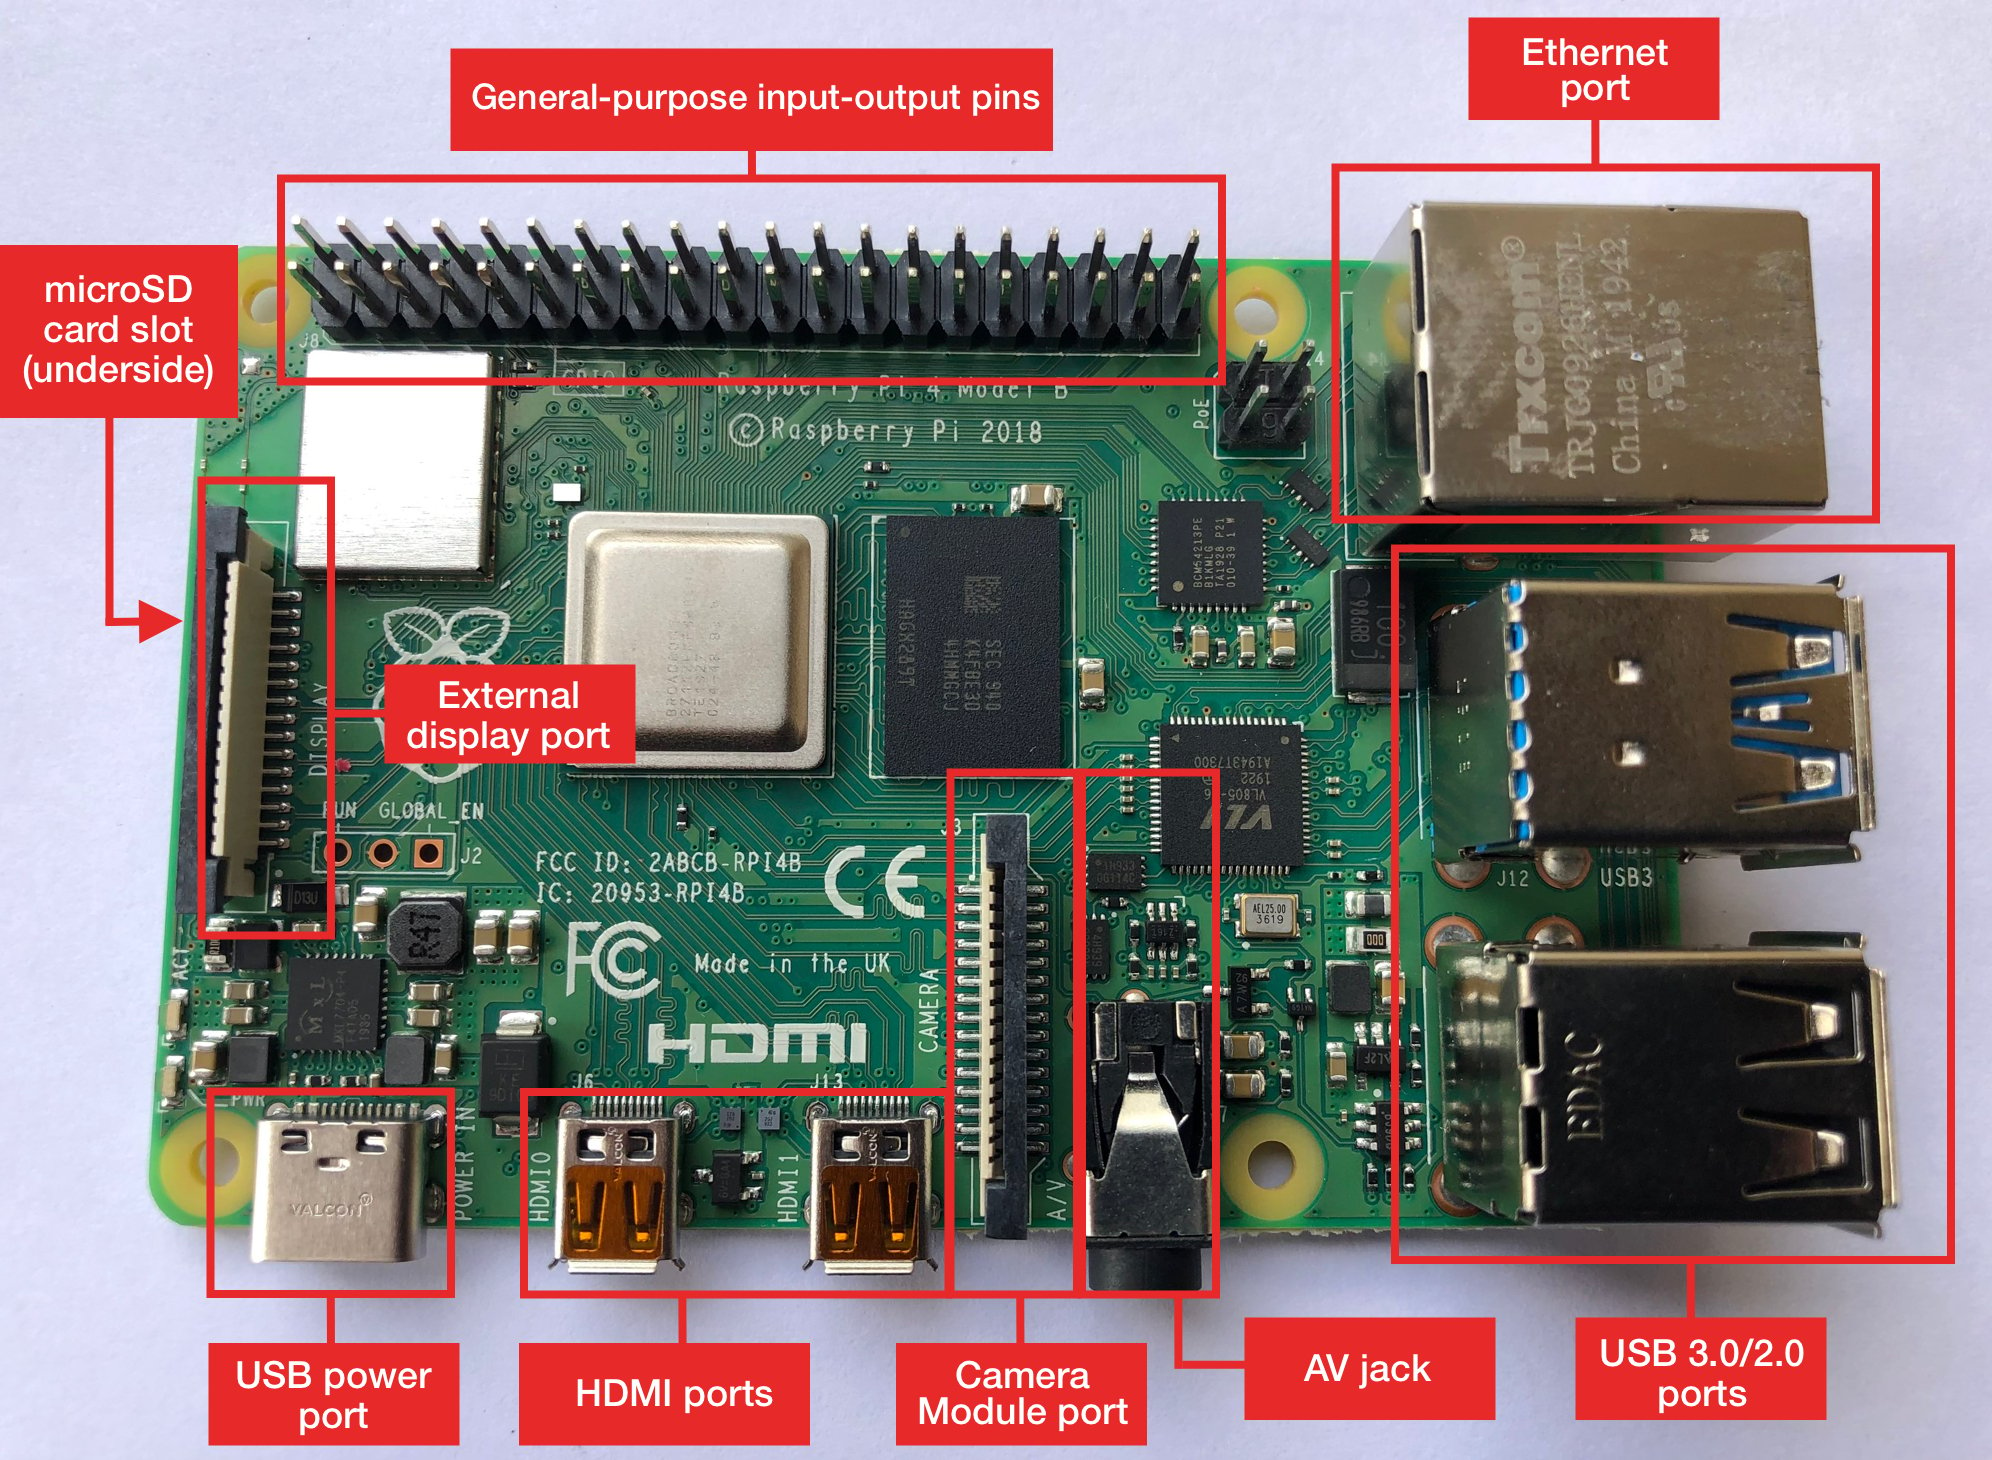
The Raspberry Pi 4 board contains the following components:
-
General-purpose input–output pins: These pins are used to connect the Raspberry Pi to electronic components.
-
Ethernet port: This port connects the Raspberry Pi to a wired network. The Raspberry Pi also has WiFi and Bluetooth built in for wireless connections.
-
Two USB 3.0 and two USB 2.0 ports: These USB ports are used to connect peripherals like a keyboard or mouse. The two black ports are USB 2.0 and the two blue ports are USB 3.0.
-
AV jack: This AV jack allows you to connect speakers or headphones to the Raspberry Pi.
-
Camera Module port: This port is used to connect the official Raspberry Pi Camera Module, which enables the Raspberry Pi to capture images.
-
HDMI ports: These HDMI ports connect the Raspberry Pi to external monitors. The Raspberry Pi 4 features two micro HDMI ports, allowing it to drive two separate monitors at the same time.
-
USB power port: This USB port powers the Raspberry Pi. The Raspberry Pi 4 has a USB Type-C port, while older versions of the Pi have a micro-USB port.
-
External display port: This port is used to connect the official seven-inch Raspberry Pi touch display for touch-based input on the Raspberry Pi.
-
microSD card slot (underside of the board): This card slot is for the microSD card that contains the Raspberry Pi operating system and files.
A little later in this tutorial, you’ll use the components above to set up your Raspberry Pi.
Raspberry Pi vs Arduino
People often wonder what the difference is between a Raspberry Pi and an Arduino. The Arduino is another device that is widely used in physical computing. While there is some overlap in the capabilities of the Arduino and the Raspberry Pi, there are some distinct differences.
The Arduino platform provides a hardware and software interface for programming microcontrollers. A microcontroller is an integrated circuit that allows you to read input from and send output to electronic components. Arduino boards generally have limited memory, so they’re often used to repeatedly run a single program that interacts with electronics.
The Raspberry Pi is a general-purpose, Linux-based computer. It has a full operating system with a GUI interface that is capable of running many different programs at the same time.
The Raspberry Pi comes with a variety of software preinstalled, including a web browser, an office suite, a terminal, and even Minecraft. The Raspberry Pi also has built-in WiFi and Bluetooth to connect to the Internet and external peripherals.
For running Python, the Raspberry Pi is often the better choice, as you get a full-fledged Python installation out of the box without any configuration.
Setting Up the Raspberry Pi
Read the full article at https://realpython.com/python-raspberry-pi/ »
[ Improve Your Python With 🐍 Python Tricks 💌 – Get a short & sweet Python Trick delivered to your inbox every couple of days. >> Click here to learn more and see examples ]
from Real Python
read more


No comments:
Post a Comment