In Part 2 of this series, you added the ability to save changes made through the REST API to a database using SQLAlchemy and learned how to serialize that data for the REST API using Marshmallow. Connecting the REST API to a database so that the application can make changes to existing data and create new data is great and makes the application much more useful and robust.
That’s only part of the power a database offers, however. An even more powerful feature is the R part of RDBMS systems: relationships. In a database, a relationship is the ability to connect two or more tables together in a meaningful way. In this article, you’ll learn how to implement relationships and turn your Person database into a mini-blogging web application.
In this article, you’ll learn:
- Why more than one table in a database is useful and important
- How tables are related to each other
- How SQLAlchemy can help you manage relationships
- How relationships help you build a mini-blogging application
Who This Article Is For
Part 1 of this series guided you through building a REST API, and Part 2 showed you how to connect that REST API to a database.
This article expands your programming tool belt further. You’ll learn how to create hierarchical data structures represented as one-to-many relationships by SQLAlchemy. In addition, you’ll extend the REST API you’ve already built to provide CRUD (Create, Read, Update, and Delete) support for the elements in this hierarchical structure.
The web application presented in Part 2 will have its HTML and JavaScript files modified in major ways to create a more fully functional mini-blogging application. You can review the final version of the code from Part 2 in the GitHub repository for that article.
Hang on as you get started creating relationships and your mini-blogging application!
Additional Dependencies
There are no new Python dependencies beyond what was required for the Part 2 article. However, you will be using two new JavaScript modules in the web application to makes things easier and more consistent. The two modules are the following:
- Handlebars.js is a templating engine for JavaScript, much like Jinja2 for Flask.
- Moment.js is a datetime parsing and formatting module that makes displaying UTC timestamps easier.
You don’t have to download either of these, as the web application will get them directly from the Cloudflare CDN (Content Delivery Network), as you’re already doing for the jQuery module.
People Data Extended for Blogging
In Part 2, the People data existed as a dictionary in the build_database.py Python code. This is what you used to populate the database with some initial data. You’re going to modify the People data structure to give each person a list of notes associated with them. The new People data structure will look like this:
# Data to initialize database with
PEOPLE = [
    {
        "fname": "Doug",
        "lname": "Farrell",
        "notes": [
            ("Cool, a mini-blogging application!", "2019-01-06 22:17:54"),
            ("This could be useful", "2019-01-08 22:17:54"),
            ("Well, sort of useful", "2019-03-06 22:17:54"),
        ],
    },
    {
        "fname": "Kent",
        "lname": "Brockman",
        "notes": [
            (
                "I'm going to make really profound observations",
                "2019-01-07 22:17:54",
            ),
            (
                "Maybe they'll be more obvious than I thought",
                "2019-02-06 22:17:54",
            ),
        ],
    },
    {
        "fname": "Bunny",
        "lname": "Easter",
        "notes": [
            ("Has anyone seen my Easter eggs?", "2019-01-07 22:47:54"),
            ("I'm really late delivering these!", "2019-04-06 22:17:54"),
        ],
    },
]
Each person in the People dictionary now includes a key called notes, which is associated with a list containing tuples of data. Each tuple in the notes list represents a single note containing the content and a timestamp. The timestamps are initialized (rather than dynamically created) to demonstrate ordering later on in the REST API.
Each single person is associated with multiple notes, and each single note is associated with only one person. This hierarchy of data is known as a one-to-many relationship, where a single parent object is related to many child objects. You’ll see how this one-to-many relationship is managed in the database with SQLAlchemy.
Brute Force Approach
The database you built stored the data in a table, and a table is a two-dimensional array of rows and columns. Can the People dictionary above be represented in a single table of rows and columns? It can be, in the following way, in your person database table. Unfortunately to include all of the actual data in the example creates a scroll bar for the table, as you’ll see below:
person_id |
lname |
fname |
timestamp |
content |
note_timestamp |
|---|---|---|---|---|---|
| 1 | Farrell | Doug | 2018-08-08 21:16:01 | Cool, a mini-blogging application! | 2019-01-06 22:17:54 |
| 2 | Farrell | Doug | 2018-08-08 21:16:01 | This could be useful | 2019-01-08 22:17:54 |
| 3 | Farrell | Doug | 2018-08-08 21:16:01 | Well, sort of useful | 2019-03-06 22:17:54 |
| 4 | Brockman | Kent | 2018-08-08 21:16:01 | I’m going to make really profound observations | 2019-01-07 22:17:54 |
| 5 | Brockman | Kent | 2018-08-08 21:16:01 | Maybe they’ll be more obvious than I thought | 2019-02-06 22:17:54 |
| 6 | Easter | Bunny | 2018-08-08 21:16:01 | Has anyone seen my Easter eggs? | 2019-01-07 22:47:54 |
| 7 | Easter | Bunny | 2018-08-08 21:16:01 | I’m really late delivering these! | 2019-04-06 22:17:54 |
The above table would actually work. All the data is represented, and a single person is associated with a collection of different notes.
Advantages
Conceptually, the above table structure has the advantage of being relatively simple to understand. You could even make the case that the data could be persisted to a flat file instead of a database.
Because of the two-dimensional table structure, you could store and use this data in a spreadsheet. Spreadsheets have been pressed into service as data storage quite a bit.
Disadvantages
While the above table structure would work, it has some real disadvantages.
In order to represent the collection of notes, all the data for each person is repeated for every unique note, the person data is therefore redundant. This isn’t such a big deal for your person data as there aren’t that many columns. But imagine if a person had many more columns. Even with large disk drives, this can get to be a storage concern if you’re dealing with millions of rows of data.
Having redundant data like this can lead to maintenance issues as time goes by. For example, what if the Easter Bunny decided a change of name was a good idea. In order to do this, every record containing the Easter Bunny’s name would have to be updated in order to keep the data consistent. This kind of work against the database can lead to data inconsistency, particularly if the work is done by a person running a SQL query by hand.
Naming columns becomes awkward. In the table above, there is a timestamp column used to track the creation and update time of a person in the table. You also want to have similar functionality for the creation and update time for a note, but because timestamp is already used, a contrived name of note_timestamp is used.
What if you wanted to add additional one-to-many relationships to the person table? For example, to include a person’s children or phone numbers. Each person could have multiple children and multiple phone numbers. This could be done relatively easily to the Python People dictionary above by adding children and phone_numbers keys with new lists containing the data.
However, representing those new one-to-many relationships in your person database table above becomes significantly more difficult. Every new one-to-many relationship increases the number of rows necessary to represent it for every single entry in the child data dramatically. In addition, the problems associated with data redundancy get bigger and more difficult to handle.
Lastly, the data you’d get back from the above table structure wouldn’t be very Pythonic: it would be just a big list of lists. SQLAlchemy wouldn’t be able to help you very much because the relationship isn’t there.
Relational Database Approach
Based on what you’ve seen above, it becomes clear that trying to represent even a moderately complex dataset in a single table becomes unmanageable pretty quickly. Given that, what alternative does a database offer? This is where the R part of RDBMS databases comes into play. Representing relationships removes the disadvantages outlined above.
Instead of trying to represent hierarchical data in a single table, the data is broken up into multiple tables, with a mechanism to relate them to one another. The tables are broken along collection lines, so for your People dictionary above, this means there will be a table representing people and another representing notes. This brings back your original person table, which looks like this:
person_id |
lname |
fname |
timestamp |
|---|---|---|---|
| 1 | Farrell | Doug | 2018-08-08 21:16:01.888444 |
| 2 | Brockman | Kent | 2018-08-08 21:16:01.889060 |
| 3 | Easter | Bunny | 2018-08-08 21:16:01.886834 |
To represent the new note information, you’ll create a new table called note. (Remember our singular table naming convention.) The table looks like this:
note_id |
person_id |
content |
timestamp |
|---|---|---|---|
| 1 | 1 | Cool, a mini-blogging application! | 2019-01-06 22:17:54 |
| 2 | 1 | This could be useful | 2019-01-08 22:17:54 |
| 3 | 1 | Well, sort of useful | 2019-03-06 22:17:54 |
| 4 | 2 | I’m going to make really profound observations | 2019-01-07 22:17:54 |
| 5 | 2 | Maybe they’ll be more obvious than I thought | 2019-02-06 22:17:54 |
| 6 | 3 | Has anyone seen my Easter eggs? | 2019-01-07 22:47:54 |
| 7 | 3 | I’m really late delivering these! | 2019-04-06 22:17:54 |
Notice that, like the person table, the note table has a unique identifier called note_id, which is the primary key for the note table. One thing that isn’t obvious is the inclusion of the person_id value in the table. What is that used for? This is what creates the relationship to the person table. Whereas note_id is the primary key for the table, person_id is what’s known as a foreign key.
The foreign key gives each entry in the note table the primary key of the person record it’s associated with. Using this, SQLAlchemy can gather all the notes associated with each person by connecting the person.person_id primary key to the note.person_id foreign key, creating a relationship.
Advantages
By breaking the data set into two tables, and introducing the concept of a foreign key, you’ve made the data a little more complex to think about, you have resolved the disadvantages of a single table representation. SQLAlchemy will help you encode the increased complexity fairly easily.
The data is no longer redundant in the database. There is only one person entry for each person you want to store in the database. This solves the storage concern immediately and dramatically simplifies the maintenance concerns.
If the Easter Bunny still wanted to change names, then you’d only have to change a single row in the person table, and anything else related to that row (like the note table) would immediately take advantage of the change.
Column naming is more consistent and meaningful. Because person and note data exist in separate tables, the creation and update timestamp can be named consistently in both tables, as there is no conflict for names across tables.
In addition, you’d no longer have to create permutations of each row for new one-to-many relationships you might want to represent. Take our children and phone_numbers example from earlier. Implementing this would require child and phone_number tables. Each table would contain a foreign key of person_id relating it back to the person table.
Using SQLAlchemy, the data you’d get back from the above tables would be more immediately useful, as what you’d get is an object for each person row. That object has named attributes equivalent to the columns in the table. One of those attributes is a Python list containing the related note objects.
Disadvantages
Where the brute force approach was simpler to understand, the concept of foreign keys and relationships make thinking about the data somewhat more abstract. This abstraction needs to be thought about for every relationship you establish between tables.
Making use of relationships means committing to using a database system. This is another tool to install, learn, and maintain above and beyond the application that actually uses the data.
SQLAlchemy Models
To use the two tables above, and the relationship between them, you’ll need to create SQLAlchemy models that are aware of both tables and the relationship between them. Here’s the SQLAlchemy Person model from Part 2, updated to include a relationship to a collection of notes:
 1 class Person(db.Model):
 2     __tablename__ = 'person'
 3     person_id = db.Column(db.Integer, primary_key=True)
 4     lname = db.Column(db.String(32))
 5     fname = db.Column(db.String(32))
 6     timestamp = db.Column(
 7         db.DateTime, default=datetime.utcnow, onupdate=datetime.utcnow
 8     )
 9     notes = db.relationship(
10         'Note',
11         backref='person',
12         cascade='all, delete, delete-orphan',
13         single_parent=True,
14         order_by='desc(Note.timestamp)'
15     )
Lines 1 to 8 of the above Python class look exactly like what you created before in Part 2. Lines 9 to 16 create a new attribute in the Person class called notes. This new notes attributes is defined in the following lines of code:
-
Line 9: Like the other attributes of the class, this line creates a new attribute called
notesand sets it equal to an instance of an object calleddb.relationship. This object creates the relationship you’re adding to thePersonclass and is created with all of the parameters defined in the lines that follow. -
Line 10: The string parameter
'Note'defines the SQLAlchemy class that thePersonclass will be related to. TheNoteclass isn’t defined yet, which is why it’s a string here. This is a forward reference and helps handle problems that the order of definitions could cause when something is needed that isn’t defined until later in the code. The'Note'string allows thePersonclass to find theNoteclass at runtime, which is after bothPersonandNotehave been defined. -
Line 11: The
backref='person'parameter is trickier. It creates what’s known as a backwards reference inNoteobjects. Each instance of aNoteobject will contain an attribute calledperson. Thepersonattribute references the parent object that a particularNoteinstance is associated with. Having a reference to the parent object (personin this case) in the child can be very useful if your code iterates over notes and has to include information about the parent. This happens surprisingly often in display rendering code. -
Line 12: The
cascade='all, delete, delete-orphan'parameter determines how to treat note object instances when changes are made to the parentPersoninstance. For example, when aPersonobject is deleted, SQLAlchemy will create the SQL necessary to delete thePersonfrom the database. Additionally, this parameter tells it to also delete all theNoteinstances associated with it. You can read more about these options in the SQLAlchemy documentation. -
Line 13: The
single_parent=Trueparameter is required ifdelete-orphanis part of the previouscascadeparameter. This tells SQLAlchemy not to allow orphanedNoteinstances (aNotewithout a parentPersonobject) to exist because eachNotehas a single parent. -
Line 14: The
order_by='desc(Note.timestamp)'parameter tells SQLAlchemy how to sort theNoteinstances associated with aPerson. When aPersonobject is retrieved, by default thenotesattribute list will containNoteobjects in an unknown order. The SQLAlchemydesc(...)function will sort the notes in descending order from newest to oldest. If this line was insteadorder_by='Note.timestamp', SQLAlchemy would default to using theasc(...)function, and sort the notes in ascending order, oldest to newest.
Now that your Person model has the new notes attribute, and this represents the one-to-many relationship to Note objects, you’ll need to define a SQLAlchemy model for a Note:
 1 class Note(db.Model):
 2     __tablename__ = 'note'
 3     note_id = db.Column(db.Integer, primary_key=True)
 4     person_id = db.Column(db.Integer, db.ForeignKey('person.person_id'))
 5     content = db.Column(db.String, nullable=False)
 6     timestamp = db.Column(
 7         db.DateTime, default=datetime.utcnow, onupdate=datetime.utcnow
 8     )
The Note class defines the attributes making up a note as seen in our sample note database table from above. The attributes are defined here:
-
Line 1 creates the
Noteclass, inheriting fromdb.Model, exactly as you did before when creating thePersonclass. -
Line 2 tells the class what database table to use to store
Noteobjects. -
Line 3 creates the
note_idattribute, defining it as an integer value, and as the primary key for theNoteobject. -
Line 4 creates the
person_idattribute, and defines it as the foreign key, relating theNoteclass to thePersonclass using theperson.person_idprimary key. This, and thePerson.notesattribute, are how SQLAlchemy knows what to do when interacting withPersonandNoteobjects. -
Line 5 creates the
contentattribute, which contains the actual text of the note. Thenullable=Falseparameter indicates that it’s okay to create new notes that have no content. -
Line 6 creates the
timestampattribute, and exactly like thePersonclass, this contains the creation or update time for any particularNoteinstance.
Initialize the Database
Now that you’ve updated the Person and created the Note models, you’ll use them to rebuild the testing database people.db. You’ll do this by updating the build_database.py code from Part 2. Here’s what the code will look like:
 1 import os
 2 from datetime import datetime
 3 from config import db
 4 from models import Person, Note
 5
 6 # Data to initialize database with
 7 PEOPLE = [
 8     {
 9         "fname": "Doug",
10         "lname": "Farrell",
11         "notes": [
12             ("Cool, a mini-blogging application!", "2019-01-06 22:17:54"),
13             ("This could be useful", "2019-01-08 22:17:54"),
14             ("Well, sort of useful", "2019-03-06 22:17:54"),
15         ],
16     },
17     {
18         "fname": "Kent",
19         "lname": "Brockman",
20         "notes": [
21             (
22                 "I'm going to make really profound observations",
23                 "2019-01-07 22:17:54",
24             ),
25             (
26                 "Maybe they'll be more obvious than I thought",
27                 "2019-02-06 22:17:54",
28             ),
29         ],
30     },
31     {
32         "fname": "Bunny",
33         "lname": "Easter",
34         "notes": [
35             ("Has anyone seen my Easter eggs?", "2019-01-07 22:47:54"),
36             ("I'm really late delivering these!", "2019-04-06 22:17:54"),
37         ],
38     },
39 ]
40
41 # Delete database file if it exists currently
42 if os.path.exists("people.db"):
43     os.remove("people.db")
44
45 # Create the database
46 db.create_all()
47
48 # Iterate over the PEOPLE structure and populate the database
49 for person in PEOPLE:
50     p = Person(lname=person.get("lname"), fname=person.get("fname"))
51
52     # Add the notes for the person
53     for note in person.get("notes"):
54         content, timestamp = note
55         p.notes.append(
56             Note(
57                 content=content,
58                 timestamp=datetime.strptime(timestamp, "%Y-%m-%d %H:%M:%S"),
59             )
60         )
61     db.session.add(p)
62
63 db.session.commit()
The code above came from Part 2, with a few changes to create the one-to-many relationship between Person and Note. Here are the updated or new lines added to the code:
-
Line 4 has been updated to import the
Noteclass defined previously. -
Lines 7 to 39 contain the updated
PEOPLEdictionary containing our person data, along with the list of notes associated with each person. This data will be inserted into the database. -
Lines 49 to 61 iterate over the
PEOPLEdictionary, getting eachpersonin turn and using it to create aPersonobject. -
Line 53 iterates over the
person.noteslist, getting eachnotein turn. -
Line 54 unpacks the
contentandtimestampfrom eachnotetuple. -
Line 55 to 60 creates a
Noteobject and appends it to the person notes collection usingp.notes.append(). -
Line 61 adds the
Personobjectpto the database session. -
Line 63 commits all of the activity in the session to the database. It’s at this point that all of the data is written to the
personandnotetables in thepeople.dbdatabase file.
You can see that working with the notes collection in the Person object instance p is just like working with any other list in Python. SQLAlchemy takes care of the underlying one-to-many relationship information when the db.session.commit() call is made.
For example, just like a Person instance has its primary key field person_id initialized by SQLAlchemy when it’s committed to the database, instances of Note will have their primary key fields initialized. In addition, the Note foreign key person_id will also be initialized with the primary key value of the Person instance it’s associated with.
Here’s an example instance of a Person object before the db.session.commit() in a kind of pseudocode:
Person (
    person_id = None
    lname = 'Farrell'
    fname = 'Doug'
    timestamp = None
    notes = [
        Note (
            note_id = None
            person_id = None
            content = 'Cool, a mini-blogging application!'
            timestamp = '2019-01-06 22:17:54'
        ),
        Note (
            note_id = None
            person_id = None
            content = 'This could be useful'
            timestamp = '2019-01-08 22:17:54'
        ),
        Note (
            note_id = None
            person_id = None
            content = 'Well, sort of useful'
            timestamp = '2019-03-06 22:17:54'
        )
    ]
)
Here’s the example Person object after the db.session.commit():
Person (
    person_id = 1
    lname = 'Farrell'
    fname = 'Doug'
    timestamp = '2019-02-02 21:27:10.336'
    notes = [
        Note (
            note_id = 1
            person_id = 1
            content = 'Cool, a mini-blogging application!'
            timestamp = '2019-01-06 22:17:54'
        ),
        Note (
            note_id = 2
            person_id = 1
            content = 'This could be useful'
            timestamp = '2019-01-08 22:17:54'
        ),
        Note (
            note_id = 3
            person_id = 1
            content = 'Well, sort of useful'
            timestamp = '2019-03-06 22:17:54'
        )
    ]
)
The important difference between the two is that the primary key of the Person and Note objects has been initialized. The database engine took care of this as the objects were created because of the auto-incrementing feature of primary keys discussed in Part 2.
Additionally, the person_id foreign key in all the Note instances has been initialized to reference its parent. This happens because of the order in which the Person and Note objects are created in the database.
SQLAlchemy is aware of the relationship between Person and Note objects. When a Person object is committed to the person database table, SQLAlchemy gets the person_id primary key value. That value is used to initialize the foreign key value of person_id in a Note object before it’s committed to the database.
SQLAlchemy takes care of this database housekeeping work because of the information you passed when the Person.notes attribute was initialized with the db.relationship(...) object.
In addition, the Person.timestamp attribute has been initialized with the current timestamp.
Running the build_database.py program from the command line (in the virtual environment will re-create the database with the new additions, getting it ready for use with the web application. This command line will rebuild the database:
$ python build_database.py
The build_database.py utility program doesn’t output any messages if it runs successfully. If it throws an exception, then an error will be printed on the screen.
Update REST API
You’ve updated the SQLAlchemy models and used them to update the people.db database. Now it’s time to update the REST API to provide access to the new notes information. Here’s the REST API you built in Part 2:
| Action | HTTP Verb | URL Path | Description |
|---|---|---|---|
| Create | POST |
/api/people |
URL to create a new person |
| Read | GET |
/api/people |
URL to read a collection of people |
| Read | GET |
/api/people/{person_id} |
URL to read a single person by person_id |
| Update | PUT |
/api/people/{person_id} |
URL to update an existing person by person_id |
| Delete | DELETE |
/api/people/{person_id} |
URL to delete an existing person by person_id |
The REST API above provides HTTP URL paths to collections of things, and to the things themselves. You can get a list of people or interact with a single person from that list of people. This path style refines what’s returned in a left-to-right manner, getting more granular as you go.
You’ll continue this left-to-right pattern to get more granular and access the notes collections. Here’s the extended REST API you’ll create in order to provide notes to the mini-blog web application:
| Action | HTTP Verb | URL Path | Description |
|---|---|---|---|
| Create | POST |
/api/people/{person_id}/notes |
URL to create a new note |
| Read | GET |
/api/people/{person_id}/notes/{note_id} |
URL to read a single person’s single note |
| Update | PUT |
api/people/{person_id}/notes/{note_id} |
URL to update a single person’s single note |
| Delete | DELETE |
api/people/{person_id}/notes/{note_id} |
URL to delete a single person’s single note |
| Read | GET |
/api/notes |
URL to get all notes for all people sorted by note.timestamp |
There are two variations in the notes part of the REST API compared to the convention used in the people section:
-
There is no URL defined to get all the
notesassociated with a person, only a URL to get a single note. This would have made the REST API complete in a way, but the web application you’ll create later doesn’t need this functionality. Therefore, it’s been left out. -
There is the inclusion of the last URL
/api/notes. This is a convenience method created for the web application. It will be used in the mini-blog on the home page to show all the notes in the system. There isn’t a way to get this information readily using the REST API pathing style as designed, so this shortcut has been added.
As in Part 2, the REST API is configured in the swagger.yml file.
Note:
The idea of designing a REST API with a path that gets more and more granular as you move from left to right is very useful. Thinking this way can help clarify the relationships between different parts of a database. Just be aware that there are realistic limits to how far down a hierarchical structure this kind of design should be taken.
For example, what if the Note object had a collection of its own, something like comments on the notes. Using the current design ideas, this would lead to a URL that went something like this: /api/people/{person_id}/notes/{note_id}/comments/{comment_id}
There is no practical limit to this kind of design, but there is one for usefulness. In actual use in real applications, a long, multilevel URL like that one is hardly ever needed. A more common pattern is to get a list of intervening objects (like notes) and then use a separate API entry point to get a single comment for an application use case.
Implement the API
With the updated REST API defined in the swagger.yml file, you’ll need to update the implementation provided by the Python modules. This means updating existing module files, like models.py and people.py, and creating a new module file called notes.py to implement support for Notes in the extended REST API.
Update Response JSON
The purpose of the REST API is to get useful JSON data out of the database. Now that you’ve updated the SQLAlchemy Person and created the Note models, you’ll need to update the Marshmallow schema models as well. As you may recall from Part 2, Marshmallow is the module that translates the SQLAlchemy objects into Python objects suitable for creating JSON strings.
The updated and newly created Marshmallow schemas are in the models.py module, which are explained below, and look like this:
 1 class PersonSchema(ma.ModelSchema):
 2     class Meta:
 3         model = Person
 4         sqla_session = db.session
 5     notes = fields.Nested('PersonNoteSchema', default=[], many=True)
 6
 7 class PersonNoteSchema(ma.ModelSchema):
 8     """
 9     This class exists to get around a recursion issue
10     """
11     note_id = fields.Int()
12     person_id = fields.Int()
13     content = fields.Str()
14     timestamp = fields.Str()
15
16 class NoteSchema(ma.ModelSchema):
17     class Meta:
18         model = Note
19         sqla_session = db.session
20     person = fields.Nested('NotePersonSchema', default=None)
21
22 class NotePersonSchema(ma.ModelSchema):
23     """
24     This class exists to get around a recursion issue
25     """
26     person_id = fields.Int()
27     lname = fields.Str()
28     fname = fields.Str()
29     timestamp = fields.Str()
There are some interesting things going on in the above definitions. The PersonSchema class has one new entry: the notes attribute defined in line 5. This defines it as a nested relationship to the PersonNoteSchema. It will default to an empty list if nothing is present in the SQLAlchemy notes relationship. The many=True parameter indicates that this is a one-to-many relationship, so Marshmallow will serialize all the related notes.
The PersonNoteSchema class defines what a Note object looks like as Marshmallow serializes the notes list. The NoteSchema defines what a SQLAlchemy Note object looks like in terms of Marshmallow. Notice that it has a person attribute. This attribute comes from the SQLAlchemy db.relationship(...) definition parameter backref='person'. The person Marshmallow definition is nested, but because it doesn’t have the many=True parameter, there is only a single person connected.
The NotePersonSchema class defines what is nested in the NoteSchema.person attribute.
Note:
You might be wondering why the PersonSchema class has its own unique PersonNoteSchema class to define the notes collection attribute. By the same token, the NoteSchema class has its own unique NotePersonSchema class to define the person attribute. You may be wondering whether the PersonSchema class could be defined this way:
class PersonSchema(ma.ModelSchema):
    class Meta:
        model = Person
        sqla_session = db.session
    notes = fields.Nested('NoteSchema', default=[], many=True)
Additionally, couldn’t the NoteSchema class be defined using the PersonSchema to define the person attribute? A class definition like this would each refer to the other, and this causes a recursion error in Marshmallow as it will cycle from PersonSchema to NoteSchema until it runs out of stack space. Using the unique schema references breaks the recursion and allows this kind of nesting to work.
People
Now that you’ve got the schemas in place to work with the one-to-many relationship between Person and Note, you need to update the person.py and create the note.py modules in order to implement a working REST API.
The people.py module needs two changes. The first is to import the Note class, along with the Person class at the top of the module. Then only read_one(person_id) needs to change in order to handle the relationship. That function will look like this:
 1 def read_one(person_id):
 2     """
 3     This function responds to a request for /api/people/{person_id}
 4     with one matching person from people
 5
 6     :param person_id:   Id of person to find
 7     :return:            person matching id
 8     """
 9     # Build the initial query
10     person = (
11         Person.query.filter(Person.person_id == person_id)
12         .outerjoin(Note)
13         .one_or_none()
14     )
15
16     # Did we find a person?
17     if person is not None:
18
19         # Serialize the data for the response
20         person_schema = PersonSchema()
21         data = person_schema.dump(person).data
22         return data
23
24     # Otherwise, nope, didn't find that person
25     else:
26         abort(404, f"Person not found for Id: {person_id}")
The only difference is line 12: .outerjoin(Note). An outer join (left outer join in SQL terms) is necessary for the case where a user of the application has created a new person object, which has no notes related to it. The outer join ensures that the SQL query will return a person object, even if there are no note rows to join with.
At the start of this article, you saw how person and note data could be represented in a single, flat table, and all of the disadvantages of that approach. You also saw the advantages of breaking that data up into two tables, person and note, with a relationship between them.
Until now, we’ve been working with the data as two distinct, but related, items in the database. But now that you’re actually going to use the data, what we essentially want is for the data to be joined back together. This is what a database join does. It combines data from two tables together using the primary key to foreign key relationship.
A join is kind of a boolean and operation because it only returns data if there is data in both tables to combine. If, for example, a person row exists but has no related note row, then there is nothing to join, so nothing is returned. This isn’t what you want for read_one(person_id).
This is where the outer join comes in handy. It’s a kind of boolean or operation. It returns person data even if there is no associated note data to combine with. This is the behavior you want for read_one(person_id) to handle the case of a newly created Person object that has no notes yet.
You can see the complete people.py in the article repository.
Notes
You’ll create a notes.py module to implement all the Python code associated with the new note related REST API definitions. In many ways, it works like the people.py module, except it must handle both a person_id and a note_id as defined in the swagger.yml configuration file. As an example, here is read_one(person_id, note_id):
 1 def read_one(person_id, note_id):
 2     """
 3     This function responds to a request for
 4     /api/people/{person_id}/notes/{note_id}
 5     with one matching note for the associated person
 6
 7     :param person_id:       Id of person the note is related to
 8     :param note_id:         Id of the note
 9     :return:                json string of note contents
10     """
11     # Query the database for the note
12     note = (
13         Note.query.join(Person, Person.person_id == Note.person_id)
14         .filter(Person.person_id == person_id)
15         .filter(Note.note_id == note_id)
16         .one_or_none()
17     )
18
19     # Was a note found?
20     if note is not None:
21         note_schema = NoteSchema()
22         data = note_schema.dump(note).data
23         return data
24
25     # Otherwise, nope, didn't find that note
26     else:
27         abort(404, f"Note not found for Id: {note_id}")
The interesting parts of the above code are lines 12 to 17:
- Line 13 begins a query against the
NoteSQLAlchemy objects and joins to the relatedPersonSQLAlchemy object comparingperson_idfrom bothPersonandNote. - Line 14 filters the result down to the
Noteobjects that has aPerson.person_idequal to the passed inperson_idparameter. - Line 15 filters the result further to the
Noteobject that has aNote.note_idequal to the passed innote_idparameter. - Line 16 returns the
Noteobject if found, orNoneif nothing matching the parameters is found.
You can check out the complete notes.py.
Updated Swagger UI
The Swagger UI has been updated by the action of updating the swagger.yml file and creating the URL endpoint implementations. Below is a screenshot of the updated UI showing the Notes section with the GET /api/people/{person_id}/notes/{note_id} expanded:

Mini-Blogging Web Application
The web application has been substantially changed to show its new purpose as a mini-blogging application. It has three pages:
-
The home page (
localhost:5000/), which shows all of the blog messages (notes) sorted from newest to oldest -
The people page (
localhost:5000/people), which shows all the people in the system, sorted by last name, and also allows the user to create a new person and update or delete an existing one -
The notes page (
localhost:5000/people/{person_id}/notes), which shows all the notes associated with a person, sorted from newest to oldest, and also allows the user to create a new note and update or delete an existing one
Navigation
There are two buttons on every page of the application:
- The Home button will navigate to the home screen.
- The People button navigates to the
/peoplescreen, showing all people in the database.
These two buttons are present on every screen in the application as a way to get back to a starting point.
Home Page
Below is a screenshot of the home page showing the initialized database contents:

The functionality of this page works like this:
-
Double-clicking on a person’s name will take the user to the
/people/{person_id}page, with the editor section filled in with the person’s first and last names and the update and reset buttons enabled. -
Double-clicking on a person’s note will take the user to the
/people/{person_id}/notes/{note_id}page, with the editor section filled in with the note’s contents and the Update and Reset buttons enabled.
People Page
Below is a screenshot of the people page showing the people in the initialized database:
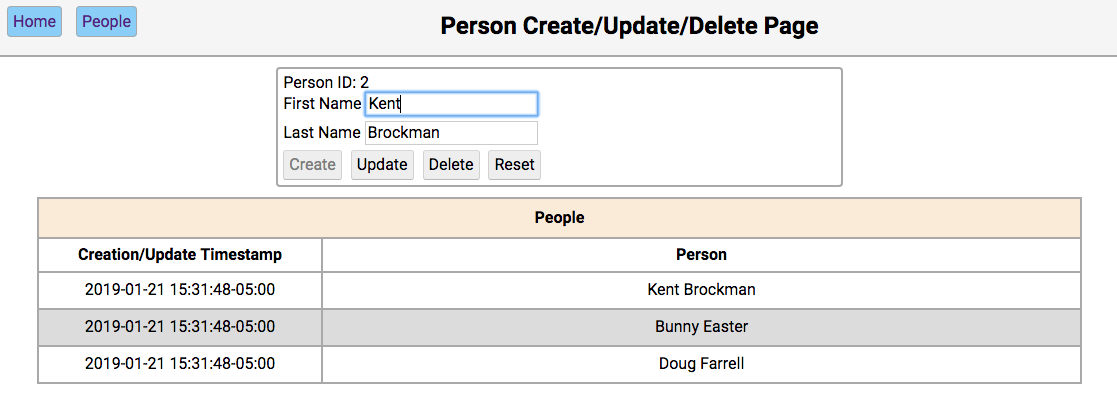
The functionality of this page works like this:
-
Single-clicking on a person’s name will populate the editor section of the page with the person’s first and last name, disabling the Create button, and enabling the Update and Delete buttons.
-
Double clicking on a person’s name will navigate to the notes pages for that person.
The functionality of the editor works like this:
-
If the first and last name fields are empty, the Create and Reset buttons are enabled. Entering a new name in the fields and clicking Create will create a new person and update the database and re-render the table below the editor. Clicking Reset will clear the editor fields.
-
If the first and last name fields have data, the user navigated here by double-clicking the person’s name from the home screen. In this case, the Update, Delete, and Reset buttons are enabled. Changing the first or last name and clicking Update will update the database and re-render the table below the editor. Clicking Delete will remove the person from the database and re-render the table.
Notes Page
Below is a screenshot of the notes page showing the notes for a person in the initialized database:

The functionality of this page works like this:
-
Single-clicking on a note will populate the editor section of the page with the notes content, disabling the Create button, and enabling the Update and Delete buttons.
-
All other functionality of this page is in the editor section.
The functionality of the editor works like this:
-
If the note content field is empty, then the Create and Reset buttons are enabled. Entering a new note in the field and clicking Create will create a new note and update the database and re-render the table below the editor. Clicking Reset will clear the editor fields.
-
If the note field has data, the user navigated here by double-clicking the person’s note from the home screen. In this case, the Update, Delete, and Reset buttons are enabled. Changing the note and clicking Update will update the database and re-render the table below the editor. Clicking Delete will remove the note from the database and re-render the table.
Web Application
This article is primarily focused on how to use SQLAlchemy to create relationships in the database, and how to extend the REST API to take advantage of those relationships. As such, the code for the web application didn’t get much attention. When you look at the web application code, keep an eye out for the following features:
-
Each page of the application is a fully formed single page web application.
-
Each page of the application is driven by JavaScript following an MVC (Model/View/Controller) style of responsibility delegation.
-
The HTML that creates the pages takes advantage of the Jinja2 inheritance functionality.
-
The hardcoded JavaScript table creation has been replaced by using the Handlebars.js templating engine.
-
The timestamp formating in all of the tables is provided by Moment.js.
You can find the following code in the repository for this article:
- The HTML for the web application
- The CSS for the web application
- The JavaScript for the web application
All of the example code for this article is available in the GitHub repository for this article. This contains all of the code related to this article, including all of the web application code.
Conclusion
Congratulations are in order for what you’ve learned in this article! Knowing how to build and use database relationships gives you a powerful tool to solve many difficult problems. There are other relationship besides the one-to-many example from this article. Other common ones are one-to-one, many-to-many, and many-to-one. All of them have a place in your toolbelt, and SQLAlchemy can help you tackle them all!
For more information about databases, you can check out these tutorials. You can also set up Flask to use SQLAlchemy. You can check out Model-View-Controller (MVC) more information about the pattern used in the web application JavaScript code.
In Part 4 of this series, you’ll focus on the HTML, CSS, and JavaScript files used to create the web application.
[ Improve Your Python With 🐍 Python Tricks 💌 – Get a short & sweet Python Trick delivered to your inbox every couple of days. >> Click here to learn more and see examples ]
from Real Python
read more


No comments:
Post a Comment