Sunday, February 6, 2022

ItsMyCode: [Solved] ImportError: No module named matplotlib.pyplot

The ImportError: No module named matplotlib.pyplot occurs if you have not installed the Matplotlib library in Python and trying to run the script which has matplotlib related code. Another issue might be that you are not importing the matplotlib.pyplot properly in your Python code.

In this tutorial, let’s look at installing the matplotlib module correctly in different operating systems and solve No module named matplotlib.pyplot.  

ImportError: No module named matplotlib.pyplot

Matplotlib is a comprehensive library for creating static, animated, and interactive visualizations in Python.

Matplotlib is not a built-in module (it doesn’t come with the default python installation) in Python, you need to install it explicitly using the pip installer and then use it.

If you looking at how to install pip or if you are getting an error installing pip checkout pip: command not found to resolve the issue.

Matplotlib releases are available as wheel packages for macOS, Windows and Linux on PyPI. Install it using pip:

Install Matplotlib in OSX/Linux 

The recommended way to install the matplotlib module is using pip or pip3 for Python3 if you have installed pip already.

Using Python 2

$ sudo pip install matplotlib

Using Python 3

$ sudo pip3 install matplotlib

Alternatively, if you have easy_install in your system, you can install matplotlib using the below command.

Using easy install

$ sudo easy_install -U matplotlib

For CentOs

$ yum install python-matplotlib

For Ubuntu

To install matplotlib module on Debian/Ubuntu :

$ sudo apt-get install python3-matplotlib

Install Matplotlib in Windows

In the case of windows, you can use pip or pip3 based on the Python version, you have to install the matplotlib module.

$ pip3 install matplotlib

If you have not added the pip to the environment variable path, you can run the below command in Python 3, which will install the matplotlib module. 

$ py -m pip install matplotlib

Install Matplotlib in Anaconda

Matplotlib is available both via the anaconda main channel and it can be installed using the following command.

$ conda install matplotlib

You can also install it via the conda-forge community channel by running the below command.

$ conda install -c conda-forge matplotlib

In case you have installed it properly but it still throws an error, then you need to check the import statement in your code.

In order to plot the charts properly, you need to import the matplotlib as shown below.

# importing the matplotlib 
import matplotlib.pyplot as plt
import seaborn as sns

# car sales data
total_sales = [3000, 2245, 1235, 5330, 4200]

location = ['Bangalore', 'Delhi', 'Chennai', 'Mumbai', 'Kolkatta']

# Seaborn color palette to plot pie chart
colors = sns.color_palette('pastel')

# create pie chart using matplotlib
plt.pie(total_sales, labels=location, colors=colors)
plt.show()


from Planet Python
via read more

Malthe Borch: PowerShell Remoting on Windows using Airflow

Apache Airflow is an open-source platform that allows you to programmatically author, schedule and monitor workflows. It comes with out-of-the-box integration to lots of systems, but the adage that the devil's in the details holds true with integration in general and remote execution is no exception – in particular PowerShell Remoting which comes with Windows as part of WinRM (Windows Remote Management).

In this post, I'll share some insights from a recent project on how to use Airflow to orchestrate the execution of Windows jobs without giving up on security.

Traditionally, job scheduling was done using agent software. An agent running locally as a system service would wake up and execute jobs at the scheduled time, reporting results back to a central system.

The configuration of the job schedule is either done by logging into the system itself or using a control channel. For example, the agent might connect to a central system to pull down work orders.

Meanwhile, Airflow has no such agents! Conveniently, WinRM works in push mode. It's a service running on Windows that you connect to using HTTP (or HTTPS). It's basically like connecting to a database and running a stored procedure.

From a security perspective, push mode is fundamentally different because traffic is initiated externally. While we might want to implement a thin agent to overcome this difference, such code is a liability on its own. Luckily, PowerShell Remoting comes with a framework that allows us to substantially limit the attack surface.

The aptly named Just-Enough-Administration (JEA) framework is basically sudo on steroids. It allows us to use PowerShell as an API, constraining the remote management interface to a configurable set of commands and executing as a specific user.

We can avoid running arbitrary code entirely by encapsulating the implementation details in predefined commands. In addition, we also separate the remote user that connects to the WinRM service from the user context that executes commands.

You can use PowerShell Remoting without JEA and/or constrained endpoints. But the intersection of Airflow and Windows is typically a bigger company or organization where security concerns mean that you want both of these.

As an aside, I mentioned stored procedures earlier on. Using JEA to change context to a different user is equivalent of Definer's Rights vs Invoker's Rights. Arguably, in a system-to-system integration, using Definer's Rights is helpful in reducing the attack surface because you can define and encapsulate the required functionality.

The steps required to register a JEA configuration are relatively straight-forward. I won't describe them in detail here but the following bullets should give an overview:

  • A JEA configuration exposes a remoting endpoint. When connecting using PowerShell Remoting, the endpoint can be selected using its configuration name. The default endpoint is "Microsoft.PowerShell" – it's available to local administrators and exposes an unconstrained shell.

    Never use a local administrator account with Airflow or any other system-to-system integration!

  • Always use the "RestrictedRemoteServer" session type. This gives you a constrained endpoint to which you can add capabilities. The endpoint will operate in "NoLanguage" mode meaning that there is no scripting functionality allowed.
  • A JEA configuration be limited to users that are members of a particular group. But perhaps more importantly, you can map different groups to different role capabilities. These role definitions determine the functionality exposed by the endpoint for a given user. You can have a single endpoint which defines multiple sets of functionality depending on the user which connected to the endpoint.
  • While a JEA configuration is registered directly with Windows, role capabilities are defined using files. A role capabilities file is responsible for exposing commands (making them visible), but you can also define custom commands directly within the file. Changes to the file take effect immediately.

    For technical reasons, the role capabilities file must be placed in a "RoleCapabilities" subfolder inside an existing (possible "empty") PowerShell module – see the documentation on making role capabilities available.

In summary, registering a JEA configuration can be as simple as defining a single role capabilities file and running a command to register the configuration.

Now, enter Airflow!

To get started, you'll need to add the PowerShell Remoting Protocol Provider to your Airflow installation.

Add a connection by providing the hostname of your Windows machine, username and password. If you're using HTTP (rather than HTTPS) then you should set up the connection to require Kerberos authentication such that credentials are not sent in clear text (in addition, WinRM will encrypt the protocol traffic using the Kerberos session key).

To allow only Kerberos authentication, provide {"auth": "kerberos"} in the connection extras. Most of the extra configuration options from the underlying Python library pypsrp are available as connection extras.

Historically, Windows machines feel worse over time for no particular reason. It's common to restart them once in a while. We can use Airflow to do that!

from airflow.providers.microsoft.psrp.operators.psrp import PSRPOperator

with DAG(...) as dag:
    # "task_id" defaults to the value of "cmdlet" so can omit it here.
    restart_computer = PSRPOperator(cmdlet="Restart-Computer", parameters={"Force": None})

This will restart the computer forcefully (which is not a good idea, but it illustrates the use of parameters). In the example, "Force" is a switch so we pass a value of None – but values can be numbers, strings, lists and even dictionaries.

In the first example, we saw how task_id defaults to the value of cmdlet – that is sometimes useful, but it's not the only way we can cut verbosity.

PowerShell cmdlets (and functions which for our purposes are the same thing) follow the naming convention verb-noun. When we define our own commands, we can for example use the verb "Invoke", e.g. "Invoke-Job1". But invoking stuff is something we do all the time in Airflow and we don't want our task ids to have this meaningless prefix all over the place.

Here's an example of fixing that, making good use of Airflow's templating syntax:

from airflow.providers.microsoft.psrp.operators.psrp import PSRPOperator

default_args = {
    "cmdlet": "Invoke-",
}

with DAG(..., default_args=default_args) as dag:
    # "cmdlet" here will be provided automatically as "Invoke-Job1".
    job1 = PSRPOperator(task_id="Job1")

Windows can have its verb-noun naming convention and we get to have short task ids.

By default, Airflow serializes operator output using XComs – a simple means of passing state between tasks.

Since XComs must be JSON-serializable, the PSRPOperator automatically converts PowerShell output values to JSON using ConvertTo-Json and then deserializes in Python before Airflow will then reserialize it when saving the XComs result to the database – there's room for optimization there! The point is that most of the time, you don't have to worry about it.

You can for example list a directory using Get-ChildItem and the resulting table will be returned as a list of dicts. Note that PowerShell has some flattening magic which generally does the right thing in terms of return values:

In PowerShell, the results of each statement are returned as output, even without a statement that contains the Return keyword.

That is, functions don't really return a single value. Instead, there is a stream of output values stemming from each command being executed.

With do_xcom_push set to false, no XComs are saved and the conversion to JSON also does not happen.

PowerShell has a number of other streams besides the output stream. These are logged to Airflow's task log by default. Unlike the default logging setup, the debug is also included unless explicitly turned off logging_level – one justification for this is given in the next section.

In traditional automation, command echoing has been a simple way to figure out what a script is doing. PowerShell is a different beast altogether, but it is possible to expose the commands being executed using Set-PSDebug.

from pypsrp.powershell import Command, CommandParameter

PS_DEBUG = Command(
    cmd="Set-PSDebug",
    args=(CommandParameter(name="Trace", value=1), ),
    is_script=False,
)

default_args = {
    "psrp_session_init": PS_DEBUG,
}

This requires that Set-PSDebug is listed under "VisibleCmdlets" in the role capabilities (like ConvertTo-Json if using XComs).

A tracing line will be sent for each line passed over during execution at logging level debug, but as mentioned above, this will nonetheless get included in the task log by default. Don't enable this and have a loop that iterates hundreds of times. You will quickly fill up the task log with useless messages.

Happy remoting!


from Planet Python
via read more

Saturday, February 5, 2022

Stack Abuse: Python - How to Sort List with sort() and sorted()

In this short guide, learn how to sort a list in Python using the built-in sort() and sorted() functions.

  • sort() is a method of the list class, and sorts the list in-place, returning None.
  • sorted() is a method built into the Python namespace, and sorts the list out-of-place, returning a sorted copy of the list, without affecting the original one.

Generally speaking - sort() is more efficient on larger datasets, while sorted() is more convenient, because it returns a copy of the list and leaves the original one intact.

Note: Both methods, by default, use the logical less-than (<) operator for element comparison, and thus sort in ascending order. You can override the default comparison function and by extension, both the logic of comparison and sorting order.

In the proceeding sections, we'll take a look at how to sort lists of various data types, including custom comparison functions, descending order, and perform a performance benchmark on the two.

Sort List with sort() and sorted()

The sort() function is called on a list we'd like to sort, and sorts it in-place, returning None:

# my_list is sorted in-place - the original list is changed
my_list.sort()

It sorts in ascending order by default. To sort in descending order, you can supply the reverse=True argument to the function:

my_list.sort(reverse=True)

The sorted() function works in much the same way as the sort() function does - and also accepts the same arguments. However, sorted() creates a copy of the list we supply, sorts the copy, and returns it - leaving the original intact:

# Sorts copy of `my_list` and returns it
sorted_list = sorted(my_list)

The way comparisons are done depends on the data type of the elements of the list. Strings are compared differently than integers, which are in turn, compared differently to custom objects, for instance.

Sort List of Strings

Strings are sorted lexicographically, when compared with the > operator:

string_list = ['I', 'see', 'skies', 'of', 'blue', 'red', 'roses', 'too']

string_list.sort()
print(string_list)
# ['I', 'blue', 'of', 'red', 'roses', 'see', 'skies', 'too']

The same logic is applied to the sorted() function:

sorted_list = sorted(string_list)
print(sorted_list)
# ['I', 'blue', 'of', 'red', 'roses', 'see', 'skies', 'too']

I has a lesser lexicographical value than blue, even though b should be before i in the dictionary, because capital letters always have a lesser lexicographic value than lowercase letters. Other than the capital letters - the rest of the strings are sorted in ascending dictionary order!

Sort List of Integers

Integers are more straightforward in their comparison with the > operator:

int_list = [1, 7, 2, 3, 8, 5, 6]
int_list.sort()

print(int_list)
# [1, 2, 3, 5, 6, 7, 8]

Or, with sorted():

sorted_list = sorted(int_list)
print(sorted_list)
# [1, 2, 3, 5, 6, 7, 8]

Sort List of Tuples

Tuples are sorted by key, not value. For instance, say you had a leaderboard of preferred programming languages, stored in a tuple of (language, rank) format - you might want to sort them in order of rank:

tuple_list = [('Java', 2), ('Python', 1), ('JavaScript', 3)]
tuple_list.sort()

print(tuple_list)
# [('Java', 2), ('JavaScript', 3), ('Python', 1)]

Or, to sort a list of tuples with sorted():

sorted_tuples = sorted(tuple_list)
print(sorted_tuples)
# [('Java', 2), ('JavaScript', 3), ('Python', 1)]

Since tuples are sorted by key, this list of tuples is sorted lexicographically, by the strings used as the keys.

Sort List of Tuples with Custom Key

To alter the item based on which tuples are sorted, without changing the tuples themselves - you can specify any item in a tuple instead as the key argument. Typically, it's easiest to map the key to another item in the list of tuples, through a lambda function:

tuple_list = [('Java', 2), ('Python', 1), ('JavaScript', 3)]
tuple_list.sort(key=lambda x:x[1])
print(tuple_list)
# [('Python', 1), ('Java', 2), ('JavaScript', 3)]

Or, with sorted():

sorted_tuples = sorted(tuple_list, key=lambda x:x[1])
print(sorted_tuples)
# [('Python', 1), ('Java', 2), ('JavaScript', 3)]

Here, we've mapped the key by which to sort, to the second item (indexing is 0-based) of the tuple, thus, sorting by the second item (integer).

If you'd like to read more about Lambda Functions - read our Guide to Lambda Functions in Python!

Note: The key doesn't correspond to the first value of the tuple, which is oftentimes referred to as a "key" as in, a "key-value" pair. The key refers to the key by which the sort() method sorts elements.

This stands true for any number of tuple elements:

tuple_list = [('Java', 2, 'General purpose'), ('Python', 1, 'General purpose'), ('JavaScript', 3, 'Web-oriented')]
tuple_list.sort(key=lambda x:x[1])

print(tuple_list)
# [('Python', 1, 'General purpose'), ('Java', 2, 'General purpose'), ('JavaScript', 3, 'Web-oriented')]

Or, with sorted():

sorted_tuples = sorted(tuple_list, key=lambda x:x[1])
print(sorted_tuples)
# [('Python', 1, 'General purpose'), ('Java', 2, 'General purpose'), ('JavaScript', 3, 'Web-oriented')]

Sort List with Custom Comparator

Ultimately, you might want to supply a custom comparator to the key argument of either sort() or sorted()! A comparator is simply a function that returns a comparable return type. For instance, you can sort by length, by passing in the len() function:

string_list = ['I', 'see', 'skies', 'of', 'blue', 'red', 'roses', 'too']
string_list.sort(key=len)

print(string_list)
# ['I', 'of', 'see', 'red', 'too', 'blue', 'skies', 'roses']

Or, with sorted():

sorted_list = sorted(string_list, key=len)
print(sorted_list)
# ['I', 'of', 'see', 'red', 'too', 'blue', 'skies', 'roses']

Similarly enough, you can sort by any custom function:

def custom_comparator(element):
    return element[-1]

string_list = ['I', 'see', 'skies', 'of', 'blue', 'red', 'roses', 'too']
string_list.sort(key=custom_comparator)

print(string_list)
# ['I', 'red', 'see', 'blue', 'of', 'too', 'skies', 'roses']

Or, with sorted():

sorted_list = sorted(string_list, key=custom_comparator)

print(sorted_list)
# ['I', 'red', 'see', 'blue', 'of', 'too', 'skies', 'roses']

Here, we've simply returned the last character of a string, via the slice notation, and sorted by that returned character. If you pay attention to the last character of each word (excluding the capital letter) - they're sorted in lexicographical order.

Benchmarking sort() vs sorted()

As stated earlier - sorted() is slightly less efficient than sort(), mainly because it creates a copy and sorts that copy, rather than changing the original collection. Though, just how much is "slightly less" efficient?

This depends on various factors - such as your hardware, and the specifics of that hardware, but you can run a very simple test to check which one works better for you, based on multiple input sizes.

Let's sort lists of 10, 100 and 1000 elements respectively, and time the runtimes of these functions using timeit. To make sure that the test is fair, we want to ensure that:

  • The lists of elements are generated before calling timeit() so the generation logic doesn't account for the benchmark time
  • The methods are run on the exact same input

Since sort() changes the lists in-place, we'll run sorted() first, and then benchmark how long it takes sort() to do those same lists:

import timeit
import random

def generate_random_strings(num):
    result = []
    for i in range(num):
        s = ''.join(random.choice([chr(i) for i in range(ord('a'),ord('z'))]) for _ in range(5))
        result.append(s)
    return result

ten = generate_random_strings(10)
hundred = generate_random_strings(100)
thousand = generate_random_strings(1000)

# For eval() statements where input is translated to list names
mapping = {
    10:'ten',
    100:'hundred',
    1000:'thousand'
}

# Based on input, evaluate the expression to sort adequate list
def run_sorted(num):
    eval(f'sort({mapping[num]})')

# Based on input, evaluate the expression to sort adequate list
def run_sorted(num):
    eval(f'sorted({mapping[num]})')

for index, num_samples in enumerate([10, 100, 1000]):
    result = timeit.timeit(f"run_sorted({num_samples})", number=100000, globals=globals())
    print(f'sorted() on {num_samples} took {result} seconds')

print('____________________________________________________')    
  
for index, num_samples in enumerate([10, 100, 1000]):
    result = timeit.timeit(f"run_sort({num_samples})", number=100000, globals=globals())
    print(f'sort() on {num_samples} took {result} seconds')

This piece of code compares the time it takes to run 100k iterations of each of the run_sort() and run_sorted() methods, on the same lists of 10, 100, 1000, and 1000000 elements produced by the generate_random_strings() method, and results in:

sorted() on 10 took 0.5450385000003735 seconds
sorted() on 100 took 0.9972869999996874 seconds
sorted() on 1000 took 10.934083999999984 seconds
____________________________________________________
sort() on 10 took 0.4839348999998947 seconds
sort() on 100 took 0.5398832000000766 seconds
sort() on 1000 took 1.3094285000001946 seconds

For 10 elements, the time is practically the same - ~0.5s. However, as soon as with 100 elements, sort() takes half the time to sort the same list. Finally, at 1000 elements, sorted() takes nearly ten times as much computation time as sort() does.

The larger the dataset you're working with - the more benefits you'll be reaping with using sort() instead of `sorted(), if you don't need an out-of-place sort.

Conclusion

In this short guide - we've taken a look at how to sort a list in Python with the help of sort() and sorted().

We've then explored sorting in descending order, instead of ascending, as well as setting a different sorting key, including writing a custom sorting method.

Finally, we've benchmarked the two methods and explored how they perform with an increasing input size.


from Planet Python
via read more

Hynek Schlawack: typing.Protocol Across Python Versions

How to seamlessly support typing.Protocol on Python versions older and newer than 3.8. At the same time.


from Planet Python
via read more

Friday, February 4, 2022

Andre Roberge: Friendly-traceback: trying to stay ahead of IPython

I'm writing this blog post in the hope that some people will be encouraged to test friendly/friendly-traceback with IPython/Jupyter and make suggestions as to how it could be even more useful.

However, before you read any further...

Important clarification: IPython is a professionally developed program which is thoroughly tested, and is an essential tool for thousands of Python programmers.  By contrast, friendly/friendly-traceback is mostly done by a hobbyist (myself) and is not nearly as widely used nor as reliable as IPython. Any comparison I make below should be taken in stride.  Still, I can't help but draw your attention to this recent tweet from Matthias Bussonnier, the IPython project leader:


I don't believe that friendly/friendly-traceback is mature and stable enough to become part of IPython's distribution. However, it is because of this endorsement that I decided to see what I could do to improve friendly/friendly-traceback's integration with IPython.

IPython news

The recent release of IPython included many traceback improvements. One of these changes, shown with the screen capture below:


is something that I am happy to have implemented many months ago as mentioned in this blog post. I have no reason to believe that my idea was the impetus for this change in IPython's formatting of tracebacks. Still, I think it validates my initial idea.

However, there have been other changes introduced in this latest IPython release, such as using colour instead of ^^ to highlight the location of the code causing a traceback is something that I had done only for IDLE but not for other environments such as IPython/Jupyter.  So, I felt that I had to catch up with what IPython has implemented and, if possible, do even better.  Of course, I must recognize that this work is greatly facilitated since I use Alex Hall's excellent stack_data (as well as some other of his packages on which stack_data depends) in friendly-traceback: stack_data is now used by IPython to generate these tracebacks. So, in principle, there is no reason why I shouldn't be able to implement similar features in friendly/friendly-traceback.

Again, I must note that the way I use stack_data is a bit hackish, and definitely not as elegant as it is used within IPython. 

Enough of a preamble, time to provide some actual examples.

First example

Consider the following module which will generate a traceback when imported in IPython:


Here is the result:


We can see not only the lines of code that caused the traceback, but actually the specific parts of each line that caused a problem.

I could replicate this example using the friendly console but, instead, I will use the specific IPython integration to see what else we could do at this point. 


We see a traceback that is somewhat similar to a standard CPython traceback, but with an additional hint at the end which gives us an additional clue as to what the cause of the error might be.  Friendly/friendly-traceback can give more information about what() a particular exception means in general, why() it might have happened in this particular case and where() it occurred:

By design, the information provided by where() only focus on the beginning and the end of the traceback, so as to no overwhelm beginners with often irrelevant steps in between. However, notice that in addition to the highlighted parts (new feature!), we also see the values of some objects from these highlighted regions.

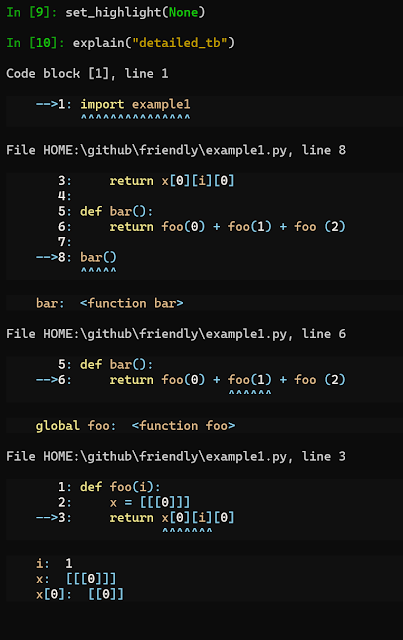
Until recently, this was all the information that one could get. However, it is now possible to get more details, in a way similar to that provided by IPython, but with the addition of the values of various objects.  (Note that the syntax shown below to obtain this information is subject to change; it is just a proof of concept.)


Other than the different colour chosen for highlighting (both IPython and this example are done in a Windows Terminal), I also chose to ensure that one line per frame was highlighted, such as the line "import example1".  Do you think this is a good choice, or should I do like IPython?

If the highlighting is not adequate, it can be changed by using either named colours (converted to lowercase with spaces removed) or hexadecimal values; the name of the function and its arguments are subject to change:


Any such change is written to a settings file so that it is remembered for future sessions. Those that prefer traditional Python's notation with ^^ can do so by using None as an argument:

Finally, one can go back to the defaults by specifying no argument:


Example 2


In the previous example, all highlighting regions were part of a single line. However, sometimes the code at fault will spill over two lines. Here's how IPython does its highlighting:

Instead of highlighting each line from the beginning, I chose to not highlight the indentation; is this a better choice?


Jupyter notebook


When IPython is used in a Jupyter notebook (or lab), I chose yet again a different way to present the result. First, let's have a look at a simple example using the Jupyter default.


In this example, only two frames are highlighted.  Let's see the result, using friendly.

We get a basic error message with a button to click if we want to have more details.


We already have seen the output of what() and why() before; this time let's just click on where():


Since we only had two frames in the traceback, where() gives us all the relevant information.

What happens if we have more than two frames in the traceback?  First, let's give an example with the Jupyter default.


What happens if we use friendly in this case?  Below I show the result after clicking "more"


An additional button has appeared.  Note that this is something new that I just did earlier today (before writing this blog post). It is quite possible that there might be bugs if you try it.

Conclusion

These new features are simple proofs of concept that have not been thoroughly tested.  If you read this far, and hopefully tried it on your own, I would really appreciate getting your feedback regarding the choices I made and any improvement you might be able to suggest.


from Planet Python
via read more

Make Your Model Faster with PyTorch Lightning

In this article we will discuss how to make your training and inference processes realy fast using pytorch lightning.

from Planet SciPy
read more

Codementor: NumPy in Python

NumPy in Python

from Planet Python
via read more

TestDriven.io: Working with Static and Media Files in Django

This article looks at how to work with static and media files in a Django project, locally and in production. from Planet Python via read...