Monday, January 31, 2022

PyCharm: PyCharm 2022.1 EAP is open!

It’s that time of the year when we count on your early feedback to help us prepare for the next major PyCharm release. The Early Acces Program (EAP) is designed to give our users and community members the chance to contribute to a better PyCharm by increasing the amount of testing we do and helping us identify bugs and usability problems that would be hard to catch just through our internal processes.

Download the EAP builds via the Toolbox App or directly from our website.
Important: EAP builds are not fully tested and might be unstable.

Download PyCharm EAP

PyCharm 2022.1 EAP1 brings the new Run Targets implementation, which adds support for creating virtual environments inside different targets.

What’s new?

Targets are configured environments where PyCharm will execute your code. PyCharm Pro users already have built-in support for Docker, Docker-Compose, SSH, WSL, and other targets for a long time.

The new implementation brings two major benefits out of the box:

1. A simpler UI to configure your targets

Configuring your targets is now a quick process performed through a wizard. The first thing to do is go to Preferences/Settings > Python Interpreter > Add Interpreter, and choose the type of target that you want to configure.

In this example, we will configure a Docker target, but you can find more information about all the supported targets in our documentation.
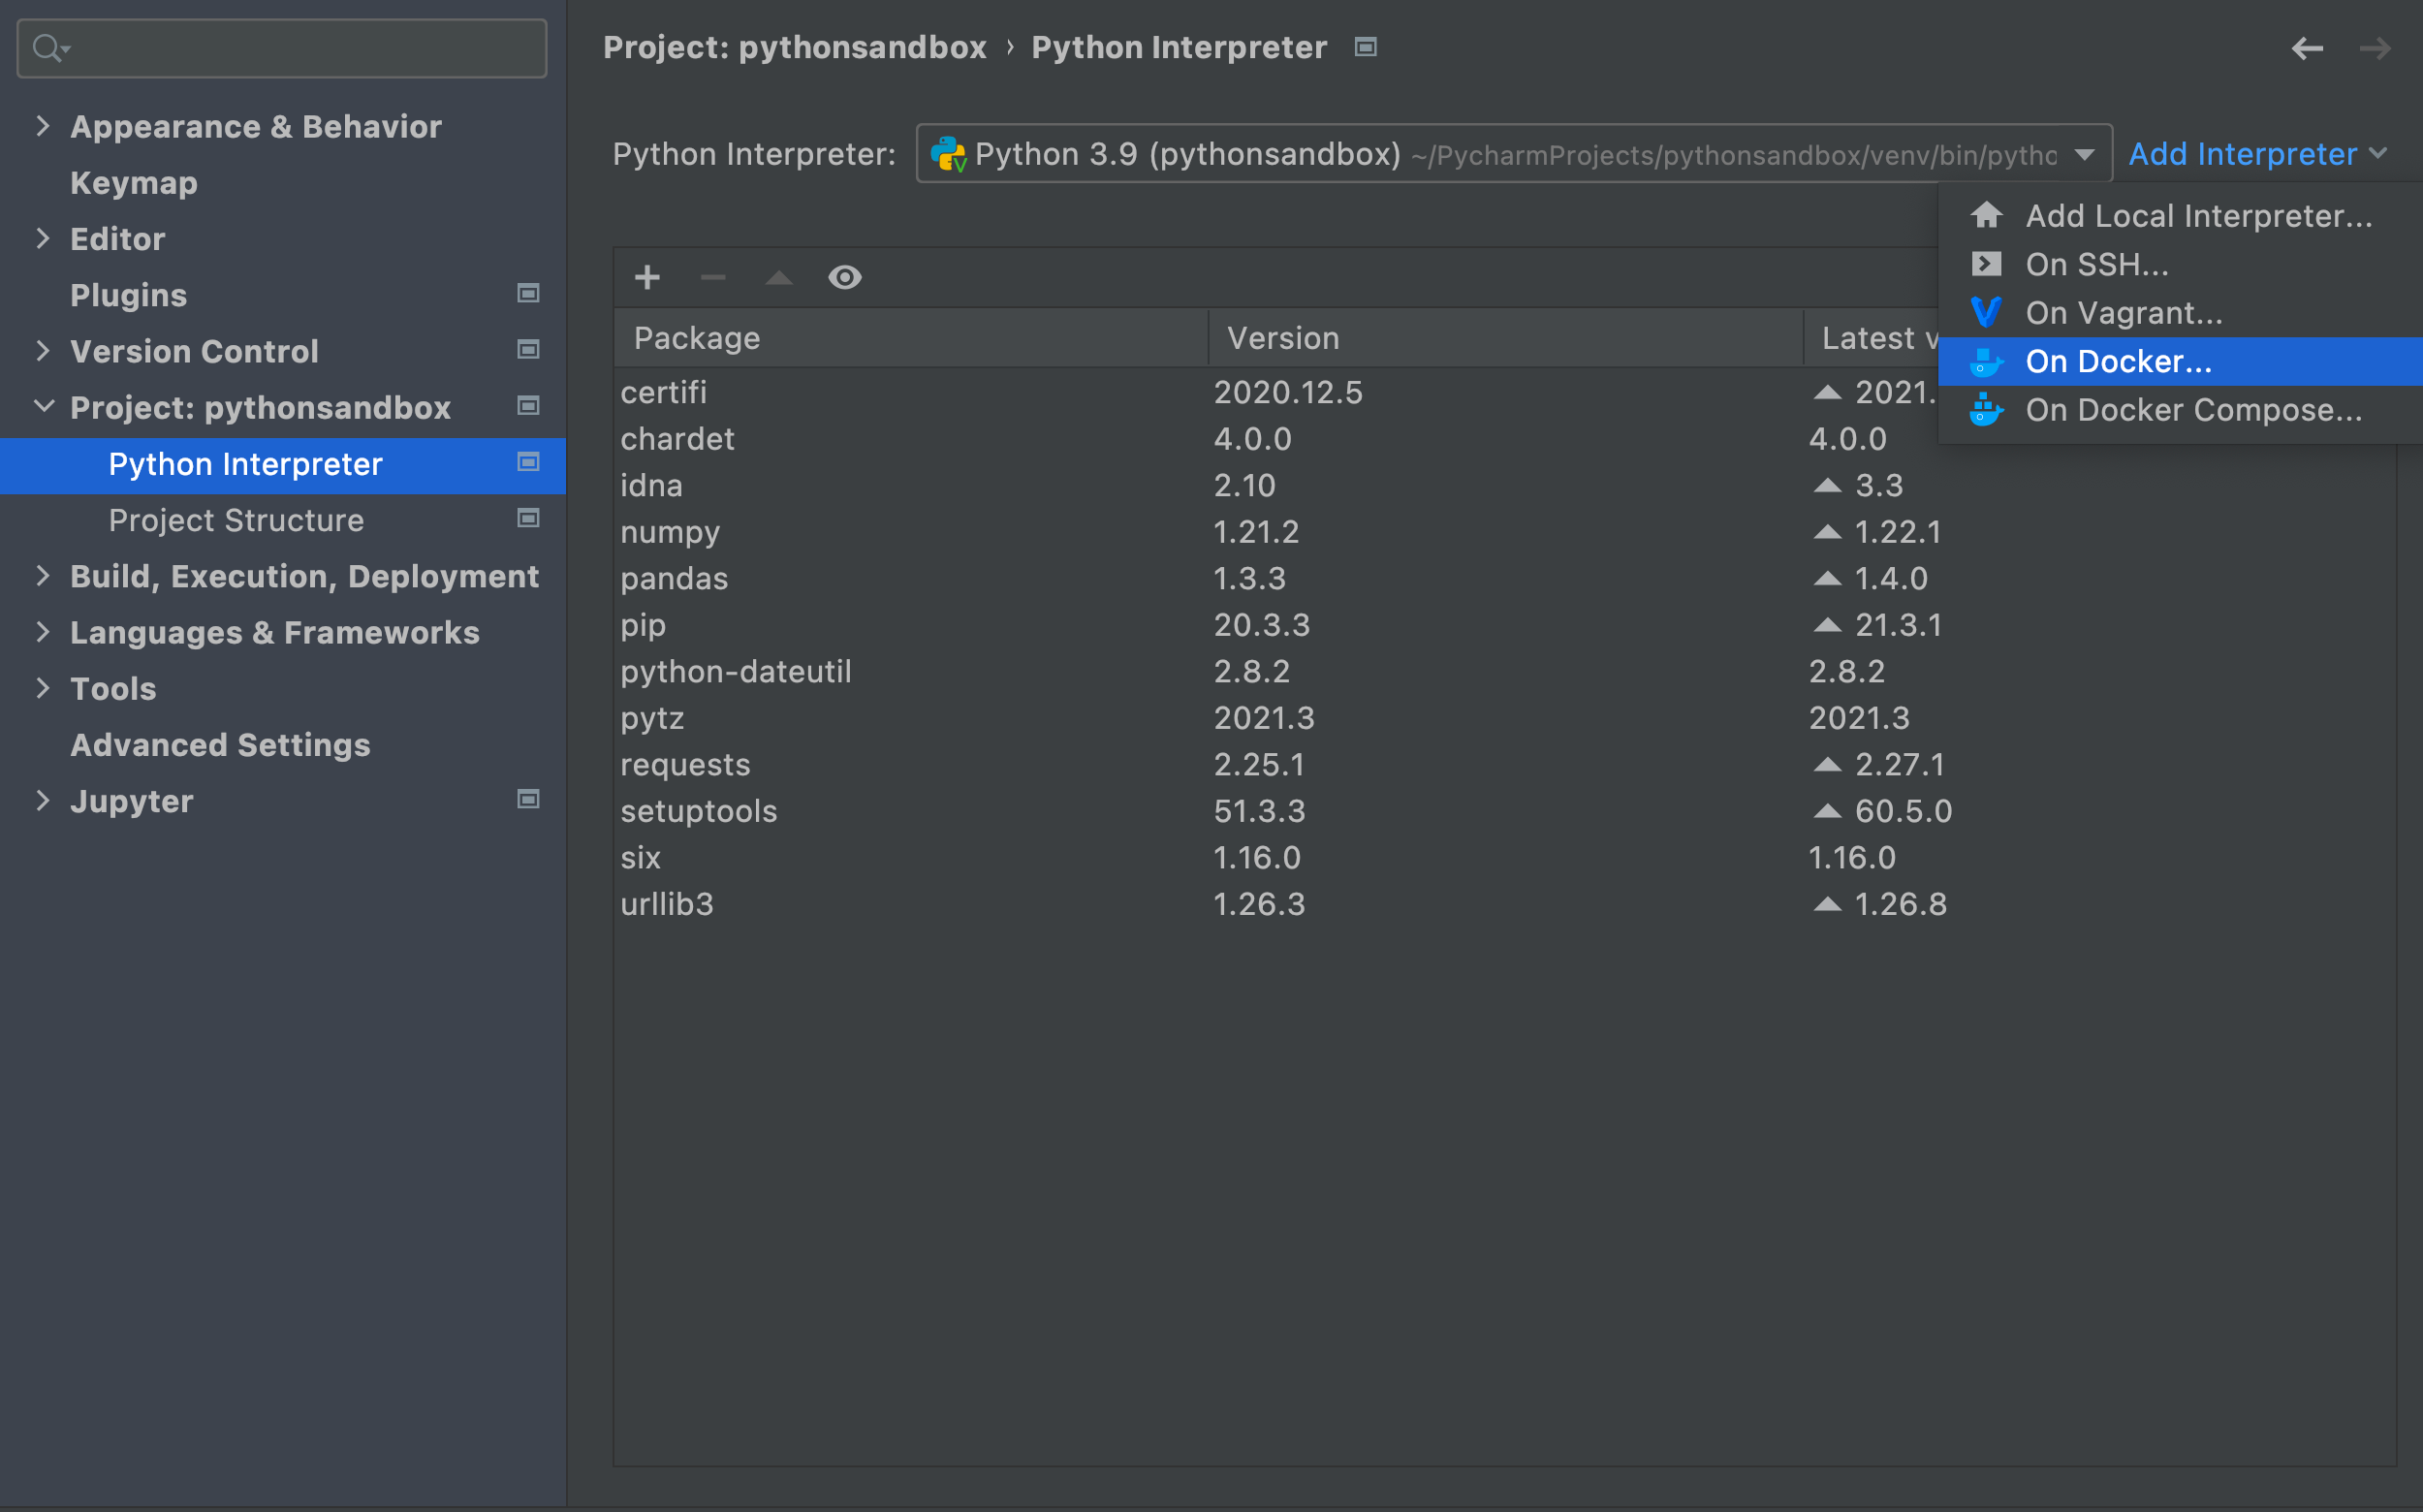
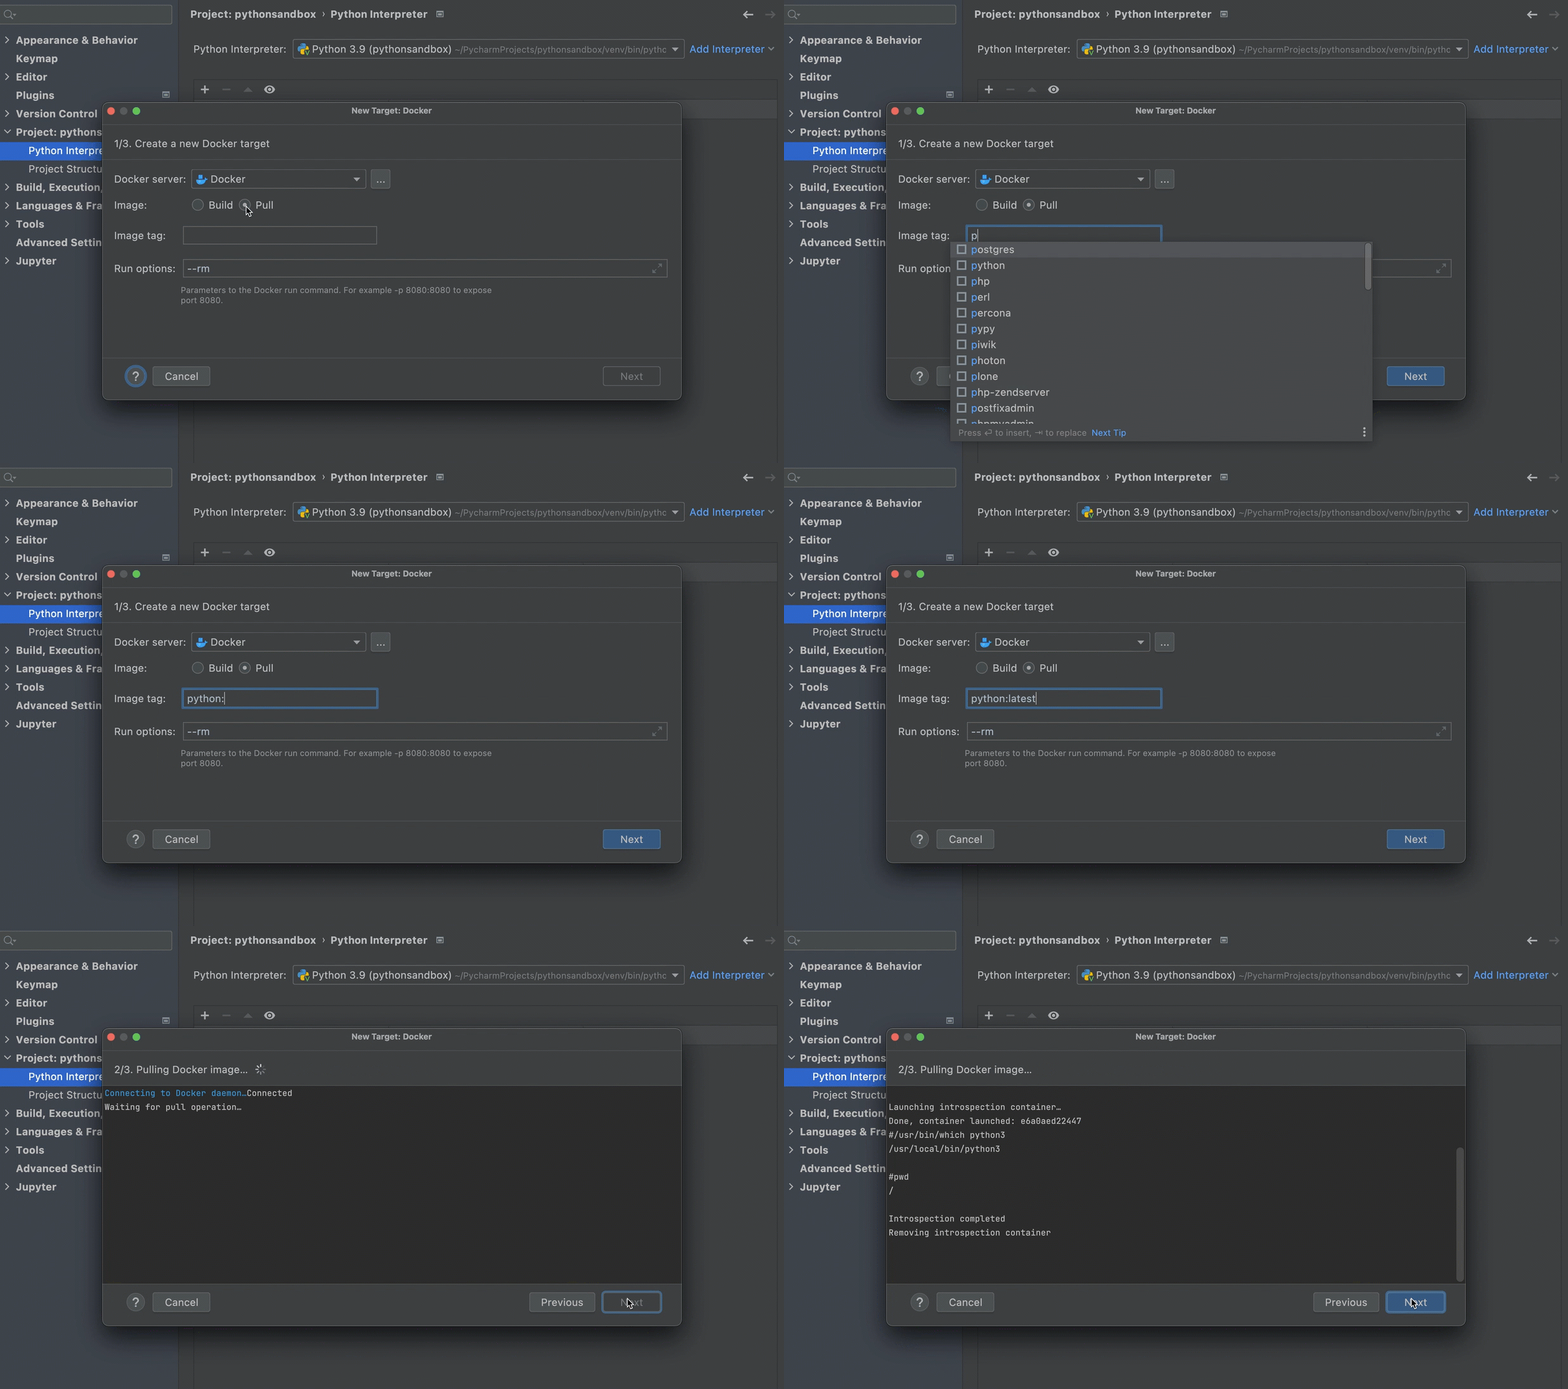
As you select the target a dialog window pops up. In the case of Docker it’s a three-step process. You can build your image locally or pull it from a registry. In step 1 (1/3) we will pull the Python:latest image from Docker and click next.

As you can see, in the next step (2/3) PyCharm will launch an introspection container to check your environment and will remove this container as soon as the introspection process is over. You can, then, click next.
The third step (3/3) is where you can create your virtual environment inside your target. This is not necessary in this example, so we will select the System Interpreter option and click Create.
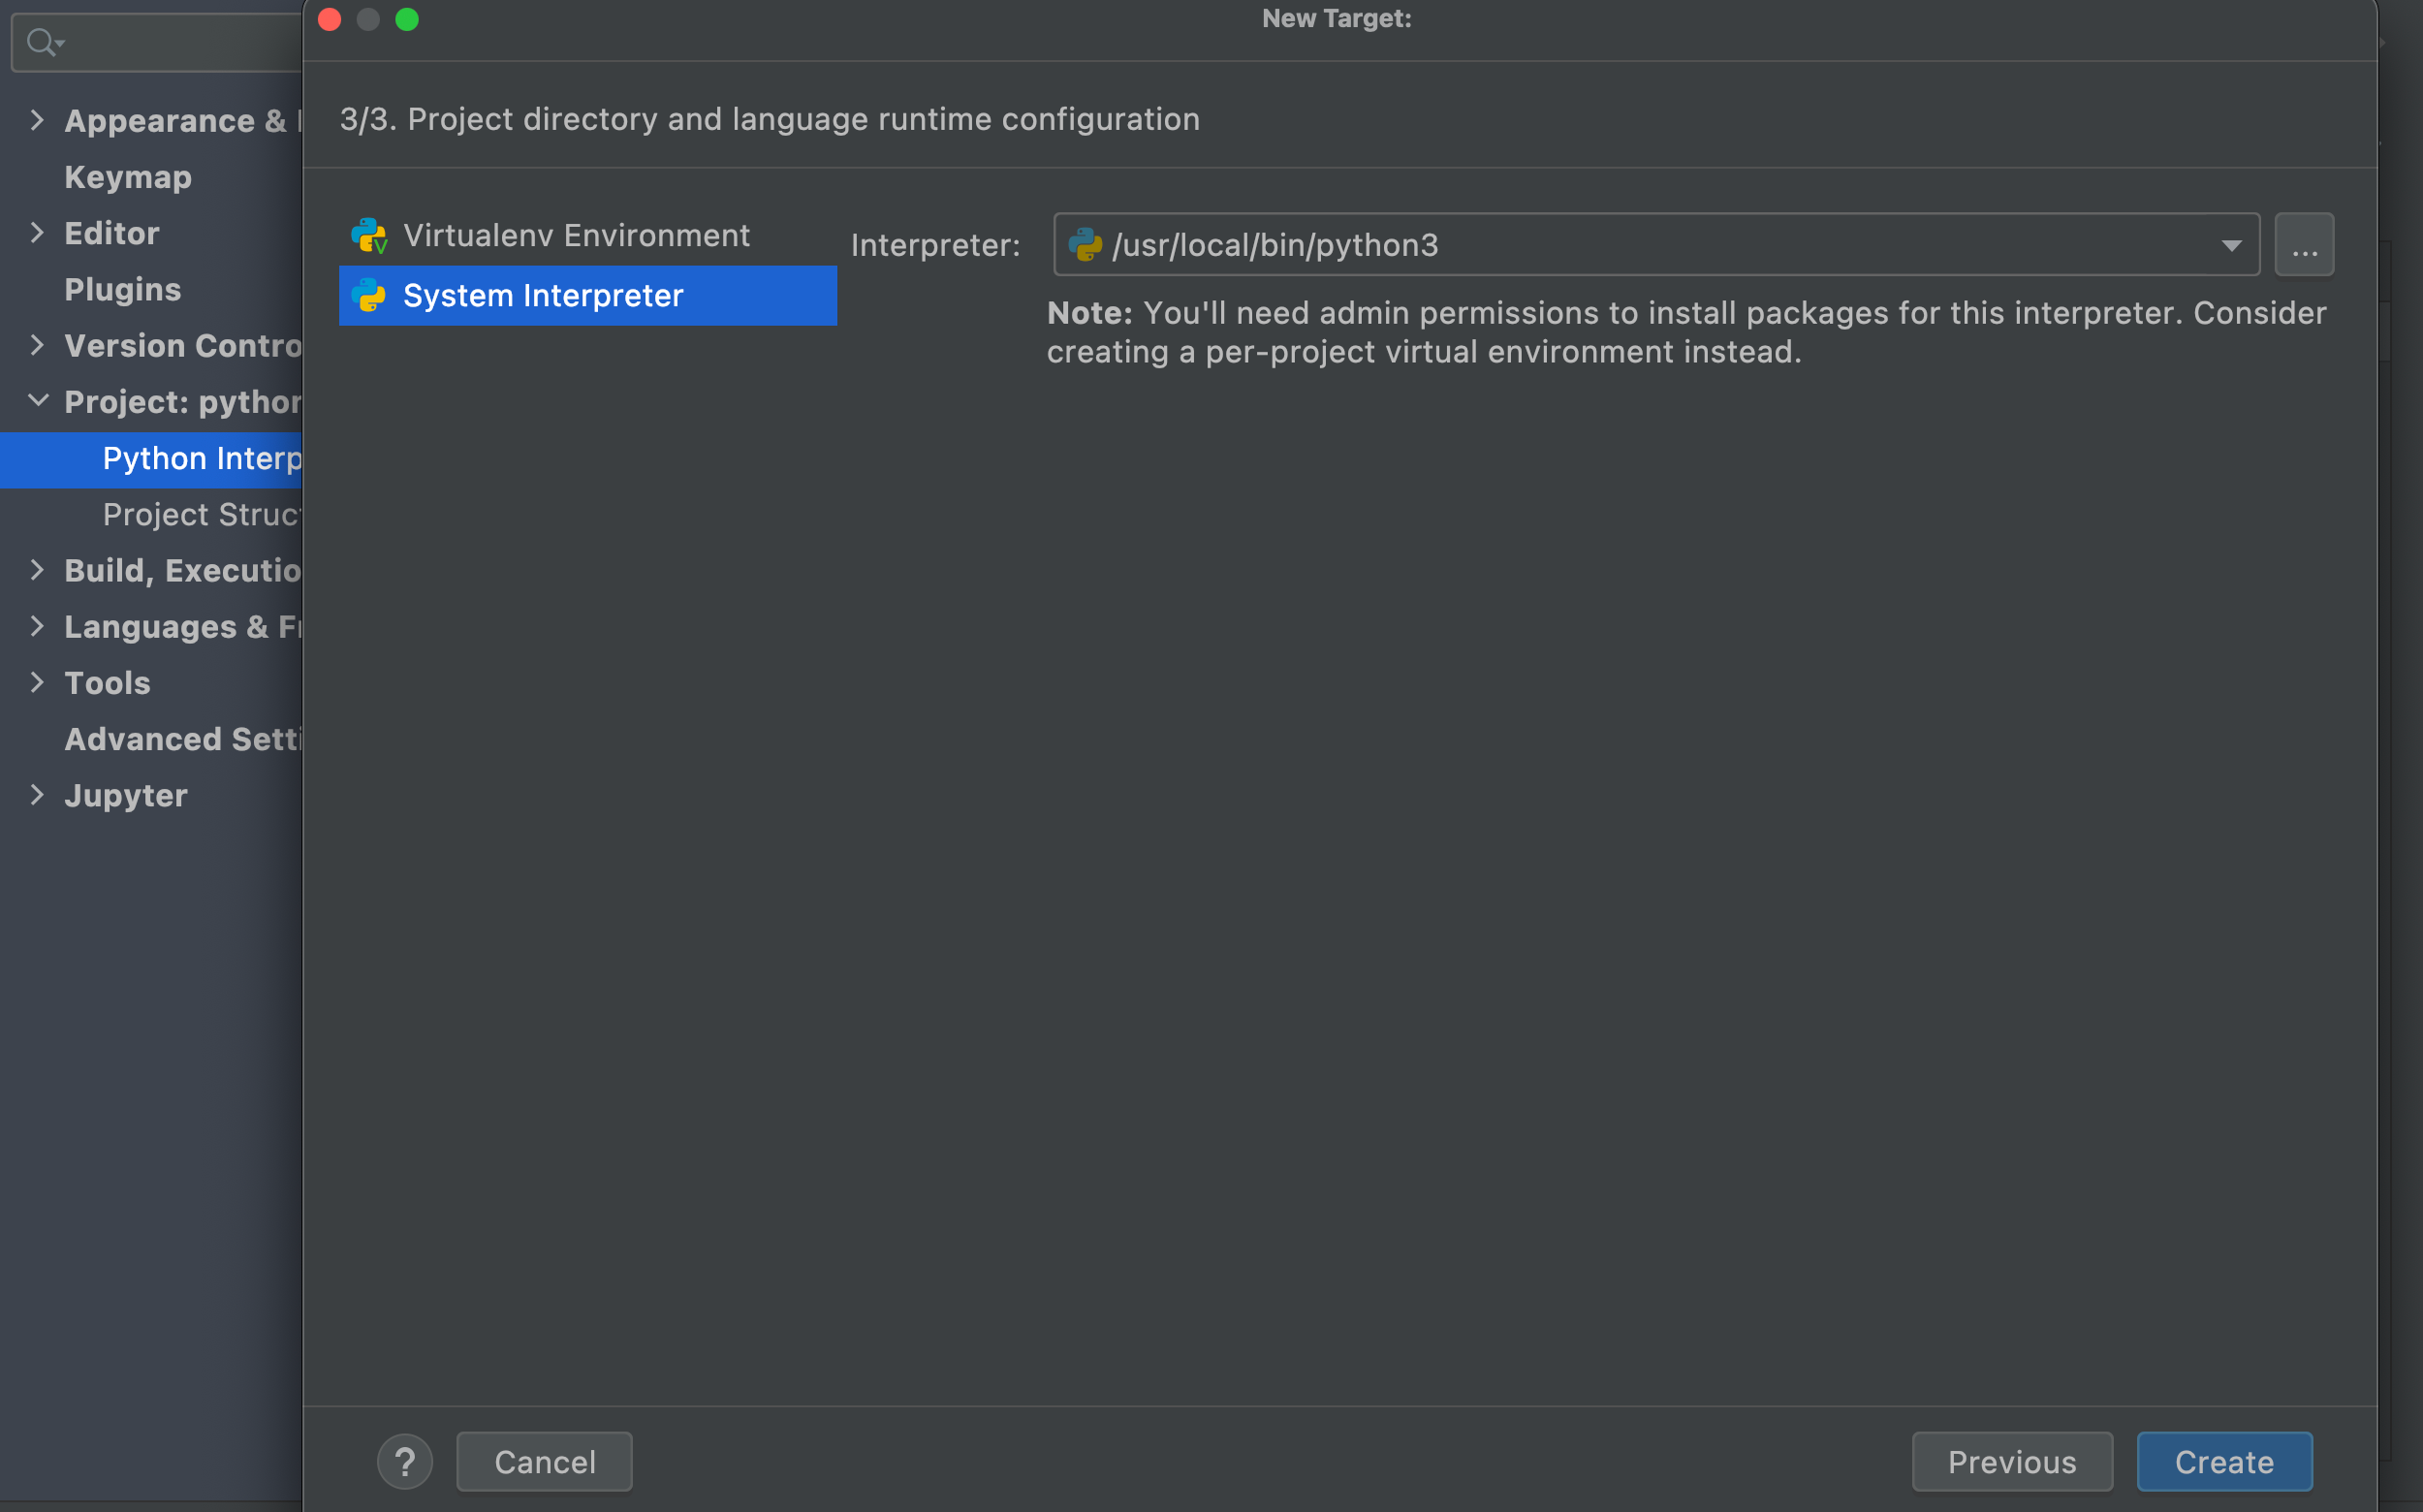
By now, you should have your target interpreter properly configured to run your application.

2. Creating virtual environments inside targets

Although in our previous example we were not intending to create a virtual environment inside our remote host (a Docker container in this case), this ability can be very useful in other types of targets, and this is one of the main reasons why we improved our Run Targets implementation.

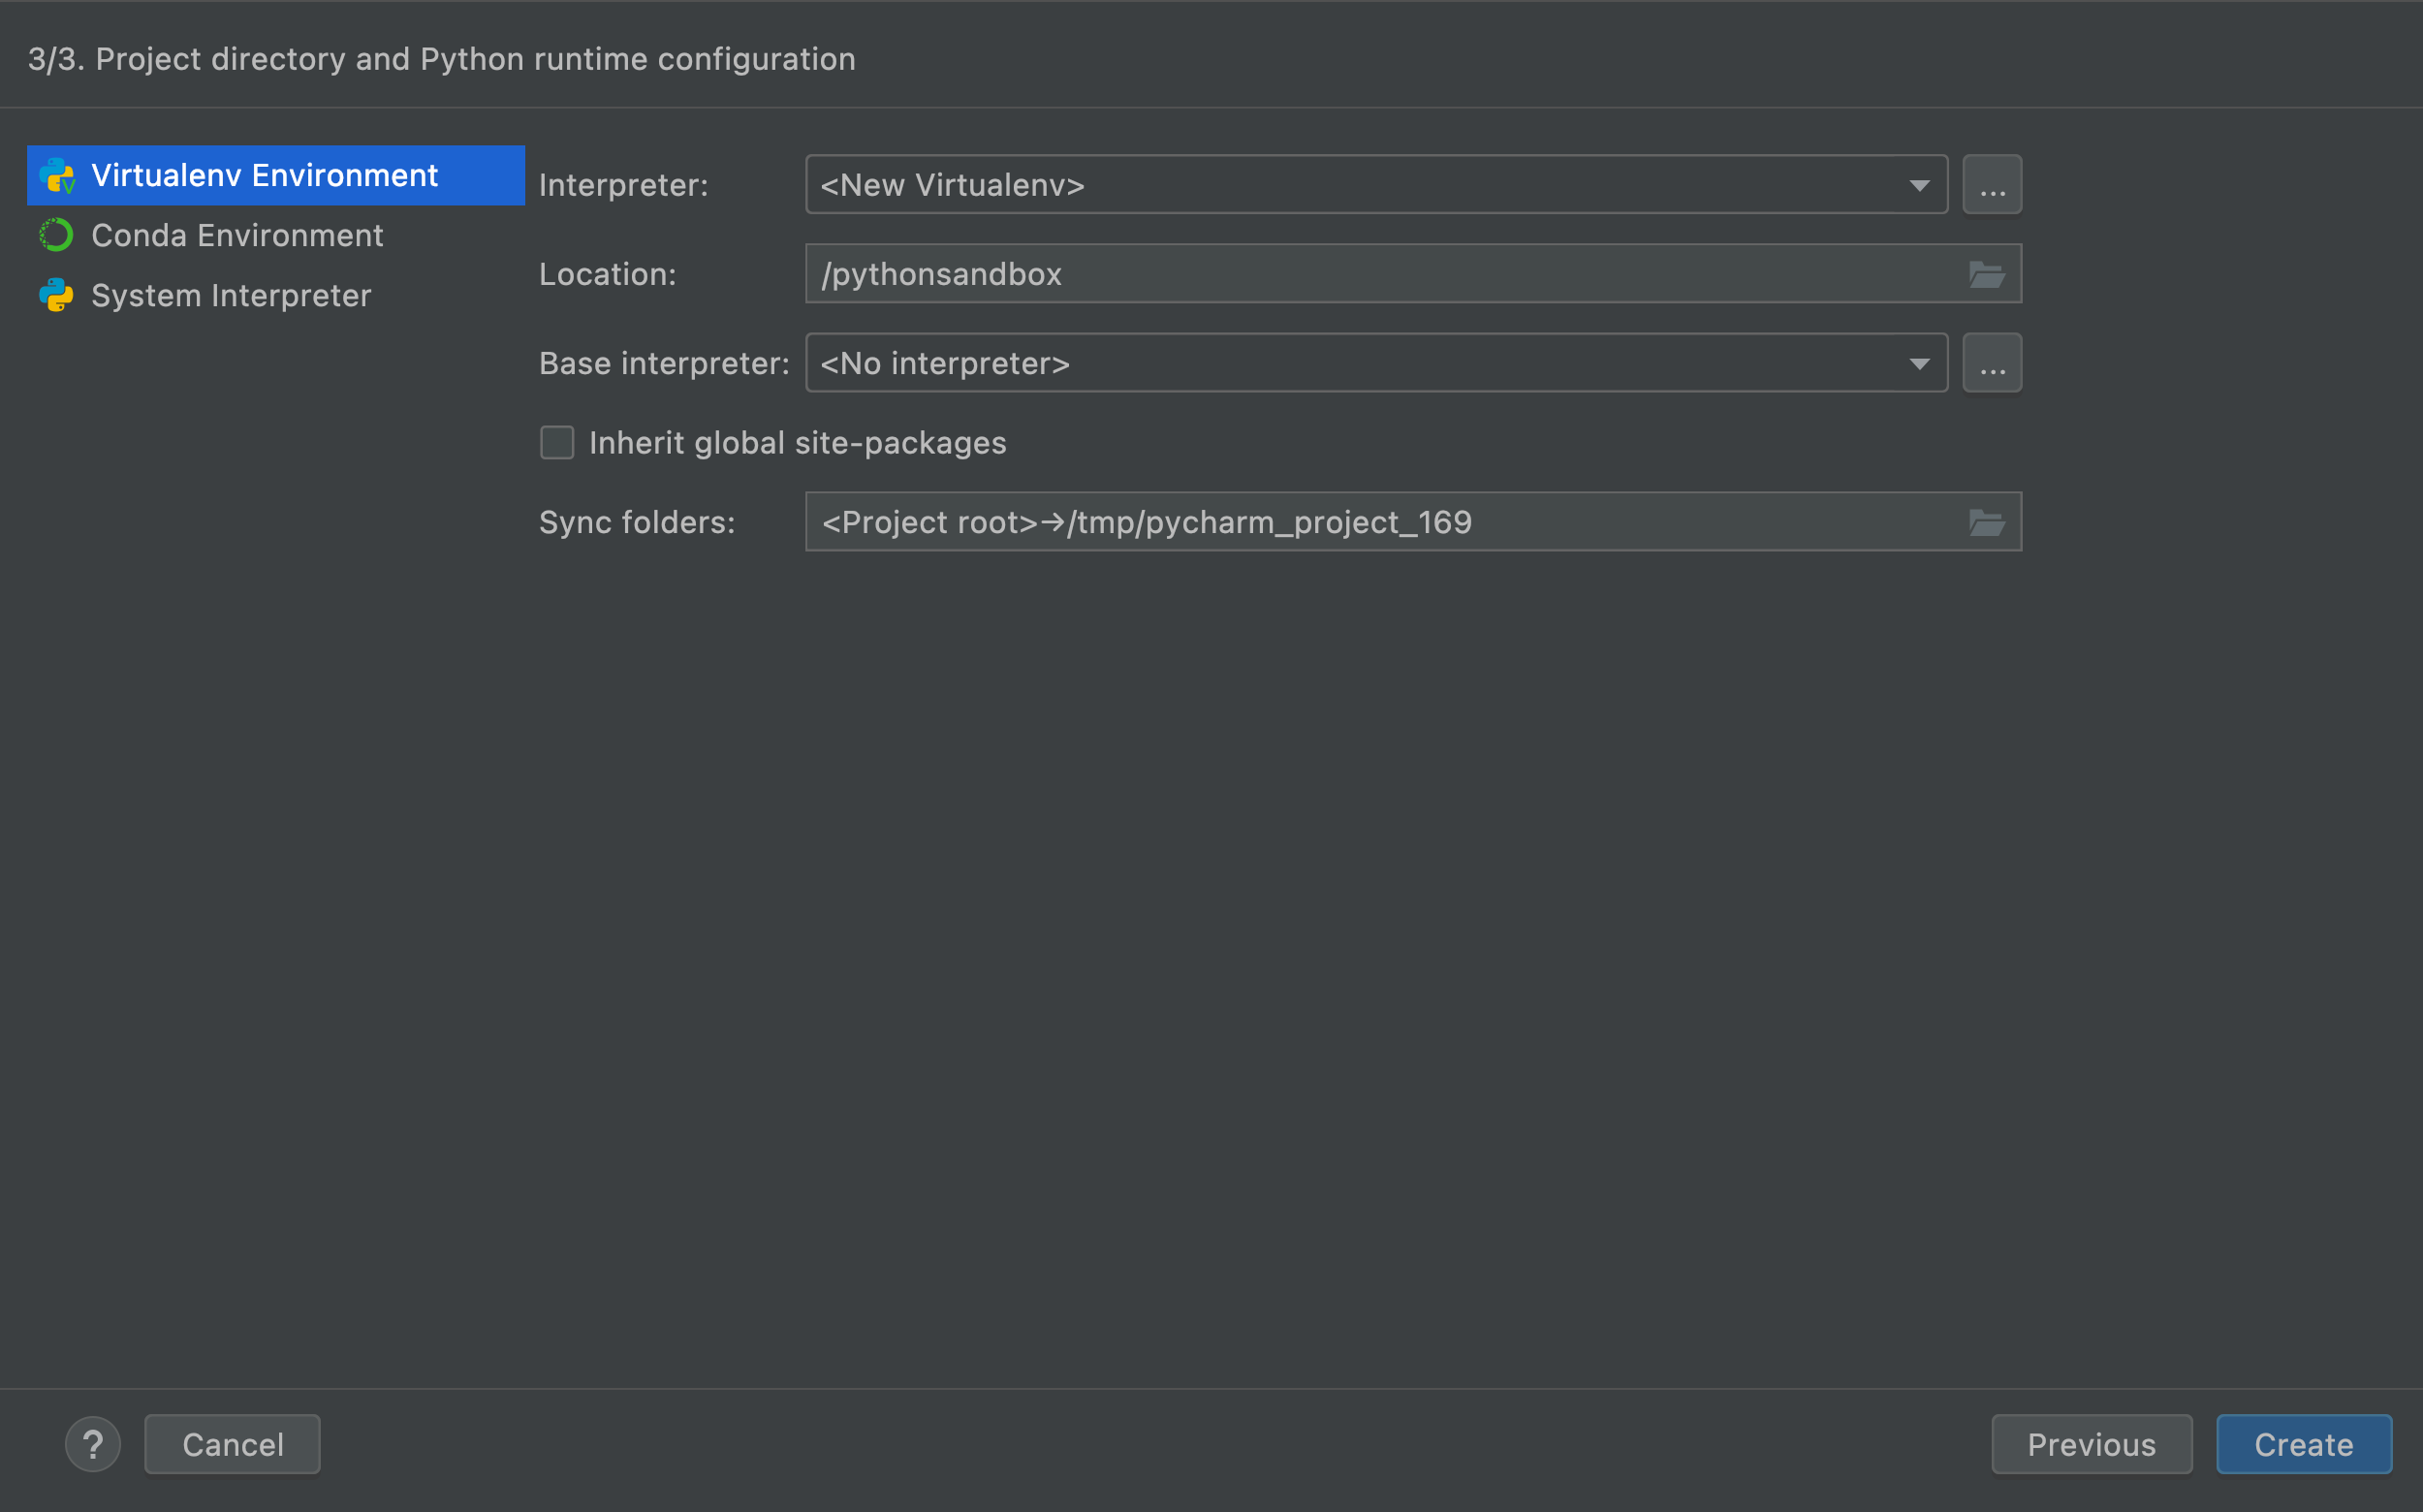
From this EAP build oneards, you can create virtual environments inside WSL, Vagrant, and SSH hosts from the comfort of your IDE. The initial process is the same as demonstrated above, but in the last step, you will be able to select the path to the virtual environment of your choice.
The new support for targets is the main feature to be highlighted in this EAP1, but, of course, it’s not the only one. While we will talk more about other improvements in the following blog posts, we highly encourage you to try PyCharm now and discover them yourself.

You can also check the release notes for a complete list of features and bug fixes brought by this build.

Ready to join the EAP?

Ground rules

  • EAP builds are free to use and require a valid JetBrains account.
  • EAP builds expire 30 days after the build date.
  • You can install an EAP build side by side with your stable PyCharm version.
  • These builds are not fully tested and can be unstable.
  • Your feedback is always welcome. Please use our issue tracker to report any bugs or inconsistencies.

How to download?

Download this EAP from our website or through the JetBrains Toolbox App. Alternatively, if you’re on Ubuntu 16.04 or later you can use snaps.

The PyCharm team


from Planet Python
via read more

Draw the Mandelbrot Set in Python

This tutorial will guide you through a fun project involving complex numbers in Python. You’re going to learn about fractals and create some truly stunning art by drawing the Mandelbrot set using Python’s Matplotlib and Pillow libraries. Along the way, you’ll learn how this famous fractal was discovered, what it represents, and how it relates to other fractals.

Knowing about object-oriented programming principles and recursion will enable you to take full advantage of Python’s expressive syntax to write clean code that reads almost like math formulas. To understand the algorithmic details of making fractals, you should also be comfortable with complex numbers, logarithms, set theory, and iterated functions. But don’t let these prerequisites scare you away, as you’ll be able to follow along and produce the art anyway!

In this tutorial, you’ll learn how to:

  • Apply complex numbers to a practical problem
  • Find members of the Mandelbrot and Julia sets
  • Draw these sets as fractals using Matplotlib and Pillow
  • Make a colorful artistic representation of the fractals

To download the source code used in this tutorial, click the link below:

Understanding the Mandelbrot Set

Before you try to draw the fractal, it’ll help to understand what the corresponding Mandelbrot set represents and how to determine its members. If you’re already familiar with the underlying theory, then feel free to skip ahead to the plotting section below.

The Icon of Fractal Geometry

Even if the name is new to you, you might have seen some mesmerizing visualizations of the Mandelbrot set before. It’s a set of complex numbers, whose boundary forms a distinctive and intricate pattern when depicted on the complex plane. That pattern became arguably the most famous fractal, giving birth to fractal geometry in the late 20th century:

Mandelbrot Set (Source: Wikimedia, Created by Wolfgang Beyer, CC BY-SA 3.0)

The discovery of the Mandelbrot set was possible thanks to technological advancement. It’s attributed to a mathematician named Benoît Mandelbrot. He worked at IBM and had access to a computer capable of what was, at the time, demanding number crunching. Today, you can explore fractals in the comfort of your home, using nothing more than Python!

Fractals are infinitely repeating patterns on different scales. While philosophers have argued for centuries about the existence of infinity, fractals do have an analogy in the real world. It’s a fairly common phenomenon occurring in nature. For example, this Romanesco cauliflower is finite but has a self-similar structure because each part of the vegetable looks like the whole, only smaller:

Fractal Structure of a Cauliflower
Fractal Structure of a Romanesco Cauliflower

Self-similarity can often be defined mathematically with recursion. The Mandelbrot set isn’t perfectly self-similar as it contains slightly different copies of itself at smaller scales. Nevertheless, it can still be described by a recursive function in the complex domain.

The Boundary of Iterative Stability

Formally, the Mandelbrot set is the set of complex numbers, c, for which an infinite sequence of numbers, z0, z1, …, zn, …, remains bounded. In other words, there is a limit that the magnitude of each complex number in that sequence never exceeds. The Mandelbrot sequence is given by the following recursive formula:

Mandelbrot Set Formula

In plain English, to decide whether some complex number, c, belongs to the Mandelbrot set, you must feed that number to the formula above. From now on, the number c will remain constant as you iterate the sequence. The first element of the sequence, z0, is always equal to zero. To calculate the next element, zn+1, you’ll keep squaring the last element, zn, and adding your initial number, c, in a feedback loop.

By observing how the resulting sequence of numbers behaves, you’ll be able to classify your complex number, c, as either a Mandelbrot set member or not. The sequence is infinite, but you must stop calculating its elements at some point. Making that choice is somewhat arbitrary and depends on your accepted level of confidence, as more elements will provide a more accurate ruling on c.

With complex numbers, you can imagine this iterative process visually in two dimensions, but you can go ahead and consider only real numbers for the sake of simplicity now. If you were to implement the above equation in Python, then it could look something like this:

>>>
>>> def z(n, c):
...     if n == 0:
...         return 0
...     else:
...         return z(n - 1, c) ** 2 + c

Your z() function returns the nth element of the sequence, which is why it expects an element’s index, n, as the first argument. The second argument, c, is a fixed number that you’re testing. This function would keep calling itself infinitely due to recursion. However, to break that chain of recursive calls, a condition checks for the base case with an immediately known solution—zero.

Try using your new function to find the first ten elements of the sequence for c = 1, and see what happens:

Read the full article at https://realpython.com/mandelbrot-set-python/ »


[ Improve Your Python With 🐍 Python Tricks 💌 – Get a short & sweet Python Trick delivered to your inbox every couple of days. >> Click here to learn more and see examples ]


from Real Python
read more

PyCharm: PyCharm 2021.3.2 Is Out

Bug fixes highlighted in this second minor release of PyCharm 2021.3:

  • We fixed the IDE’s freeze while indexing WSL projects [IDEA-286059]
  • We fixed a bug with Python string literals that were treated as ‘bytes’ in Markdown documents [PY-40313]

Download PyCharm 2021.3.2

For the full list of issues addressed in PyCharm 2021.3.2 please check the release notes.
Found a bug? Please report it using our bug tracker.


from Planet Python
via read more

ItsMyCode: TypeError: only size-1 arrays can be converted to python scalars

We get this error generally while working with NumPy and Matplotlib. If you have a function that accepts a single value, but if you pass an array instead, you will encounter TypeError: only size-1 arrays can be converted to python scalars.

In this tutorial, we will learn what is TypeError: only size-1 arrays can be converted to python scalars and how to resolve this error with examples.

What is TypeError: only size-1 arrays can be converted to python scalars?

Python generally has a handful of scalar values such as int, float, bool, etc. However, in NumPy, there are 24 new fundamental Python types to describe different types of scalars. 

Due to this nature, while working with NumPy, you should ensure to pass a correct type, else Python will raise a TypeError.

Let us take a simple example to reproduce this error. 

# import numpy and matplotlib
import numpy as np
import matplotlib.pyplot as plt

# function which accepts scalar value


def my_function(x):
    return int(x)

data = np.arange(1, 22, 0.4)

# passing an array to function
plt.plot(data, my_function(data))
plt.show()

Output

Traceback (most recent call last):
  File "c:\Personal\IJS\Code\main.py", line 14, in <module>
    plt.plot(data, my_function(data))
  File "c:\Personal\IJS\Code\main.py", line 9, in my_function
    return int(x)
TypeError: only size-1 arrays can be converted to Python scalars

In the above example, we have an int function that accepts only single values. However, we are passing an array to the np.int() or int() method, which will not work and results in TypeError.

How to fix TypeError: only size-1 arrays can be converted to python scalars?

There are two different ways to resolve this error. Let us take a look at both solutions with examples.

Solution 1 – Vectorize the function using np.vectorize

If you are working with a simple array and then vectorizing, this would be the best way to resolve the issue.

The int() accepts a single parameter and not an array according to its signature. We can use np.vectorize() function, which takes a nested sequence of objects or NumPy arrays as inputs and returns a single NumPy array or a tuple of NumPy arrays.

Behind the scenes, it’s a for loop that iterates over each array element and returns a single NumPy array as output.

Let us modify our code to use the np.vectorize() method and run the program.

# import numpy and matplotlib
import numpy as np
import matplotlib.pyplot as plt

# function which accepts scalar value

def my_function(x):
    return int(x)


# vectorize the function
f = np.vectorize(my_function)

data = np.arange(1, 22, 0.4)

# passing an array to function
plt.plot(data, f(data))
plt.show()

Output

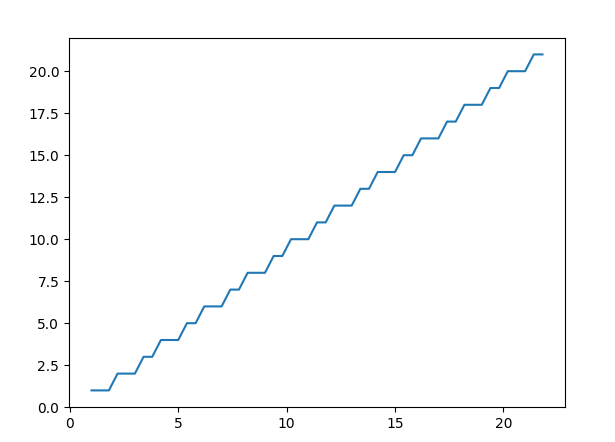
We can see that error is gone, the vectorize() function will loop through the array and returns a single array that is accepted by the int() function.

image 9TypeError: only size-1 arrays can be converted to python scalars 3

Solution 2 – Cast the array using .astype() method

The np.vectorize() method is inefficient over the larger arrays as it loops through each element.

The better way to resolve this issue is to cast the array into a specific type (int in this case) using astype() method.

# import numpy and matplotlib
import numpy as np
import matplotlib.pyplot as plt

# function which accepts scalar value


def my_function(x):
    # csat the array into integer
    return x.astype(int)


data = np.arange(1, 22, 0.4)

# passing an array to function
plt.plot(data, my_function(data))
plt.show()

Output

only size-1 arrays can be converted to python scalarsTypeError: only size-1 arrays can be converted to python scalars 4

Conclusion

We get TypeError: only size-1 arrays can be converted to python scalars if we pass an array to the method that accepts only scalar values.

The issue can be resolved by using np.vectorize() function a nested sequence of objects or NumPy arrays as inputs and returns a single NumPy array or a tuple of NumPy arrays.

Another way to resolve the error is to use the astype() method to cast the array into an integer type.


from Planet Python
via read more

Will McGugan: Textual for Windows

Textual adds Windows support

I've just released v0.1.15 of Textual, with Windows support.

The Windows support is somewhat experimental, but so far seems solid. You will get best results on the new Windows Terminal. On the classic command prompt you might find a reduced color palette. This works on VSCode, but is missing mouse input on Windows 10 due to an upstream issue which is apparently fixed in Windows 11. If you have Windows 11, I'd appreciate confirmation on that!

© 2022 Will McGugan

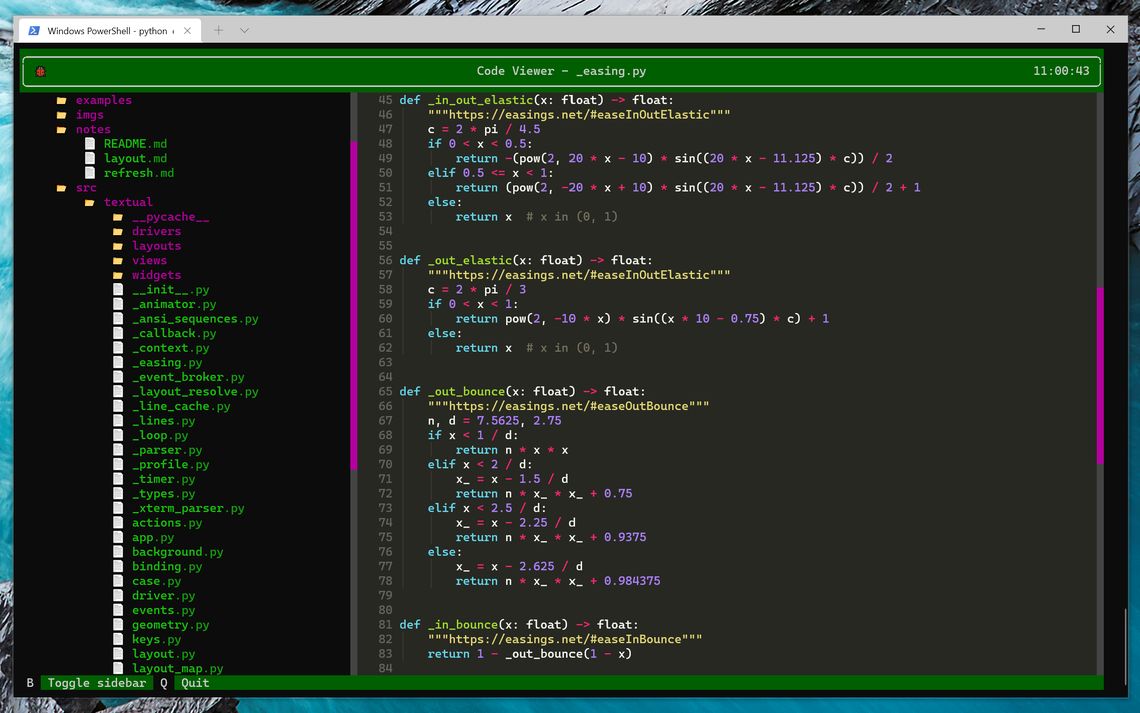
This is the code_viewer example in the Textual repo.

This is the first release under the Textualize umbrella, which is my tech startup funding development. We've been hard at work in a branch adding some very exciting new features which should push the boundaries of what you would think is possible in the terminal. Join the mailing list if you would like to be the first to hear about that.

Windows terminal apps

When it comes to developing terminal apps, MacOS and Linux are essentially the same. Textual shares code for both. Windows works differently, and requires an entirely different API to switch to application (fullscreen) mode and read keys without echo. Recently it got a little easier when Windows added support for virtual terminal sequences (~5 years ago), i.e. the same ansi codes that have been supported in Linux since forever.

The virtual terminal sequences support certainly helped. Textual can re-use the code that generates the display, but I couldn't avoid using the win32 api entirely. In particular, getting updates regarding the terminal size was problematic. Textual should update the display when resizing the window. In Linux that is done via a signal, in Windows that requires subscribing and listening to input events.

Fortunately if you build an app with Textual, you won't have to worry about the differences between these platforms. All the gnarly API details are abstracted with a driver system which ensures that by the time your code receives events any differences in platforms have been abstracted away.


from Planet Python
via read more

Stack Abuse: Guide to enumerate() in Python - Forget Counters

Introduction

Looping with a counter variable/index - a classic in Computer Science! Typically, you'd either explicitly define a counter variable/index, and manually increment it on each loop, or you'd use some sort of syntactic sugar to avoid this process through enhanced for loops:

some_list = ['Looping', 'with', 'counters', 'is', 'a', 'classic!']

# Manual counter incrementation
i = 0
for element in some_list:
    print(f'Element Index: {i}, Element: {element}')
    i += 1

# Automatic counter incrementation
for i in range(len(some_list)):
    print(f'Element Index: {i}, Element: {some_list[i]}')

Both of these snippets result in the same output:

Element Index: 0, Element: Looping
Element Index: 1, Element: with
Element Index: 2, Element: counters
Element Index: 3, Element: is
Element Index: 4, Element: a
Element Index: 5, Element: classic!

Due to how common looping like this is in day-to-day work - the enumerate() function was built into the Python namespace. You can, without any extra dependencies, loop through an iterable in Python, with an automatic counter variable/index with syntax as simple as:

for idx, element in enumerate(some_list):
     print(idx, element)

Note: It's common, but not necessary, convention to name the index as idx if no other label is applicable, since id is a reserved keyword. Commonly, based on the iterable you're working with, more meaningful names can be attributed, such as: batch_num, batch in enumerate(...).

This piece of code results in:

0 Looping
1 with
2 counters
3 is
4 a
5 classic!

Let's dive into the function and explore how it works! It's a classic and common one - and in true Python fashion, it simplifies a common, redundant operation down and improves readability of your code.

The enumerate() Function in Python

The enumerate() function accepts an iterable collection (such as a tuple, list or string), and returns an enumerate object, which consists of a key-set and value-set, where the keys correspond to a counter variable (starting at 0) and the values correspond to the original elements of the iterable collection:

obj = enumerate(some_list)
print(type(obj))
# <class 'enumerate'>

Note: The enumerate object is, itself, iterable! You can use the standard for syntax, unpacking the keys and values of the enumerate object.

Using Python's standard for syntax, we can unpack the keys and values from this object and inspect their types:

for key, value in obj:
    print(type(key), type(value))
    
# <class 'int'> <class 'str'>

The data types of the values (elements from the original collection) are retained, so even if you pass custom data types, as long as they're a valid iterable collection - they'll simply be annotated with a counter variable. If you were to collect the object itself into a list, its structure would become very clear:

print(list(obj))
# [(0, 'Looping'), (1, 'with'), (2, 'counters'), (3, 'is'), (4, 'a'), (5, 'classic!')]

It's just a set of tuples with two elements each - a counter variable, starting at 0, and each element of the original iterable mapped to the indices.

You can set an optional start argument, denoting not the starting index in the iterable, but the starting value for the first counter/index that the function will generate. For instance, say we'd like to start at 1 instead of 0:

obj = enumerate(some_list, 1)
print(list(obj))
# [(1, 'Looping'), (2, 'with'), (3, 'counters'), (4, 'is'), (5, 'a'), (6, 'classic!')]

Loop Through Iterable with enumerate()

Having said all that - looping through an enumerate object looks the same as looping through other iterables. The for loop comes in handy here as you can assign reference variables to the returned tuple values. Additionally, there's no need to reference the object explicitly, as it's very rarely used outside of a single loop so the returned value is typically used directly in the loop itself:

# No need to assign the returned `enumerate` object to a distinct reference variable
for idx, element in enumerate(some_list):
     print(f'{idx}, {element}')

This results in:

0, Looping
1, with
2, counters
3, is
4, a
5, classic!

If you'd like to read more about f-Strings and formatting output in Python, read our Guide to String Formatting with Python 3's f-Strings!

Annotating each element in an iterable - or rather, incrementing a counter and returning it, while accessing elements of iterables is as easy as that!

It's worth noting that nothing special really happens within the enumerate() function. It really is, functionally equivalent, to the initial loop we wrote, with an explicit counter variable being returned with an element. If you take a look at the note in the official documentation, the result of the function is functionally equivalent to:

def enumerate(sequence, start=0):
    n = start
    for elem in sequence:
        yield n, elem
        n += 1

You can see that the code is quite similar to the first implementation we've defined:

# Original implementation
i = 0
for element in some_list:
    print(f'Element Index: {i}, Element: {some_list[i]}')
    i += 1
    
# Or, rewritten as a method that accepts an iterable    
def our_enumerate(some_iterable, start=0):
    i = start
    for element in some_iterable:
        yield i, element
        i += 1

The key point here is - the yield keyword defines a generator, which is iterable. By yielding back the index and the element itself, we're creating an iterable generator object, which we can then loop over and extract elements (and their indices) from via the for loop.

If you'd like to read more about the usage of the yield keyword here, read our Guide to Understanding Python's "yield" Keyword!

If you were to use the our_enumerate() function instead of the built-in one, we'd have much the same results:

some_list = ['Looping', 'with', 'counters', 'is', 'a', 'classic!']

for idx, element in our_enumerate(some_list):
     print(f'{idx}, {element}')
        
obj = our_enumerate(some_list)
print(f'Object type: {obj}')

This results in:

0, Looping
1, with
2, counters
3, is
4, a
5, classic!
Object type: <generator object our_enumerate at 0x000002750B595F48>

The only difference is that we just have a generic generator object, instead of a nicer class name.

Conclusion

Ultimately, the enumerate() function is simply syntactic sugar, wrapping an extremely common and straightforward looping implementation.

In this short guide, we've taken a look at the enumerate() function in Python - the built-in convenience method to iterate over a collection and annotate the elements with indices.


from Planet Python
via read more

ItsMyCode: How to Install Seaborn in Python using the Pip command

This tutorial will learn how to install Seaborn in Python using the Pip command.

Seaborn is a library for making statistical graphics in Python. It is built on top of matplotlib and closely integrated with pandas data structures

Pip is a recursive acronym for “Pip Installs Packages” or “Pip Installs Python.” Basically, it is a package manager that allows you to download and install packages.

Supported Python Version

Python 3.6+ (Recommended)

Note: If you are installing the latest version of Seaborn, the recommended version of Python is 3.6 and above.

Required dependencies

These are the dependent libraries that need to be present. If not already present, these libraries will be downloaded when you install seaborn.

Optional dependencies

How to Install Seaborn in Python using the Pip Command

Before installing the Seaborn, ensure you have the latest version of Pip installed on your computer.

If Pip is not installed correctly or not present, check out the article pip: command not found to resolve the issue.

To install the latest version of Seaborn, run the following pip command.

pip install seaborn

For Python version 3+, it is recommended to use the pip3 command to install the seaborn, as shown below.

pip3 install seaborn

If you would like to install a specific version of Seaborn, you can provide the version number in the pip command as shown below.

pip3 install seaborn==0.11.2

The library is also included as part of Anaconda distribution. You can run the below conda command to install Seaborn on Anaconda.

conda install seaborn


from Planet Python
via read more

TestDriven.io: Working with Static and Media Files in Django

This article looks at how to work with static and media files in a Django project, locally and in production. from Planet Python via read...