Sunday, October 31, 2021

ItsMyCode: Python ValueError: cannot reindex from a duplicate axis

ItsMyCode |

In Python, you will get a valueerror: cannot reindex from a duplicate axis usually when you set an index to a specific value, reindexing or resampling the DataFrame using reindex method.

If you look at the error message “cannot reindex from a duplicate axis“, it means that Pandas DataFrame has duplicate index values. Hence when we do certain operations such as concatenating a DataFrame, reindexing a DataFrame, or resampling a DataFrame in which the index has duplicate values, it will not work, and Python will throw a ValueError.

Verify if your DataFrame Index contains Duplicate values

When you get this error, the first thing you need to do is to check the DataFrame index for duplicate values using the below code.

df.index.is_unique

The index.is_unique method will return a boolean value. If the index has unique values, it returns True else False.

Test which values in an index is duplicate

If you want to check which values in an index have duplicates, you can use index.duplicated method as shown below.

df.index.duplicated()

The method returns an array of boolean values. The duplicated values are returned as True in an array.

idx = pd.Index(['lama', 'cow', 'lama', 'beetle', 'lama'])
idx.duplicated()

Output

array([False, False,  True, False,  True])

Drop rows with duplicate index values

By using the same index.duplicated method, we can remove the duplicate values in the DataFrame using the following code.

It will traverse the DataFrame from a top-down approach and ensure all the duplicate values in the index are removed, and the unique values are preserved.

df.loc[~df.index.duplicated(), :]

Alternatively, if you use the latest version, you can even use the method df.drop_duplicates() as shown below.

Consider dataset containing ramen rating.

>>> df = pd.DataFrame({
...     'brand': ['Yum Yum', 'Yum Yum', 'Indomie', 'Indomie', 'Indomie'],
...     'style': ['cup', 'cup', 'cup', 'pack', 'pack'],
...     'rating': [4, 4, 3.5, 15, 5]
... })
>>> df
    brand style  rating
0  Yum Yum   cup     4.0
1  Yum Yum   cup     4.0
2  Indomie   cup     3.5
3  Indomie  pack    15.0
4  Indomie  pack     5.0

By default, it removes duplicate rows based on all columns.

>>> df.drop_duplicates()
    brand style  rating
0  Yum Yum   cup     4.0
2  Indomie   cup     3.5
3  Indomie  pack    15.0
4  Indomie  pack     5.0

To remove duplicates on specific column(s), use subset.

>>> df.drop_duplicates(subset=['brand'])
    brand style  rating
0  Yum Yum   cup     4.0
2  Indomie   cup     3.5

To remove duplicates and keep last occurrences, use keep.

>>> df.drop_duplicates(subset=['brand', 'style'], keep='last')
    brand style  rating
1  Yum Yum   cup     4.0
2  Indomie   cup     3.5
4  Indomie  pack     5.0

Prevent duplicate values in a DataFrame index

If you want to ensure Pandas DataFrame without duplicate values in the index, one can set a flag. Setting the allows_duplicate_labels flag to False will prevent the assignment of duplicate values.

df.flags.allows_duplicate_labels = False

Applying this flag to a DataFrame with duplicate values or assigning duplicate values will result in DuplicateLabelError: Index has duplicates.

Overwrite DataFrame index with a new one

Alternatively, to overwrite your current DataFrame index with a new one:

df.index = new_index

or, use .reset_index:

df.reset_index(level=0, inplace=True)

Remove inplace=True if you want it to return the dataframe.

The post Python ValueError: cannot reindex from a duplicate axis appeared first on ItsMyCode.


from Planet Python
via read more

Saturday, October 30, 2021

Podcast.__init__: Build Composable And Reusable Feature Engineering Pipelines with Feature-Engine

Every machine learning model has to start with feature engineering. This is the process of combining input variables into a more meaningful signal for the problem that you are trying to solve. Many times this process can lead to duplicating code from previous projects, or introducing technical debt in the form of poorly maintained feature pipelines. In order to make the practice more manageable Soledad Galli created the feature-engine library. In this episode she explains how it has helped her and others build reusable transformations that can be applied in a composable manner with your scikit-learn projects. She also discusses the importance of understanding the data that you are working with and the domain in which your model will be used to ensure that you are selecting the right features.

Summary

Every machine learning model has to start with feature engineering. This is the process of combining input variables into a more meaningful signal for the problem that you are trying to solve. Many times this process can lead to duplicating code from previous projects, or introducing technical debt in the form of poorly maintained feature pipelines. In order to make the practice more manageable Soledad Galli created the feature-engine library. In this episode she explains how it has helped her and others build reusable transformations that can be applied in a composable manner with your scikit-learn projects. She also discusses the importance of understanding the data that you are working with and the domain in which your model will be used to ensure that you are selecting the right features.

Announcements

  • Hello and welcome to Podcast.__init__, the podcast about Python’s role in data and science.
  • When you’re ready to launch your next app or want to try a project you hear about on the show, you’ll need somewhere to deploy it, so take a look at our friends over at Linode. With the launch of their managed Kubernetes platform it’s easy to get started with the next generation of deployment and scaling, powered by the battle tested Linode platform, including simple pricing, node balancers, 40Gbit networking, dedicated CPU and GPU instances, and worldwide data centers. Go to pythonpodcast.com/linode and get a $100 credit to try out a Kubernetes cluster of your own. And don’t forget to thank them for their continued support of this show!
  • Your host as usual is Tobias Macey and today I’m interviewing Soledad Galli about feature-engine, a Python library to engineer features for use in machine learning models

Interview

  • Introductions
  • How did you get introduced to Python?
  • Can you describe what feature-engine is and the story behind it?
  • What are the complexities that are inherent to feature engineering?
    • What are the problems that are introduced due to incidental complexity and technical debt?
  • What was missing in the available set of libraries/frameworks/toolkits for feature engineering that you are solving for with feature-engine?
  • What are some examples of the types of domain knowledge that are needed to effectively build features for an ML model?
  • Given the fact that features are constructed through methods such as normalizing data distributions, imputing missing values, combining attributes, etc. what are some of the potential risks that are introduced by incorrectly applied transformations or invalid assumptions about the impact of these manipulations?
  • Can you describe how feature-engine is implemented?
    • How have the design and goals of the project changed or evolved since you started working on it?
  • What (if any) difference exists in the feature engineering process for frameworks like scikit-learn as compared to deep learning approaches using PyTorch, Tensorflow, etc.?
  • Can you describe the workflow of identifying and generating useful features during model development?
    • What are the tools that are available for testing and debugging of the feature pipelines?
  • What do you see as the potential benefits or drawbacks of integrating feature-engine with a feature store such as Feast or Tecton?
  • What are the most interesting, innovative, or unexpected ways that you have seen feature-engine used?
  • What are the most interesting, unexpected, or challenging lessons that you have learned while working on feature-engine?
  • When is feature-engine the wrong choice?
  • What do you have planned for the future of feature-engine?

Keep In Touch

Picks

Closing Announcements

  • Thank you for listening! Don’t forget to check out our other show, the Data Engineering Podcast for the latest on modern data management.
  • Visit the site to subscribe to the show, sign up for the mailing list, and read the show notes.
  • If you’ve learned something or tried out a project from the show then tell us about it! Email hosts@podcastinit.com) with your story.
  • To help other people find the show please leave a review on iTunes and tell your friends and co-workers

Links

The intro and outro music is from Requiem for a Fish The Freak Fandango Orchestra / CC BY-SA


from Planet Python
via read more

Codementor: Django Website Template - Material Kit Design

Open-source Django Website template crafted on top of a pixel-perfect Bootstrap 5 design: Material Kit (free version).

from Planet Python
via read more

Weekly Python StackOverflow Report: (ccxcix) stackoverflow python report

These are the ten most rated questions at Stack Overflow last week.
Between brackets: [question score / answers count]
Build date: 2021-10-30 13:46:37 GMT


  1. NumPy: construct squares along diagonal of matrix / expand diagonal matrix - [15/3]
  2. Convert subset of columns to rows by combining columns - [14/3]
  3. Efficient algorithm to get all the combinations of numbers that are within a certain range from 2 lists in python - [8/2]
  4. Is the key order the same for OrderedDict and dict? - [6/3]
  5. Django REST API accept list instead of dictionary in post request - [6/2]
  6. cannot update spyder=5.1.5 on new anaconda install - [6/1]
  7. Why does starred assignment produce lists and not tuples? - [6/1]
  8. Is there a way to match inequalities in Python ≥ 3.10? - [5/1]
  9. Efficient way of using numpy memmap when training neural network with pytorch - [5/0]
  10. How to find which column contains a certain value? - [4/4]


from Planet Python
via read more

ItsMyCode: Python JSONPath

ItsMyCode |

JSONPath is an expression language that is used to parse the JSON data in Python. JSONPath is similar to XPath in XML, where we parse the XML data. 

JSONPath provides a simpler syntax to query JSON data and get the desired value in Python. Using JSONPath will be the more efficient way to parse and query JSON data as we don’t have to load the entire JSON data. This approach is more memory-optimized compared to any other way of querying JSON.

JSONPath Library in Python

There are many JSONPath libraries for Python, and the most popular one is the jsonpath-ng library. It’s written in the native Python language and supports both Python 2 and Python 3 versions.

jsonpath-ng is the final implementation of JSONPath for Python that aims for standard-compliant including arithmetic and binary comparison operators s, as defined in the original JSONPath proposal.  

This packages merges both jsonpath-rw and jsonpath-rw-ext and provides several AST API enhancements, such as the ability to update or remove nodes in the tree.

Installing jsonpath-ng Module

To install jsonpath-ng library, use the below pip install command. 

pip install --upgrade jsonpath-ng

The above command will install the latest version of the jsonpath-ng library on your machine. Once installed, you can import in the Python IDE using the below code.

import jsonpath_ng

Jsonpath operators:

Below are the list of operators you can use for getting json data values.

Syntax Meaning
jsonpath1 . jsonpath2 All nodes matched by jsonpath2 starting at any node matching jsonpath1
jsonpath [ whatever ] Same as jsonpath.whatever
jsonpath1 .. jsonpath2 All nodes matched by jsonpath2 that descend from any node matching jsonpath1
jsonpath1 where jsonpath2 Any nodes matching jsonpath1 with a child matching jsonpath2
jsonpath1 | jsonpath2 Any nodes matching the union of jsonpath1 and jsonpath2

Parsing a Simple JSON Data using JSONPath

A Simple example of parsing the JSON and fetching the JSON value using the attribute key.

# Program to parse JSON data in Python 
import json
from jsonpath_ng import jsonpath, parse

employee_data = '{"id":1, "first_name":"Chandler" , "last_name":"Bing"}'
json_data = json.loads(employee_data)

jsonpath_expr= parse('$.first_name')
first_name = jsonpath_expr.find(json_data)

print("The First Name of the employee is: ", first_name[0].value)

Output

The First Name of the employee is  Chandler

Parsing a Json Array using JSONPath Expression

The JSON key contains the list of values and uses the JSON Path expression. We can parse and query the exact field values of the JSON.

{
    "books": [
        {
            "category": "reference",
            "author": "Nigel Rees",
            "title": "Sayings of the Century",
            "isbn": "6-246-2356-8",
            "price": 8.95
        },
        {
            "category": "fiction",
            "author": "Evelyn Waugh",
            "title": "Sword of Honour",
            "isbn": "5-444-34234-8",
            "price": 12.99
        },
        {
            "category": "fiction",
            "author": "Herman Melville",
            "title": "Moby Dick",
            "isbn": "0-553-21311-3",
            "price": 8.99
        },
        {
            "category": "fiction",
            "author": "J. R. R. Tolkien",
            "title": "The Lord of the Rings",
            "isbn": "0-395-19395-8",
            "price": 22.99
        }
    ]
}

In the above JSON data, if we need the list of all ISBN of the book, we can use the below code to get the data using JSONPath expression as shown below.

# Program to parse JSON data in Python 
import json
from jsonpath_ng import jsonpath, parse

with open("books.json", 'r') as json_file:
    json_data = json.load(json_file)

jsonpath_expression = parse('books[*].isbn')

for match in jsonpath_expression.find(json_data):
    print(f'Books ISBN: {match.value}')


Output

Books ISBN: 6-246-2356-8
Books ISBN: 5-444-34234-8
Books ISBN: 0-553-21311-3
Books ISBN: 0-395-19395-8

The post Python JSONPath appeared first on ItsMyCode.


from Planet Python
via read more

Sebastian Pölsterl: scikit-survival 0.16 released

I am proud to announce the release if version 0.16.0 of scikit-survival, The biggest improvement in this release is that you can now change the evaluation metric that is used in estimators’ score method. This is particular useful for hyper-parameter optimization using scikit-learn’s GridSearchCV. You can now use as_concordance_index_ipcw_scorer, as_cumulative_dynamic_auc_scorer, or as_integrated_brier_score_scorer to adjust the score method to your needs. The example below illustrates how to use these in practice.

For a full list of changes in scikit-survival 0.16.0, please see the release notes.

Installation

Pre-built conda packages are available for Linux, macOS, and Windows via

 conda install -c sebp scikit-survival

Alternatively, scikit-survival can be installed from source following these instructions.

Hyper-Parameter Optimization with Alternative Metrics

The code below is also available as a notebook and can directly be executed by clicking

In this example, we are going to use the German Breast Cancer Study Group 2 dataset. We want to fit a Random Survival Forest and optimize it’s max_depth hyper-parameter using scikit-learn’s GridSearchCV.

Let’s begin by loading the data.

import numpy as np
from sksurv.datasets import load_gbsg2
from sksurv.preprocessing import encode_categorical
gbsg_X, gbsg_y = load_gbsg2()
gbsg_X = encode_categorical(gbsg_X)
lower, upper = np.percentile(gbsg_y["time"], [10, 90])
gbsg_times = np.arange(lower, upper + 1)

Next, we create an instance of Random Survival Forest.

from sksurv.ensemble import RandomSurvivalForest
rsf_gbsg = RandomSurvivalForest(random_state=1)

We define that we want to evaluate the performance of each hyper-parameter configuration by 3-fold cross-validation.

from sklearn.model_selection import KFold
cv = KFold(n_splits=3, shuffle=True, random_state=1)

Next, we define the set of hyper-parameters to evaluate. Here, we search for the best value for max_depth between 1 and 10 (excluding). Note that we have to prefix max_depth with estimator__, because we are going to wrap the actual RandomSurvivalForest instance with one of the classes above.

cv_param_grid = {
"estimator__max_depth": np.arange(1, 10, dtype=int),
}

Now, we can put all the pieces together and start searching for the best hyper-parameters that maximize concordance_index_ipcw.

from sklearn.model_selection import GridSearchCV
from sksurv.metrics import as_concordance_index_ipcw_scorer
gcv_cindex = GridSearchCV(
as_concordance_index_ipcw_scorer(rsf_gbsg, tau=gbsg_times[-1]),
param_grid=cv_param_grid,
cv=cv,
).fit(gbsg_X, gbsg_y)

The same process applies when optimizing hyper-parameters to maximize cumulative_dynamic_auc.

from sksurv.metrics import as_cumulative_dynamic_auc_scorer
gcv_iauc = GridSearchCV(
as_cumulative_dynamic_auc_scorer(rsf_gbsg, times=gbsg_times),
param_grid=cv_param_grid,
cv=cv,
).fit(gbsg_X, gbsg_y)

While as_concordance_index_ipcw_scorer and as_cumulative_dynamic_auc_scorer can be used with any estimator, as_integrated_brier_score_scorer is only available for estimators that provide the predict_survival_function method, which includes RandomSurvivalForest. If available, hyper-parameters that maximize the negative intergrated time-dependent Brier score will be selected, because a lower Brier score indicates better performance.

from sksurv.metrics import as_integrated_brier_score_scorer
gcv_ibs = GridSearchCV(
as_integrated_brier_score_scorer(rsf_gbsg, times=gbsg_times),
param_grid=cv_param_grid,
cv=cv,
).fit(gbsg_X, gbsg_y)

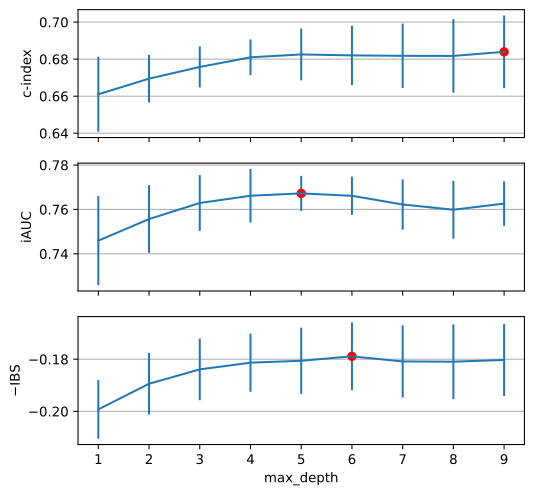
Finally, we can visualize the results of the grid search and compare the best performing hyper-parameter configurations (marked with a red dot).

import matplotlib.pyplot as plt
def plot_grid_search_results(gcv, ax, name):
ax.errorbar(
x=gcv.cv_results_["param_estimator__max_depth"].filled(),
y=gcv.cv_results_["mean_test_score"],
yerr=gcv.cv_results_["std_test_score"],
)
ax.plot(
gcv.best_params_["estimator__max_depth"],
gcv.best_score_,
'ro',
)
ax.set_ylabel(name)
ax.yaxis.grid(True)
_, axs = plt.subplots(3, 1, figsize=(6, 6), sharex=True)
axs[-1].set_xlabel("max_depth")
plot_grid_search_results(gcv_cindex, axs[0], "c-index")
plot_grid_search_results(gcv_iauc, axs[1], "iAUC")
plot_grid_search_results(gcv_ibs, axs[2], "$-$IBS")
Results of hyper-parameter optimization.

Results of hyper-parameter optimization.

When optimizing for the concordance index, a high maximum depth works best, whereas the other metrics are best when choosing a maximum depth of 5 and 6, respectively.


from Planet Python
via read more

ItsMyCode: nxnxn matrix python

ItsMyCode |

In this tutorial, we will take a look at how to create the nxnxn matrix in Python.

What is NxNxN?

The term NxNxN (pronounced as N by N by N) is also called as NxNxN cube or NxNxN puzzle. It represents the cube with the same dimensions that means the cube will have the same height, width, and length.

The NxNxN puzzles that fit under this category include the 2x2x2 cube, the Rubik’s cube, the 4x4x4 cube, the 5x5x5 cube, etc. The 1x1x1 cube also belongs in this category, even if it is not a twisty puzzle because it does complete the NxNxN set.

How to Create NxNxN Matrix in Python?

Now that we know what is nxnxn, lets us learn how to create the nxnxn matrix in Python using different ways with examples.

Create NxN Matrix in Python with Non Duplicating numbers

The below code is to create an nxn matrix in Python, and it does not repeat the numbers row-wise and column-wise. These are mainly used in Puzzles like Sudoko.

# Python Program to create nxn Matrix
import numpy as np

# Provide the value of N 
N = 5

# returns evenly spaced values 
row = np.arange(N)

# create an new array filled with zeros of given shape and type
result = np.zeros((N, N))

# Logic to roll array elements of given axis
for i in row:
    result[i] = np.roll(row, i)

print(result)

Output

[[0. 1. 2. 3. 4.]
 [4. 0. 1. 2. 3.]
 [3. 4. 0. 1. 2.]
 [2. 3. 4. 0. 1.]
 [1. 2. 3. 4. 0.]]

Create NxNxN matrix in Python using numpy

The below code is to create an nxnxn matrix in Python. Just change the value of N based on the requirement and the shape that you need to generate. For a standard Rubik’s cube, it would be 3x3x3, so the value of n would be 3.

Example: 

# Python program to create nxnxn matrix
import numpy as np

# Provide the value of nxnxn
n = 3
a = np.arange(n)
b = np.array([a]*n)
matrix = np.array([b]*n)

#creating an array containg n-dimensional points
flat_mat = matrix.reshape((int(matrix.size/n),n))

#just a random matrix we will use as a rotation
rotate = np.eye(n) + 2

#apply the rotation on each n-dimensional point
result = np.array([rotate.dot(x) for x in flat_mat])
#return to original shape
result=result.reshape((n,n,n))
print(result)

Output

[[[6. 7. 8.]
  [6. 7. 8.]
  [6. 7. 8.]]

 [[6. 7. 8.]
  [6. 7. 8.]
  [6. 7. 8.]]

 [[6. 7. 8.]
  [6. 7. 8.]
  [6. 7. 8.]]]

The post nxnxn matrix python appeared first on ItsMyCode.


from Planet Python
via read more
TestDriven.io: Working with Static and Media Files in Django

This article looks at how to work with static and media files in a Django project, locally and in production. from Planet Python via read...