Exploring Jupyer Notebook to write a Blog - gopython - Medium
Jupyter Notebooks is a great platform for doing a quick code experiment and also recording and sharing your analysis with code snippet with others. But today I am trying to explore how we can write blogs with Jupyter Notebook.
Saturday, October 20, 2018
Exploring Jupyer Notebook to write a Blog

Thursday, October 11, 2018
Reformatting micro SD cards
Reformatting micro SD cards - DYI Electronics - Medium
Yes this is what I have been doing last 3 days trying to reformat a micro sdcard and trying all possible ways to either recover the data or else reformat it completely. Though many will laugh at my exercise but those who have tried reformatting a corrupt micro sdcard will understand the pain I am talking about.
Monday, March 6, 2017
Raspberry Pi Experiments: Running Python3 , Jupyter Notebooks and Dask Cluster - Part 2
Its been a while since I posted my last post but had planned for this a while back and completely missed it. In this part of the blog I will be covering more about Dask distributed scheduler, application of dask and where is shines over excel or python pandas and also issues that you may encounter while using disk.
If you have not read my previous post I suggest you to refer it as that will give you a fair bit of idea about the setup and the background for this post.
For the post I will take the land registry file from http://data.gov.uk has details of land sales in the UK, going back several decades, and is 3.5GB as of August 2016 (this applies only to the "complete" file, "pp-complete.csv"). No registration required.
-- Download file "pp-complete.csv", which has all records.
-- If schema changes/field added, consult: https://www.gov.uk/guidance/about-the-price-paid-data
The file was placed in the below path:
/mnt/nwdrive/Backup/datasets/pp-complete.txt
The Dask Schduler & Worker were started
jns@minibian:~$ nohup /usr/local/bin/dask-scheduler3 >> /tmp/dask.log &
I started the Dask scheduler on 2 Raspberry Pi nodes with the below command
jns@minibian:~$ nohup /usr/local/bin/dask-worker3 192.168.0.7:8786 >> /tmp/dask.log &
2nd Node: - One Worker is running
pi@raspberrypi:~ $ cat /tmp/dask.log
distributed.nanny - INFO - Start Nanny at: 192.168.0.4:39911
distributed.worker - INFO - Start worker at: 192.168.0.4:45033
distributed.worker - INFO - nanny at: 192.168.0.4:39911
distributed.worker - INFO - http at: 192.168.0.4:41493
distributed.worker - INFO - Waiting to connect to: 192.168.0.7:8786
distributed.worker - INFO - -------------------------------------------------
distributed.worker - INFO - Threads: 4
distributed.worker - INFO - Memory: 0.58 GB
distributed.worker - INFO - Local Directory: /tmp/nanny-d3ye93s4
distributed.worker - INFO - -------------------------------------------------
distributed.worker - INFO - Registered to: 192.168.0.7:8786
distributed.worker - INFO - -------------------------------------------------
distributed.nanny - INFO - Nanny 192.168.0.4:39911 starts worker process 192.168.0.4:45033
Now the code that I tested via jupiter notebook:
The first one that I tested was to initialise the Pandas and Dask objects
The reason I tried this instead of dark.read_csv was because for it to access on all nodes it would have required the access to the cvs file on all nodes but I had access to that file on only one node and when ever I tried dask.read_csv it kept on failing with the error file not found. Hence as a solution I loaded the cvs file as chunks in pandas and appended to the task dataframe.
With dask-worker3 running on 2 Nodes I got the following timing to load the 3.5 GB file.
00:48:14.91
With dask-worker3 running on 3 Nodes I got the following timing to load the 3.5 GB file.
00:46:17.24
And also when I did a compute on the Dask data frame using the below command the output was good:
%timeit df.groupby(df.county).price.mean().compute()
1 loop, best of 3: 227 ms per loop
Now while comparing to Pandas the file even did not load and became non-responsive
Hence in conclusion I can say that if you are looking at running your data analytics on Raspberry Pi using python then ask is a great contender for large datasets and gives very good response. Hope this was a helpful. In future I will be posting more blogs about how we can leverage Raspberry PI and data analytics.
If you have not read my previous post I suggest you to refer it as that will give you a fair bit of idea about the setup and the background for this post.
For the post I will take the land registry file from http://data.gov.uk has details of land sales in the UK, going back several decades, and is 3.5GB as of August 2016 (this applies only to the "complete" file, "pp-complete.csv"). No registration required.
-- Download file "pp-complete.csv", which has all records.
-- If schema changes/field added, consult: https://www.gov.uk/guidance/about-the-price-paid-data
The file was placed in the below path:
/mnt/nwdrive/Backup/datasets/pp-complete.txt
The Dask Schduler & Worker were started
jns@minibian:~$ nohup /usr/local/bin/dask-scheduler3 >> /tmp/dask.log &
I started the Dask scheduler on 2 Raspberry Pi nodes with the below command
jns@minibian:~$ nohup /usr/local/bin/dask-worker3 192.168.0.7:8786 >> /tmp/dask.log &
1st Node - Schduler & Worker both are working
distributed.nanny - INFO - Start Nanny at: 192.168.0.7:39087
distributed.worker - INFO - Start worker at: 192.168.0.7:36579
distributed.worker - INFO - nanny at: 192.168.0.7:39087
distributed.worker - INFO - http at: 192.168.0.7:52884
distributed.worker - INFO - Waiting to connect to: 192.168.0.7:8786
distributed.worker - INFO - -------------------------------------------------
distributed.worker - INFO - Threads: 4
distributed.worker - INFO - Memory: 0.61 GB
distributed.worker - INFO - Local Directory: /tmp/nanny-h60j2lh3
distributed.worker - INFO - -------------------------------------------------
distributed.scheduler - INFO - Register 192.168.0.7:36579
distributed.worker - INFO - Registered to: 192.168.0.7:8786
distributed.worker - INFO - -------------------------------------------------
distributed.scheduler - INFO - Starting worker compute stream, 192.168.0.7:36579
distributed.nanny - INFO - Nanny 192.168.0.7:39087 starts worker process 192.168.0.7:36579
2nd Node: - One Worker is running
pi@raspberrypi:~ $ cat /tmp/dask.log
distributed.nanny - INFO - Start Nanny at: 192.168.0.4:39911
distributed.worker - INFO - Start worker at: 192.168.0.4:45033
distributed.worker - INFO - nanny at: 192.168.0.4:39911
distributed.worker - INFO - http at: 192.168.0.4:41493
distributed.worker - INFO - Waiting to connect to: 192.168.0.7:8786
distributed.worker - INFO - -------------------------------------------------
distributed.worker - INFO - Threads: 4
distributed.worker - INFO - Memory: 0.58 GB
distributed.worker - INFO - Local Directory: /tmp/nanny-d3ye93s4
distributed.worker - INFO - -------------------------------------------------
distributed.worker - INFO - Registered to: 192.168.0.7:8786
distributed.worker - INFO - -------------------------------------------------
distributed.nanny - INFO - Nanny 192.168.0.4:39911 starts worker process 192.168.0.4:45033
Now the code that I tested via jupiter notebook:
The first one that I tested was to initialise the Pandas and Dask objects
import pandas as pdThen I used the below code to load the 3.5 GB data file
import dask.dataframe as dd
from distributed import Client
client = Client('192.168.0.7:8786')
strcnames = """transaction
price
transfer_date
postcode
property_type
newly_built
duration
paon
saon
street
locality
city
district
county
ppd_category_type
record_status"""
cnames = [col.strip() for col in strcnames.split("\n")]
cnames
import time
start_time = time.time()
df = None
count = 0
for chunk in pd.read_csv("/mnt/nwdrive/Backup/datasets/pp-complete.txt",names=cnames, chunksize=10000):
# we are going to append to each table by group
# we are not going to create indexes at this time
# but we *ARE* going to create (some) data_columns
if df is None:
df = dd.from_pandas(chunk,npartitions=1)
df = client.persist(df)
else:
df.append(chunk)
count = count + 1
print(count)
elapsed_time = time.time() - start_time
print(str(elapsed_time))
hours, rem = divmod(elapsed_time, 3600)
minutes, seconds = divmod(rem, 60)
print("{:0>2}:{:0>2}:{:05.2f}".format(int(hours),int(minutes),seconds))
The reason I tried this instead of dark.read_csv was because for it to access on all nodes it would have required the access to the cvs file on all nodes but I had access to that file on only one node and when ever I tried dask.read_csv it kept on failing with the error file not found. Hence as a solution I loaded the cvs file as chunks in pandas and appended to the task dataframe.
With dask-worker3 running on 2 Nodes I got the following timing to load the 3.5 GB file.
00:48:14.91
With dask-worker3 running on 3 Nodes I got the following timing to load the 3.5 GB file.
00:46:17.24
And also when I did a compute on the Dask data frame using the below command the output was good:
%timeit df.groupby(df.county).price.mean().compute()
1 loop, best of 3: 227 ms per loop
Now while comparing to Pandas the file even did not load and became non-responsive
start_time = time.time()
#pdf = pd.read_csv("http://192.168.0.2:8001/pp-monthly-update-new-version.csv",names=cnames)
pdf = pd.read_csv("/mnt/nwdrive/Backup/datasets/pp-complete.txt",names=cnames)
elapsed_time = time.time() - start_time
print(elapsed_time.total_seconds())
hours, rem = divmod(elapsed_time, 3600)
minutes, seconds = divmod(rem, 60)
print("{:0>2}:{:0>2}:{:05.2f}".format(int(hours),int(minutes),seconds))
| Pandas non-responsiveness while processing 3.5GB file |
Hence in conclusion I can say that if you are looking at running your data analytics on Raspberry Pi using python then ask is a great contender for large datasets and gives very good response. Hope this was a helpful. In future I will be posting more blogs about how we can leverage Raspberry PI and data analytics.
Sunday, February 5, 2017
Raspberry Pi Experiments: Running Python3 , Jupyter Notebooks and Dask Cluster - Part 1
One of the key aims I bought Raspberry Pi in the first place was to create a Beowulf cluster. With this aim I had purchased 3 Raspberry Pi3. Now any such setup as a cluster will need some effort and planning and hence I planned to start with a Dask Cluster.
What is Dask?
Dask is a flexible parallel computing python library for analytic computing.The link to the project is http://dask.pydata.org/en/latest/. It helps to easily process large data sets with focus on lazy compute and Dask represents parallel computations with task graphs. One of the key features that I wanted to explore was the dask distributed scheduler. Dask can scale to a cluster of 100s of machines. It is resilient, elastic, data local, and low latency and it achieves so using Dask distributed scheduler. More on this later.
Exploring Jupyter
Also I wanted to use Jupyter notebooks which has a host of features that can help me to run many of my data analysis experiments on Raspberry Pi using a browser, Also open Virtual Terminals using web browser and save the python code, documentation and the results at the same place. You can explore more about Jupyter Project & Jupyter Notebooks at http://jupyter.org/Why Python 3?
And finally Python 3, during the past week or so I am reading many blog posts and social messages which are talking about the "end of life" of Python 2 & 2.7 by 2020. This weekend experiment was the perfect opportunity to transition to Python 3 and I found many good aspects which makes me confident that I will stick with Python 3 as I explore Python more. One of the simple reasons why I would transition is because it handles Unicode naively and hence there is no hell of the exceptions of Unicode character while decoding to ascii which was a constant problem in Python 2. Also most of the important python libraries are already providing python 3 support.The physical setup
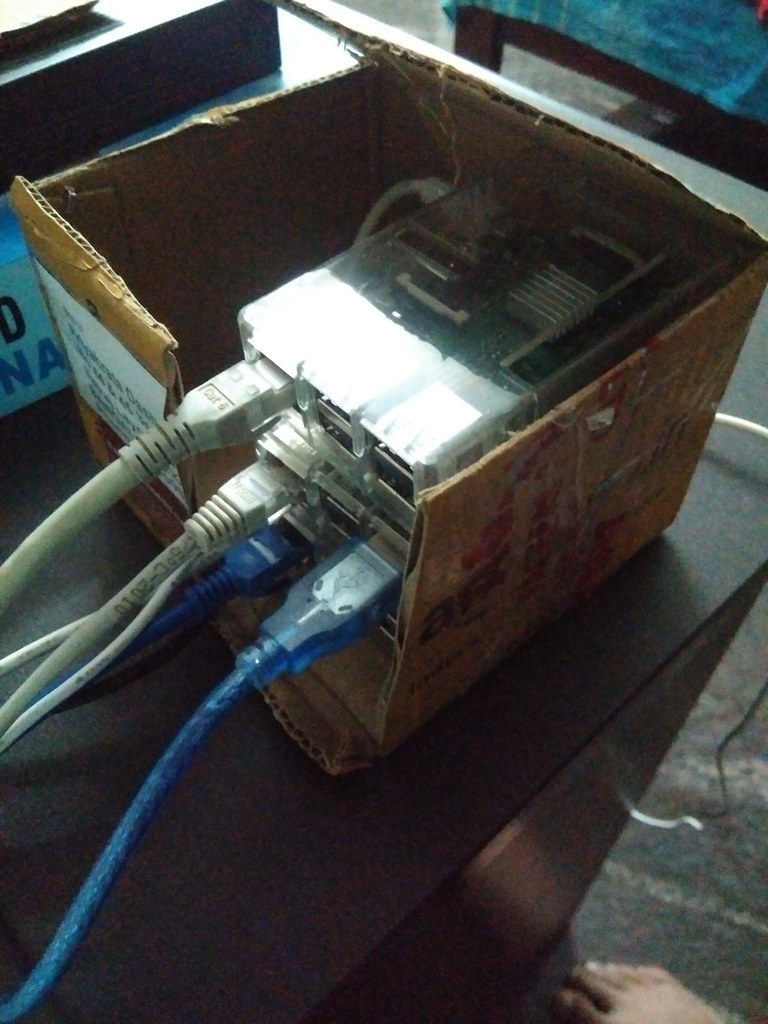
Setting up for fast data transfer was one of the most important aspect of my experiment. For set all the Raspberry Pis in a cardboard box and connected then via LAN cable to my Router. This has not only improved the stability of the network connection but also has provided with constant IP addresses without me doing any static IP changes to my network interface. I know this may change but for the weekend it was quite fine and never an issue.
Setting up Python 3 & Jupyter
For this I took the help of jns project (https://github.com/kleinee/jns) . Most of the steps that I given below are from the Readme of the project with few changes.Requirements
- a Raspberry Pi 2 or 3 complete with 5V micro-usb power-supply
- a blank 16 GB micro SD card
- an ethernet cable to connect the Pi to your network *)
- an internet connection
- a computer to carry out the installation connected to the same network as the Pi
- a fair amount of time - user feedback suggestst that a full installation takes in the order of 6 hours...
Since I already had Raspbian installed image on my Raspberry Pis, I went ahead with the rest of the software setup.
Make sure pandoc and git is installed
sudo apt-get install -y pandocI created jns user which will be the primary user for our Jupyter setup
sudo apt-get install -y git
sudo adduser jnsI downloaded the scripts from its github repo to all the 3 Raspberry Pis:
sudo usermod -aG sudo,ssh jns
git clone https://github.com/kleinee/jns.gitOne of the key issues which I faced early on was that I had Python 2.7 already installed as part of Raspbian and hence in these install scripts when I ran them I found that they were installing Python 2.7 version of the libraries instead Python 3.6. The main reason for this was because pip command was pointing to Python 2.7. Hence to fix the issue I update the sh scripts to replace pip with pip3 which the default package manager for Python3.6.
cd jns
chmod +x *.sh
sed -i -- 's/pip/pip3/g' *.shFinally I ran the below command to do the full installation
sudo ./install_jns.sh
This will create a directory notebooks in the home directory of user jns, clone this repository to get the installtion scripts, make the scripts executable and then run install_jns.sh which does the following:
- install Python
- install Jupyter
- (pre)-configure the notebook server
- install TeX
- install scientific stack
Note: In case you face issues of compiling matplotlib or sicpy I suggest to redo the installation or refer the github readme. As this helped me to resolve all the installation issues.
Install dask and its distributed framework dask.distributed
pip install dask[complete] distributed bokeh --upgrade
This will install:
- Core libraries and parallel processing engines for Dask
- Pandas
- s3fs to talk to Amazon s3 object storage
- hdfs connector
- Dask.Distributed library to talk to Dask distributed scheduler
To make sure Dask executable would point to Python3 I made changes to the following scripts:
/usr/local/bin/dask-remote
/usr/local/bin/dask-submit
/usr/local/bin/dask-scheduler
/usr/local/bin/dask-worker
/usr/local/bin/dask-ssh
To the following scripts where I pointed the python version from /usr/bin/python to /usr/local/bin/python3.6
/usr/local/bin/dask-remote3
/usr/local/bin/dask-ssh3
/usr/local/bin/dask-submit3
/usr/local/bin/dask-scheduler3
/usr/local/bin/dask-worker3
Finally once installation completed the output looked like below under /usr/local/bin
pi@raspberrypi:~ $ ls /usr/local/bin
2to3 ipython3 python3-config
2to3-3.6 isympy pyvenv
cygdb jp.py pyvenv-3.6
cython jp.pyc rst2html5.py
cythonize jsonschema rst2html5.pyc
dask-remote jupyter rst2html.py
dask-remote3 jupyter-console rst2html.pyc
dask-scheduler jupyter-kernelspec rst2latex.py
dask-scheduler3 jupyter-migrate rst2latex.pyc
dask-ssh jupyter-nbconvert rst2man.py
dask-ssh3 jupyter-nbextension rst2man.pyc
dask-submit jupyter-notebook rst2odt_prepstyles.py
dask-submit3 jupyter-qtconsole rst2odt_prepstyles.pyc
dask-worker jupyter-serverextension rst2odt.py
dask-worker3 jupyter-troubleshoot rst2odt.pyc
easy_install jupyter-trust rst2pseudoxml.py
easy_install-2.7 pip rst2pseudoxml.pyc
easy_install-3.6 pip2 rst2s5.py
f2py pip2.7 rst2s5.pyc
f2py3.6 pip3 rst2xetex.py
idle3 pip3.6 rst2xetex.pyc
idle3.6 __pycache__ rst2xml.py
ipcluster pydoc3 rst2xml.pyc
ipcontroller pydoc3.6 rstpep2html.py
ipengine pygmentize rstpep2html.pyc
iptest python3 runxlrd.py
iptest2 python3.6 runxlrd.pyc
iptest3 python3.6-config vba_extract.py
ipython python3.6m vba_extract.pyc
ipython2 python3.6m-config wheel
And finally for the jupyter to run as a backend process on startup I added the following script:
$ sudo cat /home/jns/runjupyter.sh
DAEMON=/usr/local/bin/jupyter-notebook
DAEMON_ARGS="--config=/home/jns/.jupyter/jupyter_notebook_config.py"
nohup $DAEMON $DAEMON_ARGS >> /tmp/jnsexec.log &
And added this line to crontab so that this only gets started on reboot, plan to develop an init script is in progress.And finally after rebooting my Raspberry Pi I got the below screen:jns@minibian:~$ crontab -l
@reboot sh /home/jns/runjupyter.sh
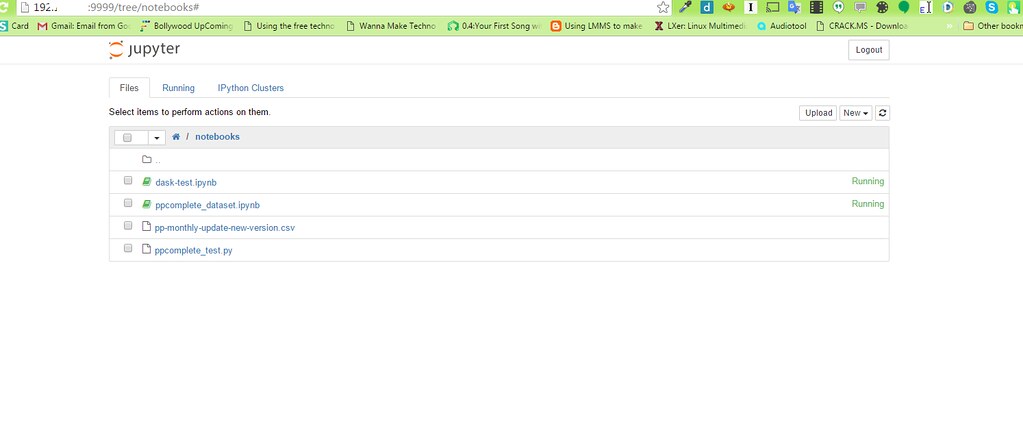
All this setup took me on all the three notes with Jupyer running on one of the nodes took me about 1 day and quite intensive. Anyone trying the same I wish them luck.
In the next post I will explain more about the Dask Distributed cluster and my experiments on it.
Tuesday, January 17, 2017
Big Data Experiments - Running Apache Spark on Windows 7
It is a different thing to run Spark on Linux and a very different experience to run Spark in Windows. Last few days had been very frustrating for me from the perspective that I have been trying hard to setup Apache Spark on my desktop and run a very simple example and finally it completed today. In the following post I will be documenting my experience and how anyone else can avoid these problems.
First let me explain my environment:
Based on a project requirement I wanted to test I chose the following version of Spark which I downloaded from Spark Website.
And then I setup Scala & SBT which I downloaded from the following links.
Then created a batch script to set it up all
https://wiki.apache.org/hadoop/Hadoop2OnWindows
I downloaded the binaries from Apache website and tried extracting the binaries and copied the winutils.exe to the hadoop bin directory. And though I ran the above hadoop command but when I ran spark-shell again I started getting new errors. And with lot of searching I restored back to the below binaries for Hadoop 2.6 and installed Microsoft Visual C++ 2010 Redistributable Package (x86) package for the correct Microsoft DLL binding for winutils to reflect. And then I re-ran the steps as in the above apache documentation.
Though Hadoop did not start but spark-shell started and I was able to use it.
Now I know this is not as detailed or as concrete an experiment as one would expect but this was helpful where I did not have to rebuild spark & hadoop from scratch for my system.
Hoping that this will be of help to others bye bye and have a great day.
First let me explain my environment:
OS: Windows 7 64 Bit
Processor: i5
RAM: 8 GB
Based on a project requirement I wanted to test I chose the following version of Spark which I downloaded from Spark Website.
spark-1.6.0-bin-hadoop2.6.tgzAs a pre-requisite I had the following version of Oracle Java
java version "1.8.0_25" and JAVA_HOME was setup appropriately.I use a batch script for the setup which is very handy.
jdk1.8.bat
@echo off
echo Setting JAVA_HOME
set JAVA_HOME=C:\jdk1.8.0_25-windows\java-windows
echo setting PATH
set PATH=%JAVA_HOME%\bin;%PATH%
echo Display java version
java -version
And then I setup Scala & SBT which I downloaded from the following links.
scala version 2.11.0-M8
sbt 0.13.13Downloaded the winutils.exe based on the advice of this stack overflow answer
http://stackoverflow.com/questions/25481325/how-to-set-up-spark-on-windows
winutils.exe linkAnd then setup the necessary access for c:\tmp\hive based on advice from this blog
Then created a batch script to set it up all
envscala.bat
@echo off
REM set SPARK & Scala related Dirs
set USERNAME=pridash4
set HADOOP_HOME=c:\rcs\hadoop-2.6.5
set SCALA_HOME=C:\scala-2.11.0-M8\scala-2.11.0-M8
set SPARK_HOME=C:\spark-1.6.0-bin-hadoop2.6
set SBT_HOME=C:\sbt-launcher-packaging-0.13.13
set PATH=%HADOOP_HOME%\bin;%SCALA_HOME%\bin;%SBT_HOME%\bin;%SPARK_HOME%\bin;%PATH%
Then I followed the following command:
>jdk1.8.bat
>envscala.bat
>spark-shell.bat
All started but again all stopped at one error:
- The root scratch dir: /tmp/hive on HDFS should be writable. Current permissions are: rw-rw-rw-
This almost wasted one full day and despite trying all the steps I still got this error.
Then I re-read and found this stack overflow post "http://stackoverflow.com/questions/40409838/the-root-scratch-dir-tmp-hive-on-hdfs-should-be-writable-current-permissions" which gave the idea to install hadoop binaries itself and run the below command.
hadoop fs -chmod -R 777 /tmp/hive/;https://wiki.apache.org/hadoop/Hadoop2OnWindows
I downloaded the binaries from Apache website and tried extracting the binaries and copied the winutils.exe to the hadoop bin directory. And though I ran the above hadoop command but when I ran spark-shell again I started getting new errors. And with lot of searching I restored back to the below binaries for Hadoop 2.6 and installed Microsoft Visual C++ 2010 Redistributable Package (x86) package for the correct Microsoft DLL binding for winutils to reflect. And then I re-ran the steps as in the above apache documentation.
Though Hadoop did not start but spark-shell started and I was able to use it.
Now I know this is not as detailed or as concrete an experiment as one would expect but this was helpful where I did not have to rebuild spark & hadoop from scratch for my system.
Hoping that this will be of help to others bye bye and have a great day.
Monday, January 16, 2017
2017 Is the year of Backbenchers ... & Shall I say generalists
Today I read this inspiring article from the Shradha Sharma Founder and Chief Editor of YourStory. And it was titled 2017 is the year of Back benchers. Personally I should call myself a backbencher who became a middle bencher then came to the front and then in last years has faded to the back. Yes I talk a lot, I question a lot, I have an air about myself and also slog a lot to learn what ever is there around in tech industry that excites me. But I also feel I am lost and hence when I heard the word Generalist I liked it. Because I am one of them. I am sure many of us are. If we observe closely much of the enterprise in India always calls for specialists. But in truth when they get recruited they do the work so unrelated that end of the day their specialization is diluted. They sometimes publish a generalist role but in our Industry we always want a Specialist. Take for an example of a call today. They wanted some one who knows Jquery, Java, Angular, Big Data, Ruby, Python, Jenkin, Docker, Devops and God knows what and yet the final question they asked me you know it all and are you comfortable to switch back to Java. My though was here the question again comes back they need a specialist not a generalist. Let me explain who is a Generalist for the ignorant. A person who is jack of all trades and master of none is not a generalist. Rather generalist is a jack of all trades and master of some and who has a passion to learn/master any new skill as the situation demands. As given in the article like back benchers even generalists toil hard to gain skills and even hard for them to unlearn it if required but they are never appreciated, they are overlooked and people with fancy titles are sought.
Yes you may say I am sulking but the truth is its the case with many who have multiple skills but can never utilize it. One reason can be that they are never given a chance to showcase it or their bosses think that what they are currently doing that is safe for them for who will replace them. That is one reason also why in our country innovation is stunted. We are doing the cheap work which world does not want to do. And when I speak about Entrepreneurship and putting the effort in creating value for ourselves many defend the necessity for job citing the fear of risk and the comfort zone that they have created around themselves. What I rather feel is that be it this year or any year for India to truly grow and pose a significant sustainable financial power the generalists has to come out and contribute to add value as Entrepreneurs and break the vicious cycles of stereotypes and dogmas that plague our businesses and enterprise.
At the end I can only say we should learn from the informal economy which this government is so hell bent to destroy. This is the economy of Entrepreneurs, a shared economy who work hard to bring value to us middle class and support our food, transport and labor demands. They and generalists like us should come ahead and add value to the growth of our motherland.
Yes you may say I am sulking but the truth is its the case with many who have multiple skills but can never utilize it. One reason can be that they are never given a chance to showcase it or their bosses think that what they are currently doing that is safe for them for who will replace them. That is one reason also why in our country innovation is stunted. We are doing the cheap work which world does not want to do. And when I speak about Entrepreneurship and putting the effort in creating value for ourselves many defend the necessity for job citing the fear of risk and the comfort zone that they have created around themselves. What I rather feel is that be it this year or any year for India to truly grow and pose a significant sustainable financial power the generalists has to come out and contribute to add value as Entrepreneurs and break the vicious cycles of stereotypes and dogmas that plague our businesses and enterprise.
At the end I can only say we should learn from the informal economy which this government is so hell bent to destroy. This is the economy of Entrepreneurs, a shared economy who work hard to bring value to us middle class and support our food, transport and labor demands. They and generalists like us should come ahead and add value to the growth of our motherland.
Tuesday, January 3, 2017
Raspberry Pi Experiments - OpenVPN for secure network
In my previous blog http://priyabgeek.blogspot.in/2016/08/raspberry-pi-experiment-ssh-reverse.html I talked about opening a reverse proxy to access Raspberry Pi using a AWS EC2 instance. While the above solution was only good for exposing some web services or even ssh but I wanted a more robust solution where I wanted to experiment using a VPN solution where a Virtual Private network will from between Raspberry Pi's that I have and any other computers that I would want to connect from anywhere and will work just as the LAN that we operate in our house.
As a solution I wanted to use OpenVPN and used partly instructions from https://dotslashnotes.wordpress.com/2013/08/05/how-to-set-up-a-vpn-private-internet-access-in-raspberry-pi/ & http://www.pivpn.io/ to setup my VPN server.
I also referred the below blogs to get some more info about OpenVPN.
http://readwrite.com/2014/04/10/raspberry-pi-vpn-tutorial-server-secure-web-browsing/
http://www.bbc.com/news/technology-33548728
http://www.instructables.com/id/Host-Your-Own-Virtual-Private-Network-VPN-with-O/
At a high level the below diagram explains the concept of a VPN:
As a solution I wanted to use OpenVPN and used partly instructions from https://dotslashnotes.wordpress.com/2013/08/05/how-to-set-up-a-vpn-private-internet-access-in-raspberry-pi/ & http://www.pivpn.io/ to setup my VPN server.
I also referred the below blogs to get some more info about OpenVPN.
http://readwrite.com/2014/04/10/raspberry-pi-vpn-tutorial-server-secure-web-browsing/
http://www.bbc.com/news/technology-33548728
http://www.instructables.com/id/Host-Your-Own-Virtual-Private-Network-VPN-with-O/
At a high level the below diagram explains the concept of a VPN:
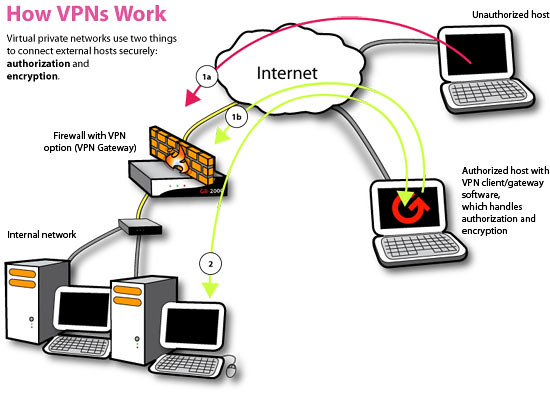
Now in OpenVPN there is a VPN server that help to generate the necessary keys and the necessary VPN configuration files and runs the VPN daemon creating a VPN network gateway to which all the other computers connect via a VPN gateway using a VPN client.
In my case I have configured my Raspberry PI as a VPN Gateway server and let other computers in my home and laptops connect to it. But the biggest issues were the bandwidth and also the necessary setup that I need to do in my router which DHCP setup for incoming connections to discover my Raspberry PI server. But many ISP providers do not support reverse connections to our home network and as it needs a static IP I was not sure if I can get such a setup. So I chose to setup my VPN on my AWS EC2 instance. With this setup I was able to connect to my Rapsberry PI with a secure VPN network same as I may connect from my home network.
I followed the below steps to get the setup completed.
1. First I connected to my AWS instance via SSH:
ssh -i <AWS PEM File>.pem ubuntu@ec2<Server>.compute.amazonaws.com
2. Then I installed PiVPN which makes the setup of OpenVPN server a breeze. To run the setup please run:
sudo curl -L https://install.pivpn.io | bashPlease make sure just to followup with the default setup and once done you will get a message like
Raspberry1.ovpn has been copied to /home/ubuntu/ovpns
(Note: While doing the above setup it will ask you to give a private pass phrase. Please remember that as you will be using it to log into your VPN server from the client)
3. After that please restart the server and once you re-login you can check the openvpn server as given below:
ps -ef | grep openvpnOutput will be something like this:
nobody 1033 1 0 Jan02 ? 00:00:01 /usr/sbin/openvpn --writepid /run/openvpn/server.pid --daemon ovpn-server --cd /etc/openvpn --config /etc/openvpn/server.conf --script-security 24. Now to connect to your VPN server from Raspberry Pi log into your Raspberry Pi via SSH
ssh pi@<Your Raspberry PI IP Address>5. Next install OpenVPN
sudo apt-get install openvpn6. Next copy the .ovpn from the VPN Server
scp -r -i <AWS Security Key>.pem ubuntu@<EC2 Server Name>.compute.amazonaws.com:/home/ubuntu/ov* .7. Next create a pass.txt and add the following value which we put in step 2 as secret passphrase.
password8. Add the following line at the end of Raspberry1.ovpn or the .ovpn file that you download:
askpass /home/pi/ovpns/pass.txtSo the output of the file should look like:
-----END OpenVPN Static key V1-----
</tls-auth>
askpass /home/pi/ovpns/pass.txt
9. Call the following command:
sudo openvpn /home/pi/openvpn/Raspberry1_wrk.ovpn10. Finally you should be able to establish VPN connectivity and check it.
ifconfig
You should see like below:
tun0 Link encap:UNSPEC HWaddr 00-00-00-00-00-00-00-00-00-00-00-00-00-00-00
-00
inet addr:10.8.0.3 P-t-P:10.8.0.3 Mask:255.255.255.0
UP POINTOPOINT RUNNING NOARP MULTICAST MTU:1500 Metric:1
RX packets:218 errors:0 dropped:0 overruns:0 frame:0
TX packets:271 errors:0 dropped:0 overruns:0 carrier:0
collisions:0 txqueuelen:100
RX bytes:21911 (21.3 KiB) TX bytes:30389 (29.6 KiB)
11. Finally you can test if the ssh is working over VPN by giving ssh command live below:
ssh -i <AWS Server Key>.pem ubuntu@10.8.0.1And you should be able to connect to it as in step 1.
Hope this post was helpful hope to share more such posts.
(Note: You can skip step 1 and 2 and can use other VPN service providers who provide OpenVPN service please refer the below links for more details:
https://www.bestvpn.com/best-vpn-openvpn/
https://securitygladiators.com/2014/09/27/5-best-free-openvpn-service-providers-2014/
https://securethoughts.com/3-best-vpns-for-open-vpn/
http://in.pcmag.com/software/38911/guide/the-best-vpn-services-of-2017
)
Subscribe to:
Posts (Atom)
-
This blogpost was originally published on the Quansight Labs website . Spyder 4 will be released very soon with lots of interesting new fe...
-
Podcasts are a great way to immerse yourself in an industry, especially when it comes to data science. The field moves extremely quickly, an...
-
Dialogs are useful GUI components that allow you to communicate with the user (hence the name dialog ). They are commonly used for file Ope...


