Monday, January 31, 2022

Test and Code: 178: The Five Factors of Automated Software Testing

"There are five practical reasons that we write tests. Whether we realize it or not, our personal testing philosophy is based on how we judge the relative importance of these reasons." - Sarah Mei

This episode discusses the factors.

Sarah's order:

  1. Verify the code is working correctly
  2. Prevent future regressions
  3. Document the code’s behavior
  4. Provide design guidance
  5. Support refactoring

Brian's order:

  1. Verify the code is working correctly
  2. Prevent future regressions
  3. Support refactoring
  4. Provide design guidance
  5. Document the code’s behavior

The episode includes reasons why I've re-ordered them.

Sponsored By:

Support Test & Code in Python

Links:

<p>&quot;There are five practical reasons that we write tests. Whether we realize it or not, our personal testing philosophy is based on how we judge the relative importance of these reasons.&quot; - Sarah Mei</p> <p>This episode discusses the factors.</p> <p>Sarah&#39;s order:</p> <ol> <li>Verify the code is working correctly</li> <li>Prevent future regressions</li> <li>Document the code’s behavior</li> <li>Provide design guidance</li> <li>Support refactoring</li> </ol> <p>Brian&#39;s order:</p> <ol> <li>Verify the code is working correctly</li> <li>Prevent future regressions</li> <li>Support refactoring</li> <li>Provide design guidance</li> <li>Document the code’s behavior</li> </ol> <p>The episode includes reasons why I&#39;ve re-ordered them.</p><p>Sponsored By:</p><ul><li><a href="https://ift.tt/YiqCze6lr" rel="nofollow">Sauce Labs</a>: <a href="https://ift.tt/YiqCze6lr" rel="nofollow">Visit saucelabs.com/testbetter for more information and a free trial. Sauce Labs. Test Continuously. Test Smarter. Develop with confidence.</a></li><li><a href="https://ift.tt/DsiQ6Bc8S" rel="nofollow">PyCharm Professional</a>: <a href="https://ift.tt/DsiQ6Bc8S" rel="nofollow">Try PyCharm Pro for 4 months and learn how PyCharm will save you time.</a> Promo Code: TESTANDCODE22</li></ul><p><a href="https://ift.tt/pABqSD2Fb" rel="payment">Support Test & Code in Python</a></p><p>Links:</p><ul><li><a href="https://ift.tt/OG0KFBux4" title="Five Factor Testing - Sarah Mei" rel="nofollow">Five Factor Testing - Sarah Mei</a></li></ul>

from Planet Python
via read more

Zero to Mastery: Python Monthly Newsletter ๐Ÿ’ป๐Ÿ January 2022

26th issue of the Python Monthly Newsletter! Read by 20,000+ Python developers every month. This monthly Python newsletter covers the latest Python news so that you stay up-to-date with the industry and keep your skills sharp.

from Planet Python
via read more

PyCharm: PyCharm 2022.1 EAP is open!

It’s that time of the year when we count on your early feedback to help us prepare for the next major PyCharm release. The Early Acces Program (EAP) is designed to give our users and community members the chance to contribute to a better PyCharm by increasing the amount of testing we do and helping us identify bugs and usability problems that would be hard to catch just through our internal processes.

Download the EAP builds via the Toolbox App or directly from our website.

Important: EAP builds are not fully tested and might be unstable.

Download PyCharm EAP

PyCharm 2022.1 EAP1 brings the new Run Targets implementation, which adds support for creating virtual environments inside different targets.

What’s new?

Targets are configured environments where PyCharm will execute your code. PyCharm Pro users already have built-in support for Docker, Docker-Compose, SSH, WSL, and other targets for a long time.

The new implementation brings two major benefits out of the box:

1. A simpler UI to configure your targets

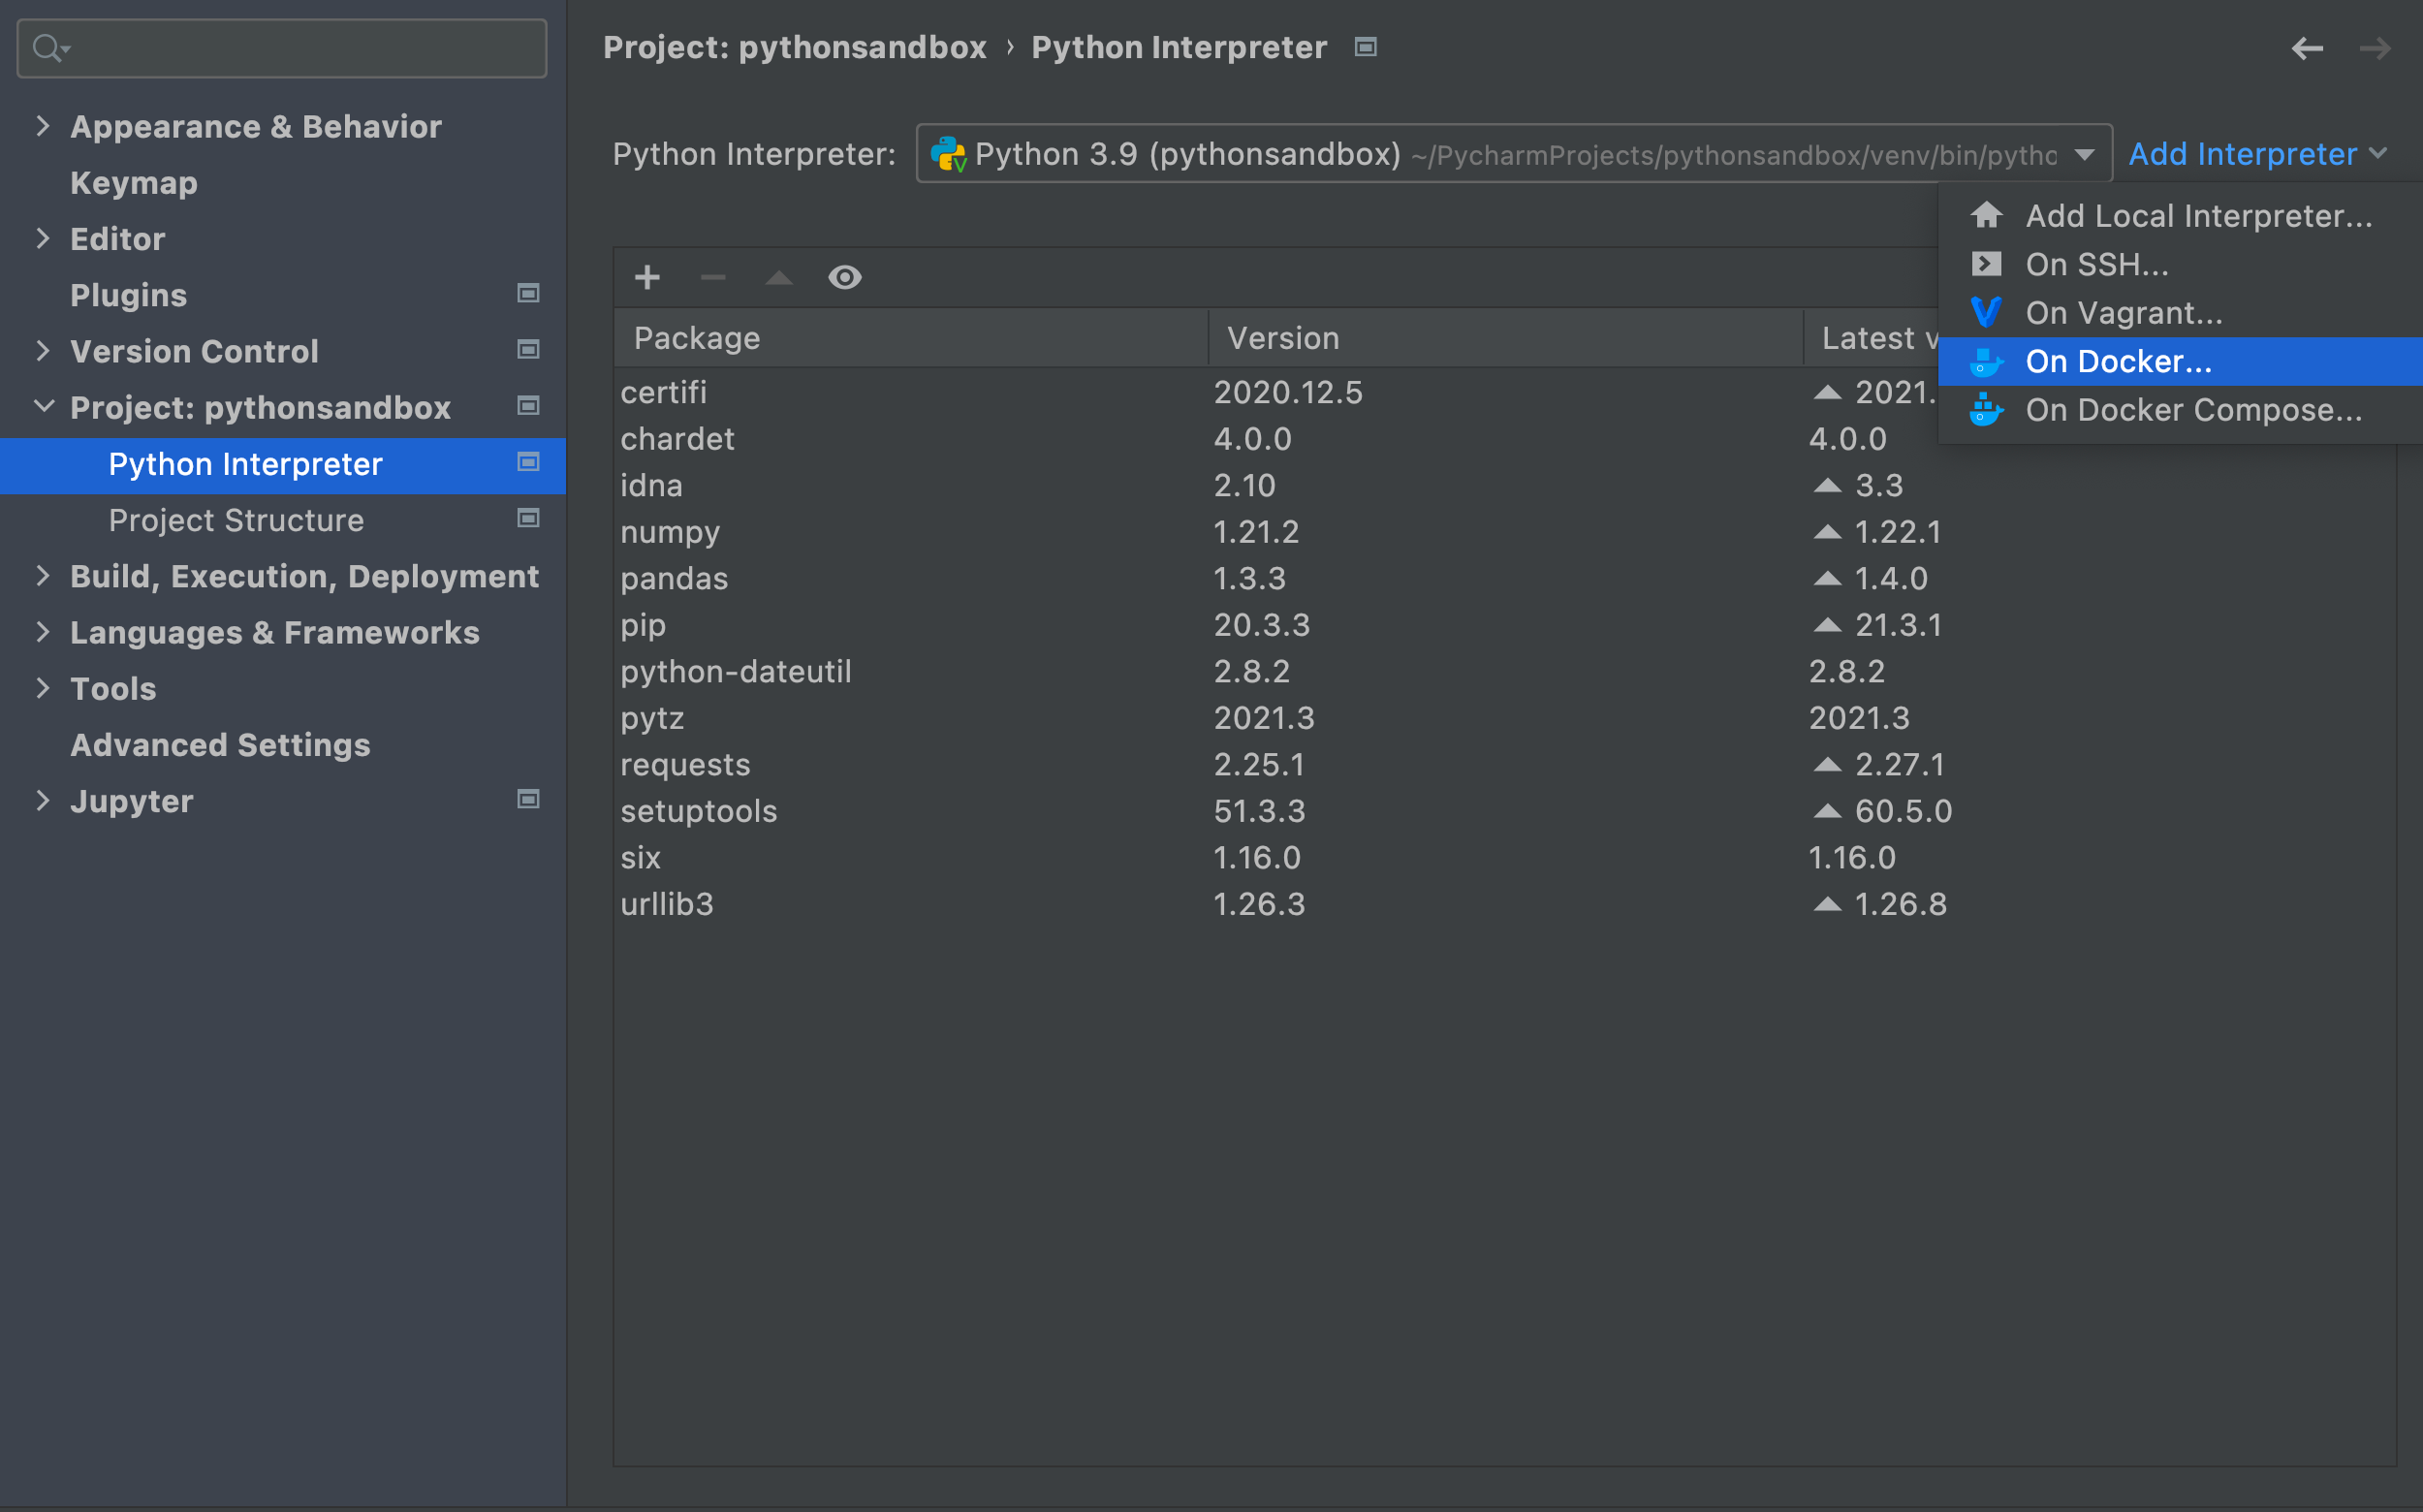
Configuring your targets is now a quick process performed through a wizard. The first thing to do is go to Preferences/Settings > Python Interpreter > Add Interpreter, and choose the type of target that you want to configure.

In this example, we will configure a Docker target, but you can find more information about all the supported targets in our documentation.

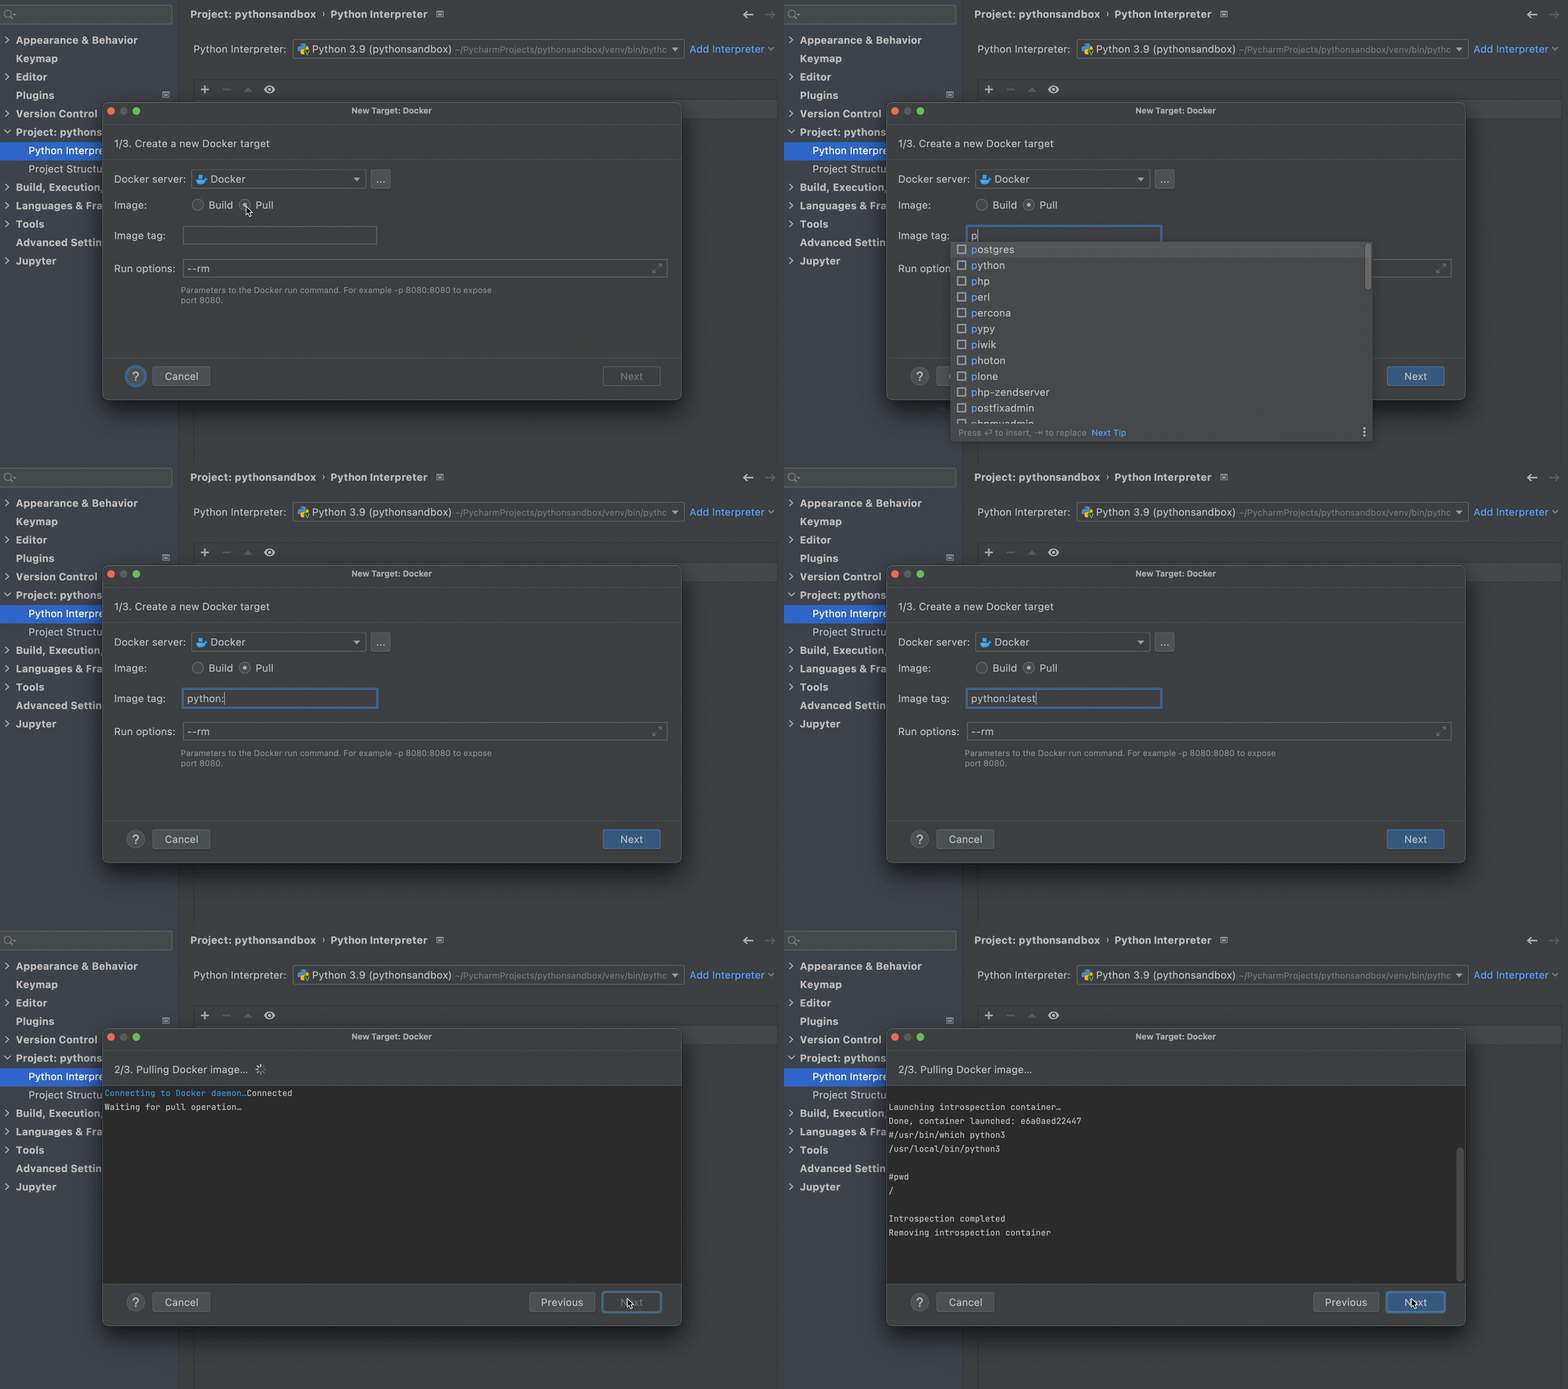
As you select the target a dialog window pops up. In the case of Docker it’s a three-step process. You can build your image locally or pull it from a registry. In step 1 (1/3) we will pull the Python:latest image from Docker and click next.

As you can see, in the next step (2/3) PyCharm will launch an introspection container to check your environment and will remove this container as soon as the introspection process is over. You can, then, click next.

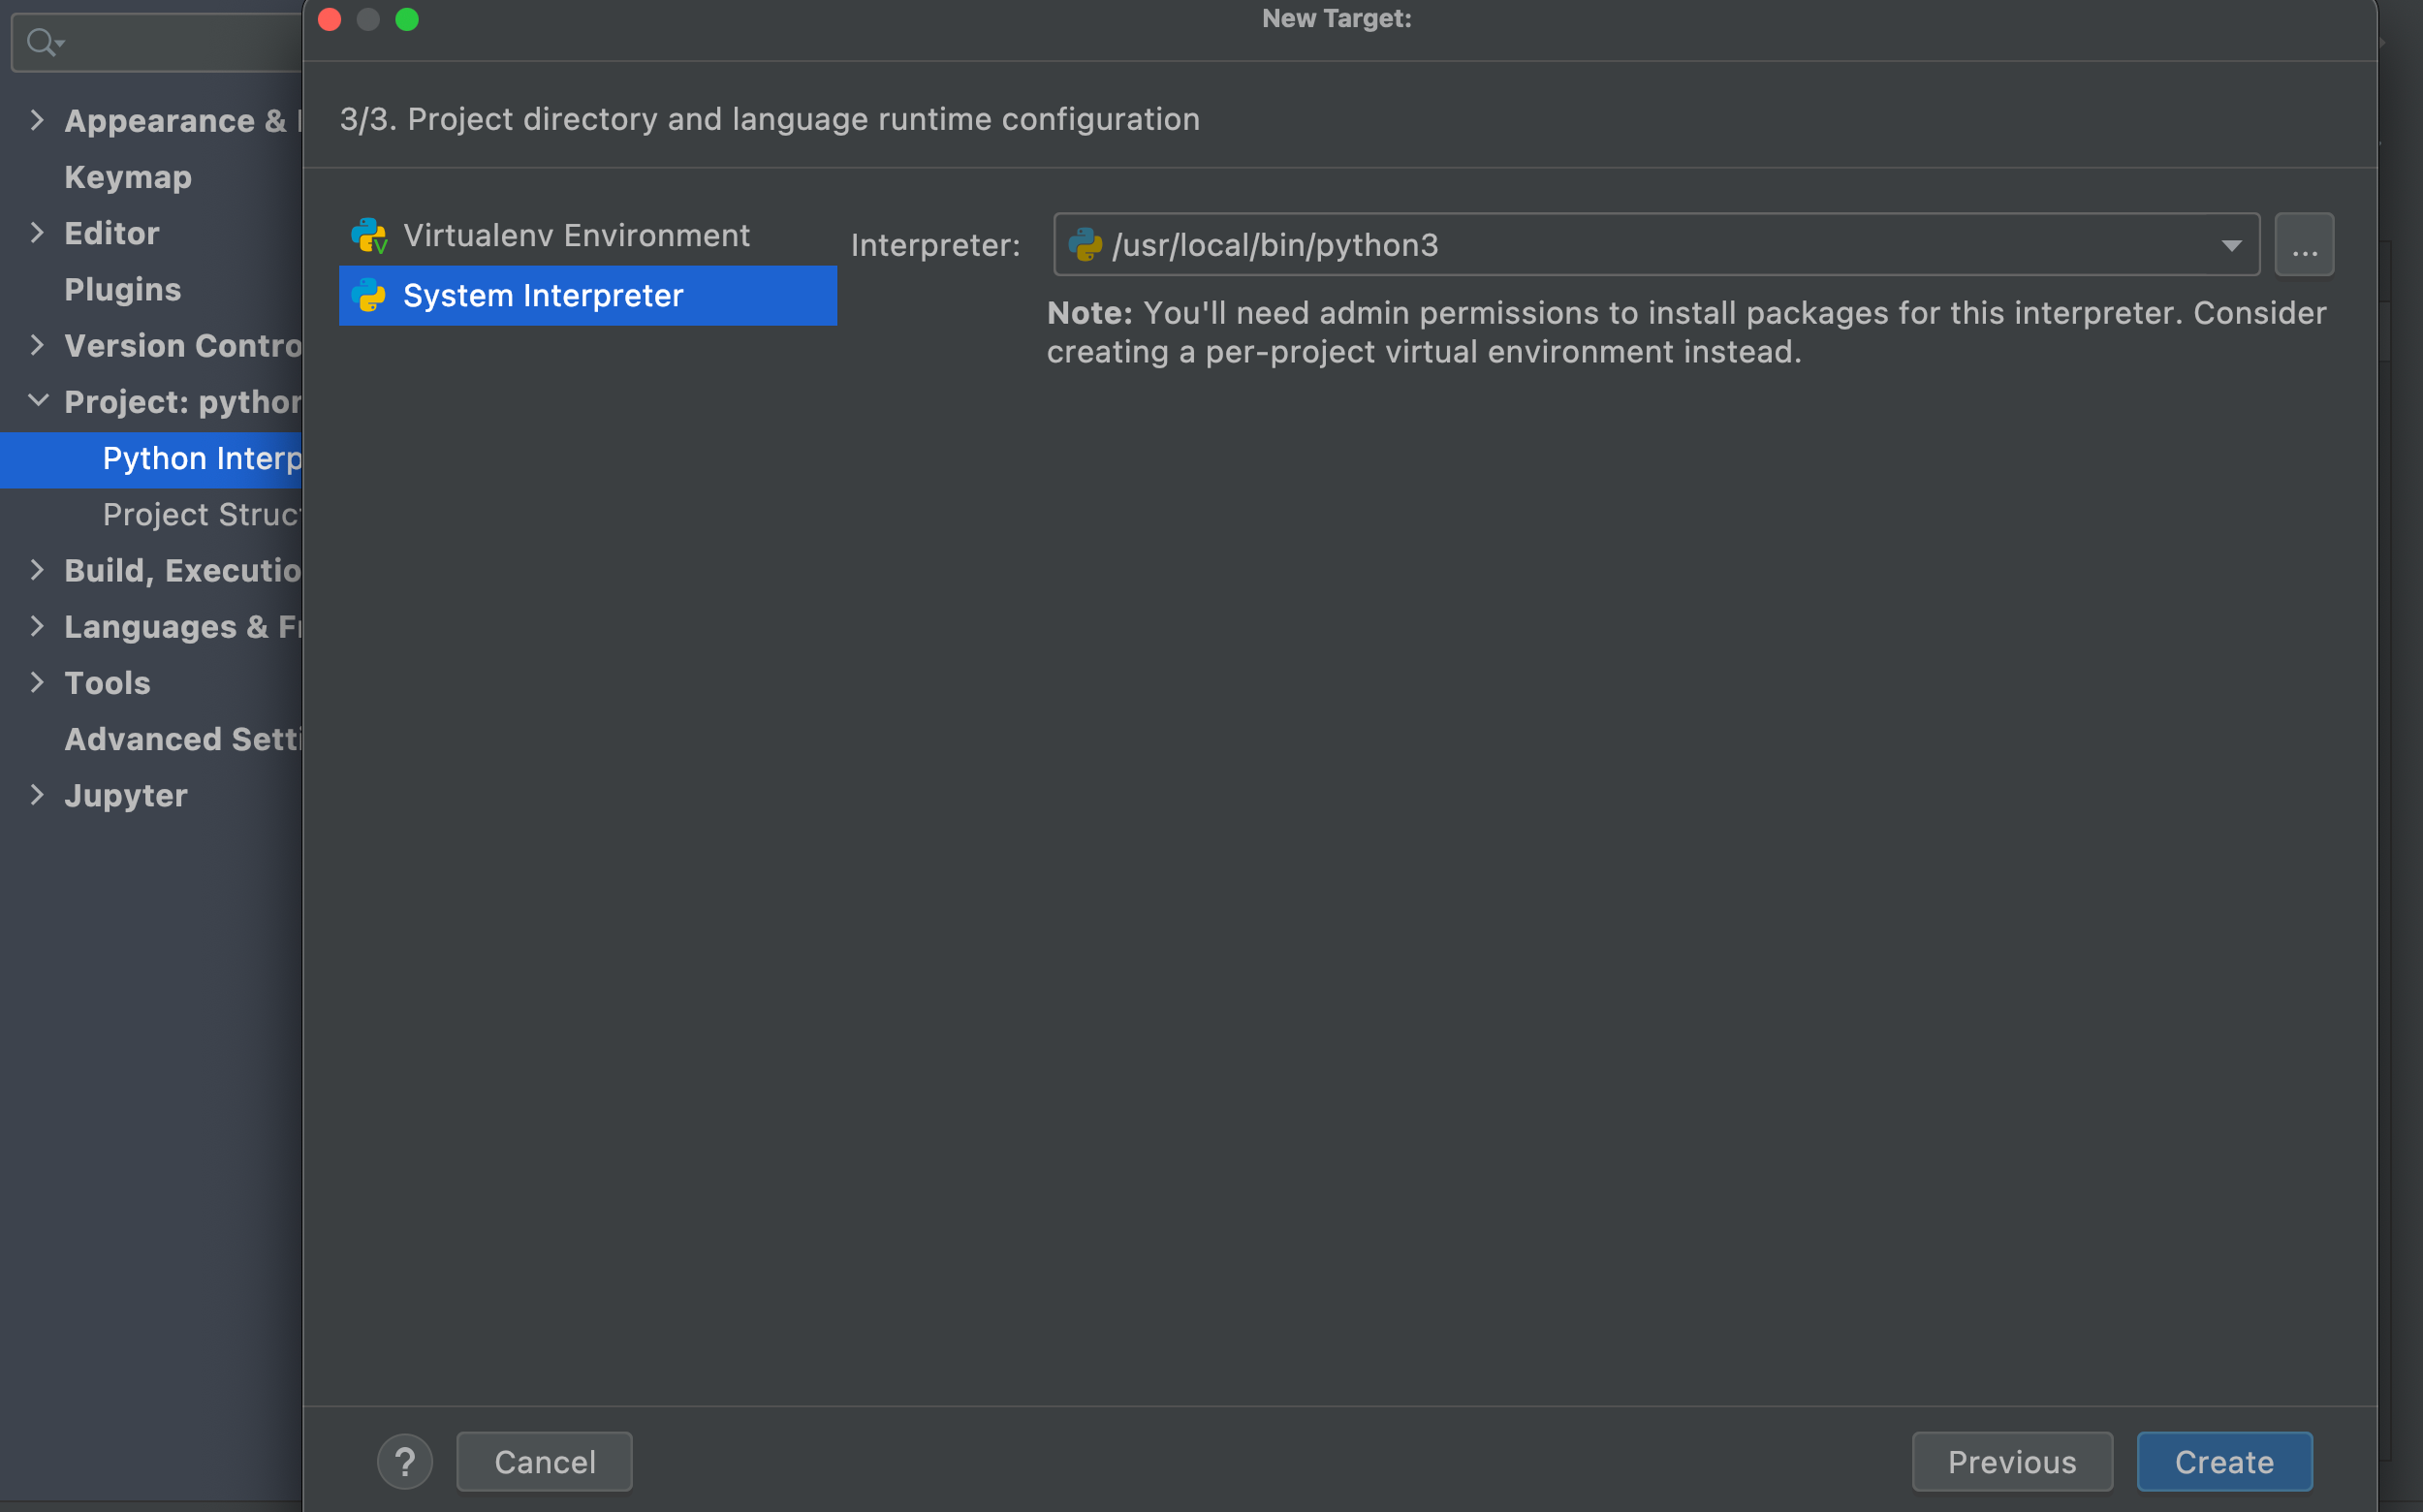
The third step (3/3) is where you can create your virtual environment inside your target. This is not necessary in this example, so we will select the System Interpreter option and click Create.

By now, you should have your target interpreter properly configured to run your application.

2. Creating virtual environments inside targets

Although in our previous example we were not intending to create a virtual environment inside our remote host (a Docker container in this case), this ability can be very useful in other types of targets, and this is one of the main reasons why we improved our Run Targets implementation.

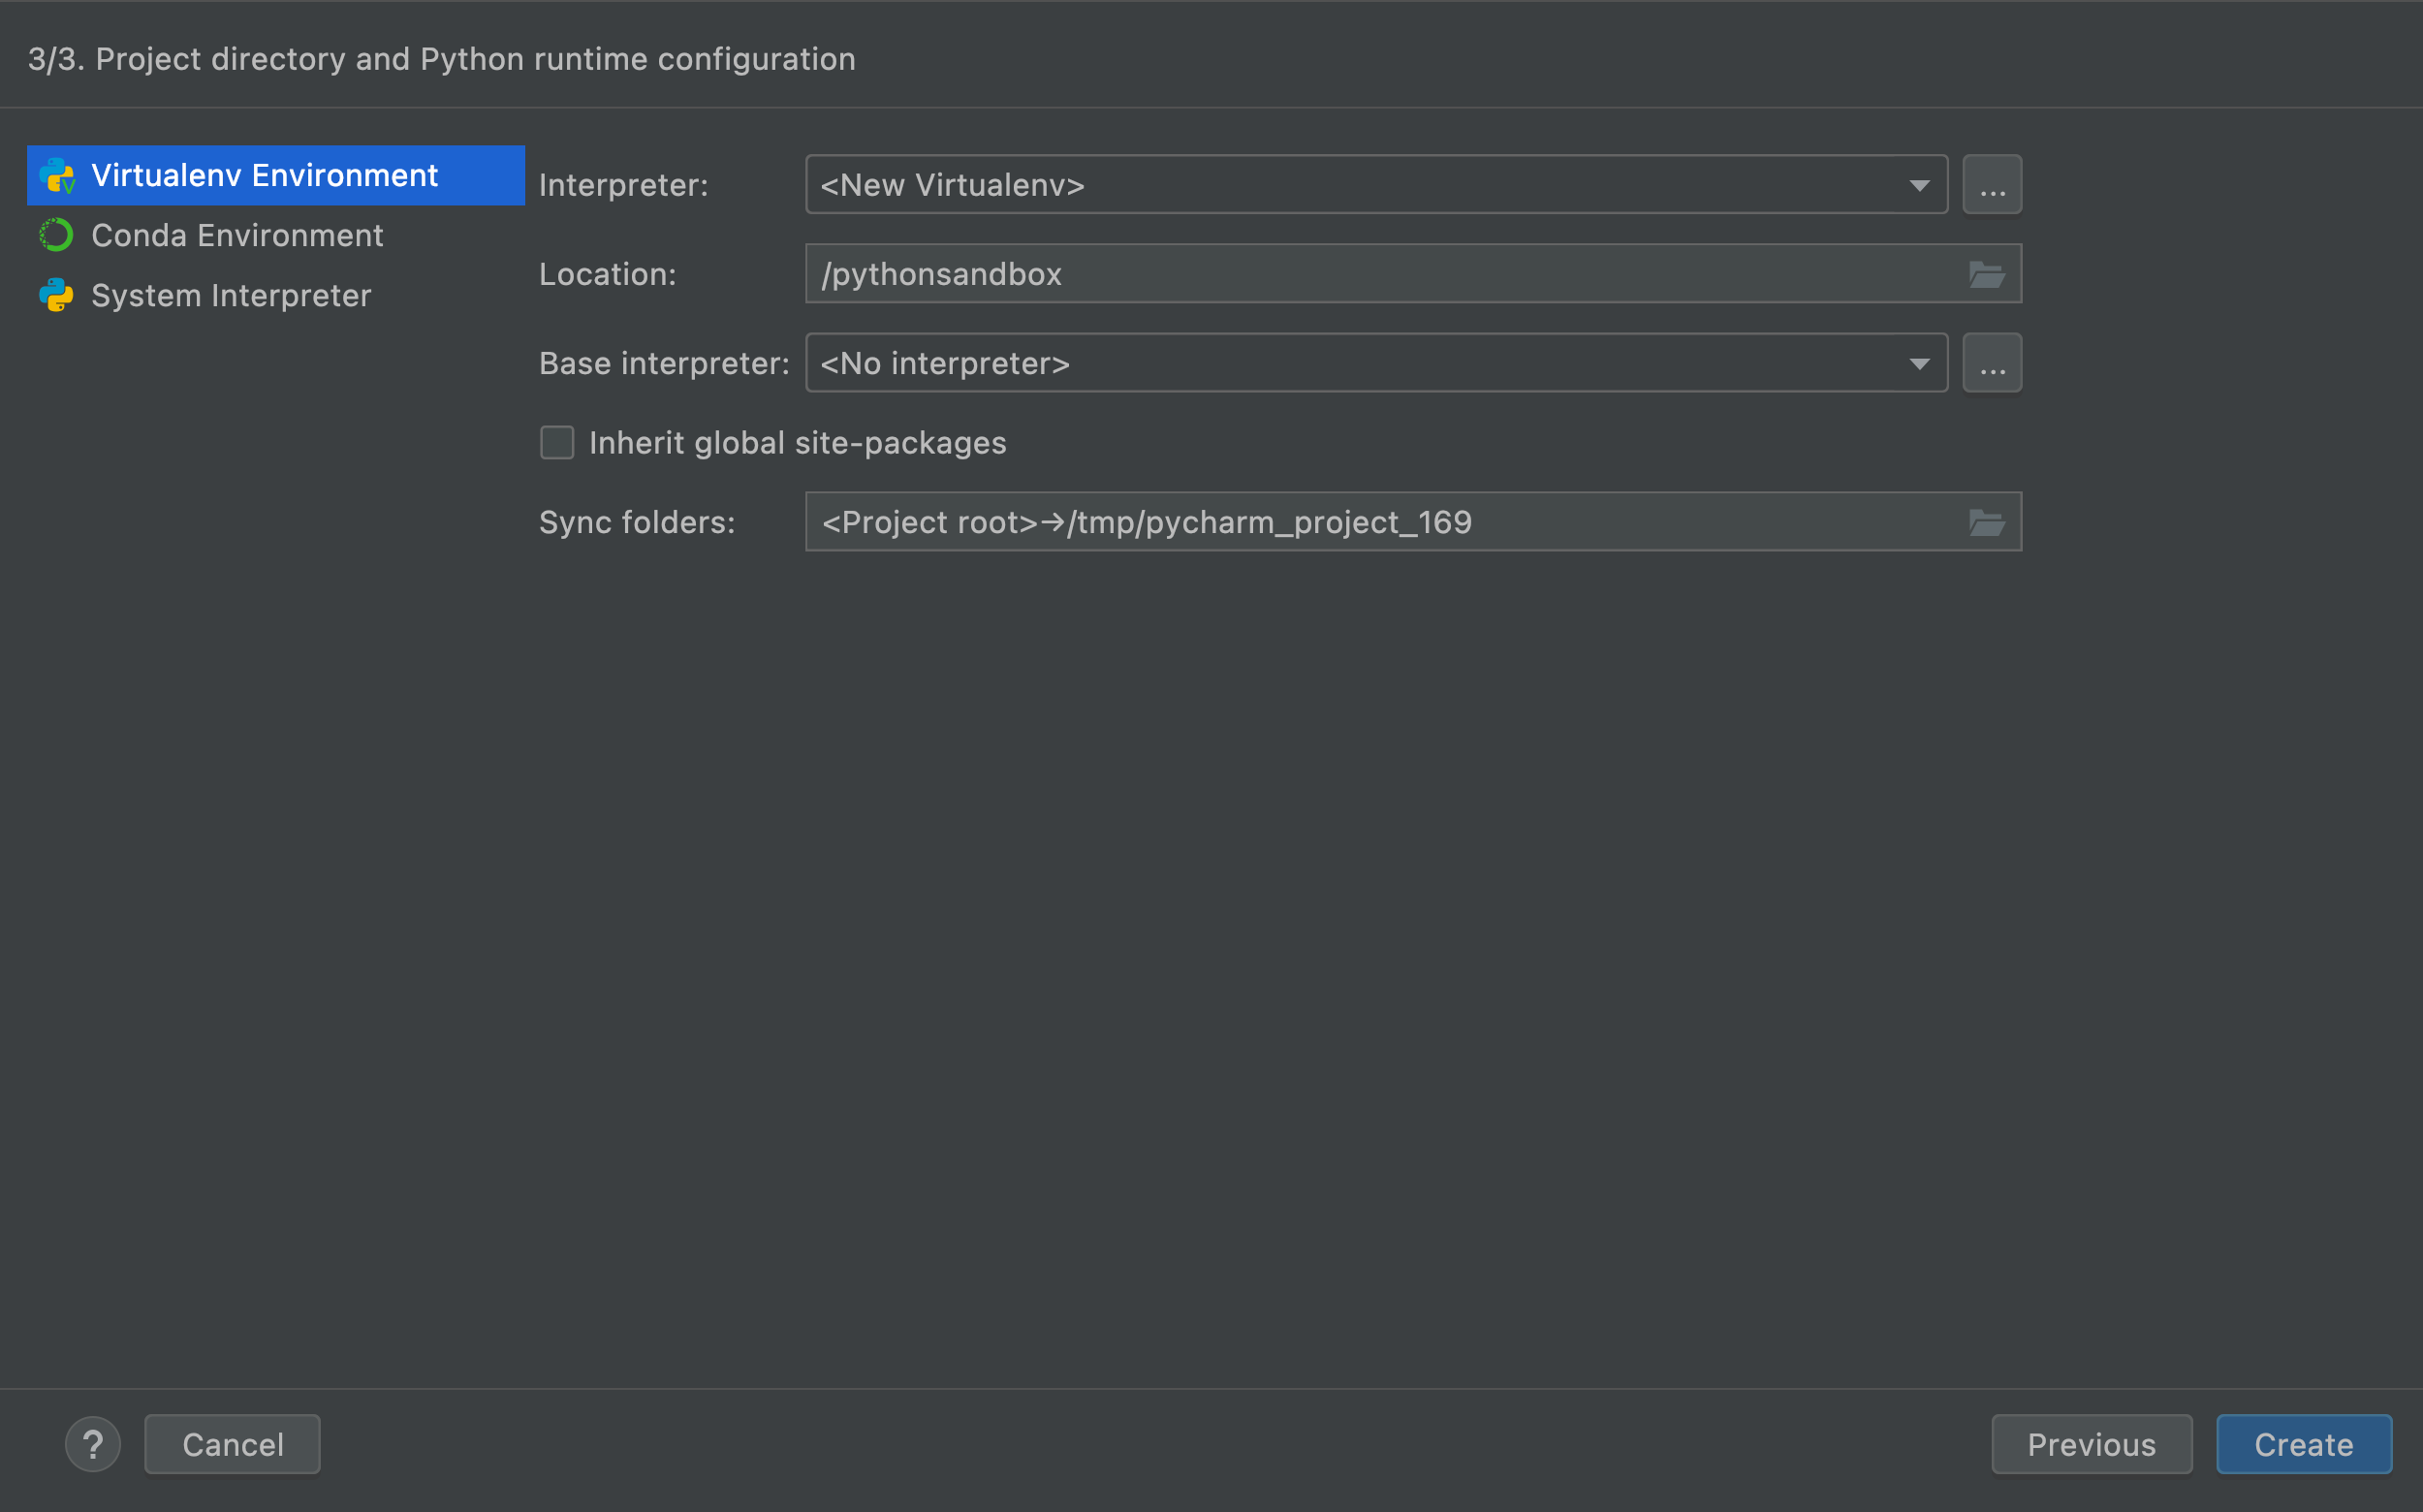
From this EAP build oneards, you can create virtual environments inside WSL, Vagrant, and SSH hosts from the comfort of your IDE. The initial process is the same as demonstrated above, but in the last step, you will be able to select the path to the virtual environment of your choice.

The new support for targets is the main feature to be highlighted in this EAP1, but, of course, it’s not the only one. While we will talk more about other improvements in the following blog posts, we highly encourage you to try PyCharm now and discover them yourself.

You can also check the release notes for a complete list of features and bug fixes brought by this build.

Ready to join the EAP?

Ground rules

  • EAP builds are free to use and require a valid JetBrains account.
  • EAP builds expire 30 days after the build date.
  • You can install an EAP build side by side with your stable PyCharm version.
  • These builds are not fully tested and can be unstable.
  • Your feedback is always welcome. Please use our issue tracker to report any bugs or inconsistencies.

How to download?

Download this EAP from our website or through the JetBrains Toolbox App. Alternatively, if you’re on Ubuntu 16.04 or later you can use snaps.

The PyCharm team


from Planet Python
via read more

Draw the Mandelbrot Set in Python

This tutorial will guide you through a fun project involving complex numbers in Python. You’re going to learn about fractals and create some truly stunning art by drawing the Mandelbrot set using Python’s Matplotlib and Pillow libraries. Along the way, you’ll learn how this famous fractal was discovered, what it represents, and how it relates to other fractals.

Knowing about object-oriented programming principles and recursion will enable you to take full advantage of Python’s expressive syntax to write clean code that reads almost like math formulas. To understand the algorithmic details of making fractals, you should also be comfortable with complex numbers, logarithms, set theory, and iterated functions. But don’t let these prerequisites scare you away, as you’ll be able to follow along and produce the art anyway!

In this tutorial, you’ll learn how to:

  • Apply complex numbers to a practical problem
  • Find members of the Mandelbrot and Julia sets
  • Draw these sets as fractals using Matplotlib and Pillow
  • Make a colorful artistic representation of the fractals

To download the source code used in this tutorial, click the link below:

Understanding the Mandelbrot Set

Before you try to draw the fractal, it’ll help to understand what the corresponding Mandelbrot set represents and how to determine its members. If you’re already familiar with the underlying theory, then feel free to skip ahead to the plotting section below.

The Icon of Fractal Geometry

Even if the name is new to you, you might have seen some mesmerizing visualizations of the Mandelbrot set before. It’s a set of complex numbers, whose boundary forms a distinctive and intricate pattern when depicted on the complex plane. That pattern became arguably the most famous fractal, giving birth to fractal geometry in the late 20th century:

Mandelbrot Set (Source: Wikimedia, Created by Wolfgang Beyer, CC BY-SA 3.0)

The discovery of the Mandelbrot set was possible thanks to technological advancement. It’s attributed to a mathematician named Benoรฎt Mandelbrot. He worked at IBM and had access to a computer capable of what was, at the time, demanding number crunching. Today, you can explore fractals in the comfort of your home, using nothing more than Python!

Fractals are infinitely repeating patterns on different scales. While philosophers have argued for centuries about the existence of infinity, fractals do have an analogy in the real world. It’s a fairly common phenomenon occurring in nature. For example, this Romanesco cauliflower is finite but has a self-similar structure because each part of the vegetable looks like the whole, only smaller:

Fractal Structure of a Cauliflower
Fractal Structure of a Romanesco Cauliflower

Self-similarity can often be defined mathematically with recursion. The Mandelbrot set isn’t perfectly self-similar as it contains slightly different copies of itself at smaller scales. Nevertheless, it can still be described by a recursive function in the complex domain.

The Boundary of Iterative Stability

Formally, the Mandelbrot set is the set of complex numbers, c, for which an infinite sequence of numbers, z0, z1, …, zn, …, remains bounded. In other words, there is a limit that the magnitude of each complex number in that sequence never exceeds. The Mandelbrot sequence is given by the following recursive formula:

Mandelbrot Set Formula

In plain English, to decide whether some complex number, c, belongs to the Mandelbrot set, you must feed that number to the formula above. From now on, the number c will remain constant as you iterate the sequence. The first element of the sequence, z0, is always equal to zero. To calculate the next element, zn+1, you’ll keep squaring the last element, zn, and adding your initial number, c, in a feedback loop.

By observing how the resulting sequence of numbers behaves, you’ll be able to classify your complex number, c, as either a Mandelbrot set member or not. The sequence is infinite, but you must stop calculating its elements at some point. Making that choice is somewhat arbitrary and depends on your accepted level of confidence, as more elements will provide a more accurate ruling on c.

With complex numbers, you can imagine this iterative process visually in two dimensions, but you can go ahead and consider only real numbers for the sake of simplicity now. If you were to implement the above equation in Python, then it could look something like this:

>>>
>>> def z(n, c):
...     if n == 0:
...         return 0
...     else:
...         return z(n - 1, c) ** 2 + c

Your z() function returns the nth element of the sequence, which is why it expects an element’s index, n, as the first argument. The second argument, c, is a fixed number that you’re testing. This function would keep calling itself infinitely due to recursion. However, to break that chain of recursive calls, a condition checks for the base case with an immediately known solution—zero.

Try using your new function to find the first ten elements of the sequence for c = 1, and see what happens:

Read the full article at https://realpython.com/mandelbrot-set-python/ »


[ Improve Your Python With ๐Ÿ Python Tricks ๐Ÿ’Œ – Get a short & sweet Python Trick delivered to your inbox every couple of days. >> Click here to learn more and see examples ]


from Real Python
read more

PyCharm: PyCharm 2021.3.2 Is Out

Bug fixes highlighted in this second minor release of PyCharm 2021.3:

  • We fixed the IDE’s freeze while indexing WSL projects [IDEA-286059]
  • We fixed a bug with Python string literals that were treated as ‘bytes’ in Markdown documents [PY-40313]

Download PyCharm 2021.3.2

For the full list of issues addressed in PyCharm 2021.3.2 please check the release notes.
Found a bug? Please report it using our bug tracker.


from Planet Python
via read more

ItsMyCode: TypeError: only size-1 arrays can be converted to python scalars

We get this error generally while working with NumPy and Matplotlib. If you have a function that accepts a single value, but if you pass an array instead, you will encounter TypeError: only size-1 arrays can be converted to python scalars.

In this tutorial, we will learn what is TypeError: only size-1 arrays can be converted to python scalars and how to resolve this error with examples.

What is TypeError: only size-1 arrays can be converted to python scalars?

Python generally has a handful of scalar values such as int, float, bool, etc. However, in NumPy, there are 24 new fundamental Python types to describe different types of scalars. 

Due to this nature, while working with NumPy, you should ensure to pass a correct type, else Python will raise a TypeError.

Let us take a simple example to reproduce this error. 

# import numpy and matplotlib
import numpy as np
import matplotlib.pyplot as plt

# function which accepts scalar value


def my_function(x):
    return int(x)

data = np.arange(1, 22, 0.4)

# passing an array to function
plt.plot(data, my_function(data))
plt.show()

Output

Traceback (most recent call last):
  File "c:\Personal\IJS\Code\main.py", line 14, in <module>
    plt.plot(data, my_function(data))
  File "c:\Personal\IJS\Code\main.py", line 9, in my_function
    return int(x)
TypeError: only size-1 arrays can be converted to Python scalars

In the above example, we have an int function that accepts only single values. However, we are passing an array to the np.int() or int() method, which will not work and results in TypeError.

How to fix TypeError: only size-1 arrays can be converted to python scalars?

There are two different ways to resolve this error. Let us take a look at both solutions with examples.

Solution 1 – Vectorize the function using np.vectorize

If you are working with a simple array and then vectorizing, this would be the best way to resolve the issue.

The int() accepts a single parameter and not an array according to its signature. We can use np.vectorize() function, which takes a nested sequence of objects or NumPy arrays as inputs and returns a single NumPy array or a tuple of NumPy arrays.

Behind the scenes, it’s a for loop that iterates over each array element and returns a single NumPy array as output.

Let us modify our code to use the np.vectorize() method and run the program.

# import numpy and matplotlib
import numpy as np
import matplotlib.pyplot as plt

# function which accepts scalar value

def my_function(x):
    return int(x)


# vectorize the function
f = np.vectorize(my_function)

data = np.arange(1, 22, 0.4)

# passing an array to function
plt.plot(data, f(data))
plt.show()

Output

We can see that error is gone, the vectorize() function will loop through the array and returns a single array that is accepted by the int() function.

image 9TypeError: only size-1 arrays can be converted to python scalars 3

Solution 2 – Cast the array using .astype() method

The np.vectorize() method is inefficient over the larger arrays as it loops through each element.

The better way to resolve this issue is to cast the array into a specific type (int in this case) using astype() method.

# import numpy and matplotlib
import numpy as np
import matplotlib.pyplot as plt

# function which accepts scalar value


def my_function(x):
    # csat the array into integer
    return x.astype(int)


data = np.arange(1, 22, 0.4)

# passing an array to function
plt.plot(data, my_function(data))
plt.show()

Output

only size-1 arrays can be converted to python scalarsTypeError: only size-1 arrays can be converted to python scalars 4

Conclusion

We get TypeError: only size-1 arrays can be converted to python scalars if we pass an array to the method that accepts only scalar values.

The issue can be resolved by using np.vectorize() function a nested sequence of objects or NumPy arrays as inputs and returns a single NumPy array or a tuple of NumPy arrays.

Another way to resolve the error is to use the astype() method to cast the array into an integer type.


from Planet Python
via read more

Will McGugan: Textual for Windows

Textual adds Windows support

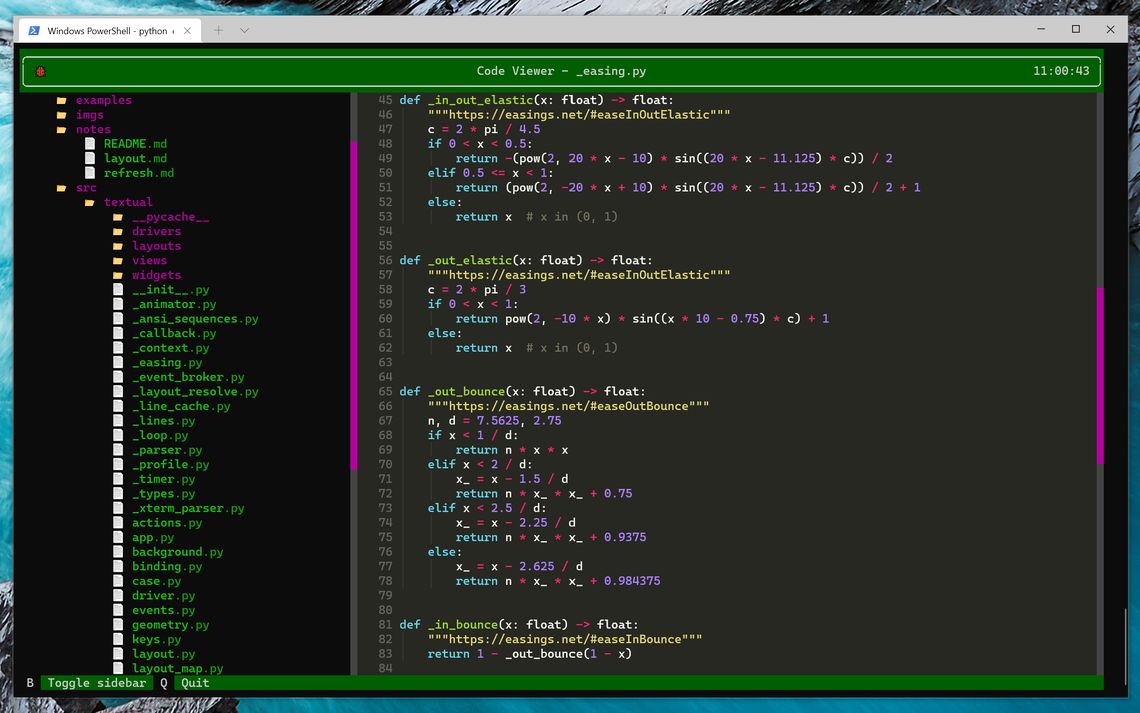
I've just released v0.1.15 of Textual, with Windows support.

The Windows support is somewhat experimental, but so far seems solid. You will get best results on the new Windows Terminal. On the classic command prompt you might find a reduced color palette. This works on VSCode, but is missing mouse input on Windows 10 due to an upstream issue which is apparently fixed in Windows 11. If you have Windows 11, I'd appreciate confirmation on that!

© 2022 Will McGugan

This is the code_viewer example in the Textual repo.

This is the first release under the Textualize umbrella, which is my tech startup funding development. We've been hard at work in a branch adding some very exciting new features which should push the boundaries of what you would think is possible in the terminal. Join the mailing list if you would like to be the first to hear about that.

Windows terminal apps

When it comes to developing terminal apps, MacOS and Linux are essentially the same. Textual shares code for both. Windows works differently, and requires an entirely different API to switch to application (fullscreen) mode and read keys without echo. Recently it got a little easier when Windows added support for virtual terminal sequences (~5 years ago), i.e. the same ansi codes that have been supported in Linux since forever.

The virtual terminal sequences support certainly helped. Textual can re-use the code that generates the display, but I couldn't avoid using the win32 api entirely. In particular, getting updates regarding the terminal size was problematic. Textual should update the display when resizing the window. In Linux that is done via a signal, in Windows that requires subscribing and listening to input events.

Fortunately if you build an app with Textual, you won't have to worry about the differences between these platforms. All the gnarly API details are abstracted with a driver system which ensures that by the time your code receives events any differences in platforms have been abstracted away.


from Planet Python
via read more

Stack Abuse: Guide to enumerate() in Python - Forget Counters

Introduction

Looping with a counter variable/index - a classic in Computer Science! Typically, you'd either explicitly define a counter variable/index, and manually increment it on each loop, or you'd use some sort of syntactic sugar to avoid this process through enhanced for loops:

some_list = ['Looping', 'with', 'counters', 'is', 'a', 'classic!']

# Manual counter incrementation
i = 0
for element in some_list:
    print(f'Element Index: {i}, Element: {element}')
    i += 1

# Automatic counter incrementation
for i in range(len(some_list)):
    print(f'Element Index: {i}, Element: {some_list[i]}')

Both of these snippets result in the same output:

Element Index: 0, Element: Looping
Element Index: 1, Element: with
Element Index: 2, Element: counters
Element Index: 3, Element: is
Element Index: 4, Element: a
Element Index: 5, Element: classic!

Due to how common looping like this is in day-to-day work - the enumerate() function was built into the Python namespace. You can, without any extra dependencies, loop through an iterable in Python, with an automatic counter variable/index with syntax as simple as:

for idx, element in enumerate(some_list):
     print(idx, element)

Note: It's common, but not necessary, convention to name the index as idx if no other label is applicable, since id is a reserved keyword. Commonly, based on the iterable you're working with, more meaningful names can be attributed, such as: batch_num, batch in enumerate(...).

This piece of code results in:

0 Looping
1 with
2 counters
3 is
4 a
5 classic!

Let's dive into the function and explore how it works! It's a classic and common one - and in true Python fashion, it simplifies a common, redundant operation down and improves readability of your code.

The enumerate() Function in Python

The enumerate() function accepts an iterable collection (such as a tuple, list or string), and returns an enumerate object, which consists of a key-set and value-set, where the keys correspond to a counter variable (starting at 0) and the values correspond to the original elements of the iterable collection:

obj = enumerate(some_list)
print(type(obj))
# <class 'enumerate'>

Note: The enumerate object is, itself, iterable! You can use the standard for syntax, unpacking the keys and values of the enumerate object.

Using Python's standard for syntax, we can unpack the keys and values from this object and inspect their types:

for key, value in obj:
    print(type(key), type(value))
    
# <class 'int'> <class 'str'>

The data types of the values (elements from the original collection) are retained, so even if you pass custom data types, as long as they're a valid iterable collection - they'll simply be annotated with a counter variable. If you were to collect the object itself into a list, its structure would become very clear:

print(list(obj))
# [(0, 'Looping'), (1, 'with'), (2, 'counters'), (3, 'is'), (4, 'a'), (5, 'classic!')]

It's just a set of tuples with two elements each - a counter variable, starting at 0, and each element of the original iterable mapped to the indices.

You can set an optional start argument, denoting not the starting index in the iterable, but the starting value for the first counter/index that the function will generate. For instance, say we'd like to start at 1 instead of 0:

obj = enumerate(some_list, 1)
print(list(obj))
# [(1, 'Looping'), (2, 'with'), (3, 'counters'), (4, 'is'), (5, 'a'), (6, 'classic!')]

Loop Through Iterable with enumerate()

Having said all that - looping through an enumerate object looks the same as looping through other iterables. The for loop comes in handy here as you can assign reference variables to the returned tuple values. Additionally, there's no need to reference the object explicitly, as it's very rarely used outside of a single loop so the returned value is typically used directly in the loop itself:

# No need to assign the returned `enumerate` object to a distinct reference variable
for idx, element in enumerate(some_list):
     print(f'{idx}, {element}')

This results in:

0, Looping
1, with
2, counters
3, is
4, a
5, classic!

If you'd like to read more about f-Strings and formatting output in Python, read our Guide to String Formatting with Python 3's f-Strings!

Annotating each element in an iterable - or rather, incrementing a counter and returning it, while accessing elements of iterables is as easy as that!

It's worth noting that nothing special really happens within the enumerate() function. It really is, functionally equivalent, to the initial loop we wrote, with an explicit counter variable being returned with an element. If you take a look at the note in the official documentation, the result of the function is functionally equivalent to:

def enumerate(sequence, start=0):
    n = start
    for elem in sequence:
        yield n, elem
        n += 1

You can see that the code is quite similar to the first implementation we've defined:

# Original implementation
i = 0
for element in some_list:
    print(f'Element Index: {i}, Element: {some_list[i]}')
    i += 1
    
# Or, rewritten as a method that accepts an iterable    
def our_enumerate(some_iterable, start=0):
    i = start
    for element in some_iterable:
        yield i, element
        i += 1

The key point here is - the yield keyword defines a generator, which is iterable. By yielding back the index and the element itself, we're creating an iterable generator object, which we can then loop over and extract elements (and their indices) from via the for loop.

If you'd like to read more about the usage of the yield keyword here, read our Guide to Understanding Python's "yield" Keyword!

If you were to use the our_enumerate() function instead of the built-in one, we'd have much the same results:

some_list = ['Looping', 'with', 'counters', 'is', 'a', 'classic!']

for idx, element in our_enumerate(some_list):
     print(f'{idx}, {element}')
        
obj = our_enumerate(some_list)
print(f'Object type: {obj}')

This results in:

0, Looping
1, with
2, counters
3, is
4, a
5, classic!
Object type: <generator object our_enumerate at 0x000002750B595F48>

The only difference is that we just have a generic generator object, instead of a nicer class name.

Conclusion

Ultimately, the enumerate() function is simply syntactic sugar, wrapping an extremely common and straightforward looping implementation.

In this short guide, we've taken a look at the enumerate() function in Python - the built-in convenience method to iterate over a collection and annotate the elements with indices.


from Planet Python
via read more

ItsMyCode: How to Install Seaborn in Python using the Pip command

This tutorial will learn how to install Seaborn in Python using the Pip command.

Seaborn is a library for making statistical graphics in Python. It is built on top of matplotlib and closely integrated with pandas data structures

Pip is a recursive acronym for “Pip Installs Packages” or “Pip Installs Python.” Basically, it is a package manager that allows you to download and install packages.

Supported Python Version

Python 3.6+ (Recommended)

Note: If you are installing the latest version of Seaborn, the recommended version of Python is 3.6 and above.

Required dependencies

These are the dependent libraries that need to be present. If not already present, these libraries will be downloaded when you install seaborn.

Optional dependencies

How to Install Seaborn in Python using the Pip Command

Before installing the Seaborn, ensure you have the latest version of Pip installed on your computer.

If Pip is not installed correctly or not present, check out the article pip: command not found to resolve the issue.

To install the latest version of Seaborn, run the following pip command.

pip install seaborn

For Python version 3+, it is recommended to use the pip3 command to install the seaborn, as shown below.

pip3 install seaborn

If you would like to install a specific version of Seaborn, you can provide the version number in the pip command as shown below.

pip3 install seaborn==0.11.2

The library is also included as part of Anaconda distribution. You can run the below conda command to install Seaborn on Anaconda.

conda install seaborn


from Planet Python
via read more

Python GUIs: PySide2 vs PySide6: What are the differences, and is it time to upgrade? — Is it time to upgrade?

If you are already developing Python GUI apps with PySide2, you might be asking yourself whether it's time to upgrade to PySide6 and use the latest version of the Qt library. In this article we'll look at the main differences between PySide2 and PySide6, benefits of upgrading and problems you might encounter when doing so.

Background

Qt is a GUI framework written in the C++ programming language, now owned by The Qt Company. They also maintain the Qt for Python project, which provides the official Python binding for Qt under the name PySide.

The name PySide was chosen because the word side means binding in the Finnish language.

The development of Qt itself started with Trolltech in 1992, but it wasn't until 2009 that the Python binding PySide became available. Development of PySide lagged behind Qt for many years, and the other Python binding PyQt became more popular. However, in recent years The Qt Company have been putting increased resources into development, and it now tracks Qt releases closely.

The first version of PySide6 was released on December 10, 2020, just two days after the release of Qt6 itself.

Upgrading from PySide2 to PySide6

The upgrade path from PySide2 to PySide6 is very straightforward. For most applications, just renaming the imports from PySide2 to PySide6 will be enough to convert your application to work with the new library.

If you are considering upgrading, I recommend you try this first and see if works -- if not, take a look at the differences below and see if they apply to your project.

Where things might go wrong

Let’s get acquainted with a few differences between the two versions to know how to write code that works seamlessly with both. After reading this, you should be able to take any PySide2 example online and convert it to work with PySide6. These changes reflect underlying differences in Qt6 vs. Qt5 and aren't unique to PySide itself.

If you’re still using Python 2.x, note that PySide6 is available only for Python 3.x versions.

High DPI Scaling

The high DPI (dots per inch) scaling attributes Qt.AA_EnableHighDpiScaling, Qt.AA_DisableHighDpiScaling and Qt.AA_UseHighDpiPixmaps have been deprecated because high DPI is enabled by default in PySide6 and can’t be disabled.

QMouseEvent

QMouseEvent.pos() and QMouseEvent.globalPos() methods returning a QPoint object as well as QMouseEvent.x() and QMouseEvent.y() returning an int object have been deprecated – use QMouseEvent.position() and QMouseEvent.globalPosition() returning a QPointF object instead, so like QMouseEvent.position().x() and QMouseEvent.position().y().

Qt.MidButton has been renamed to Qt.MiddleButton

Platform specific

Finally, platform-specific methods in the QtWin and QtMac modules have been deprecated, in favor of using the native calls instead. In PySide applications the only likely consequence of this will be the setCurrentProcessExplicitAppUserModelID call to set an application ID, for taskbar grouping.

python
try:
    # Include in try/except block if you're also targeting Mac/Linux
    from PyQt5.QtWinExtras import QtWin
    myappid = 'com.learnpyqt.examples.helloworld'
    QtWin.setCurrentProcessExplicitAppUserModelID(myappid)
except ImportError:
    pass
python
try:
    # Include in try/except block if you're also targeting Mac/Linux
    from ctypes import windll  # Only exists on Windows.
    myappid = 'mycompany.myproduct.subproduct.version'
    windll.shell32.SetCurrentProcessExplicitAppUserModelID(myappid)
except ImportError:
    pass

Miscellaneous

  • QDesktopWidget has been removed – use QScreen instead, which can be retrieved using QWidget.screen(), QGuiApplication.primaryScreen(), or QGuiApplication.screens().
  • .width() of QFontMetrics has been renamed to .horizontalAdvance().
  • .get() of QOpenGLVersionFunctionsFactory() has been recommended to be used instead of .versionFunctions() of QOpenGLContext() when obtaining any functions of the Open GL library.
  • QRegularExpression has replaced QRegExp.
  • QWidget.mapToGlobal() and QWidget.mapFromGlobal() now accept and return a QPointF object.
  • All methods named .exec_() (in classes QCoreApplication, QDialog, and QEventLoop) have been deprecated, and should be replaced with .exec() which became possible since Python 3. However, they are still available under the underscored names for backwards compatibility.

snake_case and the new true_property

PySide2 introduced the snake_case feature to write Qt method names – like .addWidget() – in a Python-friendly snake-case style like .add_widget(). This allows your PySide code to follow the Python standard PEP8 style.

Introduced in PySide6 is a new feature which allows direct access to Qt properties as Python object properties, eliminating the setter and getter methods. This can be enabled explicitly on a per-module basis by importing the true_property feature.

The example below demonstrates the effect on PySide6 code of applying both these features.

python
table = QTableWidget()
table.setColumnCount(2)

button = QPushButton("Add")
button.setEnabled(False)

layout = QVBoxLayout()
layout.addWidget(table)
layout.addWidget(button)
python
from __feature__ import snake_case, true_property

table = QTableWidget()
table.column_count = 2

button = QPushButton("Add")
button.enabled = False

layout = QVBoxLayout()
layout.add_widget(table)
layout.add_widget(button)

As you can see, the true_property feature allows you to assign a value to a Qt property directly – rather than using setters.

In the pre-PySide6 code, you could only do .setEnabled(False) to set the enabled property of a widget to the value False, hence disabling the widget. However, with true_property enabled, you can set a property directly with, for example, button.enabled = False. While this may seem like a cosmetic change, following Pythonic style in this way makes code easier for Python developers to understand and maintain.

PySide6 demo

Let’s demonstrate how these two features could be valuable in your PySide6 code.

python
import sys
import random

from PySide6.QtCore import Slot, Qt
from PySide6.QtWidgets import (
    QLabel,
    QWidget,
    QMainWindow,
    QPushButton,
    QVBoxLayout,
    QApplication,
)

# Import snake_case and true_property after PySide6 imports.
from __feature__ import snake_case, true_property


class MainWindow(QMainWindow):

    def __init__(self):
        super().__init__()

        # Since QMainWindow does not have a fixedSize property,
        # we use the setFixedSize() method but call it in the
        # snake-case style.
        self.set_fixed_size(300, 100)

        # However, QMainWindow does have a windowTitle property
        # for which we assign a value directly but must write
        # the property's name in snake-case style.
        self.window_title = "PySide6 Translator"

        # And this is our non-Qt Python property to which
        # we must assign a value just like above anyway,
        # so assigning values to properties uniformly
        # throughout our code could be intriguing.
        self.multilingual_greetings = (
            "&Pcy&rcy&icy&vcy&iecy&tcy &mcy&icy&rcy!",    # Russian ("Privet mir!" in Cyrillic)
            "Hallo Welt!",    # German
            "¡Hola Mundo!",   # Spanish
            "Hei maailma!",   # Finnish
            "Hellรณ Vilรกg!",   # Hungarian
            "Hallo Wereld!",  # Dutch
        )

        # We create a label with an English greeting by default.
        self.greeting = QLabel("Hello world!")

        # Instead of self.message.setAlignment(Qt.AlignCenter),
        # we set a value to the alignment property directly...
        self.greeting.alignment = Qt.AlignCenter

        # We now also create a button to translate our
        # English greeting and then connect it with
        # our translate_greeting() slot.
        self.translate_button = QPushButton("Translate")
        self.translate_button.clicked.connect(self.translate_greeting)

        self.vertical_layout = QVBoxLayout()
        self.vertical_layout.add_widget(self.greeting)
        self.vertical_layout.add_widget(self.translate_button)

        self.widget_container = QWidget()
        self.widget_container.set_layout(self.vertical_layout)

        # Instead of calling .setCentralWidget(),
        # we call it by its snake-case name...
        self.set_central_widget(self.widget_container)

    @Slot()
    def translate_greeting(self):
        # Here, instead of using the .setText() method,
        # we set a value to the text property directly...
        self.greeting.text = random.choice(self.multilingual_greetings)


if __name__ == "__main__":
    app = QApplication(sys.argv)

    main_window = MainWindow()
    main_window.show()

    app.exec()

.exec() or .exec_()?

The .exec() method in Qt starts the event loop of your QApplication or dialog boxes. In Python 2.7, exec was a keyword, meaning that it could not be used as a variable name, a function name, or a method name. The solution used in PySide was to name the method as .exec_() – adding a trailing underscore – to avoid a conflict.

Python 3.0 removed the exec keyword, freeing up the name to be used. And since PySide6 targets only Python 3.x versions, it currently deprecates the workaround name and will later remove it. The .exec() method is named just as in Qt itself. However, the .exec_() name only exists for short-term backward compatibility with old code.

If your code must target PySide2 and PySide6 libraries, you can use .exec_(), but beware that this method name will be removed.

Missing modules

This isn’t a concern anymore, but when Qt6 was new, not all of the Qt modules had been ported yet, and so were not available in PySide6. If you needed any of these modules, the upgrade to PySide6 was not desirable then. Fast forward to Qt 6.2 and PySide 6.2, the good news is that all of those missing modules are now back. You can upgrade with no hesitation.

Is it time to upgrade?

Whether or not it's time to upgrade depends on your project. If you're starting out learning PySide (or GUI programming in general), you may prefer to stick with PySide2 for the time being as there are more examples available for PySide2 online. While the differences are minor, anything not working is confusing when you learn. Anything you know using PySide2 will carry over when you choose to upgrade to PySide6.

However, if you're starting a new project and are reasonably familiar with PySide/Qt, I'd recommend jumping into PySide6 now.

If you want to get started with PySide6, the PySide6 book is available with all code examples updated for this latest PySide edition.

PySide Backwards compatibility

If you're developing software that's targeting both PySide2 and PySide6 you can use conditional imports to import the classes from whichever module is loaded.

python
try:
    from PySide6 import QtWidgets, QtGui, QtCore # ...
except ImportError:
    from PySide2 import QtWidgets, QtGui, QtCore # ...

If you add these imports to a file in the root of your project named qt.py. You can then, in your own code files import use from qt import QtWidgets and the available library will be imported automatically.

Note however, that importing in this way won't work around any of the other differences between PySide2 and PySide6 mentioned above. For that, we recommend using the QtPy library.

Universal compatibility

If you need to support all Python Qt libraries (PySide2, PySide6, PyQt5, PyQt6) or are dependent on features which have changed between versions of Qt, then you should consider using QtPy. This package is a small abstraction layer around all versions of the Qt libraries, which allows you to use them interchangeably (as far as possible) in your applications.

If you're developing Python libraries or applications that need to be portable across different versions it is definitely worth a look.

Conclusion

As we've discovered, there are no major differences between PySide2 and PySide6. The changes that are there can be easily worked around. If you are new to Python GUI programming with Qt you may find it easier to start with PySide2 still, but for any new project I'd suggest starting with PySide6. It is an LTS (Long Term Support) version. If you’re not upgrading for the benefits, which are not significant, do it for the long-term bug fixes.

For more, see the complete PyQt6 tutorial.


from Planet Python
via read more
Mike Driscoll: PyDev of the Week: Sundeep Agarwal

This week we welcome Sundeep Agarwal (@learn_byexample) as our PyDev of the Week! Sundeep has authored more than 10 books about RegEx, Awk, Python and more! You can see what else Sundeep has been up to by checking out his blog or his GitHub profile.

Sundeep Agarwal

Let's spend some time getting to know Sundeep better!

Can you tell us a little about yourself (hobbies, education, etc):

Hello! My name is Sundeep Agarwal and I'm from India. I did my bachelors in Electronics and Communications, worked at Analog Devices (a semiconductor company) for six years and now write technical books for a living. I help programmers learn tricky topics like Regular Expressions and CLI tools with understandable examples.

I love reading novels, preferred genre these days being fantasy and science-fiction. I used to go on trekking and hiking a lot, but not much opportunities in the past few years.

If I had to choose one notable thing from my country, it'd be the melodious film music that I listen to all day long. Born in North India but raised in South India, I get to enjoy them in two languages!

Why did you start using Python?

I was familiar with Linux, Vim and Perl (for scripting and text processing tasks) while working at Analog Devices. Our college decided to introduce Scripting Course for Electronics students to help them prepare for such jobs. I've been part of the team that conducts such workshops. In 2016, based on industry trend, it was decided to shift to Python from Perl. Around that time, I was learning Python anyway, so I decided to dig deeper for these workshops and started using Python for my scripting tasks as well.

Which Python libraries are your favorite (core or 3rd party)?

I'm biased since they are part of my best selling ebook — the built-in "re" and third-party "regex" modules.

Working with "tkinter" was nice too. I hope to try out other GUI frameworks this year.

What other programming languages do you know and which is your favorite?

I've had to learn or use several programming languages as part of my education and work — C, C++, Java, MATLAB, Perl and Verilog. But I don't use them anymore and don't remember much either!

I dabbled with Ruby while writing ebooks and understood just enough JavaScript to write a Regular Expressions book.

These days, I primarily use Linux CLI one-liners and Vim for most of my programming tasks. I reach for Python if I need more than a few lines of code, so you could say that's my favorite. Last year I made a few GUI apps using Python and that was a nice experience. Hope to do more such projects this year too.

How did you decide to start writing technical books?

The materials I had prepared for college workshops played a role here too! And there were several other factors that led me to try authoring programming books.

I started using GitHub in 2016, attracted by the simplicity of markdown files for presenting programming concepts. I had also been learning and improving my programming skills by answering questions on stackoverflow. So, by the time I decided to write ebooks in 2018, I had more than two years worth of tutorials. I've published 11 ebooks by now, but I still have materials left for more ebooks!

What challenges have you had writing the books and how did you overcome them?

I found it difficult to brace myself for valid criticism, like grammar and cover design. They only made my ebooks better when I tried to incorporate the suggestions, but it isn't easy to face faults in your creative work.

What projects are you working on now?

I'm currently writing a Vim Reference Guide for beginner to intermediate level users.

Aiming to publish the ebook in February.

Is there anything else you’d like to say?

Thank you Mike for the opportunity to share my journey here.

Wishing all readers a great year ahead ๐Ÿ™‚

Thanks for doing the interview, Sundeep!

The post PyDev of the Week: Sundeep Agarwal appeared first on Mouse Vs Python.


from Planet Python
via read more

Sunday, January 30, 2022

Podcast.__init__: Building A Detailed View Of Your Software Delivery Process With The Eiffel Protocol

Summary

The process of getting software delivered to an environment where users can interact with it requires many steps along the way. In some cases the journey can require a large number of interdependent workflows that need to be orchestrated across technical and organizational boundaries, making it difficult to know what the current status is. Faced with such a complex delivery workflow the engineers at Ericsson created a message based protocol and accompanying tooling to let the various actors in the process provide information about the events that happened across the different stages. In this episode Daniel Stรฅhl and Magnus Bรคck explain how the Eiffel protocol allows you to build a tooling agnostic visibility layer for your software delivery process, letting you answer all of your questions about what is happening between writing a line of code and your users executing it.

Announcements

  • Hello and welcome to Podcast.__init__, the podcast about Python’s role in data and science.
  • When you’re ready to launch your next app or want to try a project you hear about on the show, you’ll need somewhere to deploy it, so take a look at our friends over at Linode. With the launch of their managed Kubernetes platform it’s easy to get started with the next generation of deployment and scaling, powered by the battle tested Linode platform, including simple pricing, node balancers, 40Gbit networking, dedicated CPU and GPU instances, and worldwide data centers. Go to pythonpodcast.com/linode and get a $100 credit to try out a Kubernetes cluster of your own. And don’t forget to thank them for their continued support of this show!
  • Your host as usual is Tobias Macey and today I’m interviewing Daniel Stรฅhl and Magnus Bรคck about Eiffel, an open protocol for platform agnostic communication for CI/CD systems

Interview

  • Introductions
  • How did you get introduced to Python?
  • Can you describe what Eiffel is and the story behind it?
    • What are the goals of the Eiffel protocol and ecosystem?
    • What is the role of Python in the Eiffel ecosystem?
  • What are some of the types of questions that someone might ask about their CI/CD workflow?
    • How does Eiffel help to answer those questions?
  • Who are the personas that you would expect to interact with an Eiffel system?
  • Can you describe the core architectural elements required to integrate Eiffel into the software lifecycle?
    • How have the design and goals of the Eiffel protocol/architecture changed or evolved since you first began working on it?
  • What are some example workflows that an engineering/product team might build with Eiffel?
  • What are some of the challenges that teams encounter when integrating Eiffel into their delivery process?
  • What are the most interesting, innovative, or unexpected ways that you have seen Eiffel used?
  • What are the most interesting, unexpected, or challenging lessons that you have learned while working on Eiffel?
  • When is Eiffel the wrong choice?
  • What do you have planned for the future of Eiffel?

Keep In Touch

Picks

Closing Announcements

  • Thank you for listening! Don’t forget to check out our other show, the Data Engineering Podcast for the latest on modern data management.
  • Visit the site to subscribe to the show, sign up for the mailing list, and read the show notes.
  • If you’ve learned something or tried out a project from the show then tell us about it! Email hosts@podcastinit.com) with your story.
  • To help other people find the show please leave a review on iTunes and tell your friends and co-workers

Links

The intro and outro music is from Requiem for a Fish The Freak Fandango Orchestra / CC BY-SA


from Planet Python
via read more

Armin Ronacher: Uninitialized Memory: Unsafe Rust is Too Hard

Rust is in many ways not just a modern systems language, but also quite a pragmatic one. It promises safety and provides an entire framework that makes creating safe abstractions possible with minimal to zero runtime overhead. A well known pragmatic solution in the language is an explicit way to opt out of safety by using unsafe. In unsafe blocks anything goes.

Except that's a big lie and within unsafe so many rules apply that people often forget to follow, and that are so complex, that writing the (supposedly) equivalent C code significantly easier and safer.

I made the case on Twitter a few days ago that writing unsafe Rust is harder than C or C++, so I figured it might be good to explain what I mean by that.

From C to Rust

So let's start with something simple: we have some struct that we want to initialize with some values. The values in that struct don't require allocation themselves and we want to allow passing this final value around. Where it's allocated doesn't matter to us, let's just put it on the stack for this example. The idea is that after the initialization that thing can be passed around safely and printed.

#include <stdio.h>
#include <stdlib.h>
#include <stdbool.h>

struct role {
    const char *name;
    bool disabled;
    int flag;
};

int main() {
    struct role r;
    r.name = "basic";
    r.flag = 1;
    r.disabled = false;
    printf("%s (%d, %s)\n", r.name, r.flag, r.disabled ? "true" : "false");
}

Now let's write this in Rust. Let's not read the docs too much, let's just do a 1:1 translation to more or less the same but by using unsafe. One note here before you read the code: we're purposefully trying to create an object that looks familiar to Rust programmers and can be seen as public API. So we use a &'static str here instead of a C string so there are some changes to the C code.

use std::mem;

struct Role {
    name: &'static str,
    disabled: bool,
    flag: u32,
}

fn main() {
    let role = unsafe {
        let mut role: Role = mem::zeroed();
        role.name = "basic";
        role.flag = 1;
        role.disabled = false;
        role
    };

    println!("{} ({}, {})", role.name, role.flag, role.disabled);
}

So immediately one will ask why unsafe is needed here and the answer is that of course you don't need it here. However this code is also using a suboptimal function: std::mem::zeroed. If you run this on a recent Rust compiler you will get this result:

thread 'main' panicked at 'attempted to zero-initialize type `Role`, which is invalid', src/main.rs:11:30

On older Rust compilers this code will run but it was never really correct. So how do we solve this? The compiler already tells us that we need to use something else:

warning: the type `Role` does not permit zero-initialization
  --> src/main.rs:11:30
   |
11 | let mut role: Role = mem::zeroed();
   |                      ^^^^^^^^^^^^^
   |                      |
   |                      this code causes undefined behavior when executed
   |                      help: use `MaybeUninit<T>` instead, and only call
   |                         `assume_init` after initialization is done
   |

So why does this type not support zero initialization? What do we have to change? Can zeroed not be used at all? Some of you might think that the answer is #[repr(C)] on the struct to force a C layout but that won't solve the problem. We in fact need to reach for MaybeUninit as the compiler indicates. So let's try that first and then afterwards we figure out why we need it:

use std::mem::MaybeUninit;

struct Role {
    name: &'static str,
    disabled: bool,
    flag: u32,
}

fn main() {
    let role = unsafe {
        let mut uninit = MaybeUninit::<Role>::uninit();
        let role = uninit.as_mut_ptr();
        (*role).name = "basic";
        (*role).flag = 1;
        (*role).disabled = false;
        uninit.assume_init()
    };

    println!("{} ({}, {})", role.name, role.flag, role.disabled);
}

By swapping out zeroed for MaybeUninit everything changes. We can no longer manipulate our struct directly, we now need to manipulate a raw pointer. Because that raw pointer does not implement deref and because Rust has no -> operator we now need to dereference the pointer permanently to assign the fields with that awkward syntax.

So first of all: why does this work now and what changed? The answer lies in the fact that any construct like a mutable reference (&mut) or value on the stack in itself (even in unsafe) that would be valid outside of unsafe code still needs to be in a valid state at all times. zeroed returns a zeroed struct and there is no guarantee that this is a valid representation of either the struct or the fields within it. So in particular our &'static str reference is definitely not valid all zeroed out.

A mutable reference must also never point to an invalid object, so doing let role = &mut uninit.as_mut_ptr() if that object is not fully initialized is also wrong.

So let's just accept that MaybeUninit is necessary and we need to deal with raw references here. It's somewhat cumbersome but it doesn't look too bad. Unfortunately we're still using it wrong. Remember how I mentioned that creating “safe things” that don't uphold the guarantees of that safe thing is not allowed, even in unsafe code? We're in fact having exactly this happen in our code. For instance (*role).name creates a &mut str behind the scenes which is illegal, even if we can't observe it because the memory where it points to is not initialized.

So now we have two new problems: we know that &mut X is not allowed, but *mut X is. How do we get this? Ironically until Rust 1.51 it was impossible to construct such a thing without breaking the rules. Today you can use the addr_of_mut! macro. So we can do this:

let name_ptr = std::ptr::addr_of_mut!((*role).name);

Great, so now we have this pointer. How do we write into it? Can't you just dereference and assign?

let name_ptr = std::ptr::addr_of_mut!((*role).name);
*name_ptr = "basic";

Again, dereferencing is illegal, so we need to do something else. We can use the write method instead:

addr_of_mut!((*role).name).write("basic");

Are we okay now? Remember how we used a regular struct? If we read the documentation we learn that there are no guarantees of such a struct at all. I'm pretty sure we can depend on things being aligned as even the original motivating GitHub issue only calls out #[repr(packed)] but let's be better safe than sorry. So we now either change to #[repr(C)] or we use write_unaligned instead which is legal if Rust were to pick for a member of the struct to be unaligned. So this could be the final version:

use std::mem::MaybeUninit;
use std::ptr::addr_of_mut;

struct Role {
    name: &'static str,
    disabled: bool,
    flag: u32,
}

fn main() {
    let role = unsafe {
        let mut uninit = MaybeUninit::<Role>::uninit();
        let role = uninit.as_mut_ptr();

        addr_of_mut!((*role).name).write_unaligned("basic");
        addr_of_mut!((*role).flag).write_unaligned(1);
        addr_of_mut!((*role).disabled).write_unaligned(false);

        uninit.assume_init()
    };

    println!("{} ({}, {})", role.name, role.flag, role.disabled);
}

Is my Unsafe Correct?

It's 2022 and I will admit that I no longer feel confident writing unsafe Rust code. The rules were probably always complex but I know from reading a lot of unsafe Rust code over many years that most unsafe code just did not care about those rules and just disregarded them. There is a reason that addr_of_mut! did not get added to the language until 1.53. Even today the docs both say there are no guarantees on the alignment on native rust struct reprs yet a lot of code assumes now that write rather than write_unaligned is legal.

Over the last few years it seem to have happened that the Rust developers has made writing unsafe Rust harder in practice and the rules are so complex now that it's very hard to understand for a casual programmer. This has made one of Rust's best features less and less approachable.

I'm no longer think this is good. In fact, I believe this is not at all a great trend. C interop is a bit part of what made Rust great, and that we're creating such massive barriers should be seen as undesirable. More importantly: the compiler is not helpful in pointing out when I'm doing something wrong. The compiler does not warn that not using addr_of_mut! is wrong. It also does not warn if I'm using write instead of write_unaligned and even consulting the docs does not clarify this.

Making unsafe more ergonomic is a hard problem for sure but it might be worth addressing. Because one thing is clear: people won't be stopping writing unsafe code any time soon.


from Planet Python
via read more

Kay Hayen: Next Nuitka Live Stream

Today, Sunday 30.01.2022, there will be the third live stream of me coding on Nuitka, and talking and chatting with visitors in the Discord channel created specifically for this. I will go from 9-12 CEST and from 18 CEST until probably at least 20 CEST, but it seems I tend to go overtime.

Last time

So the last two streams are on my Youtube, these are around 4h videos, done on the same day.

In the second stream I was working on Onefile compression for all Python versions, by making the location of another Python that for Scons we sort of did already, reusable. So now, you can run Nuitka with Python2.6 and compile your legacy code, while with say 3.6 also installed on the same system, you do the zstandard compression. That will be used for other things in the future as well. This is going to be part of the next release and currently on develop.

In the first stream, I also did a little bit of performance plans, but mostly only showing people what I have there in stock, not actually went there and I started work on a upx plugin, such that DLLs for standalone are compressed with that. That also required a bit of plugin interface changes and research. This one works mostly, but will need more live. Also I think I looked at reducing what is included with the follow standard library option, getting very minimal distributions out of it.

This time

All around, this last stream, was a huge success. I was a bit under the weather last weekend, but we go on now.

Not sure yet, what to do. I might be debugging issues I have with 2.6 and a recent optimization, that prevents factory branch from becoming the next pre-release, I might be looking at macOS still. And I might be looking at the caching of bytecode demoted modules, that is kind of ready to be used, but is not currently, which is a pity. And of course, the Python PGO may get a closer look, such that e.g. it works for standalone mode.

How to Join

There is a dedicated page on the web site which has the details. Spoiler, it’s free and I have no plans for anything that involves a subscription of any kind. Of course, talking of subscription, do also checkout the Nuitka commercial offering. That is a subscription with adds that protect your IP even more than regular Nuitka.

Join me

Come and join me there. Instructions here. You know you want to do it. I know I want you to do to it!

Yours,
Kay


from Planet Python
via read more

TestDriven.io: Working with Static and Media Files in Django

This article looks at how to work with static and media files in a Django project, locally and in production. from Planet Python via read...