Tuesday, August 31, 2021

PyCoder’s Weekly: Issue #488 (Aug. 31, 2021)

#488 – AUGUST 31, 2021
View in Browser »

The PyCoder’s Weekly Logo


Python Ranks #1 in IEEE “Top Programming Languages”

“Python dominates as the de facto platform for new technologies” and “Learn Python. That’s the biggest takeaway we can give you from its continued dominance of IEEE Spectrum’s annual interactive rankings of the top programming languages. You don’t have to become a dyed-in-the-wool Pythonista, but learning the language well enough to use one of the vast number of libraries written for it is probably worth your time.”
IEEE.ORG

skybison: Instagram’s Experimental Performance Oriented Greenfield Implementation of Python

“Skybison is experimental performance-oriented greenfield implementation of Python 3.8. It contains a number of performance optimizations, including: small objects; a moving GC; hidden classes; bytecode inline caching; type-specialized bytecode; an experimental template JIT.”
GITHUB.COM/FACEBOOKEXPERIMENTAL

Start Your Free Scout APM Trial, No CC Needed, and Receive a $5 Donation to the OSS of Your Choice

alt

Scout APM is leading-edge application performance and error monitoring designed to help devs find and fix observability issues before the customer ever sees them. You can connect your error reporting and APM data on one platform, with Scout’s new error monitoring feature add-on →
SCOUT APM sponsor

How to Use Optional Arguments When Defining Python Functions

In this tutorial, you’ll learn about optional arguments in Python and how to define functions with default values. You’ll also learn how to create functions that accept any number of arguments using args and kwargs.
REAL PYTHON

Python Project-Local Virtualenv Management

On UNIX-like operating systems you can have the Python equivalent of node_modules today, for every Python version, without changing your workflows.
HYNEK SCHLAWACK

Humble Software Bundle: Python Superpowers 2021

Pick up the awesome programming potential of Python with software like Mastering PyCharm (2021 Edition) & Object-Oriented Programming (OOP) in Python. Pay what you want & support charity!
HUMBLEBUNDLE.COM

Join the PyCon US 2022 Team!

The PyCon US organizers are looking for motivated volunteers who want to contribute their time and knowledge to make this year’s conference a great success.
PYCON US

Discussions

math.sqrt vs numpy.sqrt vs x ** 0.5 Performance Discussion

Andrej Karpathy (Director of AI at Tesla) shares an interesting performance observation on this Twitter thread that turns into a tale about accurate benchmarking. Calculating math.sqrt(1337.0) appears to be 10x faster than numpy.sqrt(1337.0). Python’s built-in square root (x ** 0.5) appears to be even faster. However, most of the performance differences seem to come from the benchmark setup, as Ishan Bhatt explains in this writeup.
TWITTER.COM/KARPATHY

Python Jobs

Data Engineer - Python & PostgreSQL (Newport Beach, CA, USA)

Research Affiliates

Sr. Backend Developer (Amsterdam, Netherlands)

GUTS Tickets

Backend Software Engineer (Anywhere)

Catalpa International

More Python Jobs >>>

Articles & Tutorials

A Python Data Scientist’s Guide to the Apple Silicon Transition

A break down of what Apple Silicon means for Python users today, especially those doing scientific computing and data science: what works, what doesn’t, and where this might be going.
STANLEY SEIBERT

Write an SQL Query Builder in 150 Lines of Python

“This is the fourth article in a series about writing my own SQL query builder. Today, we’ll rewrite it from scratch, explore API design, learn when to be lazy, and look at worse and better ways of doing things – all in 150 lines of Python!”
ANDGRAVITY.COM

Rev APIs Solve All of Your Speech-to-Text Needs

alt

Rev.ai is the most sophisticated automatic speech recognition in the world. Our speech-to-text APIs are more accurate, easier to use, and have less bias than competitors like Google, Amazon, and Microsoft. Try Rev.ai free for five hours right now →
REV.AI sponsor

Splitting Datasets With scikit-learn and train_test_split()

Learn why it’s important to split your dataset in supervised machine learning and how to do that with train_test_split() from the widely used scikit-learn package.
REAL PYTHON video

Building With CircuitPython & Constraints of Python for Microcontrollers

Can you make a version of Python that fits within the memory constraints of a microcontroller and have it still feel like Python? That is the intention behind CircuitPython. This week on the show, Scott Shawcroft, who is the project lead for CircuitPython.
REAL PYTHON podcast

Parsing in Python: Tools and Libraries You Can Use

“We present and compare all possible alternatives you can use to parse languages in Python. From libraries to parser generators, we present all options.”
GABRIELE TOMASSETTI

Low-Level Cache API in Django

Caching in Django can be implemented on different levels (or parts of the site). This article looks at how to use the low-level cache API in Django.
J-O ERIKSSON

SonarLint Free and Open Source IDE Extension for Python Devs

Working in VS Code, PyCharm, Visual Studio, or Eclipse? SonarLint helps you find & fix Code Quality and Code Security issues in your Python codebase!
SONARSOURCE sponsor

Python Behind the Scenes: How Async/Await Works in Python

“The async/await pattern can be explained in a simple manner if you start from the ground up. And that’s what we’re going to do today.”
VICTOR SKVORTSOV

Using libsqlite3 Directly From Python With ctypes

How to use ctypes to run SQLite queries without using the built-in sqlite3 Python package, and without compiling anything.
GITHUB.COM/MICHALC

Projects & Code

Events

PyConline AU 2021

September 10 to September 13, 2021
PYCON.ORG.AU


Happy Pythoning!
This was PyCoder’s Weekly Issue #488.
View in Browser »

alt

[ Subscribe to 🐍 PyCoder’s Weekly 💌 – Get the best Python news, articles, and tutorials delivered to your inbox once a week >> Click here to learn more ]


from Planet Python
via read more

Will McGugan: Pretty printing JSON with Rich

If you work with JSON regularly (90% of Python developers I suspect) you might appreciate the print_json function just landed in Rich v10.9.0

If you call this function with a string, Rich will decode the string, reformat it, and print it to the console with nice syntax highlighting. Here's an example:

from rich import print_json
print_json('{"foo": [false, true, null]}')

Here's the output:

© 2021 Will McGugan

Calling print_json with a string will decode the JSON and pretty print it.

Note that the atomic values false, true, and null have their own color. I find this helpful when scanning a JSON blob.

If you call print_json with a data keyword argument it will encode that data and pretty print it in the same way.

data = {
    "foo": [
        3.1427,
        (
            "Paul Atreides",
            "Vladimir Harkonnen",
            "Thufir Hawat",
        ),
    ],
    "atomic": (False, True, None),
}
from rich import print_json
print_json(data=data)

Here's the output:

© 2021 Will McGugan

Calling the print_json function with a data keyword argument.

Note that Rich will remove color if you pipe the output of your script to another program, so you can safely add syntax highlighting to your CLI tools.

You can also pretty print JSON files from the command line with the following:

python -m rich.json data.json

Here's an example of the output:

© 2021 Will McGugan

Pretty printing a JSON file from the command line

This is admittedly a small addition to Rich but I'm already finding it helpful.

Follow @willmcgugan on Twitter for Rich and Textual updates.


from Planet Python
via read more

Quansight Labs Blog: CZI EOSS4 Grants at Quansight Labs

Here, at Quansight Labs, our goal is to work on sustaining the future of Open Source. We make sure we can live up to that goal by spending a significant amount of time working on impactful and critical infrastructure and projects within the Scientific Ecosystem.

As such, our goals align with those of the Chan Zuckerberg Initiative and, in particular, the Essential Open Source Software for Science (EOSS) program that supports tools essential to biomedical research via funds for software maintenance, growth, development, and community engagement.

CZI’s Essential Open Source Software for Science program supports software maintenance, growth, development, and community engagement for open source tools critical to science. And the Chan Zuckerberg Initiative was founded in 2015 to help solve some of society’s toughest challenges — from eradicating disease and improving education, to addressing the needs of our local communities. Their mission is to build a more inclusive, just, and healthy future for everyone.

Today, we are thrilled to announce that the team at Quansight Labs has been awarded five EOSS Cycle 4 grants to work on several projects within the PyData ecosystem. This post will introduce the successful grantees and their objectives for these two-year long grants.

Read more… (5 min remaining to read)


from Planet Python
via read more

Stack Abuse: Random Projection: Theory and Implementation in Python with Scikit-Learn

Introduction

This guide is an in-depth introduction to an unsupervised dimensionality reduction technique called Random Projections. A Random Projection can be used to reduce the complexity and size of data, making the data easier to process and visualize. It is also a preprocessing technique for input preparation to a classifier or a regressor.

Random Projection is typically applied to highly-dimensional data, where other techniques such as Principal Component Analysis (PCA) can't do the data justice.

In this guide, we'll delve into the details of Johnson-Lindenstrauss lemma, which lays the mathematical foundation of Random Projections. We'll also show how to perform Random Projection using Python's Scikit-Learn library, and use it to transform input data to a lower-dimensional space.

Theory is theory, and practice is practice. As a practical illustration, we'll load the Reuters Corpus Volume I Dataset, and apply Gaussian Random Projection and Sparse Random Projection to it.

What is a Random Projection of a Dataset?

Put simply:

Random Projection is a method of dimensionality reduction and data visualization that simplifies the complexity of high-dimensional datasets.

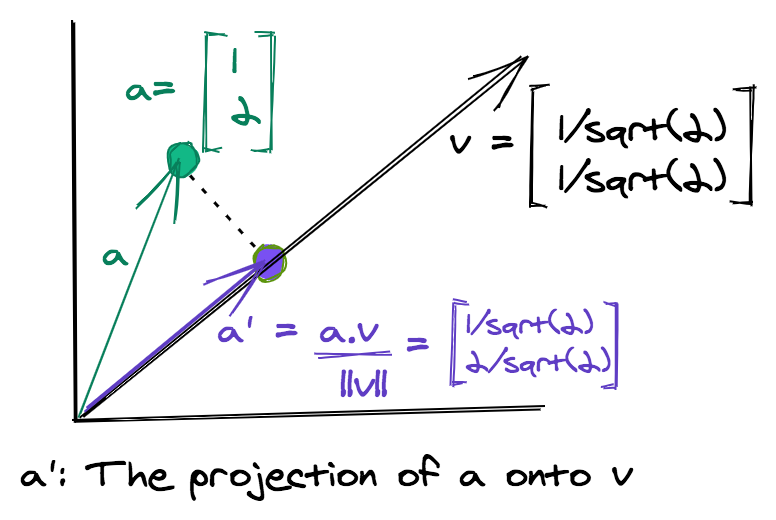
The method generates a new dataset by taking the projection of each data point along a randomly chosen set of directions. The projection of a single data point onto a vector is mathematically equivalent to taking the dot product of the point with the vector.

random projections illustration

Given a data matrix \(X\) of dimensions \(mxn\) and a \(dxn\) matrix \(R\) whose columns are the vectors representing random directions, the Random Projection of \(X\) is given by \(X_p\).

X p = X R

Each vector representing a random direction, has dimensionality \(n\), which is the same as all data points of \(X\). If we take \(d\) random directions, then we end up with a \(d\) dimensional transformed dataset. For the purpose of this tutorial, we'll fix a few notations:

  • m: Total example points/samples of input data.
  • n: Total features/attributes of the input data. It is also the dimensionality of the original data.
  • d: Dimensionality of the transformed data.

The idea of Random Projections is very similar to Principal Component Analysis (PCA), fundementally. However, in PCA, the projection matrix is computed via eigenvectors, which can be computationally expensive for large matrices.

When performing Random Projection, the vectors are chosen randomly making it very efficient. The name "projection" may be a little misleading as the vectors are chosen randomly, the transformed points are mathematically not true projections but close to being true projections.

The data with reduced dimensions is easier to work with. Not only can it be visualized but it can also be used in the pre-processing stage to reduce the size of the original data.

A Simple Example

Just to understand how the transformation works, let's take the following simple example.

Suppose our input matrix \(X\) is given by:

X = [ 1 3 2 0 0 1 2 1 1 3 0 0 ]

And the projection matrix is given by:

R = 1 2 [ 1 − 1 1 1 1 − 1 1 1 ]

The projection of X onto R is:

X p = X R = 1 2 [ 6 0 4 0 4 2 ]

We started with three points in a four-dimensional space, and with clever matrix operations ended up with three transformed points in a two-dimensional space.

Note, some important attributes of the projection matrix \(R\). Each column is a unit matrix, i.e., the norm of each column is one. Also, the dot product of all columns taken pairwise (in this case only column 1 and column 2) is zero, indicating that both column vectors are orthogonal to each other.

This makes the matrix, an Orthonormal Matrix. However, in case of the Random Projection technique, the projection matrix does not have to be a true orthonormal matrix when very high-dimensional data is involved.

The success of Random Projection is based on an awesome mathematical finding known as Johnson-Lindenstrauss lemma, which is explained in detail in the following section!

The Johnson-Lindenstrauss lemma

The Johnson-Lindenstrauss lemma is the mathematical basis for Random Projection:

The Johnson-Lindenstrauss lemma states that if the data points lie in a very high-dimensional space, then projecting such points on simple random directions preserves their pairwise distances.

Preserving pairwise distances implies that the pairwise distances between points in the original space are the same or almost the same as the pairwise distance in the projected lower-dimensional space.

Thus, the structure of data and clusters within data are maintained in a lower-dimensional space, while the complexity and size of data are reduced substantially.

In this guide, we refer to the difference in the actual and projected pairwise distances as the "distortion" in data, which is introduced due to its projection in a new space.

Johnson-Lindenstrauss lemma also provides a "safe" measure of the number of dimensions to project the data points onto so that the error/distortion lies within a certain range, so finding the target number of dimensions is made easy.

Mathematically, given a pair of points \((x_1,x_2)\) and their corresponding projections \((x_1',x_2')\) defines an eps-embedding:

$$
(1 - \epsilon) |x_1 - x_2|^2 < |x_1' - x_2'|^2 < (1 + \epsilon) |x_1 - x_2|^2
$$

The Johnson-Lindenstrauss lemma specifies the minimum dimensions of the lower-dimensional space so that the above eps-embedding is maintained.

Determining the Random Directions of the Projection Matrix

Two well-known methods for determining the projection matrix are:

  • Gaussian Random Projection: The projection matrix is constructed by choosing elements randomly from a Gaussian distribution with mean zero.

  • Sparse Random Projection: This is a comparatively simpler method, where each vector component is a value from the set {-k,0,+k}, where k is a constant. One simple scheme for generating the elements of this matrix, also called the Achlioptas method is to set \(k=\sqrt 3\):

R i j = 3 { + 1  with probability  1 6 0  with probability  2 3 − 1  with probability  1 6

The method above is equivalent to choosing the numbers from {+k,0,-k} based on the outcome of the roll of a dice. If the dice score is 1, then choose +k. If the dice score is in the range [2,5], choose 0, and choose -k for a dice score of 6.

A more general method uses a density parameter to choose the Random Projection matrix. Setting \(s=\frac{1}{\text{density}}\), the elements of the Random Projection matrix are chosen as:

R i j = { + s d  with probability  1 2 s 0  with probability  1 − 1 s − s d  with probability  1 2 s

The general recommendation is to set the density parameter to \(\frac{1}{\sqrt n}\).

As mentioned earlier, for both the Gaussian and sparse methods, the projection matrix is not a true orthonormal matrix. However, it has been shown that in high dimensional spaces, the randomly chosen matrix using either of the above two methods is close to an orthonormal matrix.

Random Projection Using Scikit-Learn

The Scikit-Learn library provides us with the random_projection module, that has three important classes/modules:

  • johnson_lindenstrauss_min_dim(): For determining the minimum number of dimensions of transformed data when given a sample size m.
  • GaussianRandomProjection: Performs Gaussian Random Projections.
  • SparseRandomProjection: Performs Sparse Random Projections.

We'll demonstrate all the above three in the sections below, but first let's import the classes and functions we'll be using:

from sklearn.random_projection import SparseRandomProjection, johnson_lindenstrauss_min_dim
from sklearn.random_projection import GaussianRandomProjection
import numpy as np
from matplotlib import pyplot as plt
import sklearn.datasets as dt
from sklearn.metrics.pairwise import euclidean_distances

Determining the Minimum Number of Dimensions Via Johnson Lindenstrauss lemma

The johnson_lindenstrauss_min_dim() function determines the minimum number of dimensions d, which the input data can be mapped to when given the number of examples m, and the eps or \(\epsilon\) parameter.

The code below experiments with a different number of samples to determine the minimum size of the lower-dimensional space, which maintains a certain "safe" distortion of data.

Additionally, it plots log(d) against different values of eps for different sample sizes m.

An important thing to note is that the Johnson Lindenstrauss lemma determines the size of the lower-dimensional space \(d\) only based on the number of example points \(m\) in the input data. The number of attributes or features \(n\) of the original data is irrelevant:

eps = np.arange(0.001, 0.999, 0.01)
colors = ['b', 'g', 'm', 'c']
m = [1e1, 1e3, 1e7, 1e10]
for i in range(4):
    min_dim = johnson_lindenstrauss_min_dim(n_samples=m[i], eps=eps)
    label = 'Total samples = ' + str(m[i])
    plt.plot(eps, np.log10(min_dim), c=colors[i], label=label)
    
plt.xlabel('eps')
plt.ylabel('log$_{10}$(d)')
plt.axhline(y=3.5, color='k', linestyle=':')
plt.legend()
plt.show()

how to determine size of lower dimensional space for random projections

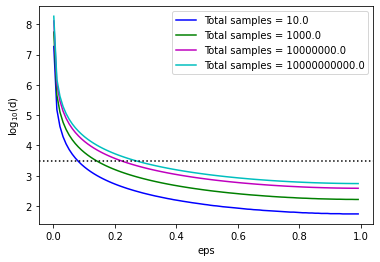
From the plot above, we can see that for small values of eps, d is quite large but decreases as eps approaches one. The dimensionality is below 3500 (the dotted black line) for mid to large values of eps.

This shows that applying Random Projections only makes sense to high-dimensional data, of the order of thousands of features. In such cases, a high reduction in dimensionality can be achieved.

Random Projections are, therefore, very successful for text or image data, which involve a large number of input features, where Principal Component Analysis would

Data Transformation

Python includes the implementation of both Gaussian Random Projections and Sparse Random Projections in its sklearn library via the two classes GaussianRandomProjection and SparseRandomProjection respectively. Some important attributes for these classes are (the list is not exhaustive):

  • n_components: Number of dimensions of the transformed data. If it is set to auto, then the optimal dimensions are determined before projection
  • eps: The parameter of Johnson-Lindenstrauss lemma, which controls the number of dimensions so that the distortion in projected data is kept within a certain bound.
  • density: Only applicable for SparseRandomProjection. The default value is auto, which sets \(s=\frac{1}{\sqrt n}\) for the selection of the projection matrix.

Like other dimensionality reduction classes of sklearn, both these classes include the standard fit() and fit_transform() methods. A notable set of attributes, which come in handy are:

  • n_components: The number of dimensions of the new space on which the data is projected.
  • components_: The transformation or projection matrix.
  • density_: Only applicable to SparseRandomProjection. It is the value of density based on which the elements of the projection matrix are computed.
Random Projection with GaussianRandomProjection

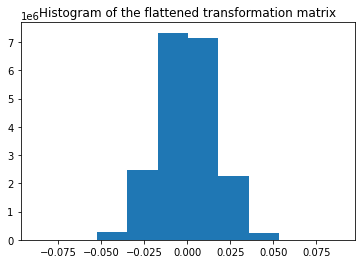
Let's start off with the GaussianRandomProjection class. The values of the projection matrix are plotted as a histogram and we can see that they follow a Gaussian distribution with mean zero. The size of the data matrix is reduced from 5000 to 3947:

X_rand = np.random.RandomState(0).rand(100, 5000)
proj_gauss = GaussianRandomProjection(random_state=0)
X_transformed = proj_gauss.fit_transform(X_rand)

# Print the size of the transformed data
print('Shape of transformed data: ' + str(X_transformed.shape))

# Generate a histogram of the elements of the transformation matrix
plt.hist(proj_gauss.components_.flatten())
plt.title('Histogram of the flattened transformation matrix')
plt.show()

This code results in:

Shape of transformed data: (100, 3947)

gaussian random projection scikit learn

Random Projection with SparseRandomProjection

The code below demonstrates how data transformation can be made using a Sparse Random Projection. The entire transformation matrix is composed of three distinct values, whose frequency plot is also shown below.

Note that the transformation matrix is a SciPy sparse csr_matrix. The following code accesses the non-zero values of the csr_matrix and stores them in p. Next, it uses p to get the counts of the elements of the sparse projection matrix:

proj_sparse = SparseRandomProjection(random_state=0)
X_transformed = proj_sparse.fit_transform(X_rand)

# Print the size of the transformed data
print('Shape of transformed data: ' + str(X_transformed.shape))

# Get data of the transformation matrix and store in p. 
# p consists of only 2 non-zero distinct values, i.e., pos and neg
# pos and neg are determined below
p = proj_sparse.components_.data
total_elements = proj_sparse.components_.shape[0] *\
                  proj_sparse.components_.shape[1]
pos = p[p>0][0]
neg = p[p<0][0]
print('Shape of transformation matrix: '+ str(proj_sparse.components_.shape))
counts = (sum(p==neg), total_elements - len(p), sum(p==pos))
# Histogram of the elements of the transformation matrix
plt.bar([neg, 0, pos], counts, width=0.1)
plt.xticks([neg, 0, pos])
plt.suptitle('Histogram of flattened transformation matrix, ' + 
             'density = ' +
             '{:.2f}'.format(proj_sparse.density_))
plt.show()

This results in:

Shape of transformed data: (100, 3947)
Shape of transformation matrix: (3947, 5000)

sparse random projections scikit learn

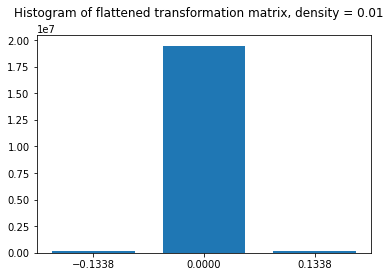
The histogram is in agreement with the method of generating a sparse Random Projection matrix as discussed in the previous section. The zero is selected with probability (1-1/100 = 0.99), hence around 99% of values of this matrix are zero. Utilizing the data structures and routines for sparse matrices makes this transformation method very fast and efficient on large datasets.

Practical Random Projections With the Reuters Corpus Volume 1 Dataset

This section illustrates Random Projections on the Reuters Corpus Volume I Dataset. The dataset is freely accessible online, though for our purposes, it's easiest to looad via Scikit-Learn.

The sklearn.datasets module contains a fetch_rcv1() function that downloads and imports the dataset.

Note: The dataset may take a few minutes to download, if you've never imported it beforehand through this method. Since there's no progress bar, it may appear as if the script is hanging without progressing further. Give it a bit of time, when you run it initially.

The RCV1 dataset is a multilabel dataset, i.e., each data point can belong to multiple classes at the same time, and consists of 103 classes. Each data point has a dimensionality of a whopping 47,236, making it an ideal case for applying fast and cheap Random Projections.

To demonstrate the effectiveness of Random Projections, and to keep things simple, we'll select 500 data points that belong to at least one of the first three classes. The fetch_rcv1() function retrieves the dataset and returns an object with data and targets, both of which are sparse CSR matrices from SciPy.

Let's fetch the Reuters Corpus and prepare it for data transformation:

total_points = 500
# Fetch the dataset
dat = dt.fetch_rcv1()
# Select the sparse matrix's non-zero targets
target_nz = dat.target.nonzero()
# Select only indices of target_nz for data points that belong to 
# either of class 1,2,3
ind_class_123 = np.asarray(np.where((target_nz[1]==0) |\
                                    (target_nz[1]==1) |\
                                    (target_nz[1] == 2))).flatten()
# Choose only 500 indices randomly
np.random.seed(0)
ind_class_123 = np.random.choice(ind_class_123, total_points, 
                                 replace=False)

# Retreive the row indices of data matrix and target matrix
row_ind = target_nz[0][ind_class_123]
X = dat.data[row_ind,:]
y = np.array(dat.target[row_ind,0:3].todense())

After data preparation, we need a function that creates a visualization of the projected data. To have an idea of the quality of transformation, we can compute the following three matrices:

  • dist_raw: Matrix of the pairwise Euclidean distances of the actual data points.
  • dist_transform: Matrix of the pairwise Euclidean distances of the transformed data points.
  • abs_diff: Matrix of the absolute difference of dist_raw and dist_actual

The abs_diff_dist matrix is a good indicator of the quality of the data transformation. Close to zero or small values in this matrix indicate low distortion and a good transformation. We can directly display an image of this matrix or generate a histogram of its values to visually assess the transformation. We can also compute the average of all the values of this matrix to get a single quantitative measure for comparison.

The function create_visualization() creates three plots. The first graph is a scatter plot of projected points along the first two random directions. The second plot is an image of the absolute difference matrix and the third is the histogram of the values of the absolute difference matrix:

def create_visualization(X_transform, y, abs_diff):
    fig,ax = plt.subplots(nrows=1, ncols=3, figsize=(20,7))

    plt.subplot(131)
    plt.scatter(X_transform[y[:,0]==1,0], X_transform[y[:,0]==1,1], c='r', alpha=0.4)
    plt.scatter(X_transform[y[:,1]==1,0], X_transform[y[:,1]==1,1], c='b', alpha=0.4)
    plt.scatter(X_transform[y[:,2]==1,0], X_transform[y[:,2]==1,1], c='g', alpha=0.4)
    plt.legend(['Class 1', 'Class 2', 'Class 3'])
    plt.title('Projected data along first two dimensions')

    plt.subplot(132)
    plt.imshow(abs_diff)
    plt.colorbar()
    plt.title('Visualization of absolute differences')

    plt.subplot(133)
    ax = plt.hist(abs_diff.flatten())
    plt.title('Histogram of absolute differences')

    fig.subplots_adjust(wspace=.3) 

Reuters Dataset: Gaussian Random Projection

Let's apply Gaussian Random Projection to the Reuters dataset. The code below runs a for loop for different eps values. If the minimum safe dimensions returned by johnson_lindenstrauss_min_dim is less than the actual data dimensions, then it calls the fit_transform() method of GaussianRandomProjection. The create_visualization() function is then called to create a visualization for that value of eps.

At every iteration, the code also stores the mean absolute difference and the percentage reduction in dimensionality achieved by Gaussian Random Projection:

reduction_dim_gauss = []
eps_arr_gauss = []
mean_abs_diff_gauss = []
for eps in np.arange(0.1, 0.999, 0.2):

    min_dim = johnson_lindenstrauss_min_dim(n_samples=total_points, eps=eps)
    if min_dim > X.shape[1]:
        continue
    gauss_proj = GaussianRandomProjection(random_state=0, eps=eps)
    X_transform = gauss_proj.fit_transform(X)
    dist_raw = euclidean_distances(X)
    dist_transform = euclidean_distances(X_transform)
    abs_diff_gauss = abs(dist_raw - dist_transform) 

    create_visualization(X_transform, y, abs_diff_gauss)
    plt.suptitle('eps = ' + '{:.2f}'.format(eps) + ', n_components = ' + str(X_transform.shape[1]))
    
    reduction_dim_gauss.append(100-X_transform.shape[1]/X.shape[1]*100)
    eps_arr_gauss.append(eps)
    mean_abs_diff_gauss.append(np.mean(abs_diff_gauss.flatten()))

RCV1 dataset gaussian random projections

RCV1 dataset gaussian random projections

RCV1 dataset gaussian random projections

RCV1 dataset gaussian random projections

RCV1 dataset gaussian random projections

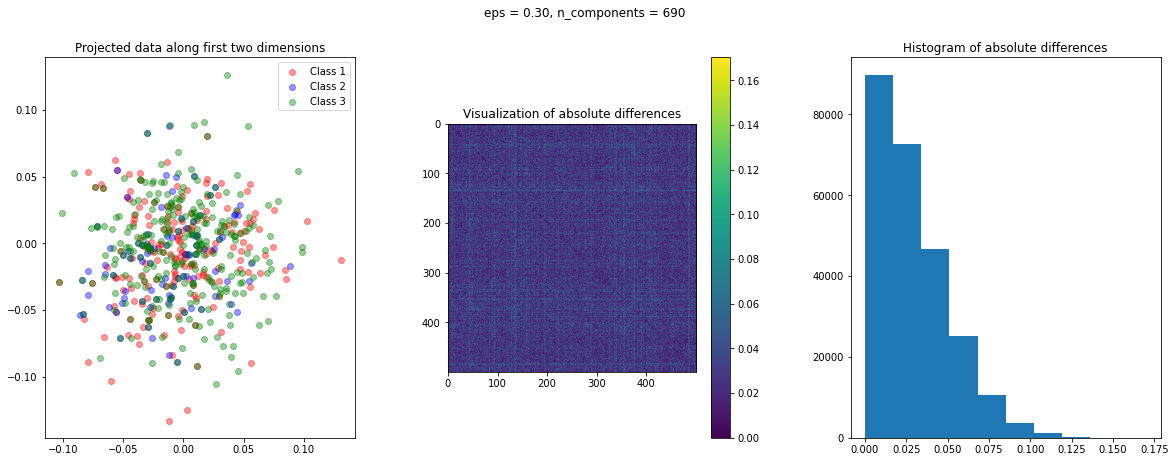
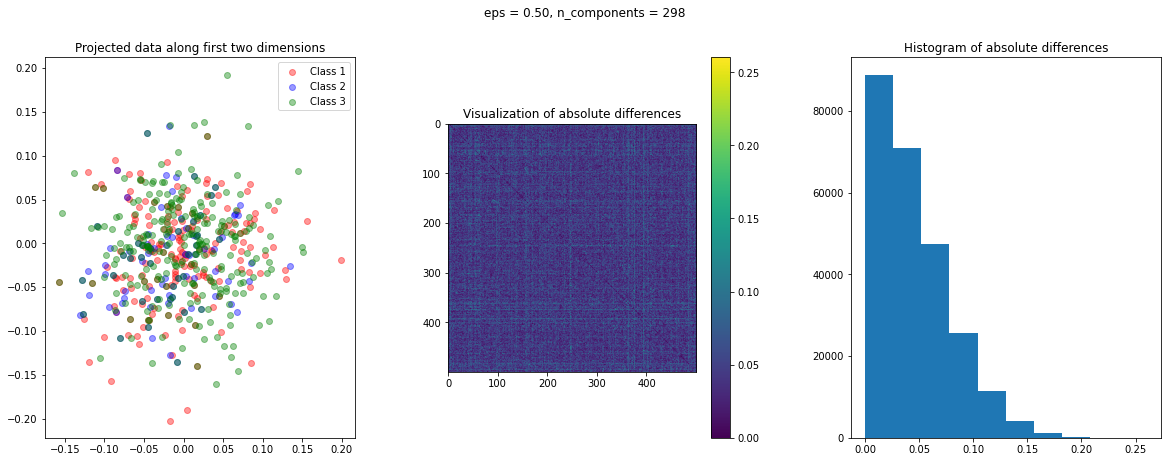
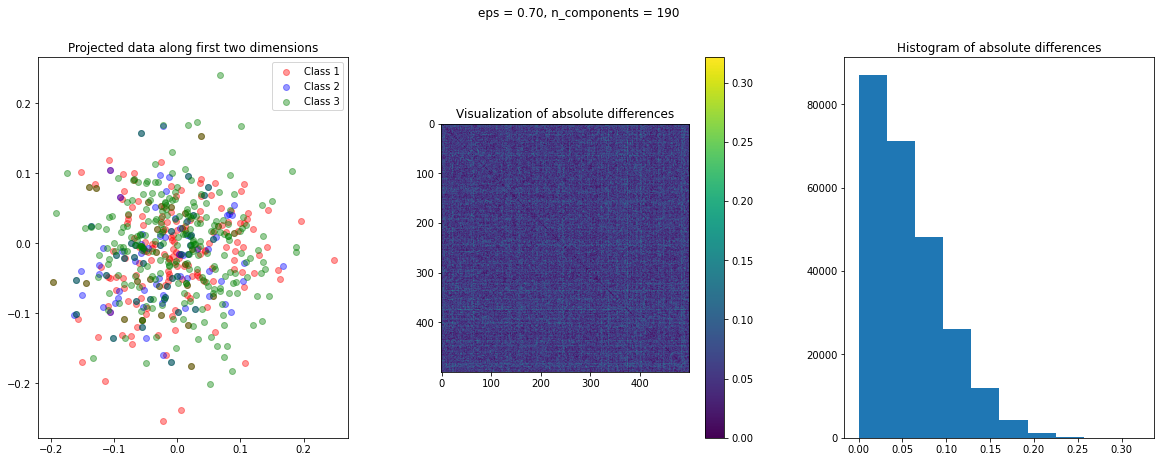
The images of the absolute difference matrix and its corresponding histogram indicate that most of the values are close to zero. Hence, a large majority of the pair of points maintain their actual distance in the low dimensional space, retaining the original structure of data.

To assess the quality of transformation, let's plot the mean absolute difference against eps. Also, the higher the value of eps, the greater the dimensionality reduction. Let's also plot the percentage reduction vs. eps in a second sub-plot:

fig,ax = plt.subplots(nrows=1, ncols=2, figsize=(10,5))
plt.subplot(121)
plt.plot(eps_arr_gauss, mean_abs_diff_gauss, marker='o', c='g')
plt.xlabel('eps')
plt.ylabel('Mean absolute difference')

plt.subplot(122)
plt.plot(eps_arr_gauss, reduction_dim_gauss, marker = 'o', c='m')
plt.xlabel('eps')
plt.ylabel('Percentage reduction in dimensionality')

fig.subplots_adjust(wspace=.4) 
plt.suptitle('Assessing the Quality of Gaussian Random Projections')
plt.show()

RCV1 random projections reduction quality

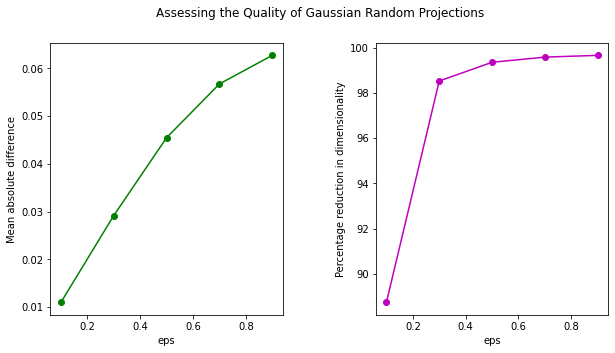
We can see that using Gaussian Random Projection we can reduce the dimensionality of data to more than 99%! Though, this does come at the cost of a higher distortion of data.

Reuters Dataset: Sparse Random Projection

We can do a similar comparison with sparse Random Projection:

reduction_dim_sparse = []
eps_arr_sparse = []
mean_abs_diff_sparse = []
for eps in np.arange(0.1, 0.999, 0.2):

    min_dim = johnson_lindenstrauss_min_dim(n_samples=total_points, eps=eps)
    if min_dim > X.shape[1]:
        continue
    sparse_proj = SparseRandomProjection(random_state=0, eps=eps, dense_output=1)
    X_transform = sparse_proj.fit_transform(X)
    dist_raw = euclidean_distances(X)
    dist_transform = euclidean_distances(X_transform)
    abs_diff_sparse = abs(dist_raw - dist_transform) 

    create_visualization(X_transform, y, abs_diff_sparse)
    plt.suptitle('eps = ' + '{:.2f}'.format(eps) + ', n_components = ' + str(X_transform.shape[1]))
    
    reduction_dim_sparse.append(100-X_transform.shape[1]/X.shape[1]*100)
    eps_arr_sparse.append(eps)
    mean_abs_diff_sparse.append(np.mean(abs_diff_sparse.flatten()))

RCV1 dataset sparse random projections

RCV1 dataset sparse random projections

RCV1 dataset sparse random projections

RCV1 dataset sparse random projections

RCV1 dataset sparse random projections

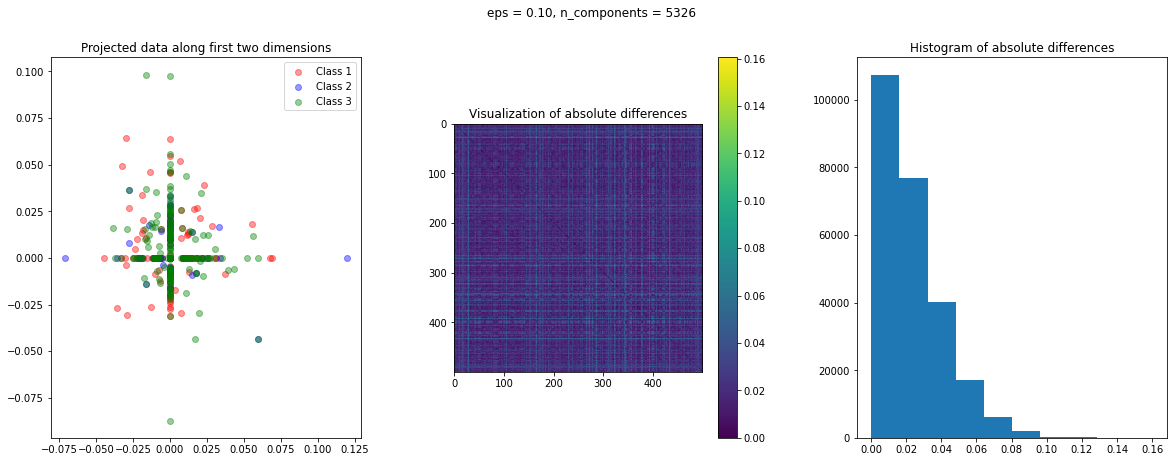
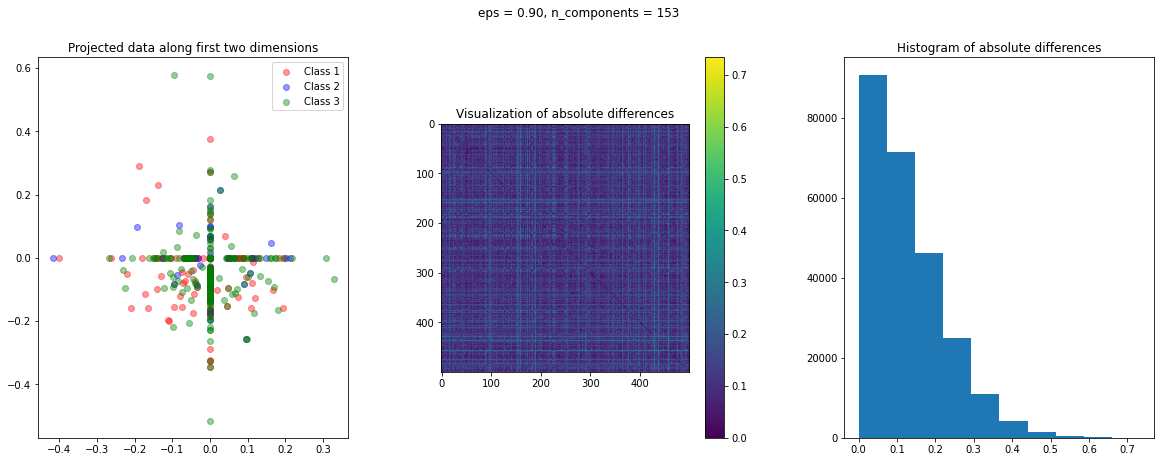
In the case of Random Projection, the absolute difference matrix appears similar to the one of Gaussian projection. The projected data on the first two dimensions, however, has a more interesting pattern, with many points mapped on the coordinate axis.

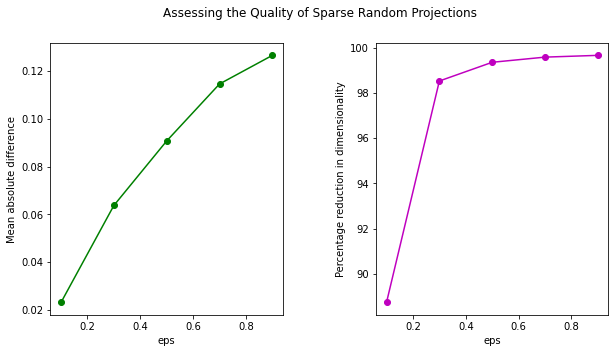
Let's also plot the mean absolute difference and percentage reduction in dimensionality for various values of the eps parameter:

fig,ax = plt.subplots(nrows=1, ncols=2, figsize=(10,5))
plt.subplot(121)
plt.plot(eps_arr_sparse, mean_abs_diff_sparse, marker='o', c='g')
plt.xlabel('eps')
plt.ylabel('Mean absolute difference')

plt.subplot(122)
plt.plot(eps_arr_sparse, reduction_dim_sparse, marker = 'o', c='m')
plt.xlabel('eps')
plt.ylabel('Percentage reduction in dimensionality')

fig.subplots_adjust(wspace=.4) 
plt.suptitle('Assessing the Quality of Sparse Random Projections')
plt.show()

sparse random projections reduction quality

The trend of the two graphs is similar to that of a Gaussian Projection. However, the mean absolute difference for Gaussian Projection is lower than that of Random Projection.

Conclusions

In this guide, we discussed the details of two main types of Random Projections, i.e., Gaussian and sparse Random Projection.

We presented the details of the Johnson-Lindenstrauss lemma, the mathematical basis for these methods. We then showed how this method can be used to transform data using Python's sklearn library.

We also illustrated the two methods on a real-life Reuters Corpus Volume I Dataset.

We encourage the reader to try out this method in supervised classification or regression tasks at the pre-processing stage when dealing with very high-dimensional datasets.


from Planet Python
via read more

Talk Python to Me: #332: Robust Python

Does it seem like your Python projects are getting bigger and bigger? Are you feeling the pain as your codebase expands and gets tougher to debug and maintain? Patrick Viafore is here to help us write more maintainable, longer-lived, and more enjoyable Python code.<br/> <br/> <strong>Links from the show</strong><br/> <br/> <div><b>Pat on Twitter</b>: <a href="https://twitter.com/PatViaforever" target="_blank" rel="noopener">@PatViaforever</a><br/> <b>Robust Python Book</b>: <a href="https://ift.tt/37Oe9uu" target="_blank" rel="noopener">oreilly.com</a><br/> <b>Typing in Python</b>: <a href="https://ift.tt/1H2EJ1a" target="_blank" rel="noopener">docs.python.org</a><br/> <b>mypy</b>: <a href="http://mypy-lang.org/" target="_blank" rel="noopener">mypy-lang.org</a><br/> <b>SQLModel</b>: <a href="https://ift.tt/2WfddMM" target="_blank" rel="noopener">sqlmodel.tiangolo.com</a><br/> <b>CUPID principles @ relevant time</b>: <a href="https://ift.tt/3yCbrSF" target="_blank" rel="noopener">overcast.fm</a><br/> <b>Stevedore package</b>: <a href="https://ift.tt/3t65Q6i" target="_blank" rel="noopener">docs.openstack.org</a><br/> <br/> <b>Episode transcripts</b>: <a href="https://ift.tt/3gMo5Ze" target="_blank" rel="noopener">talkpython.fm</a><br/> <br/> <b>Stay in touch with us</b><br/> <b>Subscribe on YouTube (for live streams)</b>: <a href="https://ift.tt/3DznvIg" target="_blank" rel="noopener">youtube.com</a><br/> <b>Follow Talk Python on Twitter</b>: <a href="https://twitter.com/talkpython" target="_blank" rel="noopener">@talkpython</a><br/> <b>Follow Michael on Twitter</b>: <a href="https://twitter.com/mkennedy" target="_blank" rel="noopener">@mkennedy</a><br/></div><br/> <strong>Sponsors</strong><br/> <a href='https://ift.tt/3mLp2Ff> <a href='https://ift.tt/3Dz3zFr> <a href='https://ift.tt/3vjihuL> <a href='https://ift.tt/2PVc9qH Python Training</a>

from Planet Python
via read more

Montreal Python User Group: Call for Speakers for Montréal-Python 88 – Hypnotized Statue

Hi everyone, exceptionally, our September meeting will take place on a Tuesday evening rather than our traditional Mondays to avoid the conflict with the elections.

We are looking for presenters for the event. If you work on a Python project, we want to see it. Maybe you have created a machine learning algorithm to predict who will win on the 20th? It would be interesting to share its internals with the community.

The rendez-vous will take place on September 22 at 6pm (Montréal time). Send up your talk proposal to mtlpyteam@googlegroups.com. Presentations can be anywhere from 5 to 20 minutes. We will accept any reasonable proposals until the program is full. We are looking forward to reading yours.

More details on the Meetup page of the event.


from Planet Python
via read more

Wingware: Wing Python IDE Version 8.0.3 - August 31, 2021

Wing 8.0.3 allows specifying the Django settings module for unit tests with --settings=<name> in Run Args on the Testing page of Project Properties, fixes using an Activated Env that contains spaces in its path, prevents failure to reformat code on remote hosts and containers, fixes searching in files with non-ascii characters, and makes several other improvements.

See the change log for details.

Download Wing 8 Now: Wing Pro | Wing Personal | Wing 101 | Compare Products


What's New in Wing 8.0


Wing 8 Screen Shot

Support for Containers and Clusters

Wing 8 adds support for developing, testing, and debugging Python code that runs inside containers, such as those provided by Docker and LXC/LXD, and clusters of containers managed by a container orchestration system like Docker Compose. A new Containers tool can be used to start, stop, and monitor container services, and new Docker container environments may be created during project creation.

For details, see Working with Containers and Clusters.

New Package Management Tool

Wing 8 adds a new Packages tool that provides the ability to install, remove, and update packages found in the Python environment used by your project. This supports pipenv, pip, and conda as the underlying package manager. Packages may be selected manually from PyPI or by package specifications found in a requirements.txt or Pipfile.

For details, see Package Manager .

Improved Project Creation

Wing 8 redesigns New Project support so that the host, project directory, Python environment, and project type may all be selected independently. New projects may use either an existing or newly created source directory, optionally cloning code from a revision control repository. An existing or newly created Python environment may be selected, using virtualenv, pipenv, conda, or Docker.

Improved Python Code Analysis and Warnings

Wing 8 expands the capabilities of Wing's static analysis engine, by improving its support for f-strings, named tuples, and other language constructs. Find Uses, Refactoring, and auto-completion now work within f-string expressions, Wing's built-in code warnings work with named tuples, the Source Assistant displays more detailed and complete value type information, and code warning indicators are updated more cleanly during edits.

And More

Wing 8 also adds support for Python 3.10, native executable for Apple Silicon (M1) hardware, a new Nord style display theme, reduced application startup time, and much more.

For a complete list of new features in Wing 8, see What's New in Wing 8.


Try Wing 8 Now!


Wing 8 is an exciting new step for Wingware's Python IDE product line. Find out how Wing 8 can turbocharge your Python development by trying it today.

Downloads: Wing Pro | Wing Personal | Wing 101 | Compare Products

See Upgrading for details on upgrading from Wing 7 and earlier, and Migrating from Older Versions for a list of compatibility notes.


from Planet Python
via read more

Python⇒Speed: The best Docker base image for your Python application (August 2021)

When you’re building a Docker image for your Python application, you’re building on top of an existing image—and there are many possible choices. There are OS images like Ubuntu, and there are the many different variants of the python base image.

Which one should you use? Which one is better? There are many choices, and it may not be obvious which is the best for your situation.

So to help you make a choice that fits your needs, in this article I’ll go through some of the relevant criteria, and suggest some reasonable defaults that will work for most people.

Read more...

from Planet Python
via read more

CZI EOSS4 Grants at Quansight Labs

Here, at Quansight Labs, our goal is to work on sustaining the future of Open Source. We make sure we can live up to that goal by spending a significant amount of time working on impactful and critical infrastructure and projects within the Scientific Ecosystem.

As such, our goals align with those of the Chan Zuckerberg Initiative and, in particular, the Essential Open Source Software for Science (EOSS) program that supports tools essential to biomedical research via funds for software maintenance, growth, development, and community engagement.

CZI’s Essential Open Source Software for Science program supports software maintenance, growth, development, and community engagement for open source tools critical to science. And the Chan Zuckerberg Initiative was founded in 2015 to help solve some of society’s toughest challenges — from eradicating disease and improving education, to addressing the needs of our local communities. Their mission is to build a more inclusive, just, and healthy future for everyone.

Today, we are thrilled to announce

(continued...)

from Planet SciPy
read more

Python for Beginners: How to Extract a Date from a .txt File in Python

In this tutorial, we’ll examine the different ways you can extract a date from a .txt file using Python programming. Python is a versatile language—as you’ll discover—and there are many solutions for this problem.

First, we’ll look at using regular expression patterns to search text files for dates that fit a predefined format. We’ll learn about using the re library and creating our own regular expression searches.

We’ll also examine datetime objects and use them to convert strings into data models. Lastly, we’ll see how the datefinder module simplifies the process of searching a text file for dates that haven’t been formatted, like we might find in natural language content.

Extract a Date from a .txt File using Regular Expression

Dates are written in many different formats. Sometimes people write month/day/year. Other dates might include times of the day, or the day of the week (Wednesday July 8, 2021 8:00PM).

How dates are formatted is a factor to consider before we go about extracting them from text files. 

For instance, if a date follows the month/date/year format, we can find it using a regular expression pattern. With regular expression, or regex for short, we can search a text by matching a string to a predefined pattern. 

The beauty of regular expression is that we can use special characters to create powerful search patterns. For instance, we can craft a pattern that will find all the formatted dates in the following body of text.

minutes.txt
10/14/2021 – Meeting with the client.
07/01/2021 – Discussed marketing strategies.
12/23/2021 – Interviewed a new team lead.
01/28/2018 – Changed domain providers.
06/11/2017 – Discussed moving to a new office.

Example: Finding formatted dates with regex

import re

# open the text file and read the data
file = open("minutes.txt",'r')

text = file.read()
# match a regex pattern for formatted dates
matches = re.findall(r'(\d+/\d+/\d+)',text)

print(matches)

Output

[’10/14/2021′, ’07/01/2021′, ’12/23/2021′, ’01/28/2018′, ’06/11/2017′]

The regex pattern here uses special characters to define the strings we want to extract from the text file. The characters d and + tell regex we’re looking for multiple digits within the text.

We can also use regex to find dates that are formatted in different ways. By altering our regex pattern, we can find dates that use either a forward slash (\) or a dash () as the separator.

This works because regex allows for optional characters in the search pattern. We can specify that either character—a forward slash or dash—is an acceptable match.

apple2.txt
The first Apple II was sold on 07-10-1977. The last of the Apple II
models were discontinued on 10/15/1994.

Example: Matching dates with a regex pattern

import re

# open a text file
f = open("apple2.txt", 'r')

# extract the file's content
content = f.read()

# a regular expression pattern to match dates
pattern = "\d{2}[/-]\d{2}[/-]\d{4}"

# find all the strings that match the pattern
dates = re.findall(pattern, content)

for date in dates:
    print(date)

f.close()

Output

07-10-1977
10/15/1994

Examining the full extent of regex’s potential is beyond the scope of this tutorial. Try experimenting with some of the following special characters to learn more about using regular expression patterns to extract a date—or other information—from a .txt file.

Special Characters in Regex

  • \s – A space character
  • \S – Any character except for a space character
  • \d – Any digit from 0 to 9
  • \D – And any character except for a digit
  • \w – Any word of characters or digits [a-zA-Z0-9]
  • \W – Any non-word characters

Extract a Datetime Object from a .txt File

In Python we can use the datetime library for manipulating dates and working with time. The datetime library comes pre-packed with Python, so there’s no need to install it.

By using datetime objects, we have more control over string data read from text files. For example, we can use a datetime object to get a copy of the current date and time of our computer.

import datetime

now = datetime.datetime.now()
print(now)

Output

2021-07-04 20:15:49.185380

In the following example, we’ll extract a date from a company .txt file that mentions a scheduled meeting. Our employer needs us to scan a group of such documents for dates. Later, we plan to add the information we gather to a SQLite database.

We’ll begin by defining a regex pattern that will match our date format. Once a match is found, we’ll use it to create a datetime object from the string data.

schedule.txt

schedule.txt
The project begins next month. Denise has scheduled a meeting in the conference room at the Embassy Suits on 10-7-2021.

Example: Creating datetime objects from file data

import re
from datetime import datetime

# open the data file
file = open("schedule.txt", 'r')
text = file.read()

match = re.search(r'\d+-\d+-\d{4}', text)
# create a new datetime object from the regex match
date = datetime.strptime(match.group(), '%d-%m-%Y').date()
print(f"The date of the meeting is on {date}.")
file.close()

Output

The date of the meeting is on 2021-07-10.

Extracting Dates from a Text File with the Datefinder Module

The Python datefinder module can locate dates in a body of text. Using the find_dates() method, it’s possible to search text data for many different types of dates. Datefinder will return any dates it finds in the form of a datetime object.

Unlike the other packages we’ve discussed in this guide, Python does not come with datefinder. The easiest way to install the datefinder module is to use pip from the command prompt.

pip install datefinder

With datefinder installed, we’re ready to open files and extract data. For this example, we’ll use a text document that introduces a fictitious company project. Using datefinder, we’ll extract each date from the .txt file, and print their datimeobject counterparts.

Feel free to save the file locally and follow along.

project_timeline.txt
PROJECT PEPPER

All team members must read the project summary by
January 4th, 2021.

The first meeting of PROJECT PEPPER begins on 01/15/2021

at 9:00am. Please find the time to read the following links by then.
created on 08-12-2021 at 05:00 PM

This project file has dates in many formats. Dates are written using dashes and forward slashes. What’s worse, the month January is written out. How can we find all these dates with Python?

Example: Using datefinder to extract dates from file data

import datefinder

# open the project schedule
file = open("project_timeline.txt",'r')

content = file.read()

# datefinder will find the dates for us
matches = list(datefinder.find_dates(content))

if len(matches) > 0:
    for date in matches:
        print(date)
else:
    print("Found no dates.")

file.close()

Output
2021-01-04 00:00:00
2021-01-15 09:00:00
2021-08-12 17:00:00

As you can see from the output, datefinder is able to find a variety of date formats in the text. Not only is the package capable of recognizing the names of months, but it also recognizes the time of day if it’s included in the text.

In another example, we’ll use the datefinder package to extract a date from a .txt file that includes the dates for a popular singer’s upcoming tour.

tour_dates.txt
Saturday July 25, 2021 at 07:00 PM     Inglewood, CA
Sunday July 26, 2021 at 7 PM     Inglewood, CA
09/30/2021 7:30PM  Foxbourough, MA

Example: Extract a tour date and times from a .txt file with datefinder

import datefinder

# open the project schedule
file = open("tour_dates.txt",'r')

content = file.read()

# datefinder will find the dates for us
matches = list(datefinder.find_dates(content))

if len(matches) > 0:
    print("TOUR DATES AND TIMES")
    print("--------------------")
    for date in matches:
        # use f string to format the text
        print(f"{date.date()}     {date.time()}")
else:
    print("Found no dates.")
file.close()

Output

TOUR DATES AND TIMES
——————–
2021-07-25     19:00:00
2021-07-26     19:00:00
2021-09-30     19:30:00

As you can see from the examples, datefinder can find many different types of dates and times. This is useful if the dates you’re looking for don’t have a certain format, as will often be the case in natural language data.

Summary

In this post, we’ve covered several methods of how to extract a date or time from a .txt file. We’ve seen the power of regular expression to find matches in string data, and we’ve seen how to convert that data into a Python datetime object.

Finally, if the dates in your text files don’t have a specified format—as will be the case in most files with natural language content—try the datefinder module. With this Python package, it’s possible to extract dates and times from a text file that aren’t conveniently formatted ahead of time.

Related Posts

If you enjoyed this tutorial and are eager to learn more about Python—and we sincerely hope you are—follow these links for more great guides from Python for Beginners.

  • How to use Python concatenation to join strings
  • Using Python try catch to mitigate errors and prevent crashes

The post How to Extract a Date from a .txt File in Python appeared first on PythonForBeginners.com.


from Planet Python
via read more

Real Python: Splitting Datasets With scikit-learn and train_test_split()

One of the key aspects of supervised machine learning is model evaluation and validation. When you evaluate the predictive performance of your model, it’s essential that the process be unbiased. Using train_test_split() from the data science library scikit-learn, you can split your dataset into subsets that minimize the potential for bias in your evaluation and validation process.

In this course, you’ll learn:

  • Why you need to split your dataset in supervised machine learning
  • Which subsets of the dataset you need for an unbiased evaluation of your model
  • How to use train_test_split() to split your data
  • How to combine train_test_split() with prediction methods

In addition, you’ll get information on related tools from sklearn.model_selection.


[ Improve Your Python With 🐍 Python Tricks 💌 – Get a short & sweet Python Trick delivered to your inbox every couple of days. >> Click here to learn more and see examples ]


from Planet Python
via read more

Splitting Datasets With scikit-learn and train_test_split()

One of the key aspects of supervised machine learning is model evaluation and validation. When you evaluate the predictive performance of your model, it’s essential that the process be unbiased. Using train_test_split() from the data science library scikit-learn, you can split your dataset into subsets that minimize the potential for bias in your evaluation and validation process.

In this course, you’ll learn:

  • Why you need to split your dataset in supervised machine learning
  • Which subsets of the dataset you need for an unbiased evaluation of your model
  • How to use train_test_split() to split your data
  • How to combine train_test_split() with prediction methods

In addition, you’ll get information on related tools from sklearn.model_selection.


[ Improve Your Python With 🐍 Python Tricks 💌 – Get a short & sweet Python Trick delivered to your inbox every couple of days. >> Click here to learn more and see examples ]


from Real Python
read more

Python Piedmont Triad User Group: Lunch and learn series

PYPTUG Lunch and Learn


In order to help those starting out with python, we are starting a lunch and learn series. You can see upcoming lunch and learns on our meetup page:


https://www.meetup.com/PYthon-Piedmont-Triad-User-Group-PYPTUG/


from Planet Python
via read more

PyBites: How to handle environment variables in Python

In this article I will share 3 libraries I often use to isolate my environment variables from production code.

Why is this important?

Separate config from code

As we can read in The Twelve-Factor App / III. Config:

Apps sometimes store config as constants in the code. This is a violation of twelve-factor, which requires strict separation of config from code.

https://ift.tt/3hxKkDM

Basically you want to be able to make config changes independently from code changes.

We also want to hide secret keys and API credentials! Notice that git is very persistent (PyCon talk: Oops, I committed my password to GitHub) so it’s important to get this right from the start.

First package: python-dotenv

These days I mostly use python-dotenv which makes this straightforward.

First install the library and add it to your requirements (or if you use Poetry it will automatically update your .toml file):

pip install python-dotenv

Secondly make an .env file with your environment variables in it.

It’s important that you ignore this file with git, otherwise you will end up committing sensitive data to your repo / project.

What I usually do is commit an empty .env-example (or .env-template) file so other developers know what they should set (see examples here and here).

So a new developer (or me checking out the repo on another machine) can do a cp .env-template .env and populate the variables. As the (checked out) .gitignore file contains .env, git won’t show it as a file to be staged for commit.

Then, to load in the variables from this file we use two lines of code:

from dotenv import load_dotenv

load_dotenv()

You can now access the environment variables using os.environ, for example:

BACKGROUND_IMG = os.environ["THUMB_BACKGROUND_IMAGE"]
FONT_FILE = os.environ["THUMB_FONT_TTF_FILE"]

To load the config without touching the environment, you can use dotenv_values(".env") which works the same as load_dotenv, except it doesn’t touch the environment, it just returns a dict with the values parsed from the .env file.

Check out the README for additional options.

Second package: python-decouple

Another library I have been using a lot with Django is python-decouple.

The process is pretty similar:

pip install python-decouple

Create an .env file with your config variables and “gitignore” it.

Then in your code you can use the config object. As per the example in the docs:

from decouple import config

SECRET_KEY = config('SECRET_KEY')
DEBUG = config('DEBUG', default=False, cast=bool)
EMAIL_HOST = config('EMAIL_HOST', default='localhost')
EMAIL_PORT = config('EMAIL_PORT', default=25, cast=int)

The casting and the ability to specify defaults are really convenient.

Another useful option is the Csv helper. For example having this in our .env file for our platform (a Django app):

ALLOWED_HOSTS=.localhost, .herokuapp.com

We can retrieve this variable in settings.py like this:

ALLOWED_HOSTS = config('ALLOWED_HOSTS', cast=Csv())

Third package: dj-database-url

And while we are here, there is one more package I want to show you: dj-database-url, which makes it easier to load in your database URL.

As per the docs:

The dj_database_url.config method returns a Django database connection dictionary, populated with all the data specified in your URL. There is also a conn_max_age argument to easily enable Django’s connection pool.

https://ift.tt/2XK3nik

And here is how to use it:

import dj_database_url

DATABASES = {
    'default': dj_database_url.config(
        default=config('DATABASE_URL')
    )
}

Nice and clean!

This is what I mostly use, for more options, check out python-decouple‘s README here.


Python Tips

As a recap, here is the python-decouple code in a concise tip you can easily paste into your project:

# pip install python-decouple dj-database-url

from decouple import config, Csv
import dj_database_url

SECRET_KEY = config('SECRET_KEY')
DEBUG = config('DEBUG', default=False, cast=bool)
ALLOWED_HOSTS = config('ALLOWED_HOSTS', cast=Csv())

DATABASES = {
    'default': dj_database_url.config(
        default=config('DATABASE_URL')
    )
}

We love practical tips like these, to get our growing collection check out our book: PyBites Python Tips – 250 Bulletproof Python Tips That Will Instantly Make You A Better Developer

And with that we got a wrap. I hope this has been useful and will make it easier for you to separate config from code, which I wholeheartedly agree with The Twelve-Factor App, is important.

— Bob


from Planet Python
via read more

PyBites: How to package and deploy CLI applications with Python PyPA setuptools build

This article covers how to package your Python code as a CLI application using just the official PyPA provided tools, without installing additional external dependencies.

If you prefer reading code to reading words, you can find the full example demo code discussed in this article here: example repo of Python CLI packaged with PyPA setuptools build

Run your Python code from the command line

Run a Python file as a script

Since Python is a scripting language, you can easily run your Python code from the CLI with the Python interpreter, like this:

# run a python source file as a script
$ python mycode.py

# run a python module
$ python -m mycode

Create a CLI shortcut to bootstrap your Python application

If you want to run your Python script as a CLI application with a user-friendly name and not have to type in the Python interpreter & path in front of it, you could of course just create an executable shortcut file in your /bin directory like this:

#!/bin/sh

python3 /path/to/mycode.py "$@"

💡 The "$@" passes all the CLI arguments from your shortcut launcher to your Python script.

But this is not all that useful when you actually want to distribute your code, because you’d still have to create & permission this executable file on all your end-users’ machines somehow, in addition to provisioning the actual Python dependencies and your app itself.

Thankfully, Python has great well-tested & widely used built-in mechanisms for doing exactly this for you – so no, you don’t even need to jerry-rig your own shortcut like this at all!

How to package your Python code as a CLI application the proper way

The standard way to package your Python code is to use setuptools. You use setuptools to create distributions that you can install with pip.

setuptools has been around for ages, and is currently (August 2021) in a bit of a transitional phase. This has been the case for a few years. This means that there are different ways of achieving the same thing using this tool-set, as the new and improved ways slowly have been supplanting the old:

  • setup.py – the old way
  • setup.cfg – the sort-of newer
  • pyproject.toml (aka PEP 517 & PEP 518) – shiny & new

The key to creating your own CLI application is to specify an entry_point in either your setup.cfg or setup.py file.

The pyproject.toml specification does define this property (as [project.scripts]), but the standard PyPA build has not yet implemented actually doing anything with this property yet.

Should you use setup.cfg, setup.py or pyproject.toml to configure Python packaging?

The short answer is: for the moment, you probably should have all three.

Now for the longer answer. You don’t necessarily have to have all three, but if you don’t you need to be sure you know exactly what you’re doing and why, otherwise you’re setting yourself up for mysterious errors down the line. If you’re not interested in the evolution & background of these mechanisms, feel free to skip to the next section.

In the beginning was setup.py

setup.py is the older, traditional way of packaging Python projects. Since setup.py is literally a Python script in itself, it is very powerful because you can script whatever advanced installation functionality you want as part of the install.

But just because you can, doesn’t mean you should. The more unusual scripting you do as part of your install, the more your install becomes brittle & unpredictable on diverse client machines where you don’t necessarily have strict control over the state & configuration of those machines.

Evolution to setup.cfg

By comparison, setup.cfg is a config file, not an installation script like setup.py. setup.cfg is static, setup.py is dynamic.

setup.cfg lets you specify declarative config – meaning that you can define your project meta-data without having to worry about scripting. This is a good thing because you avoid having to run arbitrary code during installs, which will make your security & ops teams happy, and you don’t have to maintain boilerplate code in your source. Bonus!

Although it has been there alongside setup.py since the beginning, setup.cfg has taken more of a central role over the years. You can more or less accomplish the same thing with either, so from this perspective it doesn’t really matter which you use.

However, even if you do ALL your configuration in setup.cfg you do still need a stub setup.py file unless you are running a PEP517 build. We’ll discuss this new build system in the next section.

Enter pyproject.toml

pyproject.toml is the official, anointed successor to setup.py and setup.cfg, but it has not reached feature parity with its predecessors yet. This new file format has come as a result of the PEP517 build specification.

One of the notable features of the new Python build mechanisms specified in PEP517 is that you don’t have to use the setuptools build system – other build & packaging tools like Poetry and Flit can use the same pyproject.toml specification file (PEP621) to package python projects.

Eventually all these tools should be using the exact same pyproject.toml file format, but be aware that historically build tools other than setuptools have had their own ways of specifying CLI entry-points, so be sure to check the documentation for whichever tool you end up using to double-check that it’s conforming to the latest PEP621 standard. Here, we are just going to focus on how to do this with setuptools.

While the latest version of the pyproject.toml specification did add definitions for project meta-data that you will usually find in setup.cfg and/or setup.py, the setuptools build tool does NOT yet support using the meta-data from pyproject.toml. Other PEP517 compliant tools like Flit & Poetry do support projects with only a pyproject.toml file, so if you use those you don’t need setup.py and/or setup.cfg.

You can find the full file format specification for pyproject.toml in PEP621.

For all the gory details & progress of implementing full support for pyproject.toml metadata in setuptools, you can track the discussion here: https://github.com/pypa/setuptools/issues/1688

Recommended Python packaging setup in 2021

If you are using PyPA’s setuptools during this transitional phase of Python packaging, while you can get away with using one or the other combination of setup.py, setup.cfg & pyproject.toml to specify your meta-data and build attributes, you probably want to cover your bases and avoid subtle problems by having all 3 as follows:

  1. have a minimal pyproject.toml to specify the build system
  2. put all project related config in setup.cfg
  3. have a simple shim setup.py

By “subtle problems” I mean inconsistencies like editable installs not working or builds that look like they’re working but they’re not actually using the meta-data you thought you specified (which you might only discover at deployment, urk!). So let’s avoid the unpleasantness!

In this setup, since pyproject.toml and setup.py are only minimalist shims, your individual project related configuration is only contained in the one place in setup.cfg. Therefore you’re not needlessly duplicating values between different files.

Create CLI entry point configuration for your Python project

Sample project structure

Let’s work through an example of a simple CLI application.

The project structure looks like this:

.
│ my-repo/
        │- mypackage/
                │- mymodule.py
        │- pyproject.toml
        │- setup.cfg
        │- setup.py

mypackage/mymodule.py

This is just some arbitrary code that we want to call directly from the CLI:

def my_function():
    print('hello from my_function')


def another_function():
    print('hello from another_function')


if __name__ == "__main__":
    """This runs when you execute '$ python3 mypackage/mymodule.py'"""
    my_function()

setup.py

To allow editable installs (useful for your local dev machine) you need a shim setup.py file.

All you need in this file is this bit of boilerplate:

from setuptools import setup

setup()

💡 You could actually skip the setup.cfg file and set your properties in setup() itself in setup.py, but this will make your migration harder in the future when the new PEP517 build system, like a death-star, is fully operational. I mention this because you’ll see a lot of examples on Stack Overflow & friends that go this way – it is not wrong, per se, but be aware that it is the older way of doing things.

An old-style setup.py file would look something like this:

from setuptools import setup

setup(
        name='mypackage',
        version='0.0.1',
    # To provide executable scripts, use entry points in preference to the
    # "scripts" keyword. Entry points provide cross-platform support and allow
    # pip to create the appropriate form of executable for the target platform.
    entry_points={
        'console_scripts': [
            'myapplication=mypackage.mymodule:my_function'
        ]
    },
)

setup.cfg

The setup.cfg file is where the real magic happens. This is where you set your project-specific properties.

[metadata]
name = mypackage
version = 0.0.1

[options]
packages = mypackage

[options.entry_points]
console_scripts =
    my-application = mypackage.mymodule:my_function
    another-application = mypackage.mymodule:another_function
  • name
    • The build system uses this value to generate the build output files.
    • If you do not specify this, your output filename will have “UNKNOWN” instead of a more user-friendly name.
  • version
    • The build system uses this value to add a version number to your output files.
    • If you do not specify this, your output filename will contain “0.0.0”.
  • packages
    • Use this property to tell the build system which packages to build.
    • This is a list, so you can specify more than one package.
    • If you’re not sure what a “package” is in Python, just think of it as the name of the directory your code lives in.
    • ❗If you do not specify this, your build output will not actually contain your code. If you forget to specify this, your package & deploy will look like it’s working, but it won’t actually package the code you want to run and it will not actually deploy correctly.
  • console_scripts
    • This property tells the build system to create a shortcut CLI wrapper script to run a Python function.
    • This is a list, so you can create more than one CLI application from the same code-base.
    • In this example, we are creating two CLI shortcuts:
      • my-application, which calls my_function in mypackage/mymodule.py.
      • another-application, which calls another_function in mypackage/mymodule.py.
    • The syntax for an entry is: <name> = [<package>.[<subpackage>.]]<module>[:<object>.<object>].
    • The name on the left will become the name of your CLI application. This is what an end-user will type in the CLI to invoke your application.
    • If you do not specify this property, your build will not create any CLI shortcuts for your code.
    • ❗Remember that you have to include the root package of the code you reference here under options.packages, otherwise the build tool will not actually package the code you’re referencing here!

There are many more meta-data properties that you can (and maybe should!) specify in setup.cfg – here is a more comprehensive setup.cfg example. Given here instead is the bare minimum for a tidy build & packaging experience.

💡 Of the additional unlisted properties, of especial interest is install_requires, with which you specify dependencies – in other words, any external packages that your code depends on and that you want the installer to install alongside your application.

[options]
install_requires =
    requests
    importlib; python_version == "2.6"

pyproject.toml

All you need in your minimalist pyproject.toml file is:

[build-system]
build-backend = "setuptools.build_meta"
requires = ["setuptools", "wheel"]

💡 In the pyproject.toml specification, project.scripts is the equivalent to console_scripts in setup.py and setup.cfg. However, at present this functionality is not implemented yet by the setuptools build system.

Use python -m build to create a python distribution

build, aka PyPA build, is the more modern PEP517 equivalent of the older setup.py sdist bdist_wheel build command with which you might be familiar.

If you’ve not done this before, you can install the build tool like this:

$ pip install build

Now, in the root of your project directory, you can run:

$ python -m build

This will result in two output files in the dist directory:

  • dist/mypackage-0.0.1.tar.gz
  • dist/mypackage-0.0.1-py3-none-any.whl

The tool will create the ./dist directory for you if it doesn’t exist already.

What this command does is to create a source distribution tarball (the tar.gz file), and then also create a wheel from that source distribution. A wheel (.whl) is a versioned distribution format that deploys faster because during installation you can skip the build step necessary for source distributions, and there are better caching mechanisms for it.

The output filenames you see here follow a defined format that you can find specified in the PEP427 wheel file name convention.

You’ll notice that the build tool uses name and version from setup.cfg to generate these filenames – which is why, even though you strictly speaking don’t need to specify these properties, they are useful if you want nicely named & easily identifiable outputs.

Install your wheel with pip

You can use pip to install the distribution you just created. (I’m sure pip doesn’t need any introduction to any Pythonista…)

$ pip install dist/mypackage-0.0.1-py3-none-any.whl

How PyPA build creates CLI shortcuts

The pip install command will install your package and create the CLI shortcuts (the ones you specified in setup.cfg) in the current Python environment’s bin directory.

  • {Python Path}/bin/my-application
  • {Python Path}/bin/another-application

Under the hood, these shortcut files are actually just a more sophisticated version of the quick-and-dirty bash file we created in the beginning. The auto-generated my-application shortcut file in the bin/ directory looks like this:

#!/bin/python3
# -*- coding: utf-8 -*-
import re
import sys
from mypackage.mymodule import my_function
if __name__ == '__main__':
    sys.argv[0] = re.sub(r'(-script\.pyw|\.exe)?$', '', sys.argv[0])
    sys.exit(my_function())

Testing your install in a clean environment

💡If you want to test whether your shiny new package is installable, create a fresh new virtual environment and install your package into it so that you can test it in isolation.

# create virtual environment
$ python3 -m venv .env/fresh-install-test

# activate your virtual environment
$ . .env/fresh-install-test/bin/activate

# install your package into this fresh environment
$ pip install dist/mypackage-0.0.0-py3-none-any.whl

# your shortcuts are now in the venv bin directory
$ ls .env/fresh-install-test/bin/
my-application
another-application

# so you can run it directly from the cli
$ my-application
hello from my_function

# and run the second application
$ another-application
hello from another_function

Publishing & distributing your Python package

Publishing means how you make your Python package available to your end-users.

How you publish your package depends on your deployment plan for your specific requirements. A full discussion of these is beyond the scope of this article, but just to get you started, some of the options are:

  • You can publish to and use pip to install from a private git repository.
  • You can create your own private Python repository manager.
  • You could just use pip to install the whl or sdist from a file-share in your organization.
  • If you are planning to release your application publicly to the official PyPI repository, you can use twine to upload the distribution to PyPi.
    • Be aware that you very probably should be a lot more detailed in filling in your project’s meta-data than the deliberately bare-bones minimal example given here if you are planning to create a public package.
  • Whereas pip installs to whichever Python environment is active at the time, this can get messy on end-user machines that you do not control – for example, shared dependencies can clash with other applications’ requirements.
    • If you want to install your application into an isolated environment, purposely separate just for your app with the dependencies for your app isolated from and not polluting the main system-wide Python installation, you can use pipx to install from a git repo (such as a private repo in your organization) or even just a file-path.
  • You can email your wheels around as attachments and tell people to install. Just kidding, just kidding! Don’t do this – just because it’s been known to happen doesn’t make it right. . .

How to structure a Python CLI project

For the sake of clarity, this example just directly calls a simple Python function from the CLI. Your code is very likely to be more involved.

How best to structure your code in any given application is, of course, a very. . . debatable. . . topic 😬. So instead of making bold claims about what is “best”, lets instead just look at what a typical tidy structure might look like… which is to say, while this is a relatively common way of doing things, it’s not necessarily THE way.

.
│ my-repo/
  │- mypackage/
    │- mynamespace/
      │- anothermodule.py
    │- anothernamespace/
      │- arbmodule.py
    │- mymodule.py
    │- cli.py
    │- pyproject.toml
    │- setup.cfg
    │- setup.py

If you create your entry-point function as def main() in cli.py then your setup.cfg file entry_points configuration simply becomes:

[options.entry_points]
console_scripts =
    my-application = mypackage.cli:main

You can think of your functional code as a library, and the CLI is effectively a client or consumer of that library. Break your code into namespaces and modules that make sense for you – you can group together code by functional area, or by dependency, or by object, or by whatever categorization scheme works for you.

If you think of the CLI as a consumer of your library’s API, it makes sense to encapsulate the code specific to CLI handling in its own module. You can name this what you like, but cli.py does have the benefit of being snappy. In this module you will very probably import something like argparse, to parse your CLI input arguments, print out errors when someone invokes your CLI with the wrong arguments, assign defaults and generate help & usage messages.

Here is a real-life example of a large project structured like this, with a CLI handling module that encapsulates all CLI functionality and invokes the underlying program being called like you would an API.

Alternative packaging tools in Python

In this article we just focused on using the “official” minimalist way of packaging & building your Python projects. But there are other 3rd party options out there that provide some extra functionality over and above what the vanilla setuptools build tool does.

We’ve already mentioned PEP517 compliant build tools poetry and flit. With these, as with the standard PyPA build, the end-user has to have an active Python run-time on their machine. Your code installs into that Python environment.

Whereas other utilities follow a completely different approach by creating a single file executable of your application and its Python dependencies – these 3rd party utilities create a standalone platform-native executable of your app for you. This means that the end-user does not even need to have a Python distribution on their machine – they can just run your executable file by itself.

In no particular order, some free tools in this space are:

Each of these has its own way of specifying which function to call from the CLI, so if you do want to go in this direction, be sure to check the documentation for your chosen tool.

🙌 Much thanks for these excellent tool suggestions to Mike Driscoll and markgreene from the PyBites Community, which you can freely join on slack! 🙌


from Planet Python
via read more

TestDriven.io: Working with Static and Media Files in Django

This article looks at how to work with static and media files in a Django project, locally and in production. from Planet Python via read...