This week I tried to drop the open pull request count below 1,400. This was a grueling task and I barely succeeded.
from Planet Python
via read more
This week I tried to drop the open pull request count below 1,400. This was a grueling task and I barely succeeded.
Tutorial Paralysis, information overload, hoarding and never completing online courses (How large are your Udemy and Coursera libraries?)…
This is the pain we’re increasingly hearing about in conversations with developers and it’s more common than you may realise.
It’s real, it’s crippling and it can make you feel like you’re going nowhere.
Even if you do manage to complete a course, is it what you needed? What next? Another course? Then what?
The reality is that nothing beats actual coding and implementation. This is where the real learning and growth happens.
It may be easier said than done, but the best time to do it is yesterday.
 Photo by Sangga Rima Roman Selia on Unsplash
That’s why we recommend that anybody stuck in tutorial purgatory do the following:
1. Don’t be hard on yourself. It happens. What matters is what you do next. Also tutorials in and by themselves are not bad, they give you a good understanding of fundamental concepts, what matters is how you apply what you read.
2. Pause and reflect on what your actual goal is. Without this clear vision on what you want it’s easy to waste your time consuming content that really gets you nowhere. (Is that Blockchain tutorial really going to get you where you need to be?)
3. Make a plan on precisely what you need to do to reach that goal. Our free 6 Key Ingredients of a Successful Pythonista training (particularly day 5) can help you with this.
4. Follow the plan. Consistently. Show up every day, even when you don’t feel like it. Once you’re done, we want to see your goal and your plan.
We’d love to hear what plan you came up with so comment below or shoot us a message. If you want help book a free assessment call using the link below.
And lastly it can be hard to go at it alone, we have a vibrant Python community a.k.a. The PyBites Slack that, at the time of this writing, has 2,700 members! You can join here and start building valuable relationships. See you there…
My 10th Python book is called Automating Excel with Python: Processing Spreadsheets with OpenPyXL. It only has 11 more days to go on Kickstarter where you can get an exclusive t-shirt!
I also have the eBook available for pre-order on Gumroad. No matter whether you purchase a copy on Kickstarter or Gumroad, you will be getting an early version of the book plus all the updates that I ever make to the book.
You can get some sample chapters here so you can try out the book before you commit to purchasing a copy!
In this book, you will learn how to use Python to do the following:
The post Pre-Order Automating Excel with Python appeared first on Mouse Vs Python.
The model development lifecycle starts with data exploration, then we choose features for our model, choose a baseline algorithm, and next, we try to improve baseline performance with different algorithms and parameter tuning. Sounds simple enough. But, during all of this, you’ll probably create multiple notebooks, or modify one notebook over and over again. This […]
The post How to Keep Track of TensorFlow/Keras Model Development with Neptune appeared first on neptune.ai.
In this short tutorial, we'll take a look at how to concatenate strings in Python, through a few different approaches.
It's worth noting that strings in Python are immutable - a string object in memory cannot be changed once created:
newString = "Some new string"
If you'd like to change this string in any way - under the hood, a new string with those changes is created. The same applies to concatenating strings - a new object must be created in memory.
Concatenation of strings refers to joining two or more strings together, as if links in a chain. You can concatenate in any order, such as concatenating
str1betweenstr2andstr3.
Appending strings refers to appending one or more strings to the end of another string.
In some cases, these terms are absolutely interchangeable. Appending strings is the same operation as concatenating strings at the end of another. Let's begin with the simplest way of concatenating/appending two (or more) strings.
In Python, a string is a list of characters, which means that the + operator can be used to add their constituent elements together in a new list:
title = "Prof. "
name = "Richard Feynman"

result = title + name
print(result)
This results in:
Prof. Richard Feynman
This operator doesn't limit the amount of strings which can be added together, so you can easily join a large number of strings:
string1 = "Concatenating"
string2 = "strings"
string3 = "in Python"
string4 = "is easy!"

print(string1 + string2 + string3 + string4)
Though, if your aim is to construct a sentence from a list of strings such as this, concatenating them manually, and without special characters is both inefficient and produces an unintelligible output:
Concatenatingstringsin Pythonis easy!
It'd be much more sensible to iterate through a list of strings, and add them together with a whitespace between each concatenated string:
strings = ["Concatenating", "strings", "in Python", "is easy!"]

result = ""
for string in strings:
    result += string + " "

print(result)
This results in:
Concatenating strings in Python is easy!
A shorthand operator you can use to concatenate two strings is +=, just like in the previous example. This saves you from the trouble of having to create a new variable to store the results, as you can reuse one of the existing reference variables to assign to the new object in memory:
string1 = "one"
string2 = "two"

string1 += string2
print(string1) # Output: onetwo
The main limitation of the + operator is the fact that you can't mix-and-match types. You can't add an integer to a list of characters, for instance:
print("some string" + 2)
Many languages, such as JavaScript and Java pick up on this, and would automatically convert the integer into a string (match the types) and perform the concatenation, though, Python would throw a TypeError:
TypeError: can only concatenate str (not "int") to str
However, there is an easy workaround - you can use Python's built-in str() function which converts compatibile data types into a string. Let's add some integers to our strings list and box all of the items with a str() in case there are non-string elements:
strings = ["Concatenating", "strings", "in Python", "is easy!", 5, 2]

result = ""
for string in strings:
    result += str(string) + " "

print(result)
This results in:
Concatenating strings in Python is easy! 5 2
If you want to create a new string by replicating a string n amount of times and appending it, you can achieve this with the * operator:
string = "w"

print(string * 3) # Output: www
This can be even more useful when combined with the + operator:
print("w"*3 + "." + "stackabuse.com")
Which results in:
www.stackabuse.com
Again, concatenation doesn't necessarily mean we're adding a string to the end. Using the % operator, we can perform string interpolation. By adding % in a string as a marker, we can replace the markers with concrete strings later on:
string = "This %s is a %s string" % ("here", "random")

print(string)
This should output:
This here is a random string
Similarly enough, you can use other markers for other data types:
%d - for integer representation:string = "This is a string%d" % (1)
print(string) # Output: This is a string
%c - for character representation:string = "This string starts with a %c" % ('T')
print(string) # Output: This string starts with a T
%f - for floating number:string = "There is a %f percent chance that you'll learn string concatenation in Python after reading this article" % (99.99)
print(string) # Output filled 99,990000 in %f place
Note: If you wish to explicitly mark how many digits should the number be rounded to (say 2), you can achieve it with: %.2f.
If you'd like to read more about formatting strings in Python and the different ways to do it, read our Guide to Formatting Strings in Python 3's f-Strings.
The join() method takes an iterable as an argument and returns a string created by joining the elements of that iterable. It's worth noting that these have to be strings - each element is not inherently converted using str(), unlike our own method from before.
Additionally, a separator is used to define the separator between the joined strings, and it's the base string we call join() on:
my_list = ["1", "2", "3", "4"] # List - iterable
string_from_list = "-".join(my_list) # The separator is "-"

print(string_from_list)
This should output:
1-2-3-4
In a lot of cases, the separator is just a whitespace, so you'll commonly be seeing:
" ".join(iterable)
Since the built-in join() method might behave a bit differently than you might've expected, let's implement our own join() method with an adjustable separator.
We'll want it to be able to handle 2D lists as well, so if a list contains another list within itself - it's flattened to a 1-dimensional list, before joined:
import itertools

def join(iterable, separator):
    # Empty string to hold result
    result = ""
    # Flatten 2D potentially 2D list into 1D
    iterable = list(itertools.chain(*iterable))
    # Concatenate strings with separator
    for string in iterable:
        result += str(string) + separator
    return result


string = join(['a', 'b', 'c'], ' ')
string2 = join(['a', ['b', 'c'], 'd'], ' ')

print(string)
print(string2)
This results in:
a b c
a b c d
A simple way to concatenate strings, usually only when you're printing them is to leverage the space bar. This approach is commonly used only for printing, since assigning it to an object in memory is easy, but awkward:
print("Concat" " strings" " using Space")
If you'd like to avoid using whitespaces in the strings, you can add commas (,) between each element:
print("Concat", "strings", "using Space")
Both of these result in:
Concat strings using Space
If you'd like to assign them to a variable, you're free to do so, and they'll automatically be concatenated into a single string:
string = "this " "is " "a " "big " "string"
print(type(string))
print(string)
This results in:
<class 'str'>
this is a big string
You can even do multi-line strings. To achieve this, we add a \ to the end of each line to let Python know there's more than one line:
multi_line_string = "this " "string " \
                                  "is coded in " "three lines " \
                          "but printed in one"

print(multi_line_string)
This results in:
this string is coded in three lines but printed in one
Though, this approach is fiddly and awkward, and others are preferred.
Note: The same effect cannot be achieved with variables, only string literals:
string1 = "one string"
string2 = "two string"

final_string = string1 string2
This results in:
File "<string>", line 4
    final_string = string1 string2
                           ^
SyntaxError: invalid syntax
Joining/Appending/Concatenating Strings in Python is fairly simple and like everything related to Python, there are many ways to do it. It just comes down to your needs and preferences.
In this short tutorial, we've taken a look at some of the ways to concatenate strings
Are you still sprinkling print statements throughout your code while writing it? Print statements are often clunky and offer only a limited view of the state of your code. Have you thought there must be a better way? This week on the show, we have Nina Zakharenko to discuss her conference talk titled "Goodbye Print, Hello Debugger."
[ Improve Your Python With 🐍 Python Tricks 💌 – Get a short & sweet Python Trick delivered to your inbox every couple of days. >> Click here to learn more and see examples ]
The stock market is known for being volatile, dynamic, and nonlinear. Accurate stock price prediction is extremely challenging because of multiple (macro and micro) factors, such as politics, global economic conditions, unexpected events, a company’s financial performance, and so on. But, all of this also means that there’s a lot of data to find patterns […]
The post Predicting Stock Prices Using Machine Learning appeared first on neptune.ai.
Python strings are one of the most commonly used data types. Whereas, Python lists are the most commonly used data structures. In this article, we will try to convert a list to a string using different functions in python. We will use string methods like join() and functions like map() and str() to convert a list into string.
The easiest way to convert a list to a string in python is by using for loop and string concatenation. To convert a list to a string, we can simply convert each element of the list to a string. Then we can concatenate them to form a string.
To perform the conversion, first we will take an empty string. After that, we will start adding each element of the list to the empty string after converting them to string. In this process, we will also add spaces between each element. This can be done as follows.
myList = ["PFB", 11.2, 11, "Python"]
print("The List is:",myList)
myString = ""
for elem in myList:
    myString = myString + str(elem) + " "

print("Output String is:")
print(myString.rstrip())
Output:
The List is: ['PFB', 11.2, 11, 'Python']
Output String is:
PFB 11.2 11 Python
In the above example, we can see that an extra space has been added at the end of the string. We can use the rstrip() method to remove the extra space from the string.
An alternative way to convert a list to string in python is to use the join() method. The join() method is used to create a string from a list of strings.
The join() method is invoked on a separator which is used to separate the elements of the list in the string. The list of strings is given as input to the join() method and It returns a string created by the elements of the list.
We will create an empty string to which all the elements of the list will be concatenated. To create the string, we will take each element of the list one by one and will convert it into string. Then, we will create a list of strings using the string made by previous elements of the list and the current element. We will create the new string from the current string and the previously made string using the join() method by taking a space character as a separator and invoking the join() method on it. We will do this process on all the elements of the list using a for loop till the complete string is formed. This can be seen in the following example.
myList = ["PFB", 11.2, 11, "Python"]
print("The List is:", myList)
myString = ""
for elem in myList:
    myString = " ".join([myString, str(elem)])

print("Output String is:")
print(myString.lstrip())
Output:
The List is: ['PFB', 11.2, 11, 'Python']
Output String is:
PFB 11.2 11 Python
In the above method, an extra space is added at the left of the output string which has to be removed using the lstrip() method. To avoid this,Instead of applying str() function on every element of the list, we can use map() function to convert each element of the list into a string so that we can perform the string concatenation using join() method to get the output string using a single statement.
The map() function takes as input a function and an iterable as argument and executes the function on each element of the iterable object and returns the output map object which can be converted into a list.
To convert the elements of the list to strings, we will pass the str() function and the input list to the map() method. After that, we can create a string from a list of strings using the join() method as follows.
myList = ["PFB", 11.2, 11, "Python"]
print("The List is:", myList)
strList = list(map(str, myList))
myString = " ".join(strList)

print("Output String is:")
print(myString.lstrip())
Output:
The List is: ['PFB', 11.2, 11, 'Python']
Output String is:
PFB 11.2 11 PythonWe can use list comprehension to convert a list into a string. For this, We will convert each element of the list to string using list comprehension and str() function and then we can concatenate them using the join() method as follows.
myList = ["PFB", 11.2, 11, "Python"]
print("The List is:", myList)
strList = [str(i) for i in myList]
myString = " ".join(strList)

print("Output String is:", myString)
Output:
The List is: ['PFB', 11.2, 11, 'Python']
Output String is: PFB 11.2 11 Python
Alternatively, we can use the map() function to convert the elements of the list to string. Then we will create a new list from the map object created from the map() function using list comprehension and will give it as an input to the join() method to create a string from the list as follows.
myList = ["PFB", 11.2, 11, "Python"]
print("The List is:", myList)
myString = " ".join([i for i in map(str, myList)])
print("Output String is:", myString)
Output:
The List is: ['PFB', 11.2, 11, 'Python']
Output String is: PFB 11.2 11 PythonIn this article, we have used the str(), map() and join() functions to convert a list to string. We have also seen how to use list comprehension for this task. To know how to convert a string into a list, read this article on string split operation in python.
The post Convert a List to String in Python appeared first on PythonForBeginners.com.
On behalf of the Twisted contributors I announce the final release of Twisted 21.7.0

À oui.sncf, je travaille au sein d'une équipe en charge de l'usine logicielle, qui administre depuis des années une instance Gitlab self-hosted.
Cet article contient quelques-unes de nos recommandations à l'intention des utilisateurs de notre Gitlab, ayant pour but à la fois améliorer les performances de leurs pipelines …
Before we start the overview of the major PyCharm 2021.2 features, we have some important information to make you aware of.

First of all, we have good news for our Asian users. Starting with this version, you can enjoy a fully localized UI in Chinese, Korean, or Japanese. Localization is available as a non-bundled language pack plugin, which can be easily installed in your IDE.
Secondly, please note that we are planning to end support for several packages. Namely for mako, buildout, web2py. This change will be introduced later this year, starting from PyCharm 2021.3.
Structural Pattern Matching is coming in Python 3.10. PyCharm provides a number of key features to help you adjust to its arrival, like the Unused local symbols and Unreachable code inspections, smart code completion and syntax highlighting for the match and case keywords, and the Complete Current Statement action.
In Python 3.10 you will be able to use int | str for union types instead of Union[int, str]. This functionality is already available in earlier versions of Python through the use of from __future__ import annotations.
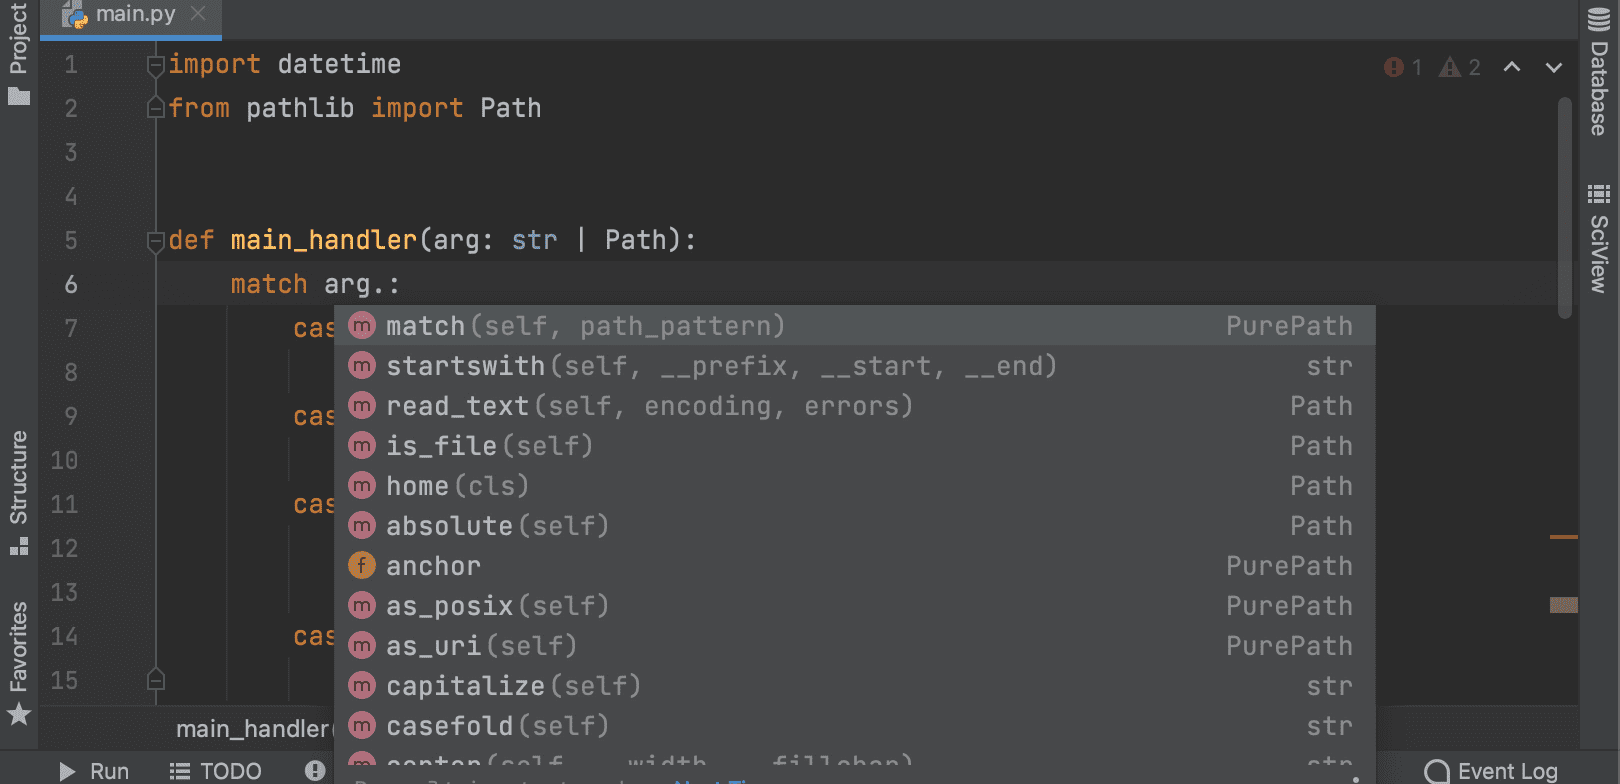
PyCharm provides overall code insight for the new syntax, including intention actions and information in the Quick Documentation. PyCharm now supports type inference for isinstance and issubclass arguments with the new syntax type.
Working in the Python console is now supported on both the client machine and the host side. During a collaborative coding session, guests can review the code while the host runs it in the interactive console. Support for the Python console in Code With Me comes complete with all the usual PyCharm features, such as on-the-fly syntax highlighting with inspections and code completion.
Now PyCharm can complete fields, nested fields, and fields inside aggregation expressions, as well as query operators, projection operators, update operators, and aggregation stages in the MongoDB console.
Context live templates now work directly from the data editor. If you’re working with a table and you wish to query it, you can easily do so with the help of the SQL scripts action!
PyCharm lets you preview HTML files in a browser using the built-in web server. Now it is able to automatically update the pages in a browser as you edit and save your HTML, CSS, and JavaScript files. To get started, open an HTML file in the editor, hover over the corner of the editor, and click on the icon for the browser you want to use – all browsers are supported.
You can now take the new Onboarding Tour in the IDE Features Trainer plugin.
With this 7-minute tour, you can get familiar with the PyCharm user interface and learn how to code in Python with smart assistance! You can start the tour from the Welcome screen or from the PyCharm main menu: Help | Learn IDE Features.

PyCharm auto-detects when there is a test runner installed on your Python interpreter and uses it to run tests. If no specific test runner is installed, PyCharm uses unittest. Still, you always have an option to explicitly specify the required test runner in the project settings. To explicitly set the required test runner in the project settings, press ⌘, to open the IDE settings and select Tools | Python Integrated Tools, and then select the target test runner from the Default test runner list.
The Test Management plugin now includes support for Python and is available for PyCharm Community. The Test Management plugin helps keep your unit tests in sync with test cases in TMS. You can load test cases from TestRail and link them with existing and new unit tests.
When you copy and paste a test case to a Python file a copy of the unit test will be pasted. You can customize the unit test template and share it with the team. With the plugin you can find test cases that are not yet automated (not linked with unit tests) and obsolete tests.
Being able to insert a randomly generated email, name, or phone number is important when developing unit tests. As a part of our Test Automation Kit the new Test Data plugin plugin brings a lot of useful actions that help to generate random data. Use the Generate menu (Cmd+N) to see all available options. If you need a specific format, feel free to create your own custom data format based on regular expression or Velocity templates. All custom data types are available in bulk mode and can be shared with your team.
In this blog post we covered only a few major features of PyCharm 2021.2. To learn about all the other new features in PyCharm 2021.2 visit our What’s New page.
When you’re loading many strings into Pandas, you’re going to use a lot of memory. If you have only a limited number of strings, you can save memory with categoricals, but that’s only helpful in a limited number of situations.
With Pandas 1.3, there’s a new option that can save memory on large number of strings as well, simply by changing to a new column type. Let’s see how.
Read more...Natural Language Processing (NLP) is a very exciting field. Already, NLP projects and applications are visible all around us in our daily life. From conversational agents (Amazon Alexa) to sentiment analysis (Hubspot’s customer feedback analysis feature), language recognition and translation (Google Translate), spelling correction (Grammarly), and much more. Whether you’re a developer or data scientist […]
The post 10 NLP Projects to Boost Your Resume appeared first on neptune.ai.
Python strings are one of the most used data types while doing data analysis for operations like pattern matching. In this article, we will use different ways to convert an integer to string in python.
The easiest way to convert an integer to string is to use the str() function. The str() function takes the integer as input and returns its string representation as follows.
myInt = 1117
myStr = str(myInt)
print("The integer myInt is:", myInt)
print("The string myStr is:", myStr)
Output:
The integer myInt is: 1117
The string myStr is: 1117
We can check the type of input variable and output variable to confirm if the integer has been converted to a string or not. To do this, we will use the type() function. The type function takes a python object as input and returns the data type of the input object as follows.
myInt = 1117
myStr = str(myInt)
print("The data type of myInt is:", type(myInt))
print("The data type of myStr is:", type(myStr))
Output:
The data type of myInt is: <class 'int'>
The data type of myStr is: <class 'str'>String formatting is a method to insert a variable or another string to a predefined string. We can also use string formatting to convert an integer to string. We will use the “%s” operator as well as the format() method to convert an integer to string in this article.
The “%s” operator is used to format a value inside a string. It is generally used to avoid string concatenation. But, we can use this operator to convert an integer to a string. For this, first we will create an empty string and put a %s placeholder in the empty string. After that, we can specify the integer which has to be converted into string. During execution of the program, the python interpreter will convert the integer into string as seen in the following example.
myInt = 1117
myStr = "%s" % myInt
print("myInt is:",myInt)
print("The data type of myInt is:", type(myInt))
print("myStr is:",myStr)
print("The data type of myStr is:", type(myStr))
Output:
myInt is: 1117
The data type of myInt is: <class 'int'>
myStr is: 1117
The data type of myStr is: <class 'str'>
In place of the “%s” operator, we can also use format() method to perform the conversion. For this we can put a {} placeholder in an empty string. After that, we can invoke the format method on the empty string with the integer given as the input to the format() method. This will convert the integer into string as follows.
myInt = 1117
myStr = "{}".format(myInt)
print("myInt is:",myInt)
print("The data type of myInt is:", type(myInt))
print("myStr is:",myStr)
print("The data type of myStr is:", type(myStr))
Output:
myInt is: 1117
The data type of myInt is: <class 'int'>
myStr is: 1117
The data type of myStr is: <class 'str'>F strings are used to embed a value or an expression into a string. We can also use f strings to convert an integer into a string.
The syntax for using f strings is similar to that of format() method. The only difference is that we can put the variables directly into the placeholders. This makes the code more readable. To put an integer variable n into a string, we simply put n into the {} placeholder as follows.
f"This is a string containing {n}"To convert an integer to string using f strings, we will declare an empty string with only a single placeholder for the integer. In this way, at runtime, the integer will be converted to string. This can be seen in the following example.
myInt = 1117
myStr = f"{myInt}"
print("myInt is:",myInt)
print("The data type of myInt is:", type(myInt))
print("myStr is:",myStr)
print("The data type of myStr is:", type(myStr))
Output:
myInt is: 1117
The data type of myInt is: <class 'int'>
myStr is: 1117
The data type of myStr is: <class 'str'>In this article, we have seen different ways to convert an integer into a string in python. We have used in-built str() method, string formatting as well as f-strings. To read more about strings, you can read this article on python string split operation.We can also write the programs used in this article with exception handling using python try except to make the programs more robust and handle errors in a systematic way.
The post Convert Integer to String in Python appeared first on PythonForBeginners.com.
There’s an amazing amount of data available on the Web. Many web services, like YouTube and GitHub, make their data accessible to third-party applications through an application programming interface (API). One of the most popular ways to build APIs is the REST architecture style. Python provides some great tools not only to get data from REST APIs but also to build your own Python REST APIs.
In this tutorial, you’ll learn:
requests libraryBy using Python and REST APIs, you can retrieve, parse, update, and manipulate the data provided by any web service you’re interested in.
Free Bonus: Click here to download a copy of the "REST API Examples" Guide and get a hands-on introduction to Python + REST API principles with actionable examples.
REST stands for representational state transfer and is a software architecture style that defines a pattern for client and server communications over a network. REST provides a set of constraints for software architecture to promote performance, scalability, simplicity, and reliability in the system.
REST defines the following architectural constraints:
Note, REST is not a specification but a set of guidelines on how to architect a network-connected software system.
A REST web service is any web service that adheres to REST architecture constraints. These web services expose their data to the outside world through an API. REST APIs provide access to web service data through public web URLs.
For example, here’s one of the URLs for GitHub’s REST API:
https://api.github.com/users/<username>
This URL allows you to access information about a specific GitHub user. You access data from a REST API by sending an HTTP request to a specific URL and processing the response.
REST APIs listen for HTTP methods like GET, POST, and DELETE to know which operations to perform on the web service’s resources. A resource is any data available in the web service that can be accessed and manipulated with HTTP requests to the REST API. The HTTP method tells the API which action to perform on the resource.
While there are many HTTP methods, the five methods listed below are the most commonly used with REST APIs:
| HTTP method | Description |
|---|---|
GET |
Retrieve an existing resource. |
POST |
Create a new resource. |
PUT |
Update an existing resource. |
PATCH |
Partially update an existing resource. |
DELETE |
Delete a resource. |
A REST API client application can use these five HTTP methods to manage the state of resources in the web service.
Once a REST API receives and processes an HTTP request, it will return an HTTP response. Included in this response is an HTTP status code. This code provides information about the results of the request. An application sending requests to the API can check the status code and perform actions based on the result. These actions could include handling errors or displaying a success message to a user.
Below is a list of the most common status codes returned by REST APIs:
| Code | Meaning | Description |
|---|---|---|
200 |
OK | The requested action was successful. |
201 |
Created | A new resource was created. |
202 |
Accepted | The request was received, but no modification has been made yet. |
204 |
No Content | The request was successful, but the response has no content. |
400 |
Bad Request | The request was malformed. |
401 |
Unauthorized | The client is not authorized to perform the requested action. |
404 |
Not Found | The requested resource was not found. |
415 |
Unsupported Media Type | The request data format is not supported by the server. |
422 |
Unprocessable Entity | The request data was properly formatted but contained invalid or missing data. |
500 |
Internal Server Error | The server threw an error when processing the request. |
These ten status codes represent only a small subset of the available HTTP status codes. Status codes are numbered based on the category of the result:
[ Improve Your Python With 🐍 Python Tricks 💌 – Get a short & sweet Python Trick delivered to your inbox every couple of days. >> Click here to learn more and see examples ]
Software Design Patterns help accelerate the development process by providing a reusable blueprint for your code to solve a particular problem. We follow Design Patterns to write generalized, reusable, and readable code that could be easily understood by others familiar with the patterns we've applied.
They encapsulate cumulative experience of software engineers solving the same problems, and represent solutions to common design-related issuees.
There are different classifications of design patterns depending on which class of problems they solve - among which the Observer Design Pattern belongs to the Behavioral Pattern class.
This class of patterns determines how objects communicate with each other. In this guide, you will learn everything you need to know about the Observer Design Pattern and understand how we can use it to solve certain problems efficiently.
The Observer Design Pattern deals with One-to-Many relationships and utilizes events to let subscribed entities know about changes in an observable.
The source of these events is called the subject or observable which sends events as streams. The observers or sinks can subscribe to the observable to obtain the events. The observable keeps track of the list of observers and notifies them of the changes when the state of the observable changes.

This functionality has many implications and implementations, and similar functionality is all around you. It's an extremely simple, yet very effective and wide-spread pattern.
A similar implementation of this design pattern is seen in generating feeds on your social platforms - the Pub/Sub (Publisher/Subscriber) Model/Pattern. When a content publisher publishes their posts, the subscribers get notified of the content. A similar analogy may be people looking out for a flare signal or a firework for a certain event, and reacting (or not) depending on their specific roles.
Does that mean that the Observer Design Pattern and Publish/Subscribe Pattern are the same?
Previously, both patterns were synonymous. Nowadays, each pattern has distinct traits that make them two separate patterns.
The following are the major differences between the Observer Pattern and the Pub/Sub Pattern:
One of the best ways to get a feel for this pattern is to implement it, let's implement it in Python!
A basic implementation requires two classes - an Observable and an Observer. The Observer class is initialized with an object as an argument. The object is none other than an Observable to keep track of, to which it is subscribed upon creation.
The class also has a notify() function which triggers a reaction and acknowledges the receival of a notification/event from the observable:
class Observer:

    def __init__(self, observable):
        observable.subscribe(self)

    def notify(
        self,
        observable,
        *args,
        **kwargs
        ):
        print ('Got', args, kwargs, 'From', observable)
The Observable class is initialized with an empty list to hold the Observer instances. It also has functions such as subscribe() to add an observer, notify_observers() to call the notify() function on each observer, and unsubscribe() to remove the observer from the list:
class Observable:

    def __init__(self):
        self._observers = []

    def subscribe(self, observer):
        self._observers.append(observer)

    def notify_observers(self, *args, **kwargs):
        for obs in self._observers:
            obs.notify(self, *args, **kwargs)

    def unsubscribe(self, observer):
        self._observers.remove(observer)
Plugging in all of the above-mentioned components, let's write some code that sets up an observer and observable and sends messages, which triggers a reaction:
# observer_pattern.py

"""
Demonstrating the Observer pattern implementation
"""
# Initializing the subject
subject = Observable()

# Initializing twp observers with the subject object
observer1 = Observer(subject)
observer2 = Observer(subject)

# The following message will be notified to 2 observers
subject.notify_observers('This is the 1st broadcast',
                         kw='From the Observer')
subject.unsubscribe(observer2)

# The following message will be notified to just 1 observer since
# the observer has been unsubscribed
subject.notify_observers('This is the 2nd broadcast',
                         kw='From the Observer')
Notice that we also unsubscribe an observer before publishing the second message. This will lead to the message being printed only once instead of twice on the second attempt, as it is received by only one subscriber.
Running this code will result in:
$ python observer_pattern.py
Got ('This is the 1st broadcast',) {'kw': 'From the Observer'} From <__main__.Observable object at 0x7f6c50d2fb50>
Got ('This is the 1st broadcast',) {'kw': 'From the Observer'} From <__main__.Observable object at 0x7f6c50d2fb50>
Got ('This is the 2nd broadcast',) {'kw': 'From the Observer'} From <__main__.Observable object at 0x7f6c50d2fb50>
As you can see, the observable can directly interact with the observers and vice versa. The observable will be in interaction with the observer as long as the observer is subscribed to the observable's subscription list.
With the implementation in place, the pros and cons of this design pattern can be compared as follows:
Pros:
The one-to-many relationship is defined between the objects. This ensures that when an object is altered, it will lead to a cascade of changes to be applied to the dependent objects.
Loosely coupled objects mean that the components can be interchanged.
Cons:
The communication between the observable and observer is synchronous and with an increased load of subscribing and unsubscribing events, the observable object could be bombarded with requests. This could be mitigated by setting up a sleep time for each request.
The sleep solution could also cause a possible loss of speed, performance, and events. This was the main reason for the Pub/Sub pattern to have a message queue in between the publisher and subscriber.
Memory leaks are common in this pattern since there is a strong reference between the observer and observable. The observables need to be mandatorily deregistered from the observable object.
To mitigate most of the cons, a message queue was introduced in between the observer and the observable to overcome all these problems, which led to devising the Pub/Sub pattern - a variation of the Observer Pattern.
This guide covered the the Observer Pattern, how it can be implemented, and compares its pros and cons.
It's interesting to note that the Observer Pattern is one of the Behavioral Patterns that has led to many of the features we use today, such as RSS feeds, social media feeds, etc.
By being introduced to the nuances of the Design Patterns, it is easier to build the functionality from the ground up. And of course, knowing different Design Patterns allows you to build the best solution for different types of problems.
In this notebook, I will show you how to calculate Stocks Support and Resistance using different clustering techniques.
Stock Data - I have stocks data in mongo DB. You can also get this data from Yahoo Finance for free.
import pymongo
from pymongo import MongoClient
client_remote = MongoClient('mongodb://localhost:27017')
db_remote = client_remote['stocktdb']
collection_remote = db_remote.stock_data
I will do this analysis using last 60 days of Google data.
mobj = collection_remote.find({'ticker':'GOOGL'}).sort([('_id',pymongo.DESCENDING)]).limit(60)
I will be using Pandas and Numpy for the data manipulation. Let us first get the data from Mongo Cursor object to Python list.
prices = []
for doc in mobj:
    prices.append(doc['high'])
import numpy as np
import pandas as pd
import matplotlib.pyplot as plt
from sklearn.cluster import AgglomerativeClustering
For K means clustering, we need to get the data in
If machine learning solutions were cars, their fuel would be data. Simply viewed, ML models are statistical equations that need values and variables to operate, and the data is the biggest contributor to ML success. Today, sources of data are ample, and the amount of available data keeps growing exponentially. This allows us to wrangle, […]
The post How to Kick Off a Machine Learning Project With Less Data appeared first on neptune.ai.
In this notebook, I will show you how to calculate Stocks Support and Resistance using different clustering techniques.
Stock Data - I have stocks data in mongo DB. You can also get this data from Yahoo Finance for free.
import pymongo
from pymongo import MongoClient
client_remote = MongoClient('mongodb://localhost:27017')
db_remote = client_remote['stocktwits']
collection_remote = db_remote.eod_stock_data
I will do this analysis using last 60 days of Google data.
mobj = collection_remote.find({'ticker':'GOOGL'}).sort([('_id',pymongo.DESCENDING)]).limit(60)
I will be using Pandas and Numpy for the data manipulation. Let us first get the data from Mongo Cursor object to Python list.
prices = []
for doc in mobj:
    prices.append(doc['high'])
import numpy as np
import pandas as pd
import matplotlib.pyplot as plt
from sklearn.cluster import AgglomerativeClustering
For K means clustering, we need to get the data in to Numpy array format.
X = np.array(prices)
For K means clustering, K which means number of clusters is very important. We can find the optimal K using the Knee plot as shown below.
from sklearn.cluster import KMeans
import numpy as np
from kneed import KneeLocator

sum_of_sq_distances = []
K = range(1,10)
for k in K:
    km = KMeans(n_clusters=k)
    km = km.fit(X.reshape(-1,1))
    sum_of_sq_distances.append(km.inertia_)
kn = KneeLocator(K, sum_of_sq_distances,S=1.0, curve="convex", direction="decreasing")
kn.plot_knee()
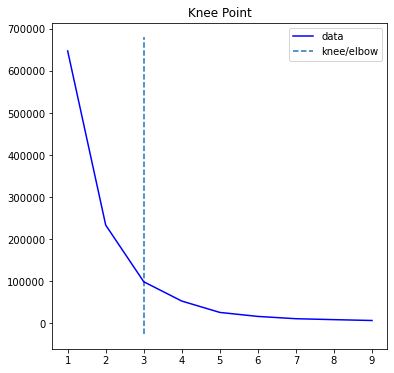
Let us check the value of K using kn.knee
kn.knee
kmeans = KMeans(n_clusters= kn.knee).fit(X.reshape(-1,1))
c = kmeans.predict(X.reshape(-1,1))
min_and_max = []
for i in range(kn.knee):
    min_and_max.append([-np.inf,np.inf])
for i in range(len(X)):
    cluster = c[i]
    if X[i] > min_and_max[cluster][0]:
        min_and_max[cluster][0] = X[i]
    if X[i] < min_and_max[cluster][1]:
        min_and_max[cluster][1] = X[i]
Let us check the min and max values of our clusters.
min_and_max
There are 3 clusters shown above, every cluster has max and min value.
At the writing of this notebook, Google stock price is 2687.98 (high of day) which happens to be the 52 high as well. Therefore based on the above clusters, we can say that 2687.98 is the resistance and next support level is 2508.0801. The next levels of support are 2461.9099, 2365.55 2357.02, 2239.4399.
Remember these support and resistances will change depending upon the range of data and value of Clustering parameter K.
mobj = collection_remote.find({'ticker':'GOOGL'}).sort([('_id',pymongo.DESCENDING)]).limit(60)
prices = []
for doc in mobj:
    prices.append(doc['high'])
Another approach that can be used is Agglomerative Clustering which is hierarchical clustering.
Agglomerative clustering is a bottoms up approach which merges child clusters to find out the big clusters of data.
I have found Aggloerative to be useful on stocks rolling data.
Let us create a rolling data of 20 days each for both calculating max and min values.
df = pd.DataFrame(prices)
max = df.rolling(20).max()
max.rename(columns={0: "price"},inplace=True)
min = df.rolling(20).min()
min.rename(columns={0: "price"},inplace=True)
Below step is required to prepare the data in two column format.
maxdf = pd.concat([max,pd.Series(np.zeros(len(max))+1)],axis = 1)
mindf = pd.concat([min,pd.Series(np.zeros(len(min))+-1)],axis = 1)
maxdf.drop_duplicates('price',inplace = True)
mindf.drop_duplicates('price',inplace = True)
Let us use n_clusters =3 value for our number of clusters.
F = maxdf.append(mindf).sort_index()
F = F[ F[0] != F[0].shift() ].dropna()

# Create [x,y] array where y is always 1
X = np.concatenate((F.price.values.reshape(-1,1),
                    (np.zeros(len(F))+1).reshape(-1,1)), axis = 1 )

cluster = AgglomerativeClustering(n_clusters=3,
          affinity='euclidean', linkage='ward')
cluster.fit_predict(X)
F['clusters'] = cluster.labels_

F2 = F.loc[F.groupby('clusters')['price'].idxmax()]

# Plotit
fig, axis = plt.subplots()
for row in F2.itertuples():

    axis.axhline( y = row.price,
            color = 'green', ls = 'dashed' )

axis.plot( F.index.values, F.price.values )
plt.show()
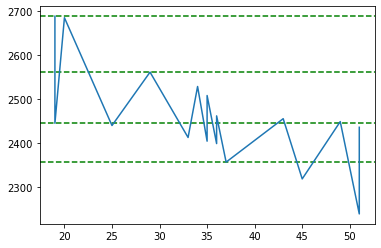
Let us plot our clusters now. As shown below, there are 2 clusters found. If we take in to account the todays closing price of Google which is 2638.00, we can say that 2687.98 is the resistance and 2357.02 is the support.
F2
One thing to notice here is that, there are only 2 clusters at price 2357.02 which is not that many. To see if we can find more number of clusters either we have to increase our number of price points in our source data or increase the number of clusters, or make our rolling window smaller.
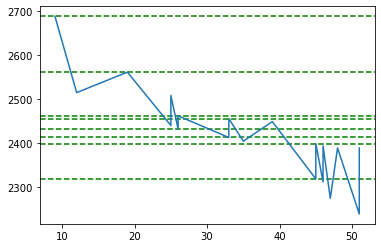
Let us increase the number of clusters to 5 and see what happens.
F = maxdf.append(mindf).sort_index()
F = F[ F[0] != F[0].shift() ].dropna()

# Create [x,y] array where y is always 1
X = np.concatenate((F.price.values.reshape(-1,1),
                    (np.zeros(len(F))+1).reshape(-1,1)), axis = 1 )

cluster = AgglomerativeClustering(n_clusters=5,
          affinity='euclidean', linkage='ward')
cluster.fit_predict(X)
F['clusters'] = cluster.labels_

F2 = F.loc[F.groupby('clusters')['price'].idxmax()]

# Plotit
fig, axis = plt.subplots()
for row in F2.itertuples():

    axis.axhline( y = row.price,
            color = 'green', ls = 'dashed' )

axis.plot( F.index.values, F.price.values )
plt.show()
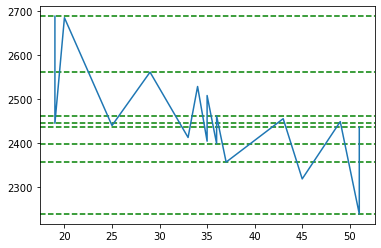
F2
Ok this time around we got more number of clusters at price 2239.43 which is quite far from todays closing price of 2638. However the resistance number looks good of 2687.98 based on 3 clusters.
Let us make our rolling window smaller. Instead of 20 days let us make it 10 days.
df = pd.DataFrame(prices)
max = df.rolling(10).max()
max.rename(columns={0: "price"},inplace=True)
min = df.rolling(10).min()
min.rename(columns={0: "price"},inplace=True)
maxdf = pd.concat([max,pd.Series(np.zeros(len(max))+1)],axis = 1)
mindf = pd.concat([min,pd.Series(np.zeros(len(min))+-1)],axis = 1)
maxdf.drop_duplicates('price',inplace = True)
mindf.drop_duplicates('price',inplace = True)
F = maxdf.append(mindf).sort_index()
F = F[ F[0] != F[0].shift() ].dropna()

# Create [x,y] array where y is always 1
X = np.concatenate((F.price.values.reshape(-1,1),
                    (np.zeros(len(F))+1).reshape(-1,1)), axis = 1 )

cluster = AgglomerativeClustering(n_clusters=5,
          affinity='euclidean', linkage='ward')
cluster.fit_predict(X)
F['clusters'] = cluster.labels_

F2 = F.loc[F.groupby('clusters')['price'].idxmax()]

# Plotit
fig, axis = plt.subplots()
for row in F2.itertuples():

    axis.axhline( y = row.price,
            color = 'green', ls = 'dashed' )

axis.plot( F.index.values, F.price.values )
plt.show()
F2
Ok this data looks much better. We got a Google resistance around 2687.98 and support around 2399.03 and 2412.8799 which is quite close to say that support is around 2400.

