Saturday, October 31, 2020

Kushal Das: High load average while package building on Fedora 33

Enabling Link time optimization (LTO) with rpmbuild is one of the new features of Fedora 33. I read the changeset page once and went back only after I did the Tor package builds locally.

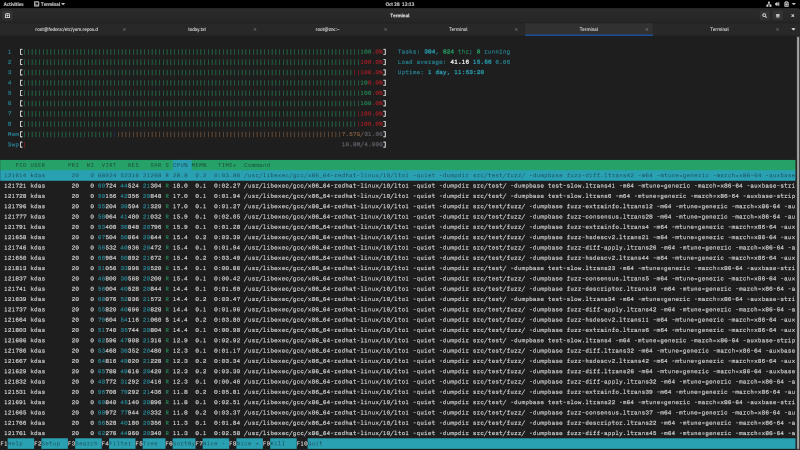
While building the package, I noticed that suddenly there are many processes with /usr/libexec/gcc/x86_64-redhat-linux/10/lto1 and my load average reached 55+. Here is a screenshot I managed to take in between.

high load average


from Planet Python
via read more

LAAC Technology: Five Advanced Django Tips

Table of Contents

Introduction

Many of the “Django tips” articles that I see online are geared towards beginners not intermediate or advanced Django developers. I hope to demonstrate some of Django’s depth, specifically around the ORM, and you’ll need to have an intermediate understanding of Django. Let’s start by looking at the example models.

from django.db import models
class Ticker(models.Model):
symbol = models.CharField(max_length=50, unique=True)
class TickerPrice(models.Model):
ticker = models.ForeignKey(
Ticker, on_delete=models.CASCADE, related_name="ticker_prices"
)
price = models.DecimalField(max_digits=7, decimal_places=2)
close_date = models.DateField()

For this article, we’ll use a stock price tracking application as our example. We have a Ticker model to store each stock ticker with its symbol, and a TickerPrice model with a many to one relationship to a Ticker where we’ll store the ticker’s price and close date.

Using Q Objects for Complex Queries

When you filter a queryset, you’re ANDing the keyword arguments together. Q objects allow Django developers to perform lookups with OR. Q objects can be combined together with &, representing AND, or |, representing OR. Let’s look at an example query.

today_and_yesterday_prices = TickerPrice.objects.filter(
models.Q(close_date=today) | models.Q(close_date=yesterday)
)

In this query, we’re fetching the ticker prices with close dates of today or yesterday. We wrap our close_date keyword arguments with a Q object and join them together with the OR operator, |. We can also combine the OR and AND operators.

today_and_yesterday_greater_than_1000 = TickerPrice.objects.filter(
models.Q(price__gt=1000),
(models.Q(close_date=today) | models.Q(close_date=yesterday)),
)

For this query, we’re getting all prices with a close date of today or yesterday with a price greater than 1000. By default, Q objects, similar to keyword arguments, are ANDed together. We can also use the ~ operator to negate Q objects.

today_and_yesterday_greater_than_1000_without_BRK = (
TickerPrice.objects.filter(
models.Q(price__gt=1000),
~models.Q(ticker__symbol__startswith="BRK"),
(models.Q(close_date=today) | models.Q(close_date=yesterday)),
)
)

In this query, we’re fetching all ticker prices greater than 1000 that don’t start with BRK with close dates of either today or yesterday. We added the condition that the ticker’s symbol does not start with BRK (Berkshire Hathaway), which will exclude those from the query.

Prefetch related and select related provide us with a mechanism to look up objects related to the model that we’re querying. We use prefetch related when we want to fetch a reverse foreign key or a many to many relationship. We use select related when we want to fetch a foreign key or a one to one relationship.

apple_with_all_prices = Ticker.objects.prefetch_related(
"ticker_prices"
).get(symbol="AAPL")

In this example, we’re fetching a single ticker, AAPL, and with this ticker, we’re fetching all of the related prices. This helps us optimize our database queries by loading all the related ticker prices instead of fetching them one by one. Without prefetch related, if we looped over ticker_prices.all(), each iteration would result in a database query, but with prefetch related, a loop would result in one database query.

latest_prices = TickerPrice.objects.filter(
close_date=today
).select_related("ticker")

Select related works similarly to prefetch related except we use select related for different types of relationships. For this case, we’re fetching all ticker prices for today and also fetching the associated ticker. Once again if we loop over latest_prices, referencing a price’s ticker won’t result in an extra database query.

Annotate Querysets to Fetch Specific Values

Annotating a queryset enables us to add attributes to each object in the queryset. Annotations can be a reference to a value on the model or related model or an expression such as a sum or count.

tickers_with_latest_price = Ticker.objects.annotate(
latest_price=TickerPrice.objects.filter(
ticker=models.OuterRef("pk")
)
.order_by("-close_date")
.values("price")[:1]
)

This queryset fetches all the tickers and annotates each ticker object with a latest_price attribute. The latest price comes from the most recent related ticker price. The OuterRef allows us to reference the primary key of the ticker object. We use order_by to get the most recent price and use values to select only the price. Finally, the [:1] ensures we retrieve only one TickerPrice object.

We could also query against our annotation.

tickers_with_latest_price = (
Ticker.objects.annotate(
latest_price=TickerPrice.objects.filter(ticker=models.OuterRef("pk"))
.order_by("-close_date")
.values("price")[:1]
)
.filter(latest_price__gte=50)
)

We added an extra filter statement after our annotation. In this query, we fetch all tickers where the latest price is greater than or equal to fifty.

Prefetch objects enable Django developers to control the operation of prefetch related. When we pass in a string argument to prefetch related, we’re saying fetch all of the related objects. A prefetch object lets us pass in a custom queryset to fetch a subset of the related objects.

tickers_with_prefetch = Ticker.objects.all().prefetch_related(
models.Prefetch(
"ticker_prices",
queryset=TickerPrice.objects.filter(
models.Q(close_date=today)
| models.Q(close_date=yesterday)
),
)
)

In this example, we combine a previous query we made for ticker prices from today or yesterday and pass that as the query set of our prefetch object. We fetch all tickers and with them we fetch all related ticker prices from today and yesterday.

Define Custom Query Sets and Model Managers for Code Reuse

Custom model managers and custom querysets let Django developers add extra methods to or modify the initial queryset for a model. Using these promotes the “don’t repeat yourself” (DRY) principle in software development and promotes reuse of common queries.

import datetime
from django.db import models
class TickerQuerySet(models.QuerySet):
def annotate_latest_price(self):
return self.annotate(
latest_price=TickerPrice.objects.filter(
ticker=models.OuterRef("pk")
)
.order_by("-close_date")
.values("price")[:1]
)
def prefetch_related_yesterday_and_today_prices(self):
today = datetime.datetime.today()
yesterday = today - datetime.timedelta(days=1)
return self.prefetch_related(
models.Prefetch(
"ticker_prices",
queryset=TickerPrice.objects.filter(
models.Q(close_date=today)
| models.Q(close_date=yesterday)
),
)
)
class TickerManager(models.Manager):
def get_queryset(self):
return TickerQuerySet(self.model, using=self._db)
class Ticker(models.Model):
symbol = models.CharField(max_length=50, unique=True)
objects = TickerManager()
class TickerPrice(models.Model):
ticker = models.ForeignKey(
Ticker, on_delete=models.CASCADE, related_name="ticker_prices"
)
price = models.DecimalField(max_digits=7, decimal_places=2)
close_date = models.DateField()

In the above code, we’ve created a custom queryset with some of the previously demonstrated queries as methods. We added this new queryset to our custom manager and overrode the default objects manager on the Ticker model with our custom manager. With the custom manager and queryset, we can do the following.

tickers_with_prefetch = (
Ticker.objects.all().prefetch_related_yesterday_and_today_prices()
)
tickers_with_latest_price = Ticker.objects.all().annotate_latest_price()

Instead of having to write the actual query for each of these examples, we call the methods defined in the custom queryset. This is especially useful if we use these queries in multiple places throughout the codebase.

Final Thoughts

I hope these Django tips shed some light on the more advanced Django features. The Django ORM has a large set of features that can be overwhelming at the beginning, but once you’re past the beginner level, the ORM contains a lot of great functionality that helps maintain a clean codebase and enable complex queries. I encourage you to dive into Django’s documentation, especially around the ORM, as it is well written with good examples.


from Planet Python
via read more

Money and California Propositions (2020)

Ten years ago, I made some plots for how much money was contributed to and spent by the various proposition campaigns in California.

I decided to update these for this election, and here's the result:

Just in case you didn't get the full picture, here is the same data plotted on a common scale:

So, whereas 10 years ago, we had a total of ~$58 million on the election, the overwhelming amount of in support, this time, we had ~$662 million, an 11 fold increase!

The Cal-Access Campaign Finance Activity: Propositions & Ballot Measures source I used last time was still there, but there are way more propositions this time (12 vs 5), and the money details are broken out by committee, with some propositions have a dozen committees. Another wrinkle is that website has protected by some fancy scraping protection. I could browse it just fine in Firefox, even with Javascript turned off, but couldn't download it using wget, curl,

(continued...)

from Planet SciPy
read more

Talk Python to Me: #288 10 tips to move from Excel to Python

Excel is one of the most used and most empowering piece of software out there. But that doesn't make it a good fit for every data processing need. And when you outgrow Excel, a really good option for a next step is Python and the data science tech stack: Pandas, Jupyter, and friends. <br/> <br/> Chris Moffitt is back on Talk Python to give us concrete tips and tricks for moving from Excel to Python!<br/> <br/> <strong>Links from the show</strong><br/> <br/> <div><b>Chris on Twitter</b>: <a href="https://twitter.com/chris1610" target="_blank" rel="noopener">@chris1610</a><br/> <b>Practical Business Python</b>: <a href="https://pbpython.com" target="_blank" rel="noopener">pbpython.com</a><br/> <b>Escaping Excel Hell with Python and Pandas Episode 200</b>: <a href="https://ift.tt/3jMBYFJ" target="_blank" rel="noopener">talkpython.fm</a><br/> <b>SideTable package</b>: <a href="https://ift.tt/2BtP0Yl" target="_blank" rel="noopener">pbpython.com</a><br/> <br/> <b>Learn more and go deeper</b><br/> <b>Move from Excel to Python with Pandas Course</b>: <a href="talkpython.fm/excel" target="_blank" rel="noopener">training.talkpython.fm</a><br/> <b>Excel to Python webcast</b>: <a href="https://ift.tt/34JnmSZ" target="_blank" rel="noopener">crowdcast.io</a><br/></div><br/> <strong>Sponsors</strong><br/> <br/> <a href='https://ift.tt/3oO5FKm game</a><br> <a href='https://ift.tt/3aBjB2k> <a href='https://ift.tt/2PVc9qH Python Training</a>

from Planet Python
via read more

Catalin George Festila: Python 3.9.0 : Testing twisted python module - part 001 .

Today I tested two python modules named: twisted and twisted[tls]. Twisted is an event-driven network programming framework written in Python and licensed under the MIT License. Twisted projects variously support TCP, UDP, SSL/TLS, IP multicast, Unix domain sockets, many protocols (including HTTP, XMPP, NNTP, IMAP, SSH, IRC, FTP, and others), and much more. Twisted is based on the event-driven

from Planet Python
via read more

Catalin George Festila: Python 3.8.5 : Testing with openpyxl - part 001 .

The Python executes the code line by line because is an interpreter language. This allows users to solve issues in the programming area, fast and easy. I use python versiono 3.8.5 build on Aug 12 2020 at 00:00:00, see the result of interactive mode: [mythcat@desk ~]$ python Python 3.8.5 (default, Aug 12 2020, 00:00:00) [GCC 10.2.1 20200723 (Red Hat 10.2.1-1)] on linux Type "help", "copyright", "

from Planet Python
via read more

Python Bytes: #205 This is going to be a little bit awkward

<p>Sponsored by us! Support our work through:</p> <ul> <li>Our <a href="https://training.talkpython.fm/"><strong>courses at Talk Python Training</strong></a></li> <li><a href="https://testandcode.com/"><strong>Test &amp; Code</strong></a> Podcast</li> <li><a href="https://www.patreon.com/pythonbytes"><strong>Patreon Supporters</strong></a></li> </ul> <p><strong>Michael #1:</strong> <a href="https://awkward-array.org"><strong>Awkward arrays</strong></a></p> <ul> <li>via Simon Thor</li> <li>Awkward Array is a library for <strong>nested, variable-sized data</strong>, including arbitrary-length lists, records, mixed types, and missing data, using <strong>NumPy-like idioms</strong>.</li> <li>This makes it better than numpy at handling data where e.g. the rows in a 2D array have different lengths. It can even be used together with numba to jit-compile the code to make it even faster.</li> <li>Arrays are <strong>dynamically typed</strong>, but operations on them are <strong>compiled and fast</strong>. Their behavior coincides with NumPy when array dimensions are regular and generalizes when they’re not.</li> <li>Recently rewritten in C++ for the 1.0 release and can even be used from C++ as well as Python.</li> <li>Careful on installation: <code>pip install awkward1</code> ← Notice the 1.</li> </ul> <p><strong>Brian #2:</strong> <a href="https://nedbatchelder.com/blog/202010/ordered_dict_surprises.html"><strong>Ordered dict surprises</strong></a></p> <ul> <li>Ned Batchelder</li> <li>“Since Python 3.6, regular dictionaries retain their insertion order: when you iterate over a dict, you get the items in the same order they were added to the dict. Before 3.6, dicts were unordered: the iteration order was seemingly random.”</li> <li>The surprises: <ul> <li>You can’t get the first item, like d[0], since that’s just the value matching key 0, if key 0 exists. (I’m not actually surprised by this.)</li> <li>equality and order (this I am surprised by) <ul> <li>Python 3.6+ dicts ignores order when testing for equality</li> <li><code>{"a": 1, "b": 2} == {"b": 2, "a": 1}</code></li> </ul></li> <li>OrderdDicts care about order when testing for equality <ul> <li><code>OrderedDict([("a", 1), ("b", 2)]) != OrderedDict([("b", 2), ("a", 1)])</code></li> </ul></li> </ul></li> </ul> <p><strong>Michael #3:</strong> <a href="https://github.com/krassowski/jupyterlab-lsp">jupyter lab autocomplete and more</a></p> <ul> <li>via Anders Källmar</li> <li>Examples show Python code, but most features also work in R, bash, typescript, and many other languages.</li> <li><strong>Hover:</strong> Hover over any piece of code; if an underline appears, you can press Ctrl to get a tooltip with function/class signature, module documentation or any other piece of information that the language server provides</li> <li><strong>Diagnostics:</strong> Critical errors have red underline, warnings are orange, etc. Hover over the underlined code to see a more detailed message</li> <li><strong>Jump to Definition:</strong> Use the context menu entries to jump to definitions</li> <li><strong>Highlight References:</strong> Place your cursor on a variable, function, etc and all the usages will be highlighted</li> <li><strong>Automatic Completion:</strong> Certain characters, for example '.' (dot) in Python, will automatically trigger completion</li> <li><strong>Automatic Signature Suggestions:</strong> Function signatures will automatically be displayed</li> <li><strong>Rename:</strong> Rename variables, functions and more, in both: notebooks and the file editor.</li> </ul> <p><strong>Brian #4:</strong> <a href="https://source-separation.github.io/tutorial/landing.html"><strong>Open Source Tools &amp; Data for Music Source Separation</strong></a></p> <ul> <li>An online “book” powered by Jupyter Book</li> <li>By Ethan Manilow, Prem Seetharaman, and Justin Salamon</li> <li>A tutorial intended to guide people “through modern, open-source tooling and datasets for running, evaluating, researching, and deploying source separation approaches. We will pay special attention to musical source separation, though we will note where certain approaches are applicable to a wider array of source types.”</li> <li>Uses Python and interactive demos with visualizations.</li> <li>Section “basics of source separation” that includes a primer on digitizing audio signals, a look time frequency representations, what phase is, and some evaluations and measurements.</li> <li>Includes <ul> <li>use of a library called nussl</li> <li>deep learning approaches</li> <li>datasets</li> <li>training deep networks</li> </ul></li> <li>Brian’s comments: <ul> <li>Very cool this is an open source book</li> <li>Even if you don’t care about source separation, the primer on waveform digitization is amazing.</li> <li>The interactive features are great.</li> </ul></li> </ul> <p><strong>Michael #5:</strong> <a href="https://realpython.com/python-pass-by-reference/"><strong>Pass by Reference in Python: Background and Best Practices</strong></a></p> <ul> <li>Does Python have pointers?</li> <li>Some languages handle function arguments as <strong>references</strong> to existing variables, which is known as <strong>pass by reference</strong>. Other languages handle them as <strong>independent values</strong>, an approach known as <strong>pass by value</strong>.</li> <li>Python uses pass by assignment, very similar to pass by ref.</li> <li>In languages that default to passing by value, you may find performance benefits from passing the variable by reference instead</li> <li>If you actually want to change the value, consider <ul> <li>Returning multiple values with tuple unpacking</li> <li>A mutable data type</li> <li>Returning optional “value” types</li> <li>For example, how would we recreate this in Python? public static bool TryParse (string s, out int result);</li> </ul></li> <li>Tuple unpacking</li> </ul> <pre><code> def tryparse(string, base=10): try: return True, int(string, base=base) except ValueError: return False, None </code></pre> <pre><code> success, result = tryparse("123") </code></pre> <ul> <li>Optional types:</li> </ul> <pre><code> def tryparse(string, base=10) -&gt; Optional[int]: try: return int(string, base=base) except ValueError: return None </code></pre> <pre><code> if (n := tryparse("123")) is not None: print(n) </code></pre> <ul> <li>Best Practice: Return and Reassign</li> </ul> <p><strong>Brian #6:</strong> <a href="https://onlywei.github.io/explain-git-with-d3/"><strong>Visualizing Git Concepts</strong></a></p> <ul> <li>by <a href="https://github.com/onlywei">onlywei</a> Wei Wang</li> <li><a href="https://git-scm.com/book/en/v2/Git-Basics-Recording-Changes-to-the-Repository">Git Basics</a> is good, and important, but hard to get all these concepts to sink in well until you play with it.</li> <li><a href="https://onlywei.github.io/explain-git-with-d3/">Visualizing Git Concepts with D3</a> solidifies the concepts</li> <li>Practice using git commands without any code, just visualizing the changes to the repository (and sometimes the remote origin repository) while typing commands. <ul> <li>commit, branch, checkout, checkout -b</li> <li>reset, revert</li> <li>merge, rebase</li> <li>tag</li> <li>fetch, pull, push</li> </ul></li> <li>Incredibly powerful to be able to play around with these concepts without using any code or possibly mucking up your repo.</li> </ul> <p>Extras:</p> <p>Brian: </p> <ul> <li><a href="https://microbit.org/new-microbit/">micro:bit now has a speaker and a microphone</a> - available in November</li> </ul> <p>Michael:</p> <ul> <li><a href="https://twitter.com/mkennedy/status/1316837032916705280"><strong>Firefox containers</strong></a></li> <li><a href="https://twitter.com/ChristosMatskas/status/1318551481021272064"><strong>Twitch!</strong></a> </li> </ul> <p>Joke:</p> <p><strong>Q:</strong> Where do developers drink? <strong>A:</strong> The Foo bar</p> <p><strong>-</strong> Knock Knock! <strong>-</strong> An async function <strong>-</strong> Who's there?</p>

from Planet Python
via read more

Weekly Python StackOverflow Report: (ccxlviii) stackoverflow python report

These are the ten most rated questions at Stack Overflow last week.
Between brackets: [question score / answers count]
Build date: 2020-10-31 15:38:41 GMT


  1. Unpacking: [x,y], (x,y), x,y - what is the difference? - [13/2]
  2. How is floor division not giving result according to the documented rule? - [8/1]
  3. How to calculate the size of blocks of values in a list? - [7/5]
  4. pandas read csv ignore ending semicolon of last column - [7/3]
  5. Update during resize in Pygame - [6/1]
  6. How to run a Julia file, which uses a package, in Python? - [6/1]
  7. Dynamic python module import and numba - [6/0]
  8. Unordered list as dict key - [5/4]
  9. Pandas .loc and PEP8 - [5/1]
  10. Efficient elementwise argmin of matrix-vector difference - [5/1]


from Planet Python
via read more

Kushal Das: Alembic migration errors on SQLite

We use SQLite3 as the database in SecureDrop. We use SQLAlchemy to talk the database and Alembic for migrations. Some of those migrations are written by hand.

Most of my work time in the last month went to getting things ready for Ubuntu Focal 20.04. We currently use Ubuntu Xenial 16.04. During this, I noticed 17 test failures related to the Alembic on Focal but works fine on Xenial. After digging a bit more, these are due to the missing reference to temporary tables we used during migrations. With some more digging, I found this entry on the SQLite website:

Compatibility Note: The behavior of ALTER TABLE when renaming a table was enhanced in versions 3.25.0 (2018-09-15) and 3.26.0 (2018-12-01) in order to carry the rename operation forward into triggers and views that reference the renamed table. This is considered an improvement. Applications that depend on the older (and arguably buggy) behavior can use the PRAGMA legacy_alter_table=ON statement or the SQLITE_DBCONFIG_LEGACY_ALTER_TABLE configuration parameter on sqlite3_db_config() interface to make ALTER TABLE RENAME behave as it did prior to version 3.25.0.

This is what causing the test failures as SQLite upgraded to 3.31.1 on Focal from 3.11.0 on Xenial.

According to the docs, we can fix the error by adding the following in the env.py.

diff --git a/securedrop/alembic/env.py b/securedrop/alembic/env.py
index c16d34a5a..d6bce65b5 100644
--- a/securedrop/alembic/env.py
+++ b/securedrop/alembic/env.py
@@ -5,6 +5,8 @@ import sys
 
 from alembic import context
 from sqlalchemy import engine_from_config, pool
+from sqlalchemy.engine import Engine
+from sqlalchemy import event
 from logging.config import fileConfig
 from os import path
 
@@ -16,6 +18,12 @@ fileConfig(config.config_file_name)
 sys.path.insert(0, path.realpath(path.join(path.dirname(__file__), '..')))
 from db import db  # noqa
 
+@event.listens_for(Engine, "connect")
+def set_sqlite_pragma(dbapi_connection, connection_record):
+    cursor = dbapi_connection.cursor()
+    cursor.execute("PRAGMA legacy_alter_table=ON")
+    cursor.close()
+
 try:
     # These imports are only needed for offline generation of automigrations.
     # Importing them in a prod-like environment breaks things.

Later, John found an even simpler way to do the same for only the migrations impacted.


from Planet Python
via read more

Friday, October 30, 2020

NumFOCUS: Public Apology to Jeremy Howard

We, the NumFOCUS Code of Conduct Enforcement Committee, issue a public apology to Jeremy Howard for our handling of the JupyterCon 2020 reports. We should have done better. We thank you for sharing your experience and we will use it to improve our policies going forward. We acknowledge that it was an extremely stressful experience, […]

The post Public Apology to Jeremy Howard appeared first on NumFOCUS.


from Planet Python
via read more

TARDIS Joins NumFOCUS as a Sponsored Project

NumFOCUS is pleased to announce the newest addition to our fiscally sponsored projects: TARDIS TARDIS is an open-source, Monte Carlo based radiation transport simulator for supernovae ejecta. TARDIS simulates photons traveling through the outer layers of an exploded star including relevant physics like atomic interactions between the photons and the expanding gas. The TARDIS collaboration […]

The post TARDIS Joins NumFOCUS as a Sponsored Project appeared first on NumFOCUS.


from Planet SciPy
read more

PythonClub - A Brazilian collaborative blog about Python: Fazendo backup do banco de dados no Django

Apresentação

Em algum momento, durante o seu processo de desenvolvimento com Django, pode ser que surja a necessidade de criar e restaurar o banco de dados da aplicação. Pensando nisso, resolvi fazer um pequeno tutorial, básico, de como realizar essa operação.

Nesse tutorial, usaremos o django-dbbackup, um pacote desenvolvido especificamente para isso.

Configurando nosso ambiente

Primeiro, partindo do início, vamos criar uma pasta para o nosso projeto e, nela, isolar o nosso ambiente de desenvolvimento usando uma virtualenv:

mkdir projeto_db && cd projeto_db #criando a pasta do nosso projeto

virtualenv -p python3.8 env && source env/bin/activate #criando e ativando a nossa virtualenv

Depois disso e com o nosso ambiente já ativo, vamos realizar os seguintes procedimentos:

pip install -U pip #com isso, atualizamos a verão do pip instalado

Instalando as dependências

Agora, vamos instalar o Django e o pacote que usaremos para fazer nossos backups.

pip install Django==3.1.2 #instalando o Django

pip install django-dbbackup #instalando o django-dbbackup

Criando e configurando projeto

Depois de instaladas nossas dependências, vamos criar o nosso projeto e configurar o nosso pacote nas configurações do Django.

django-admin startproject django_db . #dentro da nossa pasta projeto_db, criamos um projeto Django com o nome de django_db.

Depois de criado nosso projeto, vamos criar e popular o nosso banco de dados.

python manage.py migrate #com isso, sincronizamos o estado do banco de dados com o conjunto atual de modelos e migrações.

Criado nosso banco de dados, vamos criar um superusuário para podemos o painel admin do nosso projeto.

python manage.py createsuperuser

Perfeito. Já temos tudo que precisamos para executar nosso projeto. Para execução dele, é só fazermos:

python manage.py runserver

Você terá uma imagem assim do seu projeto:

Configurando o django-dbbackup

Dentro do seu projeto, vamos acessar o arquivo settings.py, como expresso abaixo:

django_db/
├── settings.py

Dentro desse arquivos iremos, primeiro, adiconar o django-dbbackup às apps do projeto:

INSTALLED_APPS = (
    ...
    'dbbackup',  # adicionando django-dbbackup
)

Depois de adicionado às apps, vamos dizer para o Django o que vamos salvar no backup e, depois, indicar a pasta para onde será encaminhado esse arquivo. Essa inserção deve ou pode ser feita no final do arquivo settings.py:

DBBACKUP_STORAGE = 'django.core.files.storage.FileSystemStorage' #o que salvar
DBBACKUP_STORAGE_OPTIONS = {'location': 'backups/'} # onde salvar

Percebam que dissemos para o Django salvar o backup na pasta backups, mas essa pasta ainda não existe no nosso projeto. Por isso, precisamos criá-la [fora da pasta do projeto]:

mkdir backups

Criando e restaurando nosso backup

Já temos tudo pronto. Agora, vamos criar o nosso primeiro backup:

python manage.py dbbackup

Depois de exetudado, será criado um arquivo -- no nosso exemplo, esse arquivo terá uma extensão .dump --, salvo na pasta backups. Esse arquivo contem todo backup do nosso banco de dados.

Para recuperarmos nosso banco, vamos supor que migramos nosso sistema de um servidor antigo para um novo e, por algum motivo, nossa base de dados foi corrompida, inviabilizando seu uso. Ou seja, estamos com o sistema/projeto sem banco de dados -- ou seja, exlua ou mova a a sua base dados .sqlite3 para que esse exemplo seja útil --, mas temos os backups. Com isso, vamos restaurar o banco:

python manage.py dbrestore

Prontinho, restauramos nosso banco de dados. O interessante do django-dbbackup, dentre outras coisas, é que ele gera os backups com datas e horários específicos, facilitando o processo de recuperação das informações mais recentes.

Por hoje é isso, pessoal. Até a próxima. ;)


from Planet Python
via read more

Real Python: The Real Python Podcast – Episode #33: Going Beyond the Basic Stuff With Python and Al Sweigart

You probably have heard of the bestselling Python book, "Automate the Boring Stuff with Python." What are the next steps after starting to dabble in the Python basics? Maybe you've completed some tutorials, created a few scripts, and automated repetitive tasks in your life. This week on the show, we have author Al Sweigart to talk about his new book, "Beyond the Basic Stuff with Python: Best Practices for Writing Clean Code."


[ Improve Your Python With 🐍 Python Tricks 💌 – Get a short & sweet Python Trick delivered to your inbox every couple of days. >> Click here to learn more and see examples ]


from Planet Python
via read more

Reuven Lerner: Join the data revolution with my “Intro to SQL” course!

Have you heard? Data is “the new oil” — meaning, data is the most valuable and important thing in the modern world. Which means that if you can store, retrieve, and organize your data, then you (and your company) are positioned for greater success.

This usually means working with a database — and frequently, a relational database, with which you communicate using a language called SQL.

In other words: SQL is the key to the modern data revolution. But too often, people are put off from learning SQL. It seems weird, even when compared with a programming language.

Well, I have good news: If you want to join the data revolution and work with databases, I’m offering a new course. On November 15th, I’ll be teaching a live, 4-hour online course, “Intro to SQL.” I’ll teach you the basics of what you need to work with a database.

The course includes:

  • Access to the live, 4-hour online course, including numerous exercises and opportunities for Q&A
  • Access to the course recording, forever
  • Participation in our private forum, where you can ask me (and others) database-related questions

I’ve been using databases since 1995, and have been teaching SQL for more than 20 years. This course is based on that corporate training, and is meant to get you jump started into the world of data and relational databases. We’ll be using PostgreSQL, a powerful open-source database I’ve been using for more than two decades.

Questions? Learn more at https://store.lerner.co.il/intro-to-sql (where there’s an extensive FAQ). Or contact me on Twitter (@reuvenmlerner) or via e-mail (reuven@lerner.co.il). I’ll answer as soon as I can.

I hope to see you there!

The post Join the data revolution with my “Intro to SQL” course! appeared first on Reuven Lerner.


from Planet Python
via read more

The Real Python Podcast – Episode #33: Going Beyond the Basic Stuff With Python and Al Sweigart

You probably have heard of the bestselling Python book, "Automate the Boring Stuff with Python." What are the next steps after starting to dabble in the Python basics? Maybe you've completed some tutorials, created a few scripts, and automated repetitive tasks in your life. This week on the show, we have author Al Sweigart to talk about his new book, "Beyond the Basic Stuff with Python: Best Practices for Writing Clean Code."


[ Improve Your Python With 🐍 Python Tricks 💌 – Get a short & sweet Python Trick delivered to your inbox every couple of days. >> Click here to learn more and see examples ]


from Real Python
read more

How to Train Your Own Object Detector Using Tensorflow Object Detection API

Object detection is a computer vision task that has recently been influenced by the progress made in Machine Learning.  In the past,...

The post How to Train Your Own Object Detector Using Tensorflow Object Detection API appeared first on neptune.ai.


from Planet SciPy
read more

Thursday, October 29, 2020

Python Engineering at Microsoft: Python in Visual Studio Code – October 2020 Release

We are pleased to announce that the October 2020 release of the Python Extension for Visual Studio Code is now available. You can download the Python extension from the Marketplace, or install it directly from the extension gallery in Visual Studio Code. If you already have the Python extension installed, you can also get the latest update by restarting Visual Studio Code. You can learn more about Python support in Visual Studio Code in the documentation.

This was a short release where we addressed 14 issues, and it includes debugpy 1.0!

If you’re interested, you can check the full list of improvements in our changelog.

Debugpy 1.0

We’re excited to announce that we’re releasing the 1.0 version of our debugger, debugpy, that was first announced in March this year.

Debugpy offers a great number of features that can help you understand bugs, errors and unexpected behaviors in your code. You can find an extensive list on our documentation, but check below for some of our favorite ones!

Debugging Web Apps

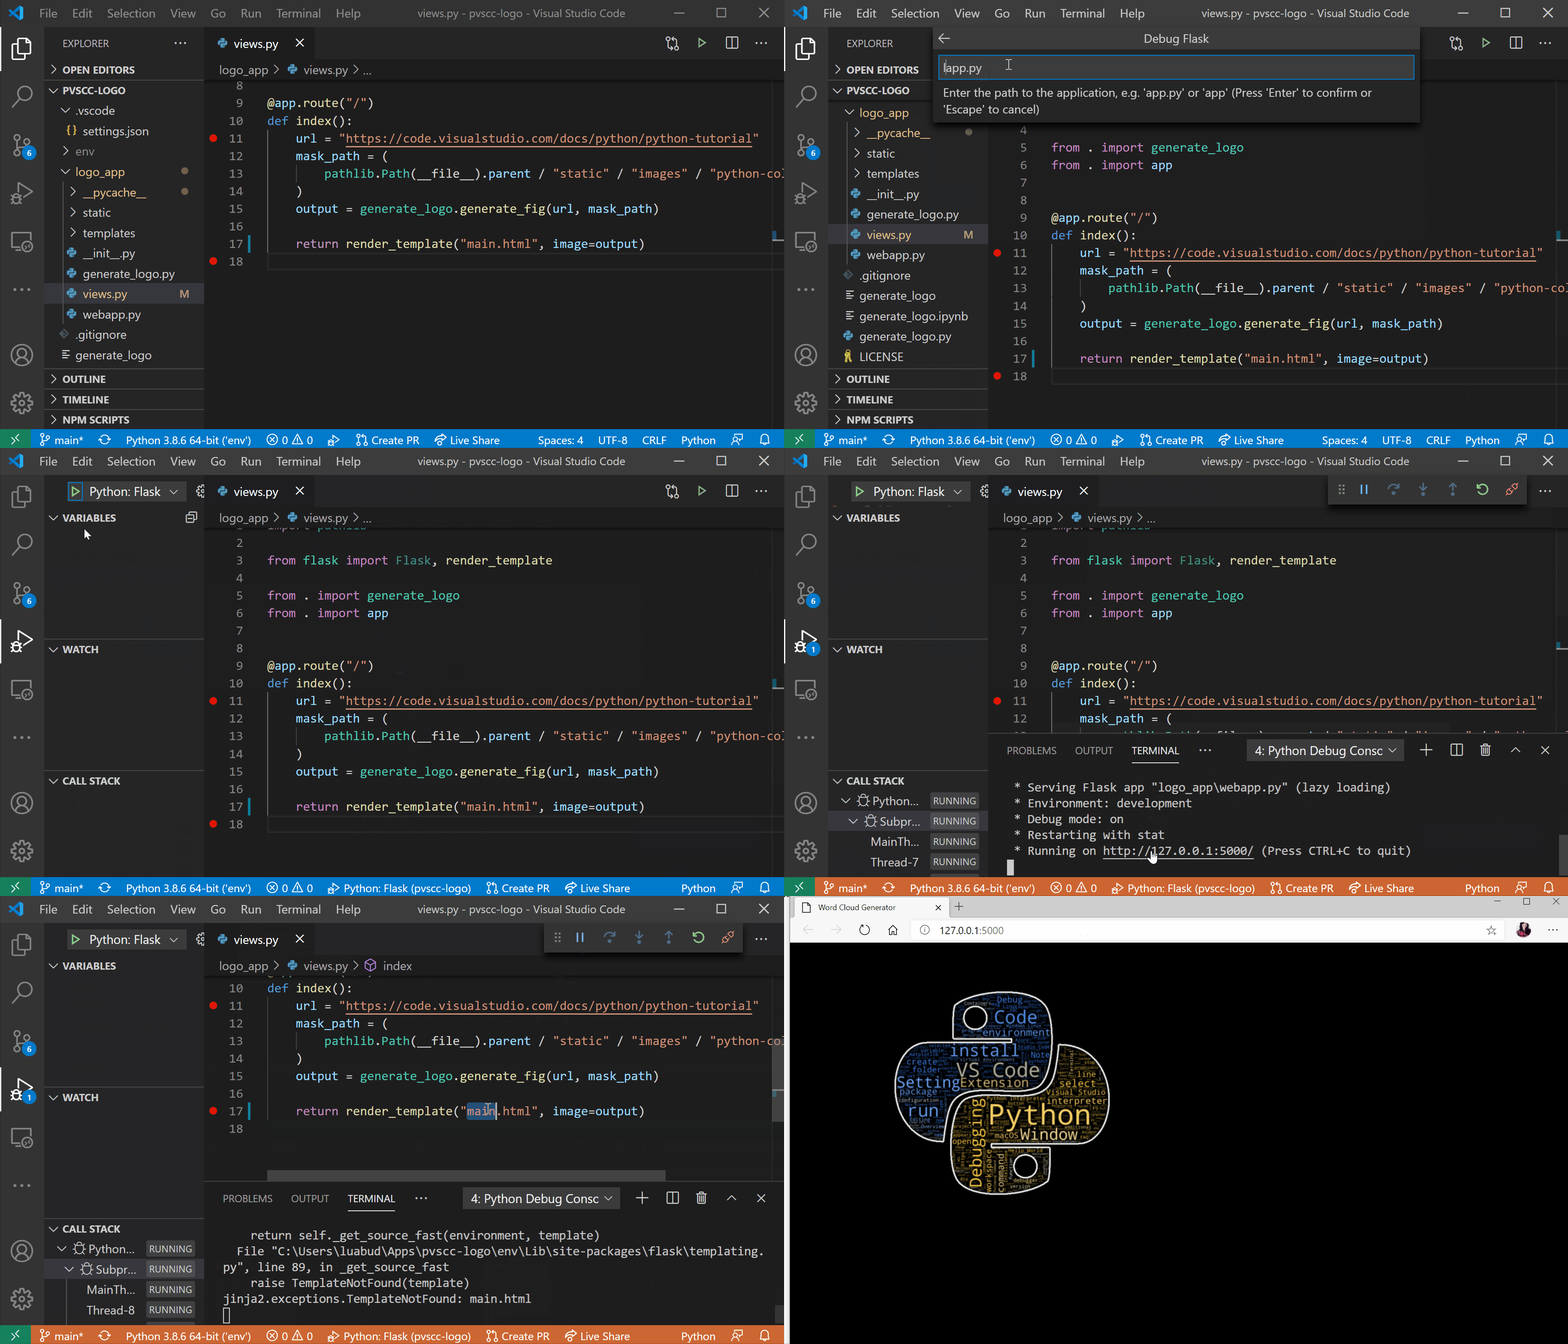
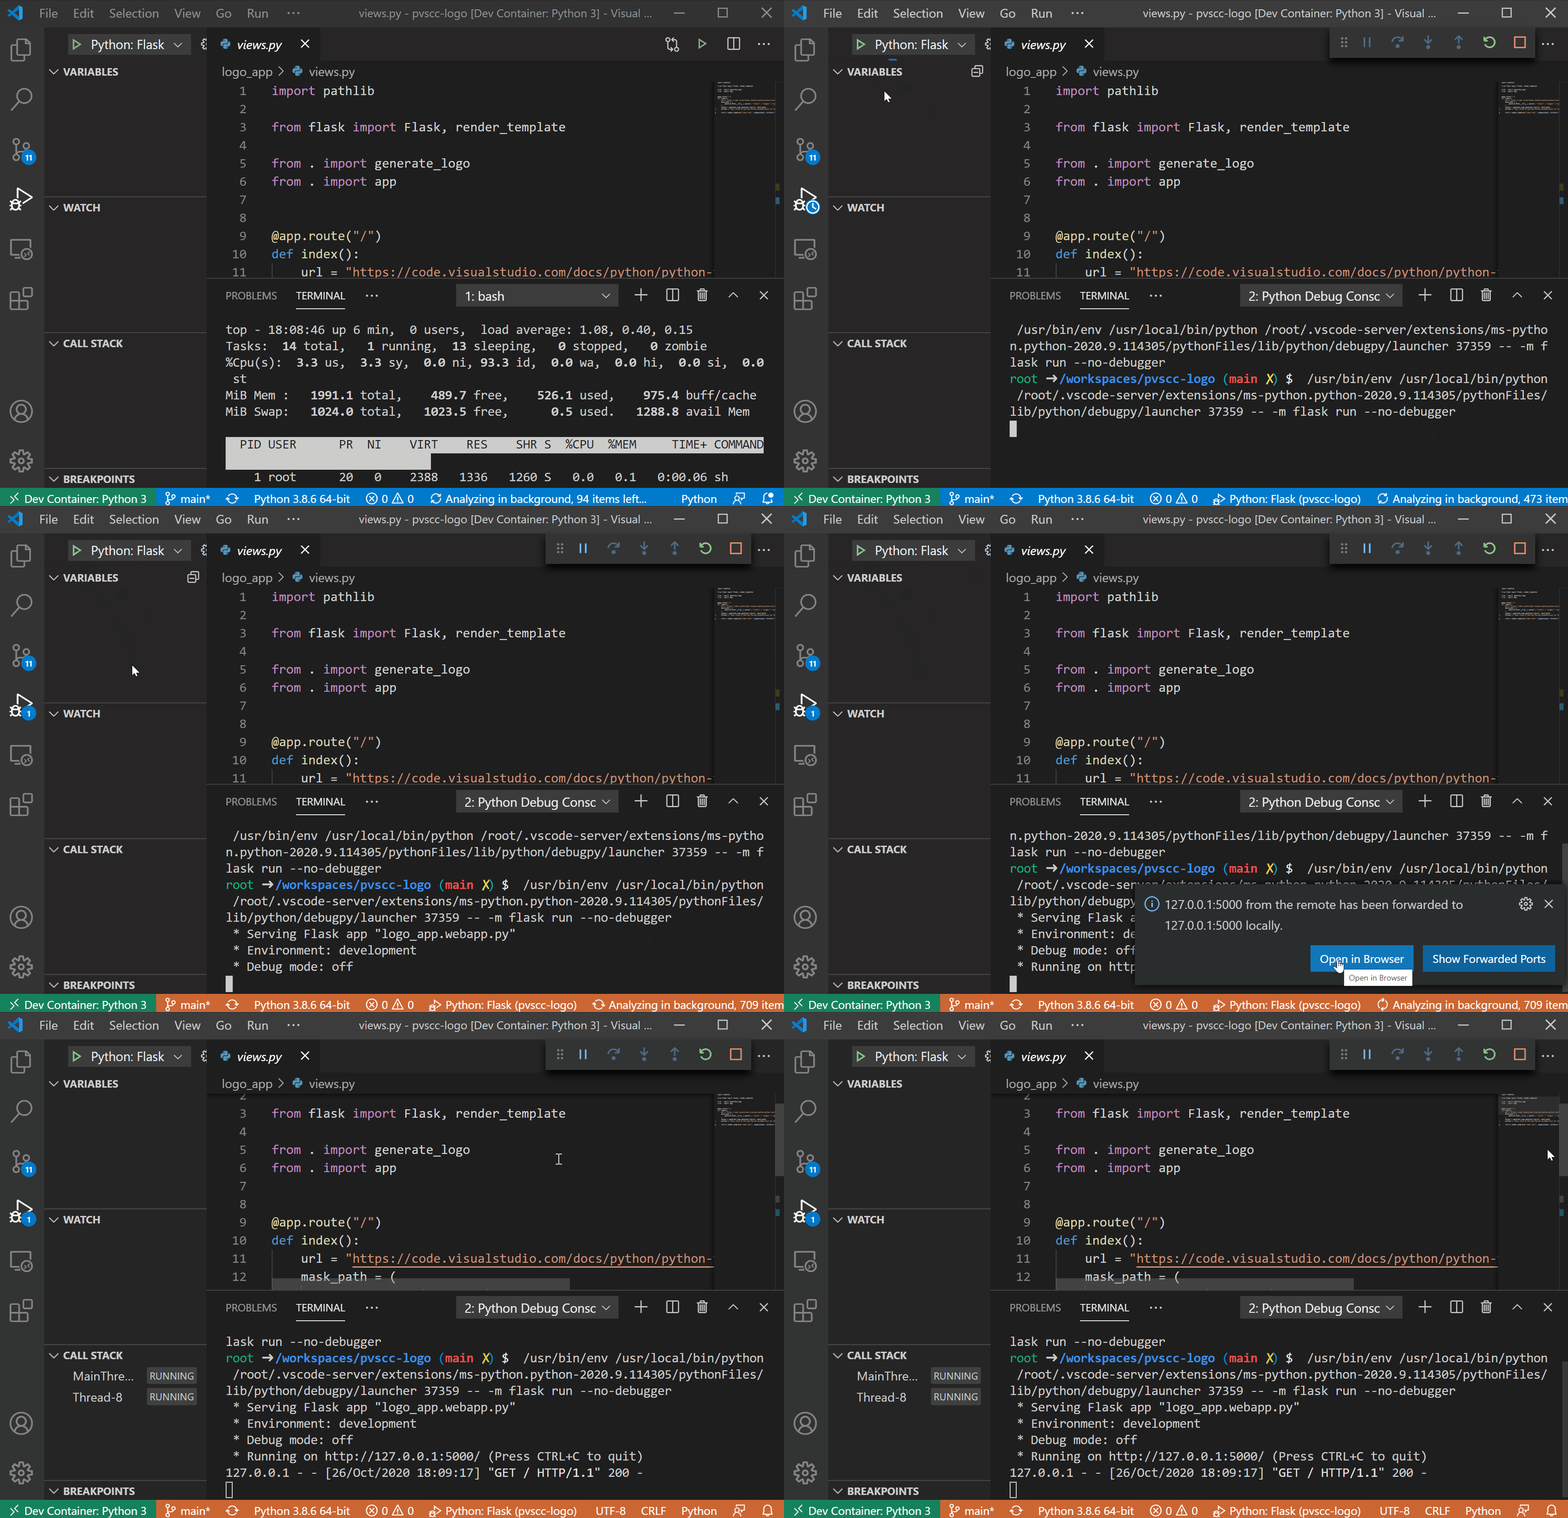
Debugpy supports live reload of web applications, such as Django and Flask apps, when debugging. This means that when you make edits to your application, you don’t need to restart the debugger to get them applied: the web server is automatically reloaded in the same debugging session once the changes are saved.  

To try it out, open a web application and add a debug configuration (by clicking on Run > Add Configuration…, or by opening the Run view and clicking on create launch.json file).  Then select the framework used in your web application – in this example, we selected Flask. 

Now you hit F5 to start debugging, and then just watch the application reload once you make a change and save it!

Live reload of Flask application when debugging

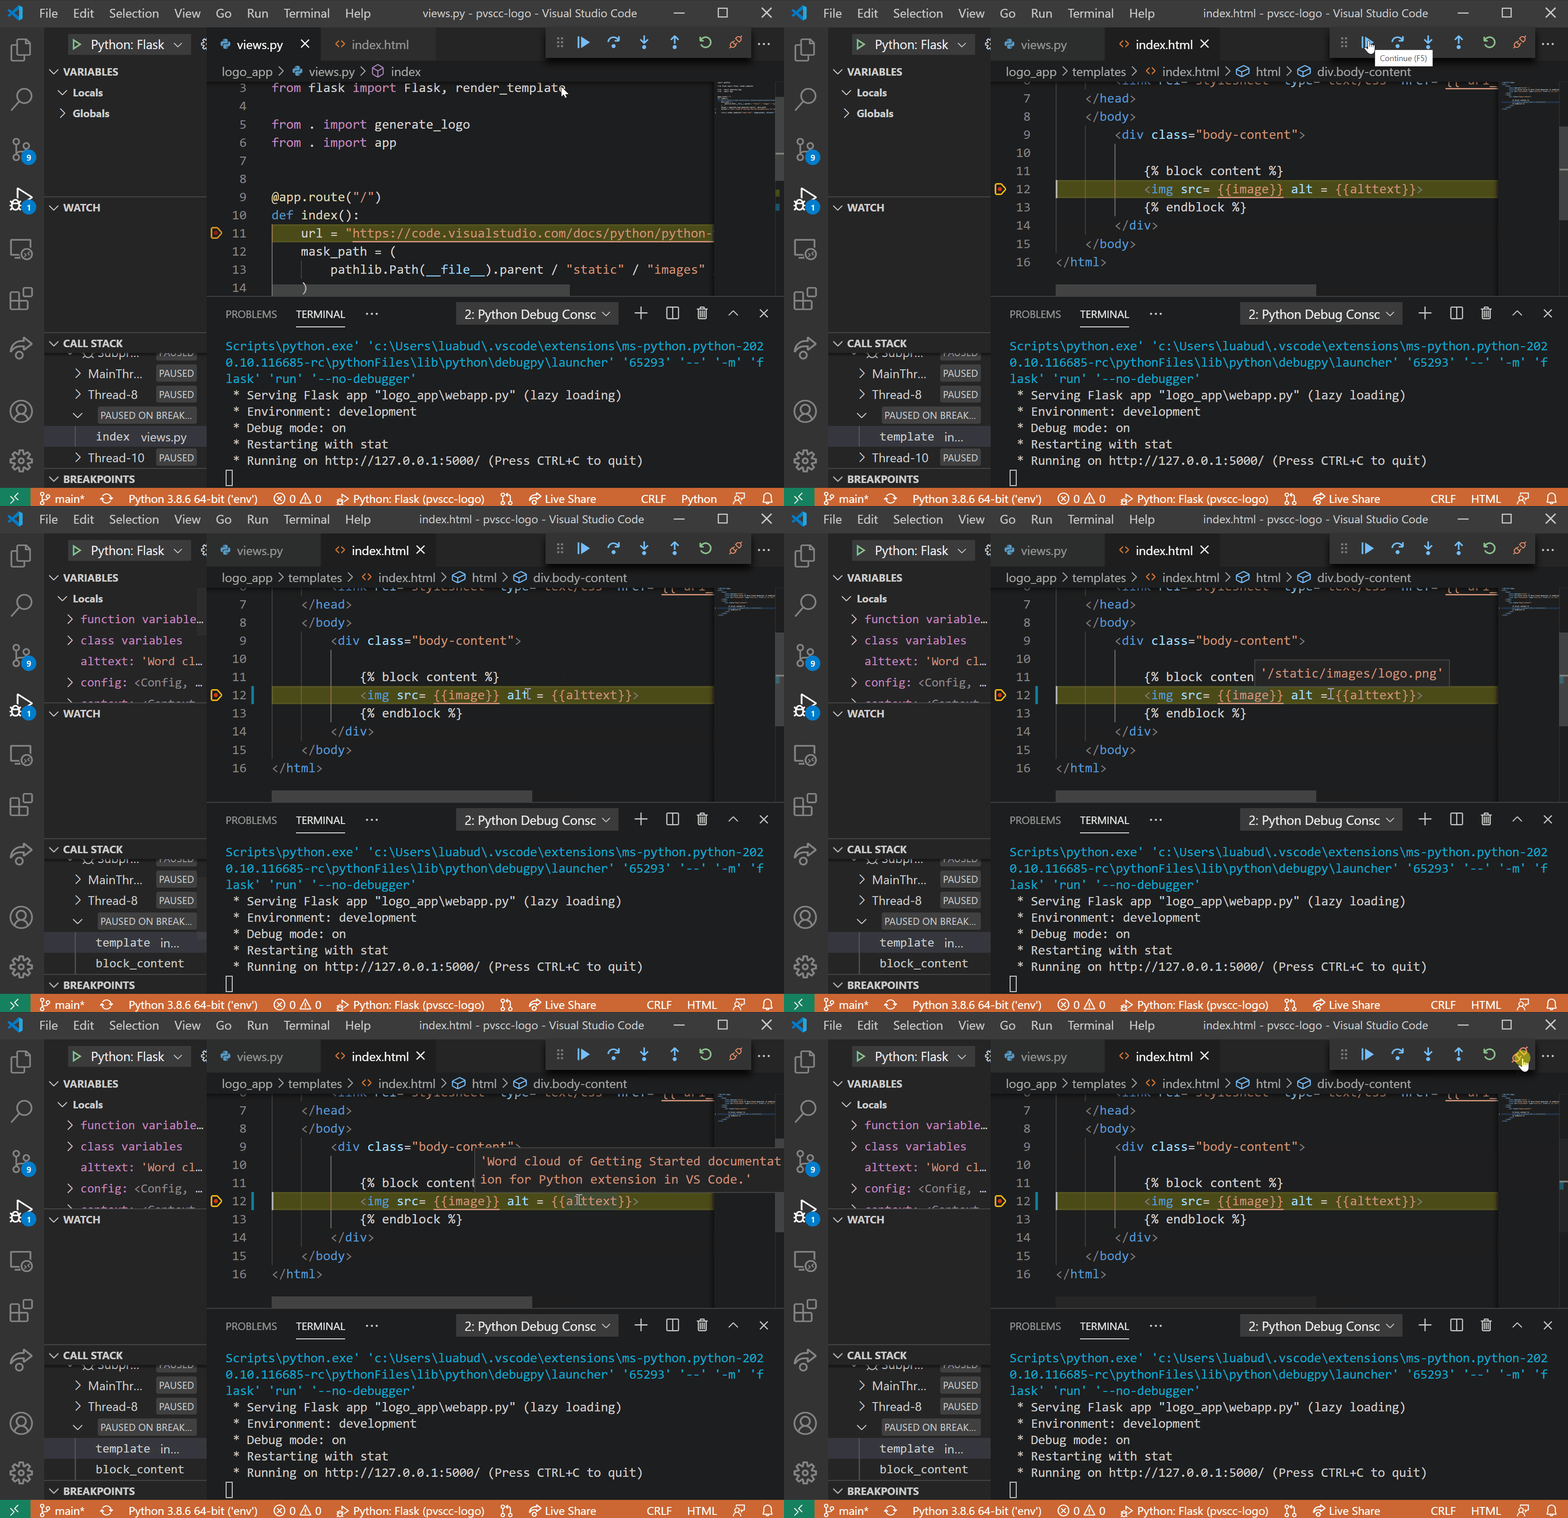
You can also debug Django and Flask HTML templates. Just set up breakpoints to the relevant lines in the HTML files and watch the magic happen:

Execution stopping on breakpoint in a template file

Debugging local processes

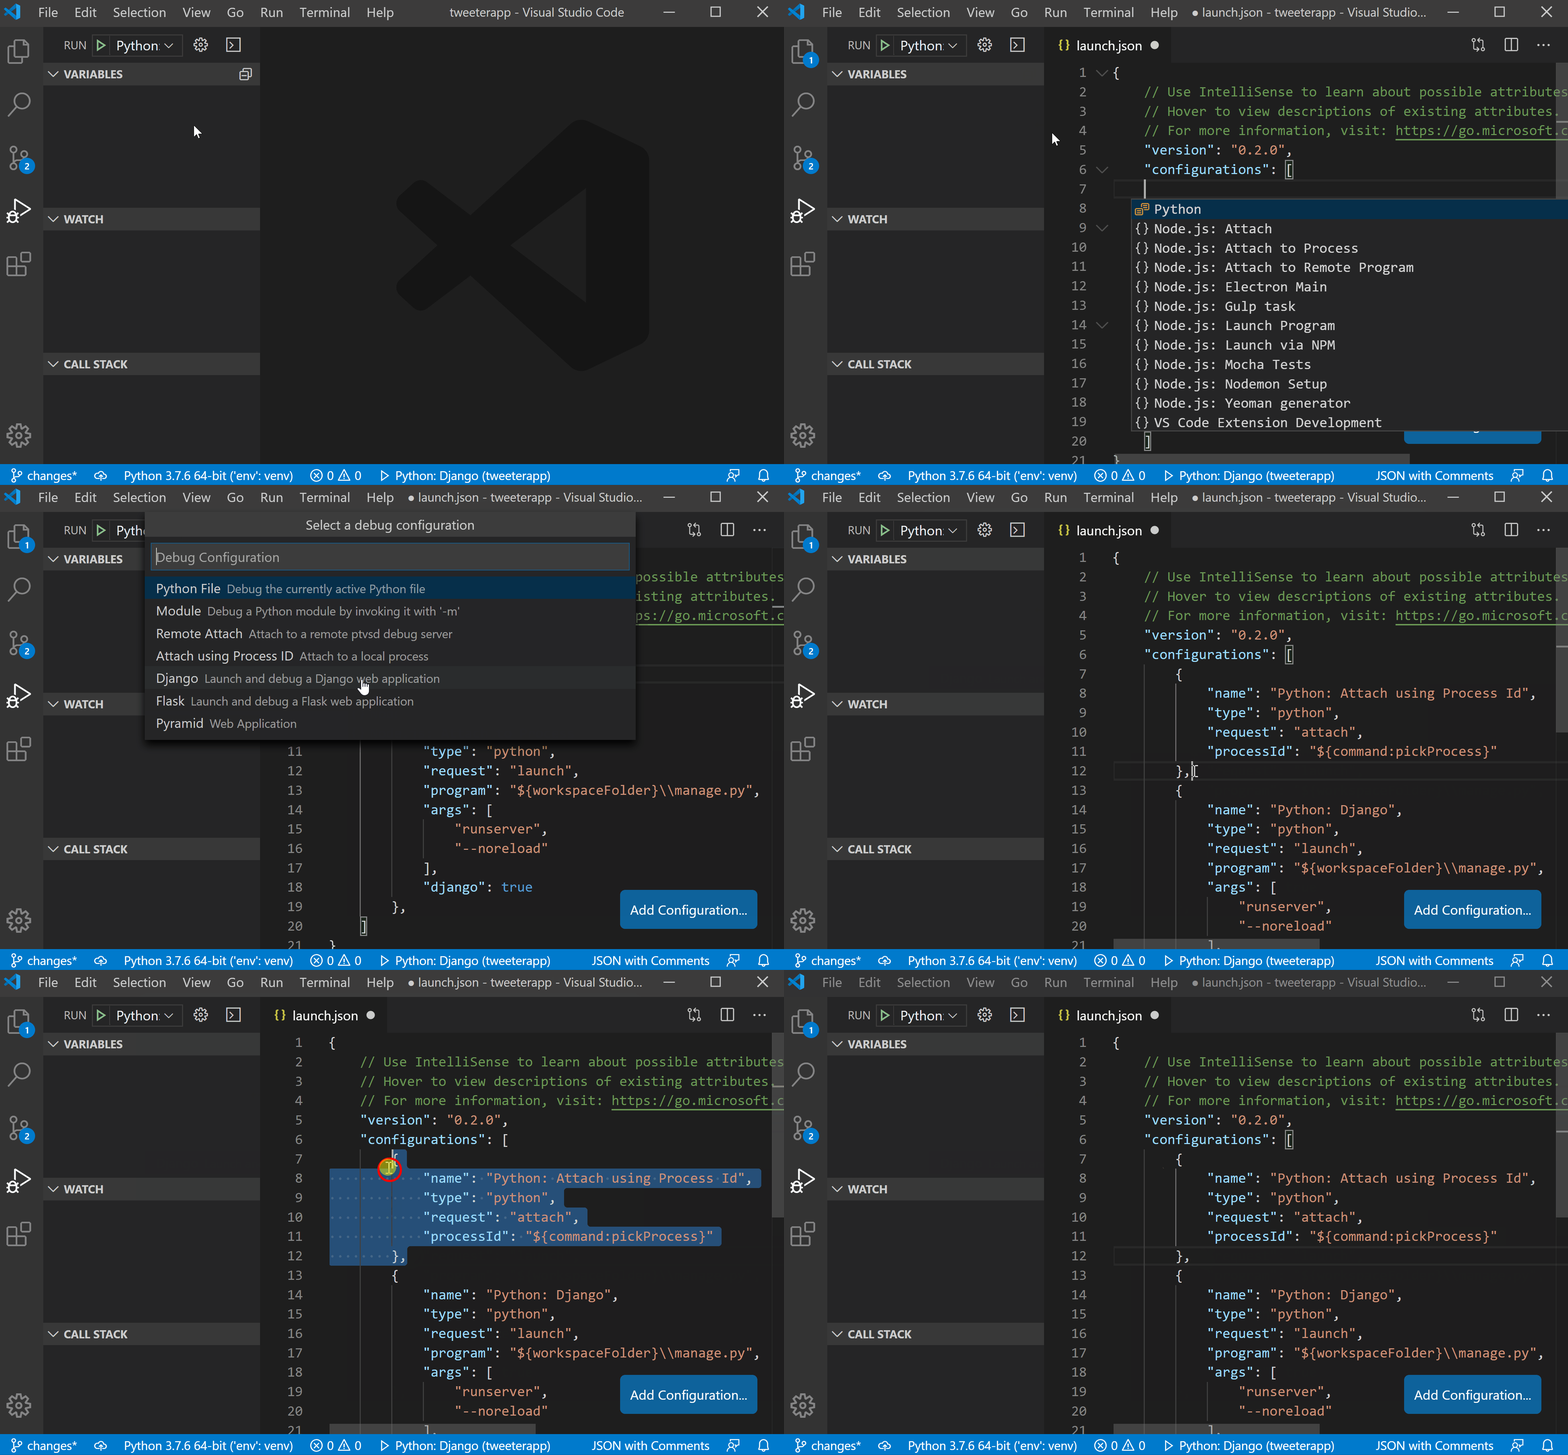
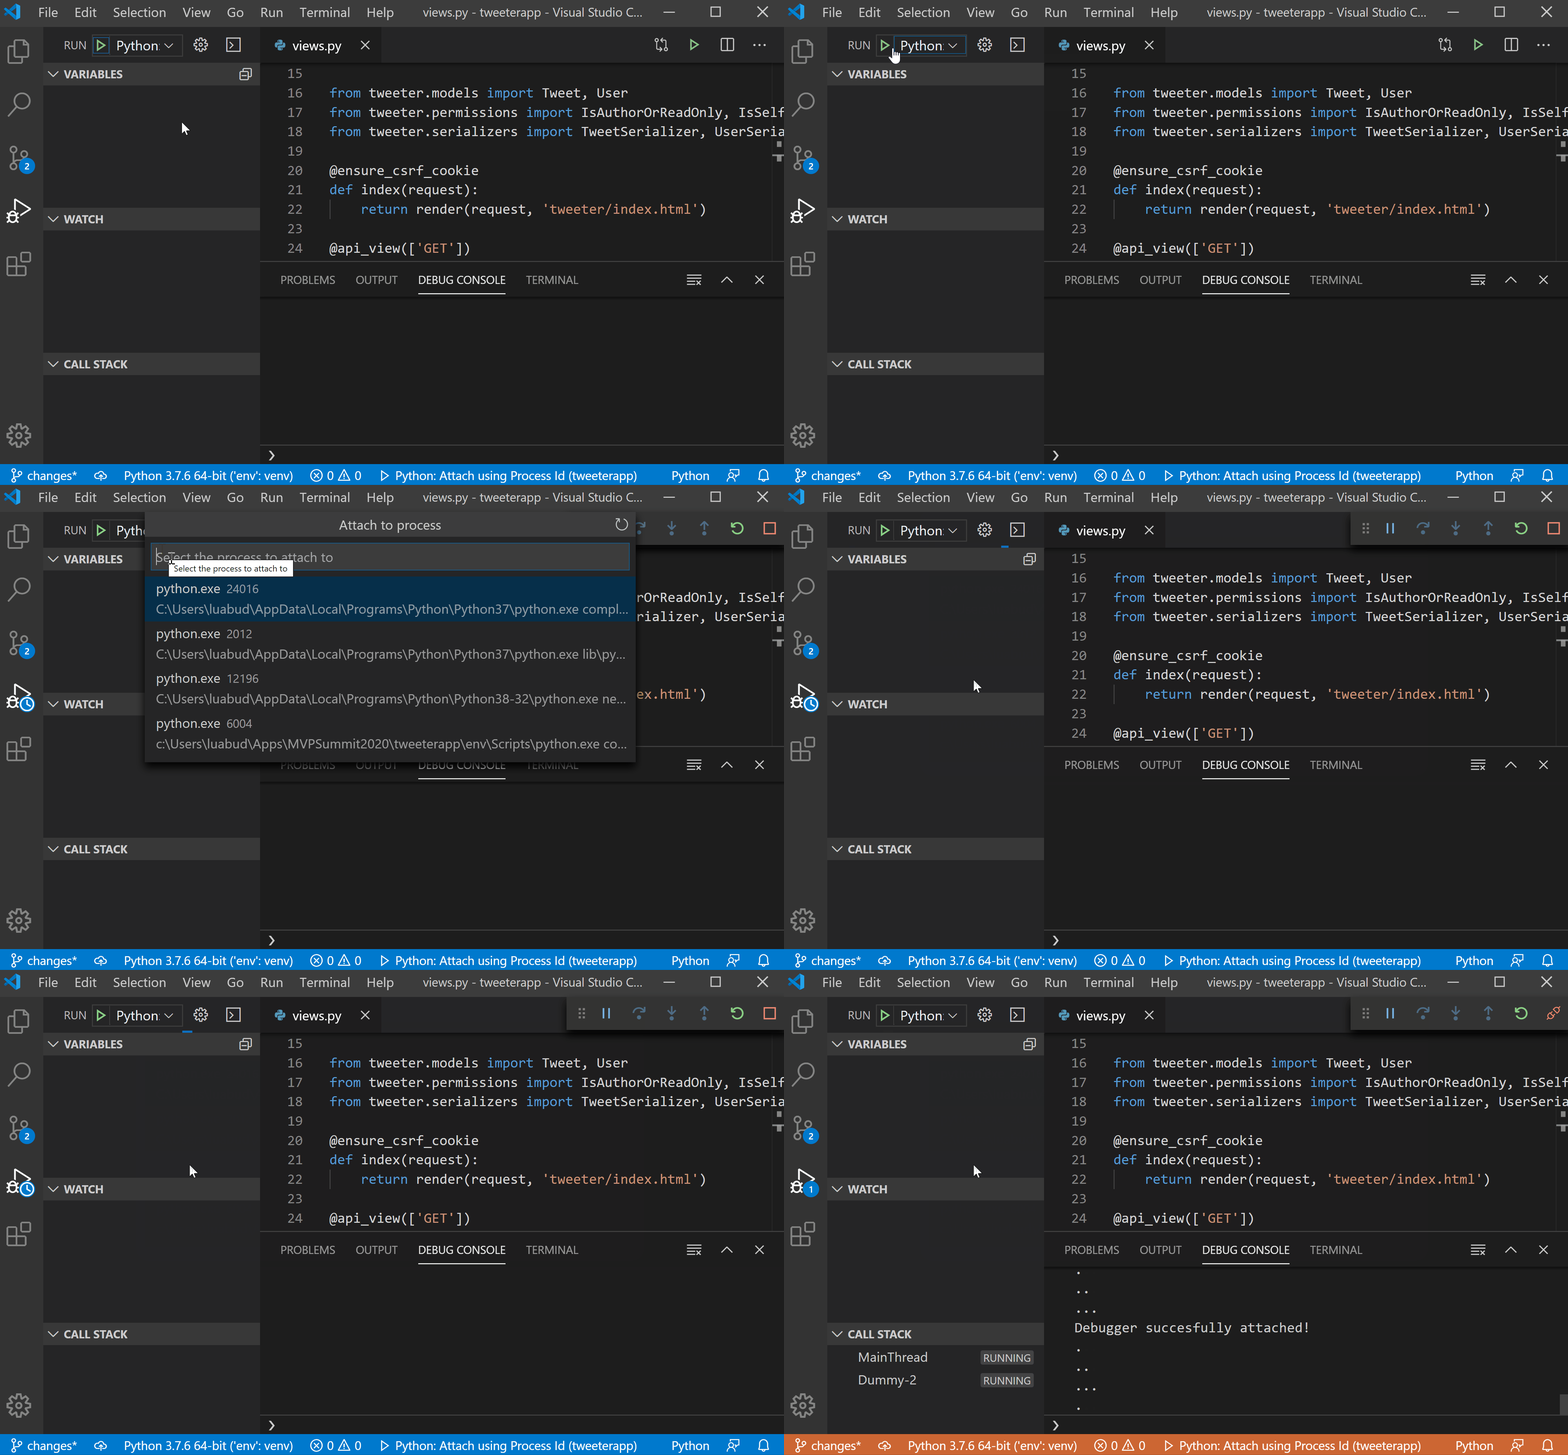
With the debugpy and the Python extension, you can get a list of processes running locally, and easily select one to attach debugpy to. Or, if you know the process ID, you can also add it directly to the “Attach using Process Id” configuration in the launch.json file:

Adding configuration for the debugger to attach to a local process

Attaching the debugger to a process running locally

Debugging remotely

Remote Development Extensions

You can use debugpy to debug your applications inside remote environments like Docker containers or remote machines (or even in WSL!) through the Remote Development extension. It allows VS Code to work seamlessly by running a light-weight server in the remote environment, while providing the same development experience as you get when developing locally:

Running the debugger inside a docker container

This way, you can use the same configurations for debugpy as you would locally – but it will actually be installed and executed in the remote scope. No more messing around with your local environment!

You can learn more about the VS Code Remote Development extensions on the documentation.

Remote attach

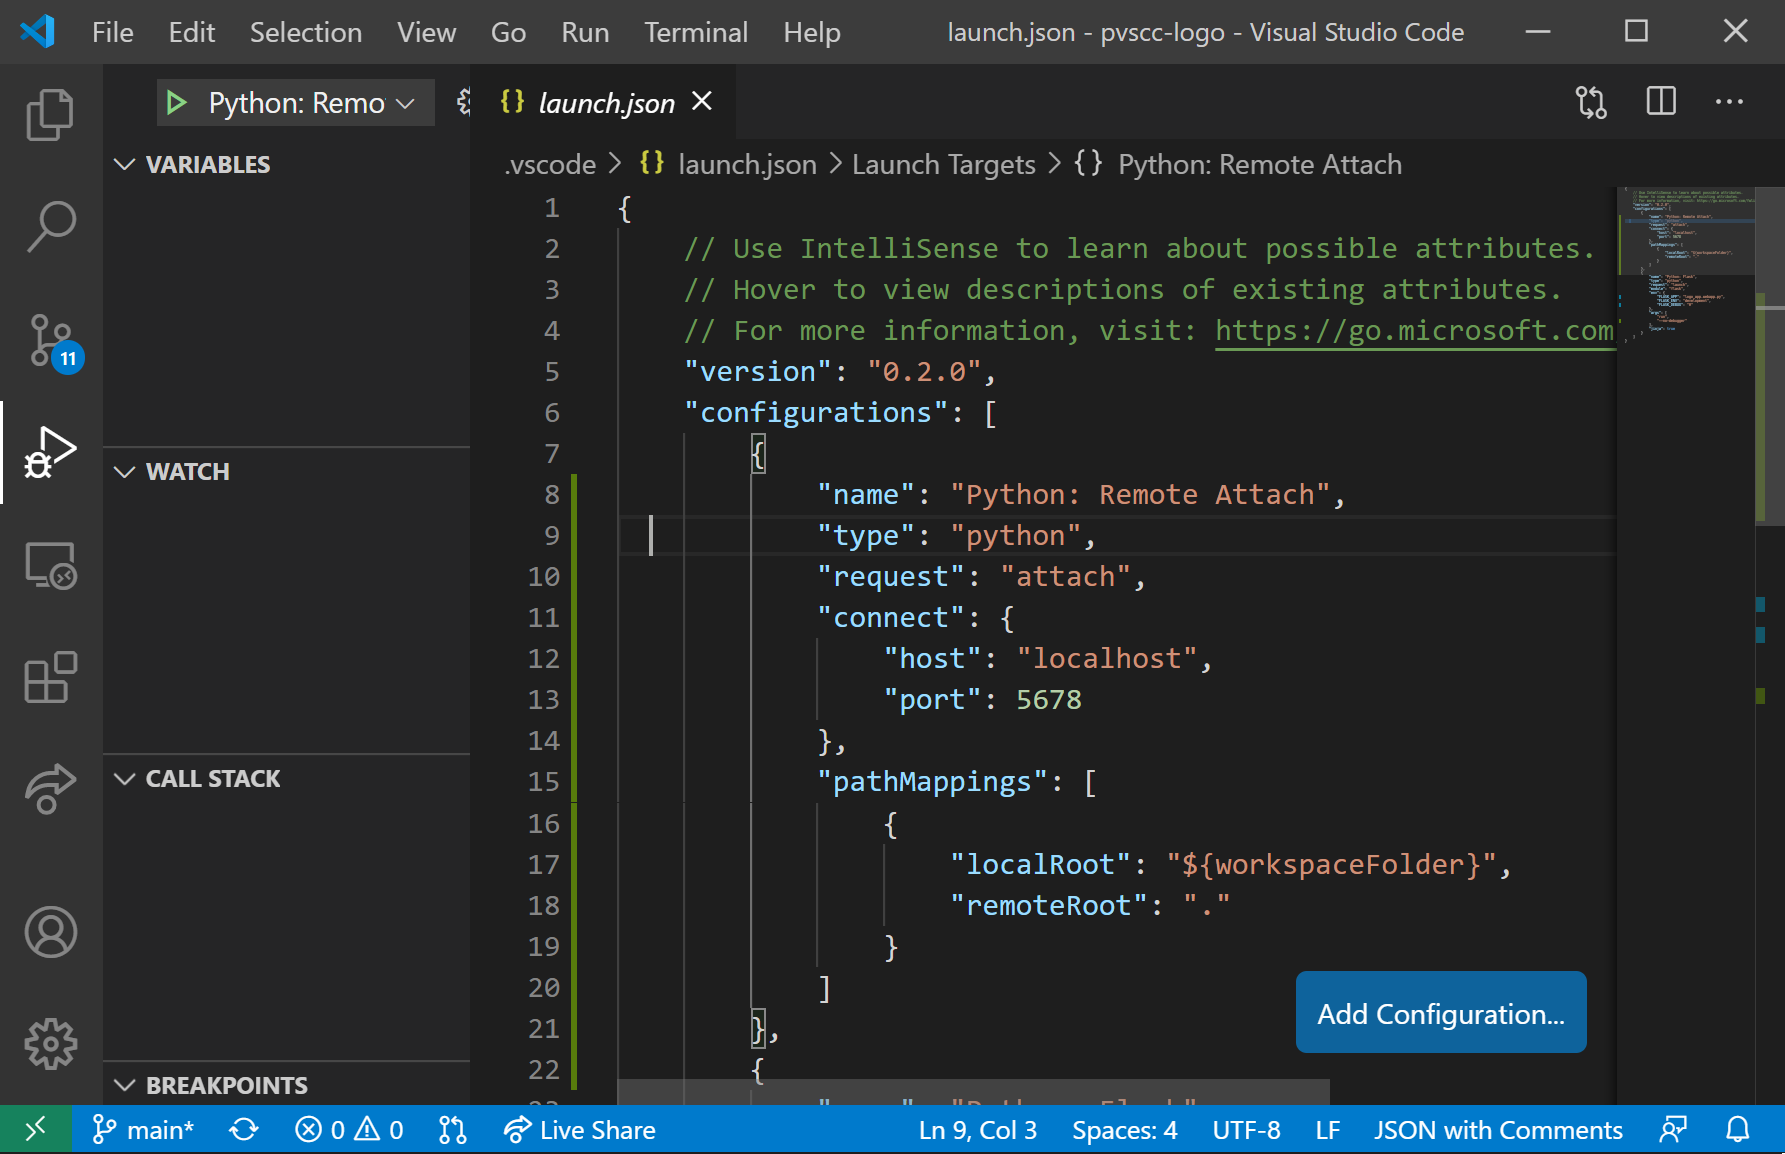
You can also configure the debugger to attach to a debugpy server running on a remote machine. All you need to provide is the host name and the port number the debugpy server is listening to in the remote environment:

Configuration for attaching the debugger to a remote machine

You can learn more about remote debugging in the documentation.

Other changes and enhancements

We have also added small enhancements and fixed issues requested by users that should improve your experience working with Python in Visual Studio Code. Some notable changes include:

  • Fix exporting from the interactive window. (#14210)
  • Do not opt users out of the insiders program if they have a stable version installed. (#14090)

We’re constantly A/B testing new features. If you see something different that was not announced by the team, you may be part of the experiment! To see if you are part of an experiment, you can check the first lines in the Python extension output channel. If you wish to opt-out of A/B testing, you can open the user settings.json file (View > Command Palette… and run Preferences: Open Settings (JSON)) and set the “python.experiments.enabled” setting to false.

Be sure to download the Python extension for Visual Studio Code now to try out the above improvements. If you run into any problems or have suggestions, please file an issue on the Python VS Code GitHub page.

The post Python in Visual Studio Code – October 2020 Release appeared first on Python.


from Planet Python
via read more

4 Free Machine Learning Tools You Must Know (+ 2 That You Probably Never Heard of)

Machine learning is one of the most dynamic industries. But the growth in usage and popularity comes from delivering new, more sophisticated...

The post 4 Free Machine Learning Tools You Must Know (+ 2 That You Probably Never Heard of) appeared first on neptune.ai.


from Planet SciPy
read more

Python Morsels: Data structures contain pointers

Watch First:

Transcript

Data structures in Python don't actually contain objects. They references to objects (aka "pointers").

Referencing the same object in multiple places

Let's take a list of three zeroes:

>>> row = [0, 0, 0]

If we make a new list like this:

>>> matrix = [row, row, row]
>>> matrix
[[0, 0, 0], [0, 0, 0], [0, 0, 0]]

We'll end up with a list of lists of zeros. We now have three lists, and each of them has three zeros inside it.

If we change one of the values in this list of lists to 1:

>>> matrix[1][1] = 1

What do you think will happen? What do you expect will change?

We're asking to change the middle item in the middle list.

So, matrix[1] is referencing index one inside the matrix, which is the second list (the middle one). Index one inside of matrix[1] (i.e. matrix[1][1]) is the second element in that list, so we should be changing the middle zero in the middle list here.

That's not quite what happens:

>>> matrix
[[0, 1, 0], [0, 1, 0], [0, 1, 0]]

Instead we changed the middle number in every list!

This happened because our matrix list doesn't actually contain 3 lists, it contains three references to the same list:

>>> matrix[0] is matrix[1]
True

We talked about the fact that all variables in Python are actually pointers. **Variables point to objects, they don't contain objects: they aren't buckets containing objects

So unlike many other programming languages, Python's varibales are not buckets containing objects. Likewise, Python's data structures are also not buckets containing objects. Python's data structures contain pointers to objects, they don't contain the objects themselves.

If we look at the row list, we'll see that it's changed too:

>>> row
[0, 1, 0]

We stored three pointers to the same list. When we "changed" one of these lists, we mutated that list (one of our two types of change in Python). And that seems to change any variable that references that list.

So matrix[0], matrix[1], and row, all are exactly the same object. We can verify this using id:

>>> id(row)
1972632707784
>>> id(matrix[0])
1972632707784
>>> id(matrix[1])
1972632707784
>>> id(matrix[2])
1972632707784

Avoiding referencing the same object

If we wanted to avoid this issue, we could manually make a list of three lists:

>>> matrix = [[0, 0, 0], [0, 0, 0], [0, 0, 0]]
>>> matrix
[[0, 0, 0], [0, 0, 0], [0, 0, 0]]

This is not going to suffer from the same problem, because these are three independent lists.

>>> matrix[1][1] = 1
>>> matrix
[[0, 0, 0], [0, 1, 0], [0, 0, 0]]

They're different lists stored in different parts of memory:

>>> matrix[0] is matrix[1]
False
>>> matrix[0] is matrix[2]
False

An ouroboros: A list that contains itself

So data structures contain pointers, not objects.

This is the ultimate demonstration of this fact:

>>> x = []
>>> x.append(x)

The ultimate demonstration of this fact is that we can take a list and stick that list inside of itself:

At this point the first element (and only element) of this list is the list itself:

>>> x[0] is x
True

And the first element of that list is also the list itself:

>>> x[0][0] is x
True

We can index this list of lists as far down as we want because we've made an infinitely recursive data structure:

>>> x[0][0][0] is x
True
>>> x[0][0][0][0][0] is x
True

Python represents this list at the Python prompt by putting three dots inside those square brackets (it's smart enough not to show an infinite number of square brackets):

>>> x
[[...]]

We didn't stick a bucket inside itself here: we didn't stick a list inside of the same list. Instead we stuck a pointer to a list inside of itself.

Lists are allowed to store pointers to anything, even themselves.

Summary

The takeaway here is that just as variables in Python are pointers, data structures in Python contain pointers. You can't "contain" an object inside another object in Python, you can really only point to an object. You can only reference objects in Python. Lists, tuples, dictionaries, and all other data structures contain pointers.


from Planet Python
via read more

Stack Abuse: How to Sort a Dictionary by Value in Python

Introduction

A dictionary in Python is a collection of items that stores data as key-value pairs. In Python 3.7 and later versions, dictionaries are sorted by the order of item insertion. In earlier versions, they were unordered.

Let's have a look at how we can sort a dictionary on basis of the values they contain.

Sort Dictionary Using a for Loop

We can sort a dictionary with the help of a for loop. First, we use the sorted() function to order the values of the dictionary. We then loop through the sorted values, finding the keys for each value. We add these keys-value pairs in the sorted order into a new dictionary.

Note: Sorting does not allow you to re-order the dictionary in-place. We are writing the ordered pairs in a completely new, empty dictionary.

dict1 = {1: 1, 2: 9, 3: 4}
sorted_values = sorted(dict1.values()) # Sort the values
sorted_dict = {}

for i in sorted_values:
    for k in dict1.keys():
        if dict1[k] == i:
            sorted_dict[k] = dict1[k]
            break

print(sorted_dict)

If you run this with the Python interpreter you would see:

{1: 1, 3: 4, 2: 9}

Now that we've seen how to sort with loops, let's look at a more popular alternative that uses the sorted() function.

Sort Dictionary Using the sorted() Function

We previously used the sorted() function to sort the values of an array. When sorting a dictionary, we can pass one more argument to the sorted() function like this: sorted(dict1, key=dict1.get).

Here, key is a function that's called on each element before the values are compared for sorting. The get() method on dictionary objects returns the value of for a dictionary's key.

The sorted(dict1, key=dict1.get) expression will return the list of keys whose values are sorted in order. From there, we can create a new, sorted dictionary:

dict1 = {1: 1, 2: 9, 3: 4}
sorted_dict = {}
sorted_keys = sorted(dict1, key=dict1.get)  # [1, 3, 2]

for w in sorted_keys:
    sorted_dict[w] = dict1[w]

print(sorted_dict) # {1: 1, 3: 4, 2: 9}

Using the sorted() function has reduced the amount of code we had to write when using for loops. However, we can further combine the sorted() function with the itemgetter() function for a more succinct solution to sorting dictionaries by values.

Sort Dictionary Using the operator Module and itemgetter()

The operator module includes the itemgetter() function. This function returns a callable object that returns an item from an object.

For example, let's use to itemgetter() to create a callable object that returns the value of any dictionary with a key that's 2:

import operator

dict1 = {1: 1, 2: 9}
get_item_with_key_2 = operator.itemgetter(2)

print(get_item_with_key_2(dict1))  # 9

Every dictionary has access to the items() method. This function returns the key-value pairs of a dictionary as a list of tuples. We can sort the list of tuples by using the itemgetter() function to pull the second value of the tuple i.e. the value of the keys in the dictionary.

Once it's sorted, we can create a dictionary based on those values:

import operator

dict1 = {1: 1, 2: 9, 3: 4}
sorted_tuples = sorted(dict1.items(), key=operator.itemgetter(1))
print(sorted_tuples)  # [(1, 1), (3, 4), (2, 9)]
sorted_dict = {k: v for k, v in sorted_tuples}

print(sorted_dict) # {1: 1, 3: 4, 2: 9}

With much less effort, we have a dictionary sorted by values!

As the key argument accepts any function, we can use lambda functions to return dictionary values so they can be sorted. Let's see how.

Sort Dictionary Using a Lambda Function

Lambda functions are anonymous, or nameless, functions in Python. We can use lamba functions to get the value of a dictionary item without having to import the operator module for itemgetter(). If you'd like to learn more about lambas, you can read about them in our guide to Lambda Functions in Python.

Let's sort a dictionary by values using a lambda function in the key argument of sorted():

dict1 = {1: 1, 2: 9, 3: 4}
sorted_tuples = sorted(dict1.items(), key=lambda item: item[1])
print(sorted_tuples)  # [(1, 1), (3, 4), (2, 9)]
sorted_dict = {k: v for k, v in sorted_tuples}

print(sorted_dict)  # {1: 1, 3: 4, 2: 9}

Note that the methods we've discussed so far only work with Python 3.7 and later. Let's see what we can do for earlier versions of Python.

Returning a New Dictionary with Sorted Values

After sorting a dictionary by values, to keep a sorted dictionary in Python versions before 3.7, you have to use the OrderedDict - available in the collections module. These objects are dictionaries that keep the order of insertion.

Here's an example of sorting and using OrderedDict:

import operator
from collections import OrderedDict

dict1 = {1: 1, 2: 9, 3: 4}
sorted_tuples = sorted(dict1.items(), key=operator.itemgetter(1))
print(sorted_tuples)  # [(1, 1), (3, 4), (2, 9)]

sorted_dict = OrderedDict()
for k, v in sorted_tuples:
    sorted_dict[k] = v

print(sorted_dict)  # {1: 1, 3: 4, 2: 9}

Conclusion

This tutorial showed how a dictionary can be sorted based on its values. We first sorted a dictionary using two for loops. We then improved our sort by using the sorted() function. We've also seen the itemgetter() function from the operator module can make our solution more succinct.

Lastly, we adapted our solution to work on Python versions lower than 3.7.

Variations of the sorted() function are the most popular and reliable to sort a dictionary by values.


from Planet Python
via read more
Matt Layman: Sending Invites - Building SaaS #77

In this episode, I worked on the form that will send invites to users for the new social network app that I’m building. We built the view, the form, and the tests and wired a button to the new view. The first thing that we do was talk through the new changes since the last stream. After discussing the progress, I took some time to cover the expected budget for the application to get it to an MVP.

from Planet Python
via read more
Wednesday, October 28, 2020

PyCharm: PyCharm 2020.3 EAP #3

The third build of PyCharm 2020.3 is now available in the Early Access Program with features and fixes for a smoother, more productive experience.

We invite you to join our EAP to try out the latest features we have coming up, test that they work properly in your environments, and help us make a better PyCharm for everyone!

pycharm EAP program

DOWNLOAD PYCHARM 2020.3 EAP

Highlights

Interpreter settings

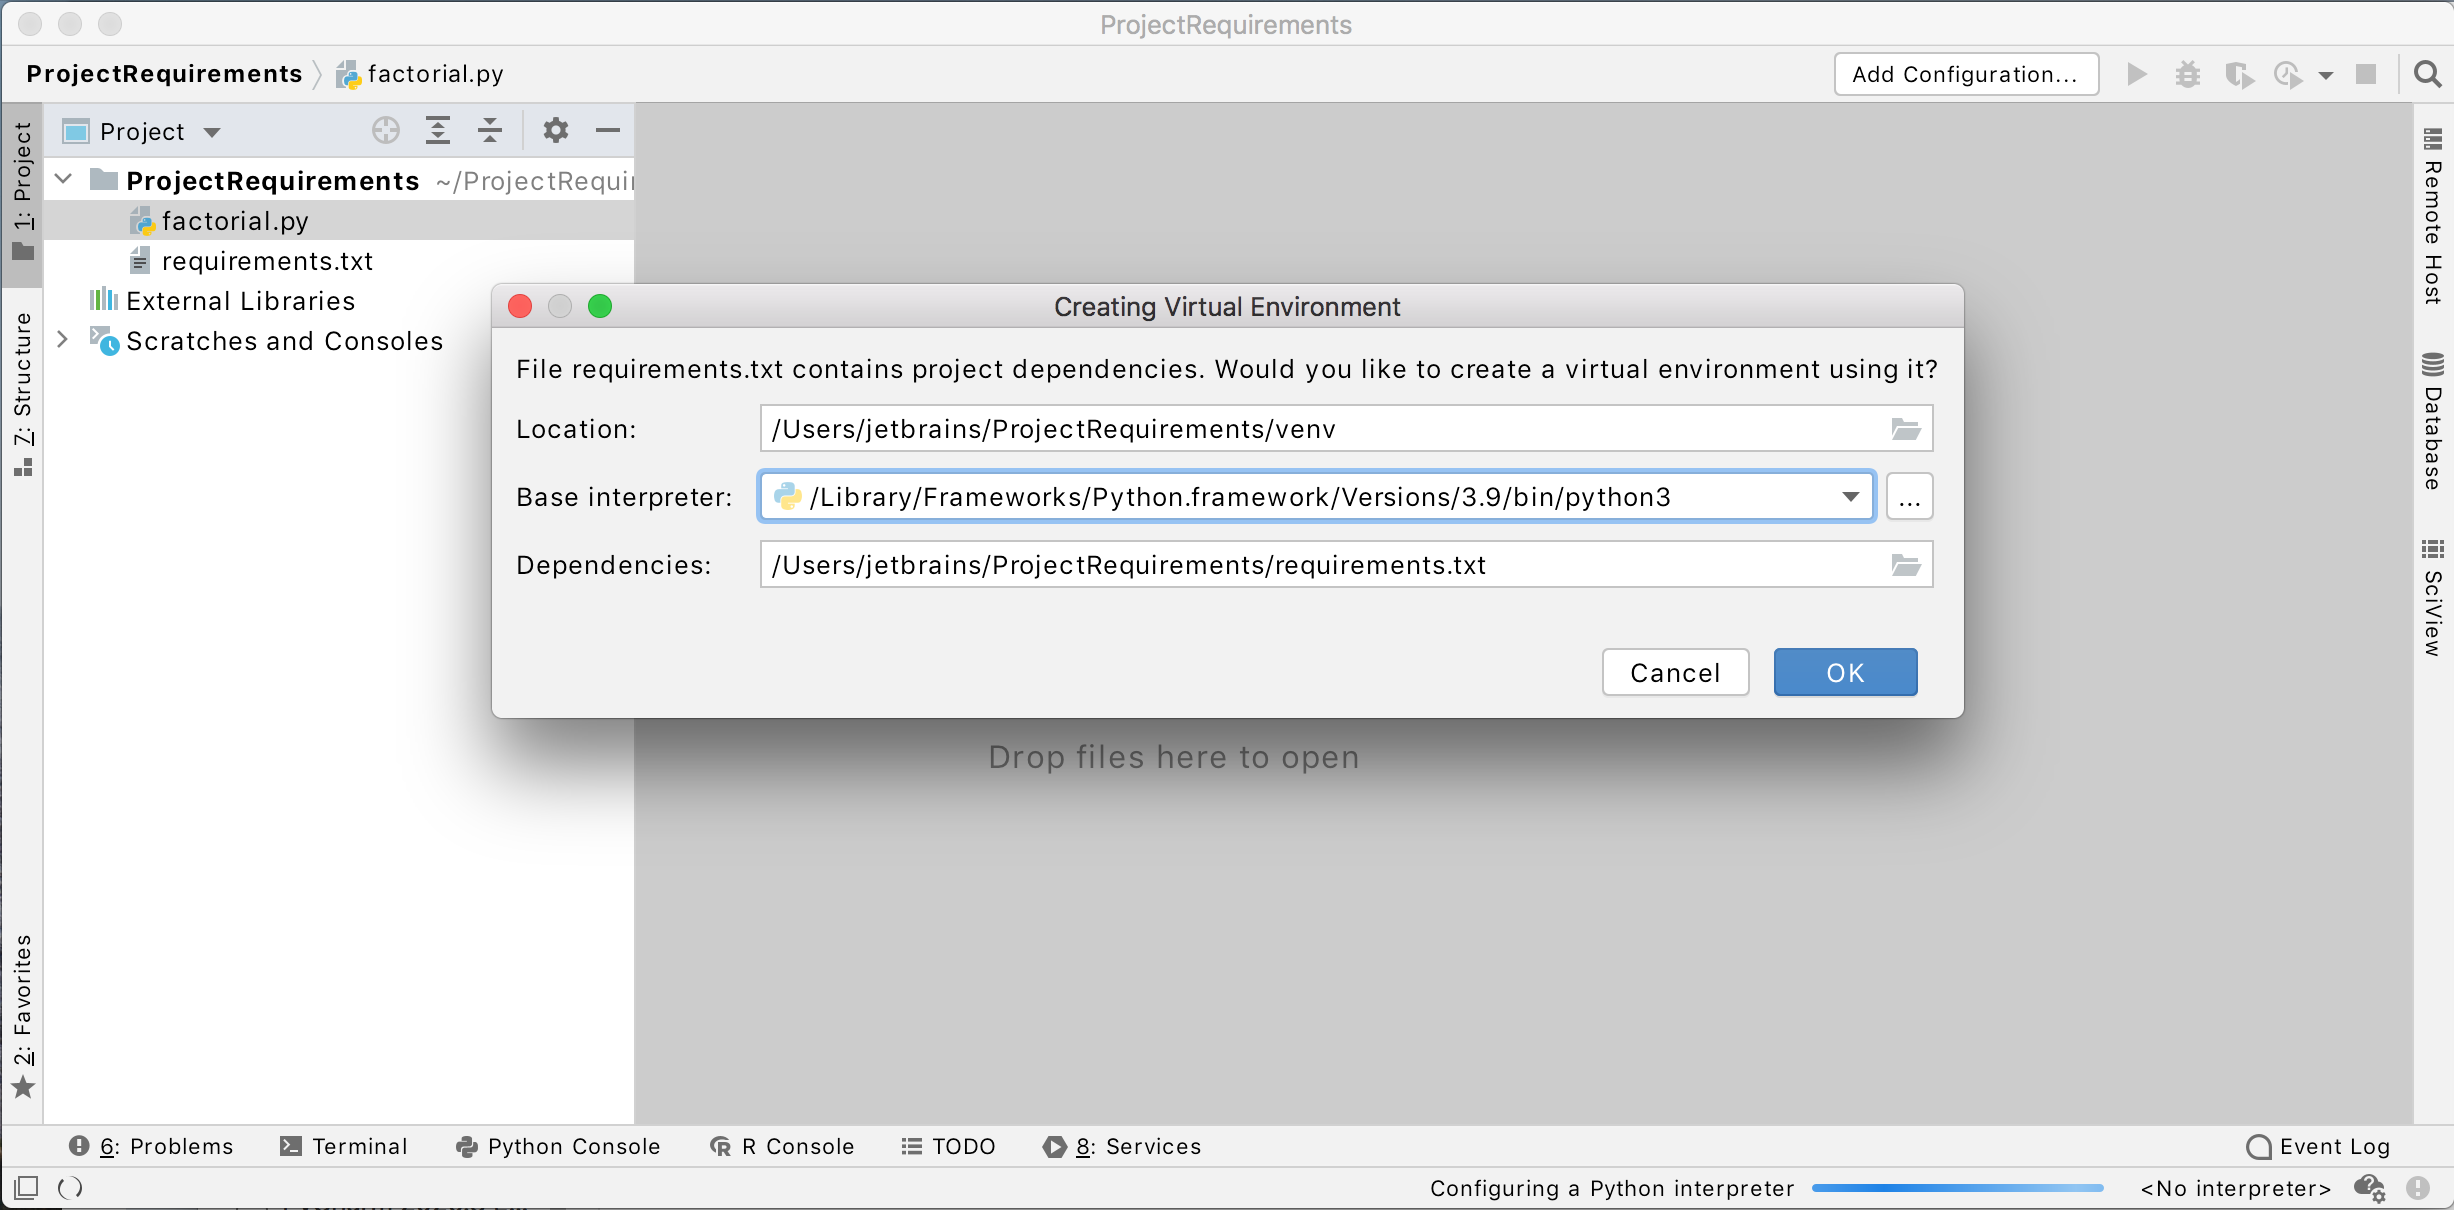
Now it is easier to create an environment for your project and set up all the dependencies at once.
When you clone a project from the repo, PyCharm checks if there is a requirements.txt, setup.py, environment.yml, or pipfile inside it. If there is, the IDE suggests per-project environment creation based on the detected files.

i2020_10_28_env

If you skip the environment creation at this step, autoconfiguration will still be available in the editor itself.

Inverting an “if” statement

Now you can easily invert “if” statements and switch them back in PyCharm. Kudos to Vasya Aksyonov, who contributed this feature to our open-source PyCharm Community Edition.

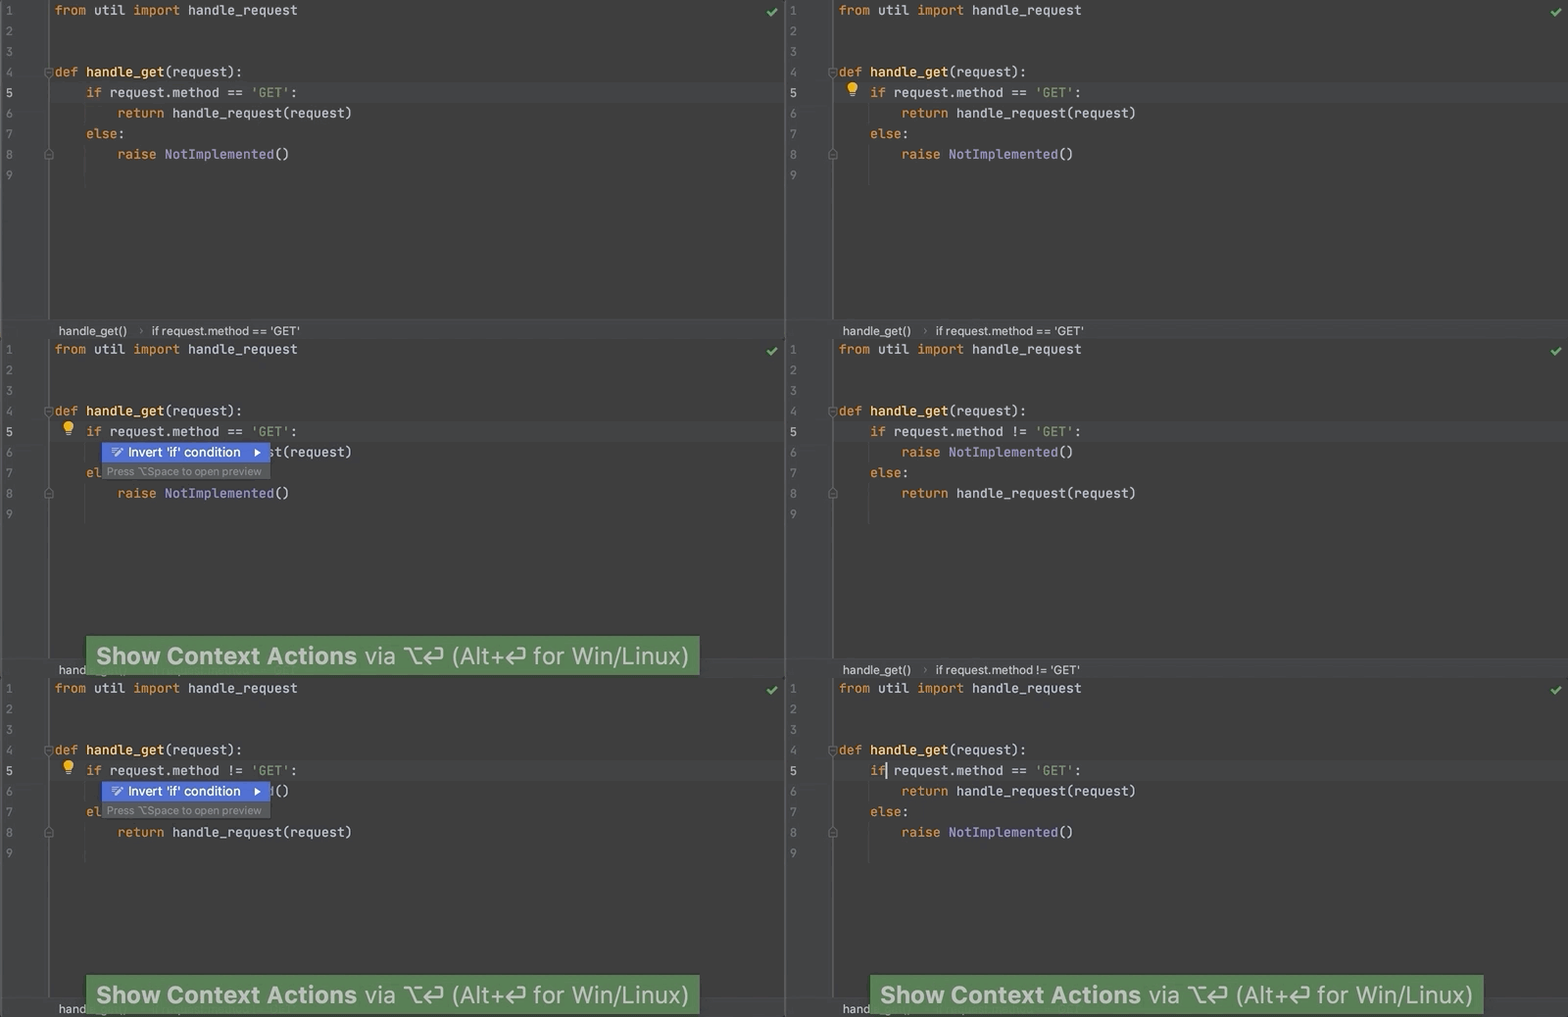
Go to the context menu for “if”, choose Show Context Actions, and then select “Invert ‘if’ condition”. The condition of the “if” statement will be inverted and the branches will switch places, preserving the initial semantics of the code.

invert_if

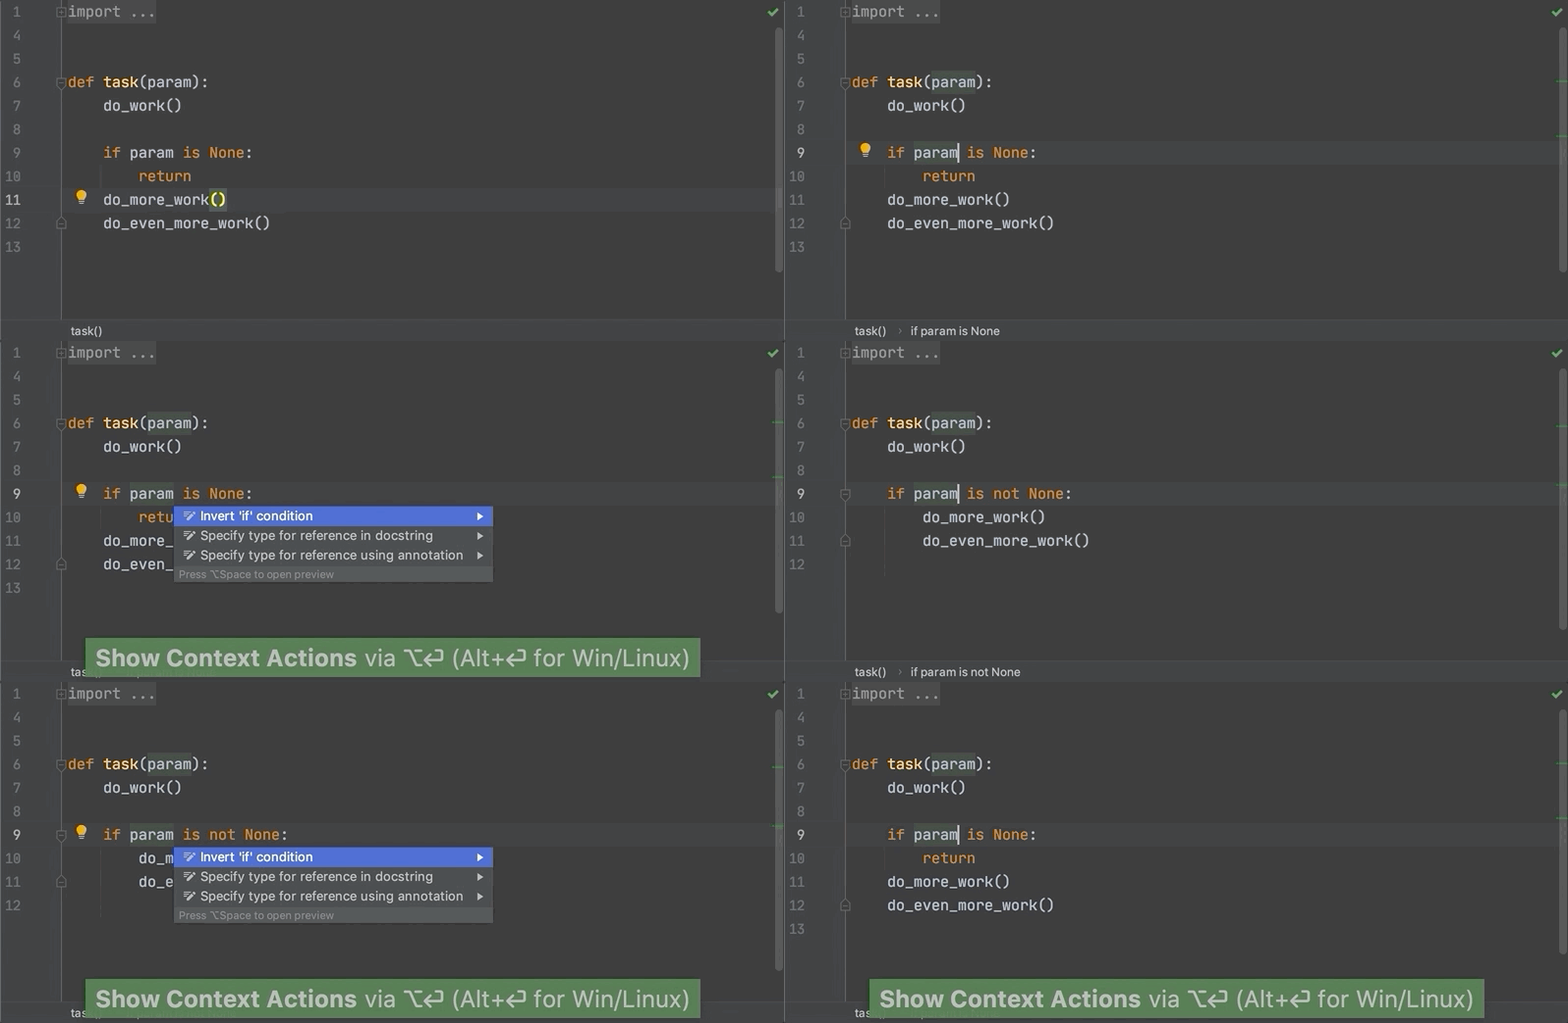
When there is an “if” statement without an “else”, then after it has been inverted a “pass” will be created for the “if” that was inverted and an “else” clause will be added to the statement.

early_return

This feature works for all “if” statements without “elif” branches. The action also understands control flow, and can handle things like early return, producing sensible code.

Learn more.

VCS

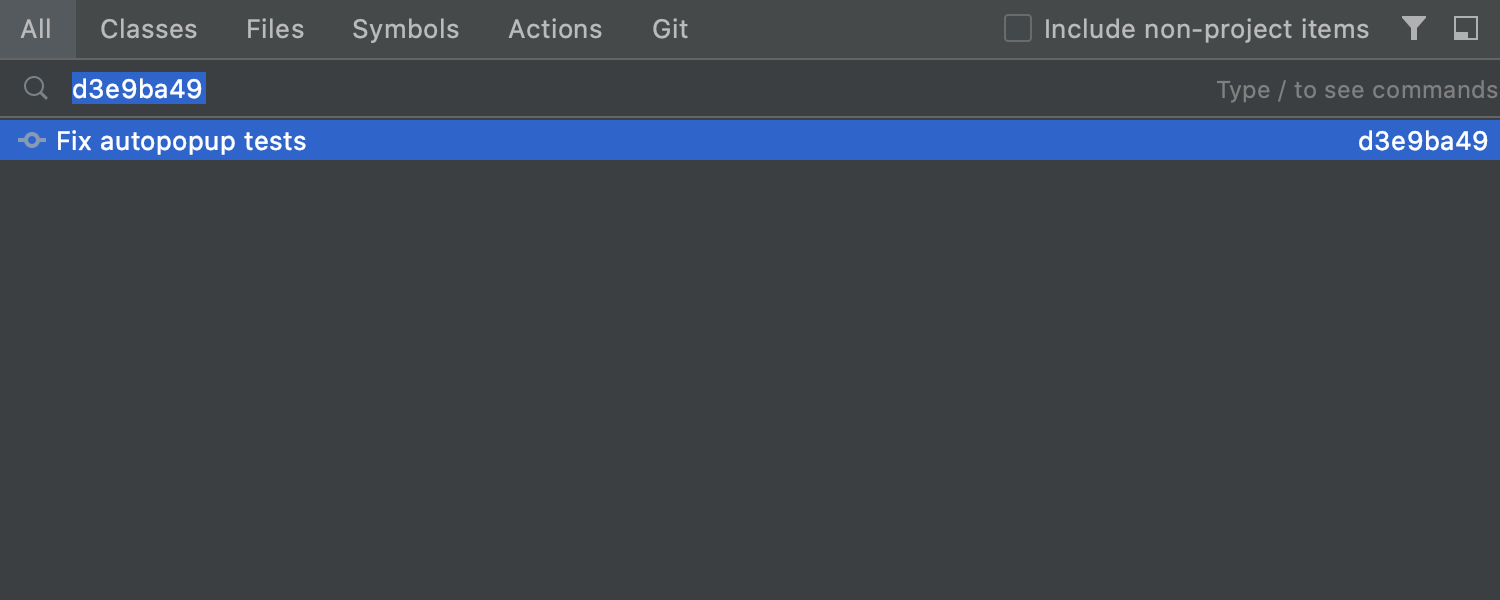
We’ve added a Git tab to the Search Everywhere dialog. In it you can find commit hashes and messages, tags, and branches.

ide_git

Web development

Create a React component from its usage

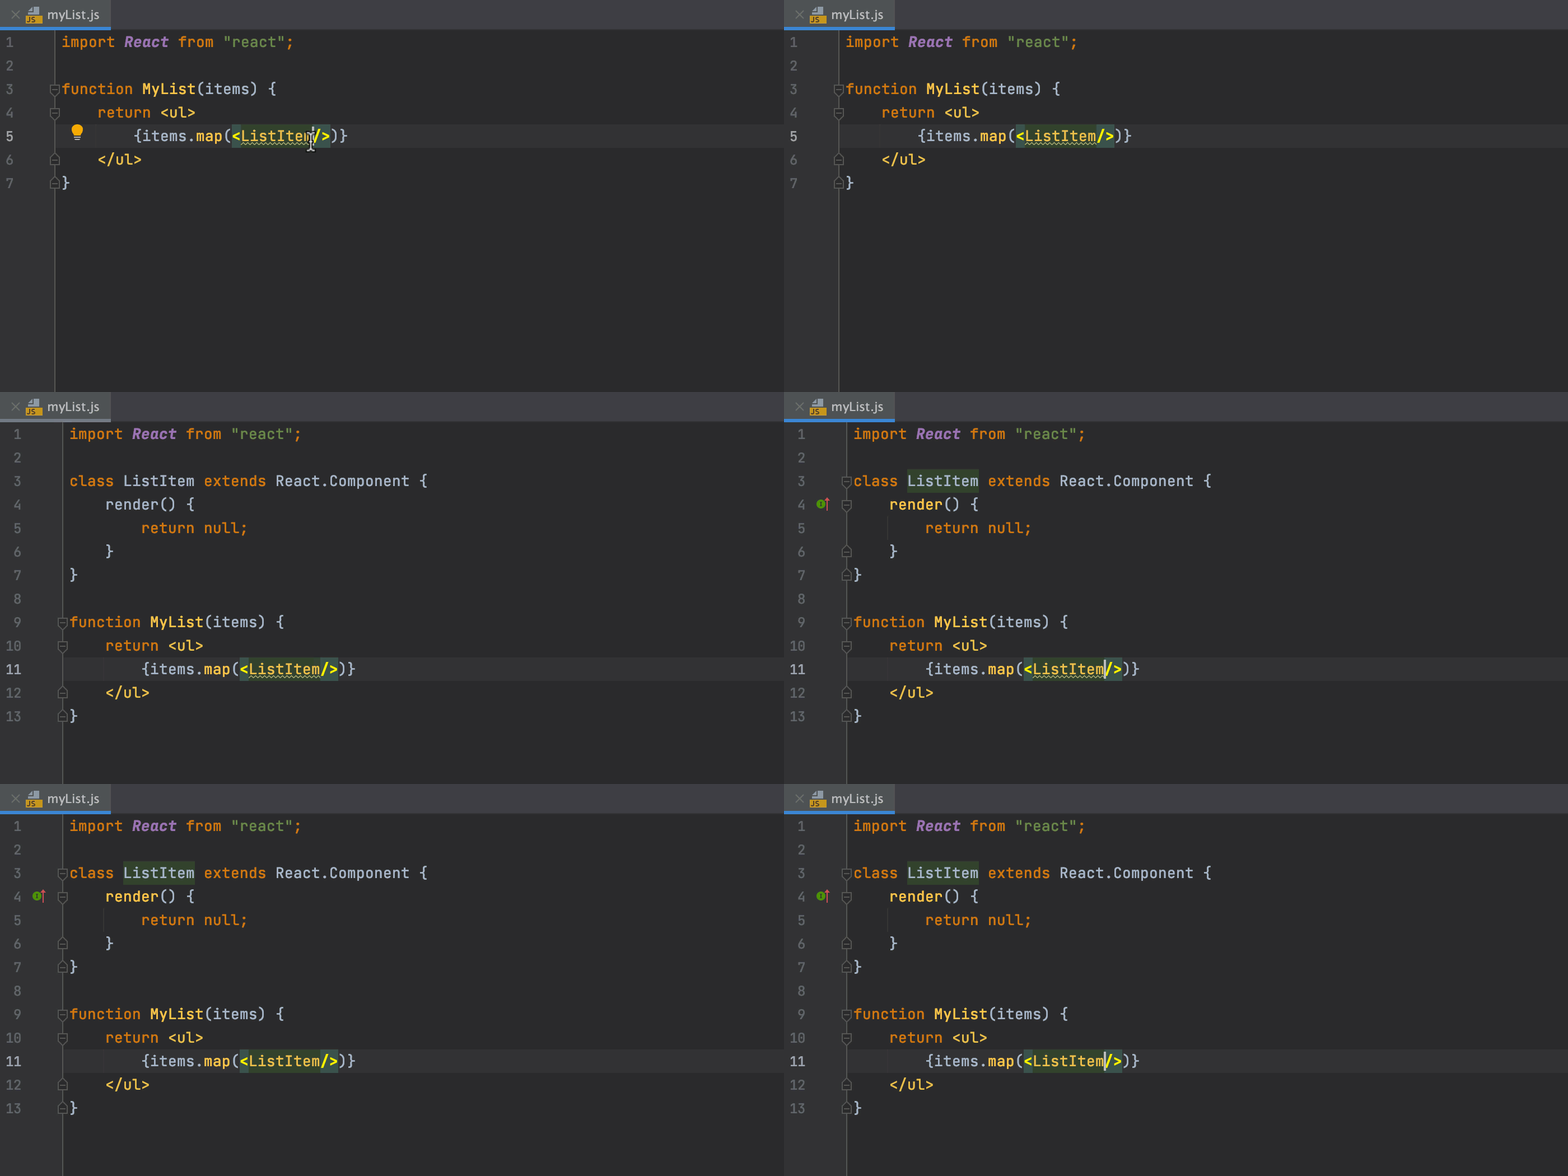
As you might know, PyCharm constantly checks that referenced variables and fields are valid. When they aren’t, in many cases it can suggest creating the relevant code construct for you. Now it can do this for React components, too. Place the caret at an unresolved component, press Alt+Enter, and then select the corresponding inspection. And you’re done!

create-react-component-from-usage

Plugins enabled per project

We have taken plugin customization one step further. In Settings | Preferences / Plugins, the drop-down list next to the plugin name has been replaced with a new gear icon that has all the activation options. You can enable the plugin just for the current project or for all of them by selecting Enable for Current Project or Enable for All Projects.

Reader Mode

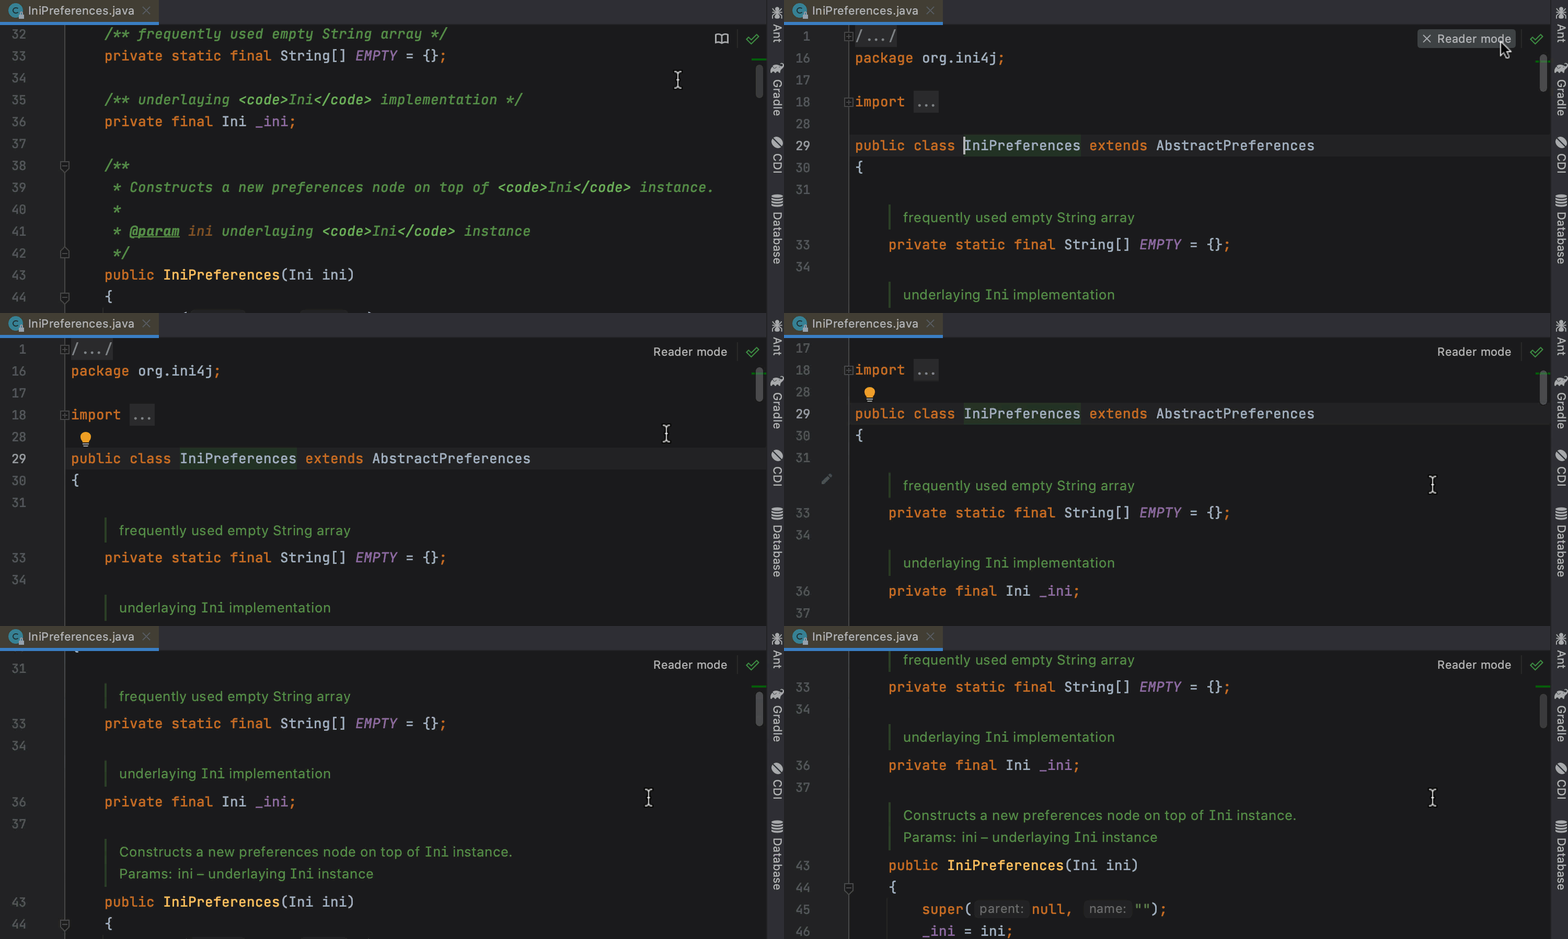
To make reading comments easier, we’ve implemented Reader Mode for read-only files and files from External Libraries. We’ve added a nicer display for font ligatures, code vision hints with the number of usages, and more. To configure the new mode, go to Preferences | Settings / Editor / Reader Mode.

ide_reader_mode-1

Other updates

  • PyCharm now supports the Couchbase Query service.
  • The Concurrency Diagram button is now moved to the Profiler Executors group panel in the top right-hand corner of the editor.
  • PyCharm now recognizes Python 3.10. Yes, we are already getting ready for it!

Notable fixes

The problem that caused copying the prompt together with the code when copying multiline commands is now fixed.

Ready to join the EAP?

Some ground rules

  • EAP builds are free to use and expire 30 days after the build date.
  • You can install an EAP build side by side with your stable PyCharm version.
  • These builds are not fully tested and can be unstable.
  • Your feedback is always welcome. Please use our issue tracker and make sure to mention your build version

How to download

Download this EAP from our website. Alternatively, you can use the JetBrains Toolbox App to stay up to date throughout the entire EAP. If you’re on Ubuntu 16.04 or later, you can use snap to get PyCharm EAP and stay up to date. You can find the installation instructions on our website.

This is all for today! For the full list of features and fixes present in this build, see our release notes. We also encourage you to stay tuned for more improvements, so come and share your feedback in the comments below, on Twitter, or via our issue tracker.

The PyCharm team


from Planet Python
via read more
Stack Abuse: Change Tick Frequency in Matplotlib

Introduction

Matplotlib is one of the most widely used data visualization libraries in Python. Much of Matplotlib's popularity comes from its customization options - you can tweak just about any element from its hierarchy of objects.

In this tutorial, we'll take a look at how to change the tick frequency in Matplotlib. We'll do this on the figure-level as well as the axis-level.

How to Change Tick Frequency in Matplotlib?

Let's start off with a simple plot. We'll plot two lines, with random values:

import matplotlib.pyplot as plt
import numpy as np

fig = plt.subplots(figsize=(12, 6))

x = np.random.randint(low=0, high=50, size=100)
y = np.random.randint(low=0, high=50, size=100)

plt.plot(x, color='blue')
plt.plot(y, color='black')

plt.show()

x and y range from 0-50, and the length of these arrays is 100. This means, we'll have 100 datapoints for each of them. Then, we just plot this data onto the Axes object and show it via the PyPlot instance plt:

plot random line plot in matplotlib

Now, the frequency of the ticks on the X-axis is 20. They're automatically set to a frequency that seems fitting for the dataset we provide.

Sometimes, we'd like to change this. Maybe we want to reduce or increase the frequency. What if we wanted to have a tick on every 5 steps, not 20?

The same goes for the Y-axis. What if the distinction on this axis is even more crucial, and we'd want to have each tick on evey step?

Setting Figure-Level Tick Frequency in Matplotlib

Let's change the figure-level tick frequency. This means that if we have multiple Axes, the ticks on all of these will be uniform and will have the same frequency:

import matplotlib.pyplot as plt
import numpy as np

fig = plt.subplots(figsize=(12, 6))

x = np.random.randint(low=0, high=50, size=100)
y = np.random.randint(low=0, high=50, size=100)

plt.plot(x, color='blue')
plt.plot(y, color='black')

plt.xticks(np.arange(0, len(x)+1, 5))
plt.yticks(np.arange(0, max(y), 2))

plt.show()

You can use the xticks() and yticks() functions and pass in an array. On the X-axis, this array starts on 0 and ends at the length of the x array. On the Y-axis, it starts at 0 and ends at the max value of y. You can hard code the variables in as well.

The final argument is the step. This is where we define how large each step should be. We'll have a tick at every 5 steps on the X-axis and a tick on every 2 steps on the Y-axis:

change figure-level tick frequency matplotlib

Setting Axis-Level Tick Frequency in Matplotlib

If you have multiple plots going on, you might want to change the tick frequency on the axis-level. For example, you'll want rare ticks on one graph, while you want frequent ticks on the other.

You can use the set_xticks() and set_yticks() functions on the returned Axes instance when adding subplots to a Figure. Let's create a Figure with two axes and change the tick frequency on them separately:

import matplotlib.pyplot as plt
import numpy as np

fig = plt.figure(figsize=(12, 6))

ax = fig.add_subplot(121)
ax2 = fig.add_subplot(122)

x = np.random.randint(low=0, high=50, size=100)
y = np.random.randint(low=0, high=50, size=100)
z = np.random.randint(low=0, high=50, size=100)

ax.plot(x, color='blue')
ax.plot(y, color='black')
ax2.plot(y, color='black')
ax2.plot(z, color='green')

ax.set_xticks(np.arange(0, len(x)+1, 5))
ax.set_yticks(np.arange(0, max(y), 2))
ax2.set_xticks(np.arange(0, len(x)+1, 25))
ax2.set_yticks(np.arange(0, max(y), 25))

plt.show()

Now, this results in:

change axis-level tick frequency in matplotlib

Conclusion

In this tutorial, we've gone over several ways to change the tick frequency in Matplotlib both on the figure-level as well as the axis-level.

If you're interested in Data Visualization and don't know where to start, make sure to check out our book on Data Visualization in Python.

Data Visualization in Python, a book for beginner to intermediate Python developers, will guide you through simple data manipulation with Pandas, cover core plotting libraries like Matplotlib and Seaborn, and show you how to take advantage of declarative and experimental libraries like Altair.


from Planet Python
via read more
Python Software Foundation: Key generation and signing ceremony for PyPI

On Friday October 30th at 11:15 AM EDT the Python Software Foundation will be live streaming a remote key generation and signing ceremony to bootstrap The Update Framework for The Python Package Index. You can click here to see what time this is in your local timezone.

This ceremony is one of the first practical steps in deploying The Update Framework to PyPI per PEP 458.

The Python Software Foundation Director of Infrastructure, Ernest W. Durbin III, and Trail of Bits Senior Security Engineer, William Woodruff, will be executing the runbook developed at https://ift.tt/2HyJwyT.

For transparency purposes a live stream will be hosted from the Python Software Foundation's YouTube channel. Please subscribe to the channel to be notified when the stream is live if you'd like to follow along.

Additionally the recording will be archived on the Python Software Foundation's YouTube channel.


This work is being funded by Facebook Research and was originally announced in late 2018 and a portion of it commenced in 2019 while awaiting PEP 458's acceptance. With PEP 458 in place we announced that work would commence in March.

We appreciate the patience and contributions of the community, Facebook Research, and Trail of Bits in seeing through the implementation of PEP 458.

Additionally volunteers from The Secure Systems Lab at NYUDatadog, and VMWare have helped to develop the implementation for PyPI but have begun work on client implementations to verify the results in pip.


from Planet Python
via read more

Key generation and signing ceremony for PyPI

On Friday October 30th at 11:15 AM EDT the Python Software Foundation will be live streaming a remote key generation and signing ceremony to bootstrap The Update Framework for The Python Package Index. You can click here to see what time this is in your local timezone.

This ceremony is one of the first practical steps in deploying The Update Framework to PyPI per PEP 458.

The Python Software Foundation Director of Infrastructure, Ernest W. Durbin III, and Trail of Bits Senior Security Engineer, William Woodruff, will be executing the runbook developed at https://ift.tt/2HyJwyT.

For transparency purposes a live stream will be hosted from the Python Software Foundation's YouTube channel. Please subscribe to the channel to be notified when the stream is live if you'd like to follow along.

Additionally the recording will be archived on the Python Software Foundation's YouTube channel.


This work is being funded by Facebook Research and was originally announced in late 2018 and a portion of it commenced in 2019 while awaiting PEP 458's acceptance. With PEP 458 in place we announced that work would commence in March.

We appreciate the patience and contributions of the community, Facebook Research, and Trail of Bits in seeing through the implementation of PEP 458.

Additionally volunteers from The Secure Systems Lab at NYUDatadog, and VMWare have helped to develop the implementation for PyPI but have begun work on client implementations to verify the results in pip.


from Python Software Foundation News
via read more

PyCharm 2020.3 EAP #3

The third build of PyCharm 2020.3 is now available in the Early Access Program with features and fixes for a smoother, more productive experience.

We invite you to join our EAP to try out the latest features we have coming up, test that they work properly in your environments, and help us make a better PyCharm for everyone!

pycharm EAP program

DOWNLOAD PYCHARM 2020.3 EAP

Highlights

Interpreter settings

Now it is easier to create an environment for your project and set up all the dependencies at once.
When you clone a project from the repo, PyCharm checks if there is a requirements.txt, setup.py, environment.yml, or pipfile inside it. If there is, the IDE suggests per-project environment creation based on the detected files.

i2020_10_28_env

If you skip the environment creation at this step, autoconfiguration will still be available in the editor itself.

Inverting an “if” statement

Now you can easily invert “if” statements and switch them back in PyCharm. Kudos to Vasya Aksyonov, who contributed this feature to our open-source PyCharm Community Edition.

Go to the context menu for “if”, choose Show Context Actions, and then select “Invert ‘if’ condition”. The condition of the “if” statement will be inverted and the branches will switch places, preserving the initial semantics of the code.

invert_if

When there is an “if” statement without an “else”, then after it has been inverted a “pass” will be created for the “if” that was inverted and an “else” clause will be added to the statement.

early_return

This feature works for all “if” statements without “elif” branches. The action also understands control flow, and can handle things like early return, producing sensible code.

Learn more.

VCS

We’ve added a Git tab to the Search Everywhere dialog. In it you can find commit hashes and messages, tags, and branches.

ide_git

Web development

Create a React component from its usage

As you might know, PyCharm constantly checks that referenced variables and fields are valid. When they aren’t, in many cases it can suggest creating the relevant code construct for you. Now it can do this for React components, too. Place the caret at an unresolved component, press Alt+Enter, and then select the corresponding inspection. And you’re done!

create-react-component-from-usage

Plugins enabled per project

We have taken plugin customization one step further. In Settings | Preferences / Plugins, the drop-down list next to the plugin name has been replaced with a new gear icon that has all the activation options. You can enable the plugin just for the current project or for all of them by selecting Enable for Current Project or Enable for All Projects.

Reader Mode

To make reading comments easier, we’ve implemented Reader Mode for read-only files and files from External Libraries. We’ve added a nicer display for font ligatures, code vision hints with the number of usages, and more. To configure the new mode, go to Preferences | Settings / Editor / Reader Mode.

ide_reader_mode-1

Other updates

  • PyCharm now supports the Couchbase Query service.
  • The Concurrency Diagram button is now moved to the Profiler Executors group panel in the top right-hand corner of the editor.
  • PyCharm now recognizes Python 3.10. Yes, we are already getting ready for it!

Notable fixes

The problem that caused copying the prompt together with the code when copying multiline commands is now fixed.

Ready to join the EAP?

Some ground rules

  • EAP builds are free to use and expire 30 days after the build date.
  • You can install an EAP build side by side with your stable PyCharm version.
  • These builds are not fully tested and can be unstable.
  • Your feedback is always welcome. Please use our issue tracker and make sure to mention your build version

How to download

Download this EAP from our website. Alternatively, you can use the JetBrains Toolbox App to stay up to date throughout the entire EAP. If you’re on Ubuntu 16.04 or later, you can use snap to get PyCharm EAP and stay up to date. You can find the installation instructions on our website.

This is all for today! For the full list of features and fixes present in this build, see our release notes. We also encourage you to stay tuned for more improvements, so come and share your feedback in the comments below, on Twitter, or via our issue tracker.

The PyCharm team


from PyCharm: the Python IDE for Professional Developers – PyCharm Blog | JetBrains
read more

Real Python: Get Started With Django Part 3: Django View Authorization

In part 1 of this series, you learned the fundamentals of Django models and views. In part 2, you learned about user management. In this tutorial, you’ll see how to combine these concepts to do Django view authorization and restrict what users can see and do in your views based on their roles.

Allowing users to log in to your website solves two problems: authentication and authorization. Authentication is the act of verifying a user’s identity, confirming they are who they say they are. Authorization is deciding whether a user is allowed to perform an action. The two concepts go hand in hand: if a page on your website is restricted to logged-in users, then users have to authenticate before they can be authorized to view the page.

Django provides tools for both authentication and authorization. Django view authorization is typically done with decorators. This tutorial will show you how to use these view decorators to enforce authorized viewing of pages in your Django site.

By the end of this tutorial you’ll know how to:

  • Use HttpRequest and HttpRequest.user objects
  • Authenticate and authorize users
  • Differentiate between regular, staff, and admin users
  • Secure a view with the @login_required decorator
  • Restrict a view to different roles with the @user_passes_test decorator
  • Use the Django messages framework to notify your users

If you’d like to follow along with the examples you’ll see in this tutorial, then you can download the sample code at the link below:

Getting Started#

To better understand authorization, you’ll need a project to experiment with. The code in this tutorial is very similar to that shown in part 1 and part 2. You can follow along by downloading the sample code from the link below:

Get the Source Code: Click here to get the source code you’ll use to learn about Django view authorization in this tutorial.

All the demonstration code was tested with Python 3.8 and Django 3.0.7. It should work with other versions, but there may be subtle differences.

Creating a Project#

First, you’ll need to create a new Django project. Since Django isn’t part of the standard library, it’s considered best practice to use a virtual environment. Once you have the virtual environment, you’ll need to take the following steps:

  1. Install Django.
  2. Create a new project.
  3. Create an app inside the project.
  4. Add a templates directory to the project.
  5. Create a site superuser.

To accomplish all that, use the following commands:

$ python -m pip install django==3.0.7
$ django-admin startproject Blog
$ cd Blog
$ python manage.py startapp core
$ mkdir templates
$ python manage.py migrate
$ python manage.py createsuperuser
Username: superuser
Email address: superuser@example.com
Password:
Password (again):

You now have a Blog project, but you still need to tell Django about the app you created and the new directory you added for templates. You can do this by modifying the Blog/settings.py file, first by changing INSTALLED_APPS:

INSTALLED_APPS = [
    "django.contrib.admin",
    "django.contrib.auth",
    "django.contrib.contenttypes",
    "django.contrib.sessions",
    "django.contrib.messages",
    "django.contrib.staticfiles",
    "core",
]

The highlighted line indicates the addition of the core app to the list of installed apps. Once you’ve added the app, you need to modify the TEMPLATES declaration:

TEMPLATES = [
    {
        "BACKEND": "django.template.backends.django.DjangoTemplates",
        "DIRS": [os.path.join(BASE_DIR, "templates")],
        "APP_DIRS": True,
        "OPTIONS": {
            "context_processors": [
                "django.template.context_processors.debug",
                "django.template.context_processors.request",
                "django.contrib.auth.context_processors.auth",
                "django.contrib.messages.context_processors.messages",
            ],
        },
    },
]

The highlighted line indicates the change you need to make. It modifies the DIRS list to include your templates folder. This tells Django where to look for your templates.

Note: Django 3.1 has moved from using the os library to pathlib and no longer imports os by default. If you’re using Django 3.1, then you need to either add import os above the TEMPLATES declaration or convert the "DIRS" entry to use pathlib instead.

The sample site you’ll be working with is a basic blogging application. The core app needs a models.py file to contain the models that store the blog content in the database. Edit core/models.py and add the following:

from django.db import models

class Blog(models.Model):
    title = models.CharField(max_length=50)
    content = models.TextField()

Now for some web pages. Create two views, one for listing all the blogs and one for viewing a blog. The code for your views goes in core/views.py:

from django.http import HttpResponse
from django.shortcuts import render, get_object_or_404
from core.models import Blog

def listing(request):
    data = {
        "blogs": Blog.objects.all(),
    }

    return render(request, "listing.html", data)

def view_blog(request, blog_id):
    blog = get_object_or_404(Blog, id=blog_id)
    data = {
        "blog": blog,
    }

    return render(request, "view_blog.html", data)

Read the full article at https://realpython.com/django-view-authorization/ »


[ Improve Your Python With 🐍 Python Tricks 💌 – Get a short & sweet Python Trick delivered to your inbox every couple of days. >> Click here to learn more and see examples ]


from Planet Python
via read more

TestDriven.io: Working with Static and Media Files in Django

This article looks at how to work with static and media files in a Django project, locally and in production. from Planet Python via read...