Wednesday, September 30, 2020

Sebastian Witowski: Checking for True or False

How do you check if something is True in Python? There are three ways:

  • One “bad” way: if variable == True:
  • Another “bad” way: if variable is True:
  • And the good way, recommended even in the Programming Recommendations of PEP8: if variable:

The “bad” ways are not only frowned upon but also slower. Let’s use a simple test:

$ python -m timeit -s "variable=False" "if variable == True: pass"
10000000 loops, best of 5: 24.9 nsec per loop

$ python -m timeit -s "variable=False" "if variable is True: pass"
10000000 loops, best of 5: 17.4 nsec per loop

$ python -m timeit -s "variable=False" "if variable: pass"
20000000 loops, best of 5: 10.9 nsec per loop

Using is is around 60% slower than if variable (17.4/10.9≈1.596), but using == is 120% slower (24.9/10.9≈2.284)! It doesn’t matter if the variable is actually True or False - the differences in performance are similar (if the variable is True, all three scenarios will be slightly slower).

Similarly, we can check if a variable is not True using one of the following methods:

  • if variable != True: (“bad”)
  • if variable is not True: (“bad”)
  • if not variable: (good)
$ python -m timeit -s "variable=False" "if variable != True: pass"
10000000 loops, best of 5: 26 nsec per loop

$ python -m timeit -s "variable=False" "if variable is not True: pass"
10000000 loops, best of 5: 18.8 nsec per loop

$ python -m timeit -s "variable=False" "if not variable: pass"
20000000 loops, best of 5: 12.4 nsec per loop

if not variable wins. is not is 50% slower (18.8/12.4≈1.516) and != takes twice as long (26/12.4≈2.016).

The if variable and if not variable versions are faster to execute and faster to read. They are common idioms that you will often see in Python (or other programming languages).

“truthy” and “falsy”

Why do I keep putting “bad” in quotes? That’s because the “bad” way is not always bad (it’s only wrong when you want to compare boolean values, as pointed in PEP8). Sometimes, you intentionally have to use one of those other comparisons.

In Python (and many other languages), there is True, and there are truthy values. That is, values interpreted as True if you run bool(variable). Similarly, there is False, and there are falsy values (values that return False from bool(variable)). An empty list ([]), string (""), dictionary ({}), None and 0 are all falsy but they are not strictly False.

Sometimes you need to distinguish between True/False and truthy/falsy values. If your code should behave in one way when you pass an empty list, and in another, when you pass False, you can’t use if not value.

Take a look at the following scenario:

def process_orders(orders=None):
    if not orders:
        # There are no orders, return
        return
    else:
        # Process orders
        ...

We have a function to process some orders. If there are no orders, we want to return without doing anything. Otherwise, we want to process existing orders.

We assume that if there are no orders, then orders parameter is set to None. But, if the orders is an empty list, we also return without any action! And maybe it’s possible to receive an empty list because someone is just updating the billing information of a past order? Or perhaps having an empty list means that there is a bug in the system. We should catch that bug before we fill up the database with empty orders! No matter what’s the reason for an empty list, the above code will ignore it. We can fix it by investigating the orders parameter more carefully:

def process_orders(orders=None):
    if orders is None:
        # orders is None, return
        return
    elif orders == []:
        # Process empty list of orders
        ...
    elif len(orders) > 0:
        # Process existing orders
        ...

The same applies to truthy values. If your code should work differently for True than for, let’s say, value 1, we can’t use if variable. We should use == to compare the number (if variable == 1) and is to compare to True (if variable is True). Sounds confusing? Let’s take a look at the difference between is and ==.

is checks the identity, == checks the value

The is operator compares the identity of objects. If two variables are identical, it means that they point to the same object (the same place in memory). They both have the same ID (that you can check with the id() function).

The == operator compares values. It checks if the value of one variable is equal to the value of some other variable.

Some objects in Python are unique, like None, True or False. Each time you assign a variable to True, it points to the same True object as other variables assigned to True. But each time you create a new list, Python creates a new object:

>>> a = True
>>> b = True
>>> a is b
True
# Variables that are identical are always also equal!
>>> a == b
True

# But
>>> a = [1,2,3]
>>> b = [1,2,3]
>>> a is b
False  # Those lists are two different objects
>>> a == b
True  # Both lists are equal (contain the same elements)

It’s important to know the difference between is and ==. If you think that they work the same, you might end up with weird bugs in your code:

a = 1
# This will print 'yes'
if a is 1:
    print('yes')

b = 1000
# This won't!
if b is 1000:
    print('yes')

In the above example, the first block of code will print “yes,” but the second won’t. That’s because Python performs some tiny optimizations and small integers share the same ID (they point to the same object). Each time you assign 1 to a new variable, it points to the same 1 object. But when you assign 1000 to a variable, it creates a new object. If we use b == 1000, then everything will work as expected.

Conclusions

To sum up:

  • To check if a variable is equal to True/False (and you don’t have to distinguish between True/False and truthy / falsy values), use if variable or if not variable. It’s the simplest and fastest way to do this.
  • If you want to check that a variable is explicitly True or False (and is not truthy/falsy), use is (if variable is True).
  • If you want to check if a variable is equal to 0 or if a list is empty, use if variable == 0 or if variable == [].


from Planet Python
via read more

Zero to Mastery: Python Monthly 💻🐍 September 2020

10th issue of Python Monthly! Read by 20,000+ Python developers every month. Keeping you up to date with the Python industry ecosystem, without wasting your valuable time.

from Planet Python
via read more

Erik Marsja: Pandas Count Occurrences in Column – i.e. Unique Values

The post Pandas Count Occurrences in Column – i.e. Unique Values appeared first on Erik Marsja.

In this Pandas tutorial, you are going to learn how to count occurrences in a column. There are occasions in data science when you need to know how many times a given value occurs. This can happen when you, for example, have a limited set of possible values that you want to compare. Another example can be if you want to count the number of duplicate values in a column. Furthermore, we may want to count the number of observations there is in a factor or we need to know how many men or women there are in the data set, for example. 

Outline

In this post, you will learn how to use Pandas value_counts() method to count the occurrences in a column in the dataframe. First, we start by importing the needed packages and then we import example data from a CSV file. Second, we will start looking at the value_counts() method and how we can use this to count distinct occurrences in a column. Third, we will have a look at an alternative method that also can be used: the groupby() method together with size() and count(). Now, let’s start by importing pandas and some example data to play around with!

How do you Count the Number of Occurrences in a data frame?

To count the number of occurences in e.g. a column in a dataframe you can use Pandasvalue_counts() method. For example, if you typedf['condition'].value_counts() you will get the frequency of each unique value in the column “condition”.

<<<<

Importing the Packages and Data

We use Pandas read_csv to import data from a CSV file found online:


import pandas as pd # URL to .csv file data_url = 'https://vincentarelbundock.github.io/Rdatasets/csv/carData/Arrests.csv' # Reading the data df = pd.read_csv(data_url, index_col=0)

In the code example above, we first imported Pandas and then we created a string variable with the URL to the dataset. In the last line of code, we imported the data and named the dataframe “df”. Note, we used the index_col parameter to set the first column in the .csv file as index column. Briefly explained, each row in this dataset includes details of a person who has been arrested. This means, and is true in many cases, that each row is one observation in the study. If you store data in other formats refer to the following tutorials:

In this tutorial, we are mainly going to work with the “sex” and “age” columns. It may be obvious but the “sex” column classifies an individual’s gender as male or female. The age is, obviously, referring to a person’s age in the dataset. We can take a quick peek of the dataframe before counting the values in the chosen columns:

Pandas dataframe to count occurences in
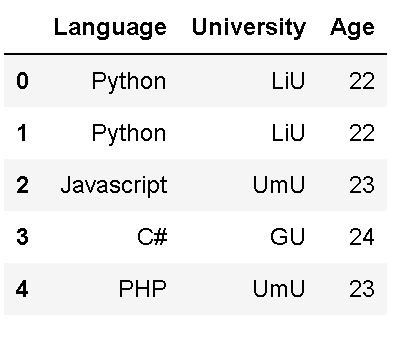
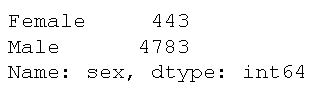
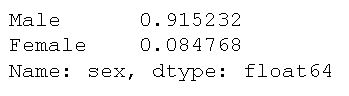
First five row of the example data
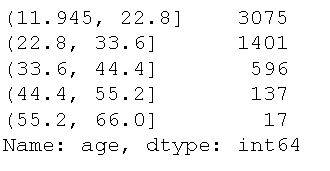
If you have another data source and you can also add a new column to the dataframe. Although, we get some information about the dataframe using the head() method you can get a list of column names using the column() method. Many times, we only need to know the column names when counting values.

Of course, in most cases, you would count occurrences in your own data set but now we have data to practice counting unique values with. In fact, we will now jump right into counting distinct values in the column “sex”.

How to Count Occurences with Pandas value_counts()

Here’s how to count occurrences (unique values) in a column in Pandas dataframe:


# pandas count distinct values in column df['sex'].value_counts()

As you can see, we selected the column “sex” using brackets (i.e. df['sex']), and then we just used the value_counts() method. Note, if we want to store the counted values as a variable we can create a new variable. For example, gender_counted = df['sex'].value_counts() would enable us to fetch the number of men in the dataset by its index (0, in this case).

pandas count unique values

As you can see, the method returns the count of all unique values in the given column in descending order, without any null values. By glancing at the above output we can, furthermore, see that there are more men than women in the dataset. In fact, the results show us that the vast majority are men.

Now, as with many Pandas methods, value_counts() has a couple of parameters that we may find useful at times. For example, if we want the reorder the output such as that the counted values (male and female, in this case) are shown in alphabetical order we can use the ascending parameter and set it to True:


# pandas count unique values ascending: df['sex'].value_counts(ascending=True)
get occurences in column pandas

Note, both of the examples above will drop missing values. That is, they will not be counted at all. There are cases, however, when we may want to know how many missing values there are in a column as well. In the next section, we will therefore have a look at another parameter that we can use (i.e., dropna). First, however, we need to add a couple of missing values to the dataset:


import numpy as np # Copying the dataframe df_na = df # Adding 10 missing values to the dataset df_na.iloc[[1, 6, 7, 8, 33, 44, 99, 103, 109, 201], 4] = np.NaN

In the code above, we used Pandas iloc method to select rows and NumPy’s nan to add the missing values to these rows that we selected. In the next section, we will count the occurrences including the 10 missing values we added, above.

Pandas Count Unique Values and Missing Values in a Column

Here’s a code example to get the number of unique values as well as how many missing values there are:


# Counting occurences as well as missing values: df_na['sex'].value_counts(dropna=False)

Looking at the output we can see that there are 10 missing values (yes, yes, we already knew that!). 

Getting the Relative Frequencies of the Unique Values

Now that we have counted the unique values in a column we will continue by using another parameter of the value_counts() method: normalize. Here’s how we get the relative frequencies of men and women in the dataset:


df['sex'].value_counts(normalize=True)
relative frequencies of values in column

This may be useful if we not only want to count the occurrences but want to know e.g. what percentage of the sample that are male and female. Before moving on to the next section, let’s get some descriptive statistics of the age column by using the describe() method:


df['age'].describe()

Naturally, counting age as we did earlier, with the column containing gender, would not provide any useful information.  Here’s the data output from the above code:

We can see that there are 5226 values of age data, a mean of 23.85, and a standard deviation of 8.32. Naturally, counting the unique values of the age column would produce a lot of headaches but, of course, it could be worse. In the next example, we will have a look at counting age and how we can bin the data. This is useful if we want to count e.g. continuous data. 

Creating Bins when Counting Distinct Values 

Another cool feature of the value_counts() method is that we can use the method to bin continuous data into discrete intervals. Here’s how we set the parameter bins to an integer representing the number of bins to create bins:


# pandas count unique values in bins: df['age'].value_counts(bins=5)
Pandas count unique values and binning themFive bins

For each bin, the range of age values (in years, naturally) is the same. One contains ages from 11.45 to 22.80 which is a range of 10.855. The next bin, on the other hand, contains ages from 22.80 to 33.60 which is a range of 11.8. in this example, you can see that all ranges here are roughly the same (except the first, of course). However, inside each range of fare values can contain a different count of the number of persons within this age range. We can see most people, that are arrested are under 22.8, followed by under 33.6. Kind of makes sense, in this case, right? In the next section, we will have a look at how we can use count the unique values in all columns in a dataframe.

Count the Frequency of Occurrences Across Multiple Columns

Naturally, it is also possible to count the occurrences in many columns using the value_counts() method. Now, we are going to start by creating a dataframe from a dictionary:


# create a dict of lists data = {'Language':['Python', 'Python', 'Javascript', 'C#', 'PHP'], 'University':['LiU', 'LiU', 'UmU', 'GU','UmU'], 'Age':[22, 22, 23, 24, 23]} # Creating a dataframe from the dict df3 = pd.DataFrame(data) df3.head()
Pandas dataframe

As you can see in the output, above, we have a smaller data set which makes it easier to show how to count the frequency of unique values in all columns. If you need, you can convert a NumPy array to a Pandas dataframe, as well. That said, here’s how to use the apply() method:


df3.apply(pd.value_counts)

What we did, in the code example above, was to use the method with the value_counts method as the only parameter. This will apply this method to all columns in the Pandas dataframe. However, this really not a feasible approach if we have larger datasets. In fact, the unique counts we get for this rather small dataset is not that readable:

values counted across all columns in the pandas dataframe

As often, when working with programming languages, there are more approaches than one to solve a problem. Therefore, in the next example, we are going to have a look at some alternative methods that involve grouping the data by category using Pandas groupby() method

Counting the Frequency of Occurrences in a Column using Pandas groupby Method

In this section, we are going to learn how to count the frequency of occurrences across different groups. For example, we can use size() to count the number of occurrences in a column:


# count unique values with pandas size: df.groupby('sex').size()

Another method to get the frequency we can use is the count() method:


# counting unique values with pandas groupby and count: df.groupby('sex').count()

Now, in both examples above, we used the brackets to select the column we want to apply the method on. Just as in the value_counts() examples we saw earlier. Note that this produces the exact same output as using the previous method and to keep your code clean I suggest that you use value_counts(). Finally, it is also worth mentioning that using the count() method will produce unique counts, grouped, for each column. This is clearly redundant information:

counting unique values in pandas dataframe with the groupby and count methods

Conclusion: Pandas Count Occurences in Column

In this Pandas tutorial, you have learned how to count occurrences in a column using 1) value_counts() and 2) groupby() together with size() and count(). Specifically, you have learned how to get the frequency of occurrences in ascending and descending order, including missing values, calculating the relative frequencies, and binning the counted values. 

The post Pandas Count Occurrences in Column – i.e. Unique Values appeared first on Erik Marsja.


from Planet Python
via read more

PyBites: Cleaning Text Data With Python

Table of Contents

  1. Cleaning Text Data with Python
  2. Tokenisation
  3. Normalising Case
  4. Remove All Punctuation
  5. Stop Words
  6. Spelling and Repeated Characters (Word Standardisation)
  7. Remove URLs, Email Addresses and Emojis
  8. Stemming and Lemmatisation
  9. A Simple Demonstration

Cleaning Text Data with Python

Machine Learning is super powerful if your data is numeric. What do you do, however, if you want to mine text data to discover hidden insights or to predict the sentiment of the text. What, for example, if you wanted to identify a post on a social media site as cyber bullying.

The first concept to be aware of is a Bag of Words. When training a model or classifier to identify documents of different types a bag of words approach is a commonly used, but basic, method to help determine a document's class. A bag of words is a representation of text as a set of independent words with no relationship to each other. It is called a “bag” of words, because any information about the order or structure of words in the document is discarded. The model is only concerned with whether known words occur in the document, not where in the document. It involves two things:

  1. A vocabulary of known words.
  2. A measure of the presence of known words.

Consider the phrases

  • "The cat in the hat sat in the window"
  • "The dog sat on the hat"

These phrases can be broken down into the following vector representations with a simple measure of the count of the number of times each word appears in the document (phrase):

Word the cat dog in on hat sat window
Phrase 1 3 1 0 2 0 1 1 1
Phrase 2 2 0 1 0 1 1 1 0

These two vectors [3, 1, 0, 2, 0, 1, 1, 1] and [2, 0, 1, 0, 1, 1, 1, 0] could now be be used as input into your data mining model.

A more sophisticated way to analyse text is to use a measure called Term Frequency - Inverse Document Frequency (TF-IDF). Term Frequency (TF) is the number of times a word appears in a document. This means that the more times a word appears in a document the larger its value for TF will get. The TF weighting of a word in a document shows its importance within that single document. Inverse Document Frequency (IDF) then shows the importance of a word within the entire collection of documents or corpus. The nature of the IDF value is such that terms which appear in a lot of documents will have a lower score or weight. This means terms that only appear in a single document, or in a small percentage of the documents, will receive a higher score. This higher score makes that word a good discriminator between documents. The TF-IDF weight for a word i in document j is given as:

TF-IDF weight image

A detailed background and explanation of TF-IDF, including some Python examples, is given here Analyzing Documents with TF-IDF. Suffice it to say that TF-IDF will assign a value to every word in every document you want to analyse and, the higher the TF-IDF value, the more important or predictive the word will typically be.

However, before you can use TF-IDF you need to clean up your text data. But why do we need to clean text, can we not just eat it straight out of the tin? The answer is yes, if you want to, you can use the raw data exactly as you've received it, however, cleaning your data will increase the accuracy of your model. This guide is a very basic introduction to some of the approaches used in cleaning text data. Some techniques are simple, some more advanced. For the more advanced concepts, consider their inclusion here as pointers for further personal research.

In the following sections I'm assuming that you have plain text and your text is not embedded in HTML or Markdown or anything like that. If your data is embedded in HTML, for example, you could look at using a package like BeautifulSoup to get access to the raw text before proceeding. You could use Markdown if your text is stored in Markdown.

Tokenisation

Typically the first thing to do is to tokenise the text. This is just a fancy way of saying split the data into individual words that can be processed separately. Tokenisation is also usually as simple as splitting the text on white-space. It's important to know how you want to represent your text when it is dived into blocks. By this I mean are you tokenising and grouping together all words on a line, in a sentence, all words in a paragraph or all words in a document. The simplest assumption is that each line a file represents a group of tokens but you need to verify this assumption. BTW I said you should do this first, I lied. A lot of the tutorials, sample code on the internet talks about tokenising your text immediately. This then has the downside that some of the simpler clean up tasks, like converting to lowercase and removing punctuation for example, need to be applied to each token and not on the text block as a whole. Something to consider.

Normalising Case

This is just a fancy way of saying convert all your text to lowercase. If using Tf-IDF Hello and hello are two different tokens. This has the side effect of reducing the total size of the vocabulary, or corpus, and some knowledge will be lost such as Apple the company versus eating an apple. In all cases you should consider if each of these actions actually make sense to the text analysis you are performing. If you are not sure, or you want to see the impact of a particular cleaning technique try the before and after text to see which approach gives you a more predictive model. Sometimes, in text mining, there are multiple different ways of achieving one's goal, and this is not limited to text mining as it is the same for standardisation in normal Machine Learning.

Remove Punctuation

When a bag of words approach, like described above is used, punctuation can be removed as sentence structure and word order is irrelevant when using TF-IDF. Some words of caution though. Punctuation can be vital when doing sentiment analysis or other NLP tasks so understand your requirements. Also, if you are also going to remove URL's and Email addresses you might want to the do that before removing punctuation characters otherwise they'll be a bit hard to identify. Another consideration is hashtags which you might want to keep so you may need a rule to remove # unless it is the first character of the token.

Stop Words

Stop Words are the most commonly used words in a language. You could consider them the glue that binds the important words into a sentence together. Sample stop words are I, me, you, is, are, was etc. Removing stop words have the advantage of reducing the size of your corpus and your model will also train faster which is great for tasks like Classification or Spam Filtering. Removing stop words also has the advantage of reducing the noise signal ratio as we don't want to analyse stop words because they are very unlikely to contribute to the classification task. However, another word or warning. If you are doing sentiment analysis consider these two sentences:

  • this movie was not good
  • movie good

By removing stop words you've changed the sentiment of the sentence. Who said NLP and Text Mining was easy.

Spelling and Repeated Characters (Word Standardisation)

Fixing obvious spelling errors can both increase the predictiveness of your model and speed up processing by reducing the size of your corpora. A good example of this is on Social Media sites when words are either truncated, deliberately misspelt or accentuated by adding unnecessary repeated characters. Consider:

  • love, luv, lovvvvv, lovvveeee

To an English speaker it's pretty obvious that the single word that represents all these tokens is love. Standardising your text in this manner has the potential to improve the predictiveness of your model significantly.

Remove URLs, Email Addresses and Emojis

Depending on your modelling requirements you might want to either leave these items in your text or further preprocess them as required. A general approach though is to assume these are not required and should be excluded. Consider if it is worth converting your emojis to text, would this bring extra predictiveness to your model? Regular expressions are the go to solution for removing URLs and email addresses.

Stemming and Lemmatisation

Stemming is a process by which derived or inflected words are reduced to their stem, sometimes also called the base or root. Using the words stemming and stemmed as examples, these are both based on the word stem. Stemming algorithms work by cutting off the end or the beginning of the word, taking into account a list of common prefixes and suffixes that can be found in an inflected word.

Lemmatisation in linguistics, is the process of grouping together the different inflected forms of a word so they can be analysed as a single item. In languages, words can appear in several inflected forms. For example, in English, the verb 'to walk' may appear as 'walk', 'walked', 'walks', 'walking'. The base form, 'walk', that one might look up in a dictionary, is called the lemma for the word.

So stemming uses predefined rules to transform the word into a stem whereas lemmatisation uses context and lexical library to derive a lemma. The stem doesn’t always have to be a valid word whereas lemma will always be a valid word because lemma is a dictionary form of a word.

A Simple Demonstration

Let have a look at some simple examples. We start by creating a string with five lines of text:

In [1]: data = """This is the first line
    ...: This is the 2nd line
    ...: The third line, this line, has punctuation.
    ...: THE FORTH LINE I we and you are not wanted
    ...: I lovveee email fred@flintsones.ie"""

At this point we could split the text into lines and split lines into tokens but first lets covert all the text to lowercase (line 4), remove that email address (line 5) and punctuation (line 6) and then split the string into lines (line 7).

In [2]: import re
In [3]: import string
In [4]: data = data.lower()
In [5]: data = re.sub(r'\S*@\S*\s*', '', data)
In [6]: data = data.translate(str.maketrans('', '', string.punctuation))
In [7]: lines = data.split('\n')
In [8]: lines
Out[8]:
['this is the first line',
 'this is the 2nd line',
 'the third line this line has punctuation',
 'the forth line i we and you are not wanted',
 'i lovveee email rocks']

Line 8 now shows the contents of the data variable which is now a list of 5 strings).

Next we'll tokenise each sentence and remove stop words. Normally you's use something like NLTK (Natural Language Toolkit) to remove stop words but in this case we'll just use a list of prepared tokens (words)

In [9]: tokens = [[word for word in line.split() if word not in stop_words] for line in lines]

In [10]: tokens
Out[10]:
[['first', 'line'],
 ['2nd', 'line'],
 ['third', 'line', 'line', 'punctuation'],
 ['forth', 'line', 'wanted'],
 ['lovveee', 'email', 'rocks']]

The final data cleansing example to look is spell checking and word normalisation. If we look at the list of tokens above you can see that there are two potential misspelling candidates 2nd and lovveee. Rather then fixing them outright, as every text mining scenario is different a possible solution to help identify the misspelt words in your corpus is shown. This would then allow you determine the percentage of words that are misspelt and, after analysis or all misspellings or a sample if the number of tokens is very large, an appropriate substituting algorithm if required.

In [1]: from spellchecker import SpellChecker

In [2]: spell = SpellChecker()

In [3]: misspelled = ['lovve', 'lovee', 'lovvee', 'lovveee', '2nd']

In [4]: for word in misspelled:
    ...:    print(f'{word}: \t{spell.correction(word)} \t{spell.candidates(word)}')
    ...:
lovve:    love    {'love'}
lovee:    love    {'lover', 'love', 'levee', 'loved', 'lovey', 'loves'}
lovvee:   love    {'lover', 'lovage', 'ovver', 'love', 'levee', ... 'loves', 'loaves'}
lovveee:    lovveee {'lovveee'}
2nd:        and     {'mnd', 'und', 'ond', 'nd', 'cnd', 'ind', 'bnd', 'and', 'hnd', 'end'}

In lines 1 and 2 a Spell Checker is imported and initialised. Line 3 creates a list of misspelt words. Then in line 4 each misspelt word, the corrected word, and possible correction candidate are printed. This is not suggested as an optimised solution but only provided as a suggestion.


from Planet Python
via read more

Anarcat: Presentation tools

I keep forgetting how to make presentations. I had a list of tools in a wiki from a previous job, but that's now private and I don't see why I shouldn't share this (even if for myself!).

So here it is. What's your favorite presentation tool?

Tips

  • if you have some text to present, outline keywords so that you can present your subject without reading every word
  • ideally, don't read from your slides - they are there to help people follow, not for people to read
  • even better: make your slides pretty with only a few words, or don't make slides at all

Further advice:

I'm currently using Pandoc with PDF input (with a trip through LaTeX) for most slides, because PDFs are more reliable and portable than web pages. I've also used Libreoffice, Pinpoint, and S5 (through RST) in the past. I miss Pinpoint, too bad that it died.

Some of my presentations are available in my GitLab.com account:

See also my list of talks and presentations which I can't seem to keep up to date.

Tools

Beamer (LaTeX)

  • LaTeX class
  • Do not use directly unless you are a LaTeX expert or masochist, see Pandoc below
  • see also powerdot
  • Home page

Impress.js

Libreoffice Impress

  • Powerpoint clone
  • Makes my life miserable
  • PDF export, presenter notes, outline view, etc
  • Home page, screenshots

Magicpoint

  • ancestor of everyone else (1997!)
  • text input format, image support, talk timer, slide guides, HTML/Postscript export, draw on slides, X11 output
  • no release since 2008
  • Home page

mdp

Pandoc

  • Allows converting from basically whatever into slides, including Beamer, DZSlides, reveal.js, slideous, slidy, Powerpoint
  • PDF, HTML, Powerpoint export, presentation notes, full screen background images
  • nice plain text or markdown input format
  • Home page, documentation

PDF Presenter

  • PDF presentation tool, shows presentation notes
  • basically "Keynote for Linux"
  • Home page, pdf-presenter-console in Debian

Pinpoint

  • Native GNOME app
  • Full screen slides, PDF export, live change, presenter notes, pango markup, video, image backgrounds
  • Home page
  • Abandoned since at least 2019

Reveal.js

  • HTML, Javascript
  • PDF export, Markdown, LaTeX support, syntax-highlighting, nested slides, speaker notes
  • Source code, demo

S5

  • HTML, CSS
  • incremental, bookmarks, keyboard controls
  • can be transformed from ReStructuredText (RST) with rst2s5 with python-docutils
  • Home page, demo

Sozi

  • Entire presentation is one poster, zooming and jumping around
  • SVG + Javascript
  • Home page, demo


from Planet Python
via read more

Codementor: Quit Virtualenv and use Docker

Start using docker in your dev environment

from Planet Python
via read more

Sumana Harihareswara - Cogito, Ergo Sumana: Changes Coming To Pip In October 2020

People who deal with Python: Changes are coming to pip, Python's package installation tool, in October 2020. Please share this migration guide and our video with your circles.

SHORT VERSION:

I'm working on improving the Python packaging toolchain, foundational work that will (in the long run) make the whole Python experience way less confusing. In the short term this may mess with some people's workflows, so we want lots of people to hear about it now.

The pip team made a 2-minute video to explain what's up:

We are also doing user experience studies, and want you to sign up if you ever do anything with Python (whatever your level of skill/experience).

Please boost this toot or retweet this tweet if you want to help us get the word out.

MORE DETAILS:

Computers need to know the right order to install pieces of software ("to install x, you need to install y first"). So, when Python programmers share software, like when they publish packages on the Python Package Index or internally in large companies, they have to precisely describe those installation prerequisites. And then pip needs to navigate tricky situations when it gets conflicting instructions.

Up until now, pip's been very inconsistent in handling this stuff, which makes it easy for your Python environment to get messed up. That's why we successfully applied for $407K in funding from Mozilla and the Chan Zuckerberg Initiative to finish and roll out a proper dependency resolver for pip. The goal is that pip will get better at handling that tricky logic, and easier for you to use and troubleshoot.

You can test the new behavior (in beta) right now by using an optional flag in pip 20.2. And in pip 20.3, coming in October, the new behavior will be the default.

Once you're using the new resolver, pip is going to be stricter and more consistent. So things won't mysteriously break as much, and we can add more features that lots of people want.

But! Right now, a ton of people unknowingly have Jenga towers of wobbly dependencies in their environments and will run into pain when we make the resolver stricter and more consistent. And this may lead to you getting stuck in troubleshooting, assuming that pip caused the problem, when actually the deeper cause is conflicts among how your upstreams specify requirements (TensorFlow just fixed a related thing, for example).

So: We're trying to get Python users to try out the beta of the new resolver that's available in the current stable release of pip (20.2), fix your own environments, report bugs in your upstreams in advance, and report bugs to us so we can fix them in the next couple weeks. We started spreading the word about this a few months ago. And now: video! People watch videos, I hear? I hope this helps.


from Planet Python
via read more

Codementor: Production ready Django App in Amazon Lightsail - Weblog

This article is based in this documentation page and this video where Mike Coleman takes us how to deploy a Django application on Amazon Lightsail.

from Planet Python
via read more

Real Python: Python's map(): Processing Iterables Without a Loop

Python’s map() is a built-in function that allows you to process and transform all the items in an iterable without using an explicit for loop, a technique commonly known as mapping. map() is useful when you need to apply a transformation function to each item in an iterable and transform them into a new iterable. map() is one of the tools that support a functional programming style in Python.

In this tutorial, you’ll learn:

  • How Python’s map() works
  • How to transform different types of Python iterables using map()
  • How to combine map() with other functional tools to perform more complex transformations
  • What tools you can use to replace map() and make your code more Pythonic

With this knowledge, you’ll be able to use map() effectively in your programs or, alternatively, to use list comprehensions or generator expressions to make your code more Pythonic and readable.

For a better understanding of map(), some previous knowledge of how to work with iterables, for loops, functions, and lambda functions would be helpful.

Free Bonus: 5 Thoughts On Python Mastery, a free course for Python developers that shows you the roadmap and the mindset you'll need to take your Python skills to the next level.

Coding With Functional Style in Python#

In functional programming, computations are done by combining functions that take arguments and return a concrete value (or values) as a result. These functions don’t modify their input arguments and don’t change the program’s state. They just provide the result of a given computation. These kinds of functions are commonly known as pure functions.

In theory, programs that are built using a functional style will be easier to:

  • Develop because you can code and use every function in isolation
  • Debug and test because you can test and debug individual functions without looking at the rest of the program
  • Understand because you don’t need to deal with state changes throughout the program

Functional programming typically uses lists, arrays, and other iterables to represent the data along with a set of functions that operate on that data and transform it. When it comes to processing data with a functional style, there are at least three commonly used techniques:

  1. Mapping consists of applying a transformation function to an iterable to produce a new iterable. Items in the new iterable are produced by calling the transformation function on each item in the original iterable.

  2. Filtering consists of applying a predicate or Boolean-valued function to an iterable to generate a new iterable. Items in the new iterable are produced by filtering out any items in the original iterable that make the predicate function return false.

  3. Reducing consists of applying a reduction function to an iterable to produce a single cumulative value.

According to Guido van Rossum, Python is more strongly influenced by imperative programming languages than functional languages:

I have never considered Python to be heavily influenced by functional languages, no matter what people say or think. I was much more familiar with imperative languages such as C and Algol 68 and although I had made functions first-class objects, I didn’t view Python as a functional programming language. (Source)

However, back in 1993, the Python community was demanding some functional programming features. They were asking for:

These functional features were added to the language thanks to the contribution of a community member. Nowadays, map(), filter(), and reduce() are fundamental components of the functional programming style in Python.

In this tutorial, you’ll cover one of these functional features, the built-in function map(). You’ll also learn how to use list comprehensions and generator expressions to get the same functionality of map() in a Pythonic and readable way.

Getting Started With Python’s map()#

Sometimes you might face situations in which you need to perform the same operation on all the items of an input iterable to build a new iterable. The quickest and most common approach to this problem is to use a Python for loop. However, you can also tackle this problem without an explicit loop by using map().

In the following three sections, you’ll learn how map() works and how you can use it to process and transform iterables without a loop.

Understanding map()#

map() loops over the items of an input iterable (or iterables) and returns an iterator that results from applying a transformation function to every item in the original input iterable.

According to the documentation, map() takes a function object and an iterable (or multiple iterables) as arguments and returns an iterator that yields transformed items on demand. The function’s signature is defined as follows:

map(function, iterable[, iterable1, iterable2,..., iterableN])

Read the full article at https://realpython.com/python-map-function/ »


[ Improve Your Python With 🐍 Python Tricks 💌 – Get a short & sweet Python Trick delivered to your inbox every couple of days. >> Click here to learn more and see examples ]


from Planet Python
via read more

Python's map(): Processing Iterables Without a Loop

Python’s map() is a built-in function that allows you to process and transform all the items in an iterable without using an explicit for loop, a technique commonly known as mapping. map() is useful when you need to apply a transformation function to each item in an iterable and transform them into a new iterable. map() is one of the tools that support a functional programming style in Python.

In this tutorial, you’ll learn:

  • How Python’s map() works
  • How to transform different types of Python iterables using map()
  • How to combine map() with other functional tools to perform more complex transformations
  • What tools you can use to replace map() and make your code more Pythonic

With this knowledge, you’ll be able to use map() effectively in your programs or, alternatively, to use list comprehensions or generator expressions to make your code more Pythonic and readable.

For a better understanding of map(), some previous knowledge of how to work with iterables, for loops, functions, and lambda functions would be helpful.

Coding With Functional Style in Python#

In functional programming, computations are done by combining functions that take arguments and return a concrete value (or values) as a result. These functions don’t modify their input arguments and don’t change the program’s state. They just provide the result of a given computation. These kinds of functions are commonly known as pure functions.

In theory, programs that are built using a functional style will be easier to:

  • Develop because you can code and use every function in isolation
  • Debug and test because you can test and debug individual functions without looking at the rest of the program
  • Understand because you don’t need to deal with state changes throughout the program

Functional programming typically uses lists, arrays, and other iterables to represent the data along with a set of functions that operate on that data and transform it. When it comes to processing data with a functional style, there are at least three commonly used techniques:

  1. Mapping consists of applying a transformation function to an iterable to produce a new iterable. Items in the new iterable are produced by calling the transformation function on each item in the original iterable.

  2. Filtering consists of applying a predicate or Boolean-valued function to an iterable to generate a new iterable. Items in the new iterable are produced by filtering out any items in the original iterable that make the predicate function return false.

  3. Reducing consists of applying a reduction function to an iterable to produce a single cumulative value.

According to Guido van Rossum, Python is more strongly influenced by imperative programming languages than functional languages:

I have never considered Python to be heavily influenced by functional languages, no matter what people say or think. I was much more familiar with imperative languages such as C and Algol 68 and although I had made functions first-class objects, I didn’t view Python as a functional programming language. (Source)

However, back in 1993, the Python community was demanding some functional programming features. They were asking for:

These functional features were added to the language thanks to the contribution of a community member. Nowadays, map(), filter(), and reduce() are fundamental components of the functional programming style in Python.

In this tutorial, you’ll cover one of these functional features, the built-in function map(). You’ll also learn how to use list comprehensions and generator expressions to get the same functionality of map() in a Pythonic and readable way.

Getting Started With Python’s map()#

Sometimes you might face situations in which you need to perform the same operation on all the items of an input iterable to build a new iterable. The quickest and most common approach to this problem is to use a Python for loop. However, you can also tackle this problem without an explicit loop by using map().

In the following three sections, you’ll learn how map() works and how you can use it to process and transform iterables without a loop.

Understanding map()#

map() loops over the items of an input iterable (or iterables) and returns an iterator that results from applying a transformation function to every item in the original input iterable.

According to the documentation, map() takes a function object and an iterable (or multiple iterables) as arguments and returns an iterator that yields transformed items on demand. The function’s signature is defined as follows:

map(function, iterable[, iterable1, iterable2,..., iterableN])

Read the full article at https://realpython.com/python-map-function/ »


[ Improve Your Python With 🐍 Python Tricks 💌 – Get a short & sweet Python Trick delivered to your inbox every couple of days. >> Click here to learn more and see examples ]


from Real Python
read more

LAAC Technology: Making Concurrent HTTP requests with Python AsyncIO

Table of Contents

Introduction

Python 3.4 added the asyncio module to the standard library. Asyncio allows us to run IO-bound tasks asynchronously to increase the performance of our program. Common IO-bound tasks include calls to a database, reading and writing files to disk, and sending and receiving HTTP requests. A Django web application is a common example of an IO-bound application.

We’ll demonstrate the usage of concurrent HTTP requests by fetching prices for stock tickers. The only third party package we’ll use is httpx. Httpx is very similar to the popular requests package, but httpx supports asyncio.

Project Set Up

Requires Python 3.8+

  1. Create a project directory
  2. Create a virtual environment inside the directory
    • python3 -m venv async_http_venv
  3. Activate the virtual environment
    • source ./async_http_venv/bin/activate
  4. Install httpx
    • pip install httpx
  5. Copy the below example code into a python file named async_http.py

Example Code

import argparse
import asyncio
import itertools
import pprint
from decimal import Decimal
from typing import List, Tuple
import httpx
YAHOO_FINANCE_URL = "https://query1.finance.yahoo.com/v8/finance/chart/{}"
async def fetch_price(
ticker: str, client: httpx.AsyncClient
) -> Tuple[str, Decimal]:
print(f"Making request for {ticker} price")
response = await client.get(YAHOO_FINANCE_URL.format(ticker))
print(f"Received results for {ticker}")
price = response.json()["chart"]["result"][0]["meta"]["regularMarketPrice"]
return ticker, Decimal(price).quantize(Decimal("0.01"))
async def fetch_all_prices(tickers: List[str]) -> List[Tuple[str, Decimal]]:
async with httpx.AsyncClient() as client:
return await asyncio.gather(
*map(fetch_price, tickers, itertools.repeat(client),)
)
if __name__ == "__main__":
parser = argparse.ArgumentParser()
parser.add_argument(
"-t",
"--tickers",
nargs="+",
help="List of tickers separated by a space",
required=True,
)
args = parser.parse_args()
loop = asyncio.get_event_loop()
result = loop.run_until_complete(fetch_all_prices(args.tickers))
pprint.pprint(result)

Test the Example Code

With the newly created virtual environment activated and python file ready, let’s run the program to test our setup.

python async_http.py -t VTSAX VTIAX IJS VSS AAPL ORCL GOOG MSFT FB

python asyncio http first request

If you look at the output, the requests do not finish sequentially. In a synchronous program, the request for VTSAX would be made first and finish first. Afterward, the next request for VTIAX would start. In our asynchronous program, the requests are made back to back and finish out of order whenever the API responds. Let’s run the script again with the same arguments and see what the order of results are.

python asyncio http second request

As you can see in the first request we received results for IJS first, but in the second request, the results for IJS returned fourth. Let’s walk through the code to see what our program does.

Walk Through

Let’s start with the fetch_all_prices function. The function starts by creating an AsyncClient that we’ll pass in every time we call fetch_price.

async with httpx.AsyncClient() as client:

Creating a client allows us to take advantage of HTTP connection pooling, which reuses the same TCP connection for each request. This increases the performance for each HTTP request. Additionally, we’re using a with statement to automatically close our client when the function finishes.

Next, let’s look at our return statement.

return await asyncio.gather(
*map(fetch_price, tickers, itertools.repeat(client),)
)

First, we’re running asyncio.gather which accepts asyncio futures or coroutines. In our case, we’re expanding, using an asterisk, a map of fetch_price functions which are our coroutines. To create our map of functions, we’re using the list of tickers and using itertools.repeat, which passes in our client to every function for each ticker. Once our map call is done, we have a function for each ticker which we can pass to asyncio.gather to run concurrently.

Now let’s look at our fetch_price function.

response = await client.get(YAHOO_FINANCE_URL.format(ticker))

We’re using the AsyncClient that we passed in to make an HTTP GET request to Yahoo Finance. We use the await keyword here because this is where the IO happens. Once the program reaches this line, it makes the HTTP GET request and yields control to the event loop while the request finishes.

price = response.json()["chart"]["result"][0]["meta"]["regularMarketPrice"]
return ticker, Decimal(price).quantize(Decimal("0.01"))

Once the request finishes, we extract the json from the response and return the price along with the ticker to identify which price is associated with a ticker. Finally before returning the price, we turn it into a decimal and round it to the nearest two decimal points.

Final Thoughts

The package ecosystem around the asyncio module is still maturing. Httpx looks like a quality replacement for requests. Starlette and FastAPI are two promising ASGI based web servers. As of version 3.1, Django has support for ASGI. Finally, more libraries are being released with asyncio in mind. As of this writing, asyncio has not seen widespread usage, but over the next few years, I predict asyncio will see a lot more adoption within the Python community.


from Planet Python
via read more

eGenix.com: Python Meeting Düsseldorf - 2020-09-30

The following text is in German, since we're announcing a regional user group meeting in Düsseldorf, Germany.

Ankündigung

Das nächste Python Meeting Düsseldorf findet an folgendem Termin statt:

30.09.2020, 18:00 Uhr
Raum 1, 2.OG im Bürgerhaus Stadtteilzentrum Bilk
Düsseldorfer Arcaden, Bachstr. 145, 40217 Düsseldorf


Programm

Bereits angemeldete Vorträge

Ulf Morys
        "Extraktion von Tabellendaten aus PDF Dateien"

Marc-Andre Lemburg
        "Ansible Vault - Wie kann ich Geheimnisse in Repos verwalten ?"

Jochen Wersdörfer
        "Django Aysnc"

Weitere Vorträge können gerne noch angemeldet werden. Bei Interesse, bitte unter info@pyddf.de melden.

Startzeit und Ort

Wir treffen uns um 18:00 Uhr im Bürgerhaus in den Düsseldorfer Arcaden.

Das Bürgerhaus teilt sich den Eingang mit dem Schwimmbad und befindet sich an der Seite der Tiefgarageneinfahrt der Düsseldorfer Arcaden.

Über dem Eingang steht ein großes "Schwimm’ in Bilk" Logo. Hinter der Tür direkt links zu den zwei Aufzügen, dann in den 2. Stock hochfahren. Der Eingang zum Raum 1 liegt direkt links, wenn man aus dem Aufzug kommt.

>>> Eingang in Google Street View

Corona

Es gelten die üblichen Regelungen zum Abstand und dem Tragen einer Maske. Der Raum kann gut belüftet werden und bietet mit 83 m² genügend Platz für 13 Personen.

Masken müssen getragen werden, während man sich durch den Raum bewegt. Am Platz sind sie nicht verpflichtend. Zudem müssen wir die Kontaktdaten von allen Teilnehmern erfassen.

Wichtig: Bitte nur dann anmelden, wenn ihr absolut sicher seid, dass ihr auch kommt. Angesichts der geringen Anzahl Plätze haben wir kein Verständnis für kurzfristige Absagen oder No-Shows.

Einleitung

Das Python Meeting Düsseldorf ist eine regelmäßige Veranstaltung in Düsseldorf, die sich an Python Begeisterte aus der Region wendet.

Einen guten Überblick über die Vorträge bietet unser PyDDF YouTube-Kanal, auf dem wir Videos der Vorträge nach den Meetings veröffentlichen.

Veranstaltet wird das Meeting von der eGenix.com GmbH, Langenfeld, in Zusammenarbeit mit Clark Consulting & Research, Düsseldorf:

Programm

Das Python Meeting Düsseldorf nutzt eine Mischung aus (Lightning) Talks und offener Diskussion.

Vorträge können vorher angemeldet werden, oder auch spontan während des Treffens eingebracht werden. Ein Beamer mit XGA Auflösung steht zur Verfügung.

(Lightning) Talk Anmeldung bitte formlos per EMail an info@pyddf.de

Kostenbeteiligung

Das Python Meeting Düsseldorf wird von Python Nutzern für Python Nutzer veranstaltet.

Da Tagungsraum, Beamer, Internet und Getränke Kosten produzieren, bitten wir die Teilnehmer um einen Beitrag in Höhe von EUR 10,00 inkl. 19% Mwst. Schüler und Studenten zahlen EUR 5,00 inkl. 19% Mwst.

Wir möchten alle Teilnehmer bitten, den Betrag in bar mitzubringen.

Anmeldung

Da wir nur für ca. 20 Personen Sitzplätze haben, möchten wir bitten, sich per EMail anzumelden. Damit wird keine Verpflichtung eingegangen. Es erleichtert uns allerdings die Planung.

Meeting Anmeldung bitte per Meetup oder formlos per EMail an info@pyddf.de

Weitere Informationen

Weitere Informationen finden Sie auf der Webseite des Meetings:

              http://pyddf.de/

Viel Spaß !

Marc-Andre Lemburg, eGenix.com


from Planet Python
via read more

Best YouTube Machine Learning Channels

Machine learning has revolutionized the world in a very short span of time. Since the data is growing on the exponential rate...

The post Best YouTube Machine Learning Channels appeared first on neptune.ai.


from Planet SciPy
read more

Tuesday, September 29, 2020

Design of the Versioned HDF5 Library

In a previous post, we introduced the Versioned HDF5 library and described some of its features. In this post, we'll go into detail on how the underlying design of the library works on a technical level.

Read more… (6 min remaining to read)


from Planet SciPy
read more

Catalin George Festila: Python Qt5 - Use QStandardItem with Images.

This tutorial show you how to use QStandardItem with Images. The source code is simple to understand. import sys from PyQt5.QtWidgets import QApplication, QMainWindow, QTreeView from PyQt5.QtCore import Qt from PyQt5.QtGui import QFont, QColor, QImage, QStandardItemModel, QStandardItem class ItemImage(QStandardItem): def __init__(self, txt='', image_path='', set_bold=False, color=QColor(0,

from Planet Python
via read more

TestDriven.io: Working with Static and Media Files in Django

This article looks at how to work with static and media files in a Django project, locally and in production. from Planet Python via read...