Saturday, February 29, 2020

Test and Code: 103: Django - Lacey Williams Henschel

Django is without a doubt one of the most used web frameworks for Python. Lacey Williams Henschel is a Django consultant and has joined me to talk about Django, the Django community, and so much more.

Topics:

  • Django
  • The Django Community
  • Django Girls
  • Django Girls Tutorial
  • DjangoCon
  • Software Testing
  • Using tests during learning
  • pytest-django
  • testing Django
  • Wagtail

Special Guest: Lacey Williams Henschel.

Sponsored By:

Support Test & Code: Python Software Testing & Engineering

Links:

<p>Django is without a doubt one of the most used web frameworks for Python. Lacey Williams Henschel is a Django consultant and has joined me to talk about Django, the Django community, and so much more.</p> <p>Topics:</p> <ul> <li>Django</li> <li>The Django Community</li> <li>Django Girls</li> <li>Django Girls Tutorial</li> <li>DjangoCon</li> <li>Software Testing</li> <li>Using tests during learning</li> <li>pytest-django</li> <li>testing Django</li> <li>Wagtail</li> </ul><p>Special Guest: Lacey Williams Henschel.</p><p>Sponsored By:</p><ul><li><a href="https://ift.tt/34ZzBsU" rel="nofollow">Raygun</a>: <a href="https://ift.tt/34ZzBsU" rel="nofollow">Detect, diagnose, and destroy Python errors that are affecting your customers. With smart Python error monitoring software from Raygun.com, you can be alerted to issues affecting your users the second they happen.</a></li></ul><p><a href="https://ift.tt/2tzXV5e" rel="payment">Support Test & Code: Python Software Testing & Engineering</a></p><p>Links:</p><ul><li><a href="https://ift.tt/q4NHeK" title="Django " rel="nofollow">Django </a></li><li><a href="https://ift.tt/1eJ7zX9" title="Django Girls " rel="nofollow">Django Girls </a></li><li><a href="https://ift.tt/2fSiKia" title="Django Girls Tutorial" rel="nofollow">Django Girls Tutorial</a></li><li><a href="https://ift.tt/2VAXsNg" title="DjangoCon US 2020 " rel="nofollow">DjangoCon US 2020 </a></li><li><a href="https://ift.tt/2aaNkAd" title="Django: Under the Hood" rel="nofollow">Django: Under the Hood</a></li><li><a href="https://pydata.org/" title="PyData" rel="nofollow">PyData</a></li><li><a href="https://ift.tt/2PChLpQ" title="PyCascades" rel="nofollow">PyCascades</a></li><li><a href="https://ift.tt/2tsMDzk" title="Django REST framework" rel="nofollow">Django REST framework</a></li><li><a href="https://ift.tt/2UVp8sZ" title="pytest-django" rel="nofollow">pytest-django</a></li><li><a href="https://wagtail.io/" title="Wagtail CMS - Django Content Management System" rel="nofollow">Wagtail CMS - Django Content Management System</a></li></ul>

from Planet Python
via read more

Roberto Alsina: Episodio 25: Asignaciones y mutabilidad

En Python, asignar valores a variables no es exactamente igual que en otros lenguajes. Y eso provoca comportamientos que pueden resultar sorprendentes. Y después eso te lleva a ver que con algunos tipos funciona distinto. Y eso es porque algunos tipos son "inmutables". Y así sigue, una cosa lleva a la otra.


from Planet Python
via read more

Erik Marsja: How to Convert a Python Dictionary to a Pandas DataFrame

The post How to Convert a Python Dictionary to a Pandas DataFrame appeared first on Erik Marsja.

In this brief Python Pandas tutorial, we will go through the steps of creating a dataframe from a dictionary. Specifically, we will learn how to convert a dictionary to a Pandas dataframe in 3 simple steps. First, however, we will just look at the syntax. After we have had a quick look at the syntax on how to create a dataframe from a dictionary we will learn the easy steps and some extra things. In the end, there’s a YouTube Video and a link to the Jupyter Notebook containing all the example code from this post.

Data Import in Python with Pandas

Now, most of the time we will use Pandas read_csv or read_excel to import data for our statistical analysis in Python. Of course, sometimes we may use the read_sav, read_spss, and so on. If we need to import data from other file types refer to the following posts on how to read csv files with Pandas, how to read excel files with Pandas, and how to read Stata, read SPSS files, and read SAS files with Python and Pandas.

convert a python dictionary to a pandas dataframe

However, there are cases when we may only have a few rows of data or some basic calculations that need to be done. If this is the case, we may want to know how to easily convert a Python dictionary to a Pandas dataframe.

Basic Syntax for Creating a Dataframe from a Dictionary

If we want to convert a Python Dictionary to a Pandas dataframe here’s the simple syntax:

import pandas as pd

data = {‘key1’: values, ‘key2’:values, ‘key3’:values, …, ‘keyN’:values}
df = pd.DataFrame(data)

When we use the above template we will create a dataframe from a dictionary. Now, before we go on with the steps on how to convert a dictionary to a dataframe we are going to answer some questions:

What is a Python Dictionary?

Now, a dictionary in Python is an unordered collection of data values. If we compare a Python dictionary to other data types, in Python, it holds a key:value pair.

What is a DataFrame?

Now, the next question we are going to answer is concerning what a dataframe is. A DataFrame is a 2-d labeled data structure that has columns of potentially different types (e.g., numerical, categorical, date). It is in many ways a lot like a spreadsheet or SQL table.

Create a Dataframe from a Dictionary

In general, we can create the dataframe from a range of different objects. We will just use the default constructor.

convert a Dictionary to a dataframeDataFrame Constructor

3 Steps to Convert a Dictionary to a Dataframe

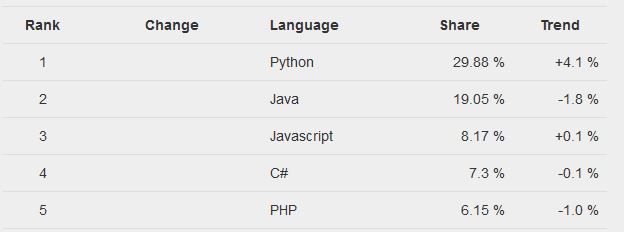
Now, we are ready to go through how to convert a dictionary to a Pandas dataframe step by step.  In the first example, on how to build a dataframe from a dictionary we will get some data on the popularity of programming languages (here).

1. Add, or gather, data to the Dictionary

In the first step, we need to get our data to a Python dictionary. This may be done by scraping data from the web or just crunching in the numbers in a dictionary as in the example below.

If we collect the top 5 most popular programming languages:

make dataframe from python dictionary

2. Create the Python Dictionary

In the second step, we will create our Python dictionary from the data we gathered in the first step. That is, before converting the dictionary to a dataframe we need to create it:

data = {'Rank':[1, 2, 3, 4, 5],
       'Language': ['Python', 'Java',
                   'Javascript',
                   'C#', 'PHP'],
       'Share':[29.88, 19.05, 8.17,
               7.3, 6.15],
       'Trend':[4.1, -1.8, 0.1, -0.1, -1.0]}

print(data)
dataframe from dict

3. Convert the Dictionary to a Pandas Dataframe

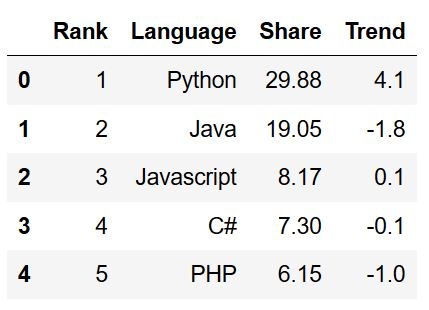
Finally, we are ready to take our Python dictionary and convert it into a Pandas dataframe. This is easily done, and we will just use pd.DataFrame and put the dictionary as the only input:

df = pd.DataFrame(data)

display(df)
make a dataframe from a dictionary

Note, when we created the Python dictionary, we added the values in lists. If we’re to have different lengths of the Python lists, we would not be able to create a dataframe from the dictionary. This would lead to a ValueError (“ValueError: arrays must all be the same length”).

Now that we have our dataframe, we may want to get the column names from the Pandas dataframe.

Pandas Dataframe from Dictionary Example 2

In the second, how to create Pandas create dataframe from dictionary example, we are going to work with Python’s OrderedDict.

from collections import OrderedDict

data= OrderedDict([('Trend', [4.1, -1.8, 0.1, 
                              -0.1, -1.0]),
                   ('Rank',[1, 2, 3, 4, 5]),
                   ('Language', ['Python', 'Java',
                                 'Javascript',
                                 'C#', 'PHP']),
                   ('Share', [29.88, 19.05, 8.17,
                              7.3, 6.15])])

display(data)
create a dataframe from a python dictionary

Now, to create a dataframe from the ordered dictionary (i.e. OrderedDict) we just use the pd.DataFrame constructor again:

df = pd.DataFrame(data)

Note, this dataframe, that we created from the OrderedDict, will, of course, look exactly the same as the previous ones.

Create a DataFrame from a Dictionary Example 3: Custom Indexes

Now, in the third create a DataFrame from a Python dictionary, we will use the index argument to create custom indexes of the dataframe.

from collections import OrderedDict

data = OrderedDict([('Trend', [4.1, -1.8, 0.1, 
                              -0.1, -1.0]),
                   ('Rank',[1, 2, 3, 4, 5]),
                   ('Language', ['Python', 'Java',
                                 'Javascript',
                                 'C#', 'PHP']),
                   ('Share', [29.88, 19.05, 8.17,
                              7.3, 6.15])])

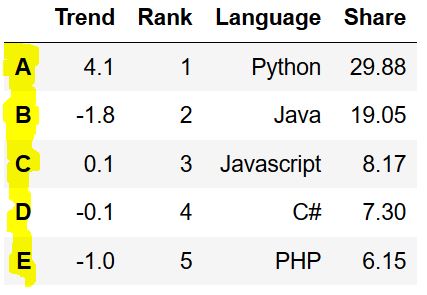
df = pd.DataFrame(data, index = ['A', 'B',
                                'C', 'D',
                                'E'])

display(df)
convert a dictionary to a pandas dataframe

Note, we can, of course, use the columns argument also when creating a dataframe from a dictionary, as in the previous examples.

Create a DataFrame from a Dictionary Example 4: Skip Data

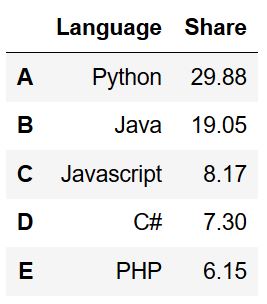
In the fourth example, we are going to create a dataframe from a dictionary and skip some columns. This is easily done using the columns argument. This argument takes a list as a parameter and the elements in the list will be the selected columns:

from collections import OrderedDict

data = OrderedDict([('Trend', [4.1, -1.8, 0.1, 
                              -0.1, -1.0]),
                   ('Rank',[1, 2, 3, 4, 5]),
                   ('Language', ['Python', 'Java',
                                 'Javascript',
                                 'C#', 'PHP']),
                   ('Share', [29.88, 19.05, 8.17,
                              7.3, 6.15])])
df = pd.DataFrame(data, index = ['A', 'B',
                                'C', 'D',
                                'E'],
                 columns=['Language', 'Share'])

display(df)
dict to pandas dataframe

Create DataFrame from Dictionary Example 5: Changing the Orientation

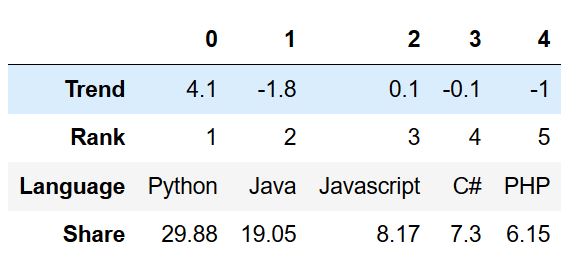
In the fifth example, we are going to make a dataframe from a dictionary and change the orientation. That is, in this example, we are going to make the rows columns. Note, however, that here we use the from_dict method to make a dataframe from a dictionary:

df = pd.DataFrame.from_dict(data, orient='index')

df.head()
how to convert a dictionary to a pandas dataframe

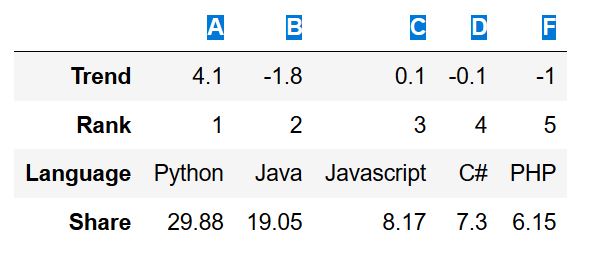
As we can see in the image above, the dataframe we have created has the column names 0 to 4. If we want to, we can name the columns using the columns argument:

df = pd.DataFrame.from_dict(data, orient='index',
                            columns=['A', 'B', 'C',
                                    'D', 'F'])

df.head()
convert dictionary to dataframe

YouTube Video: Convert a Dictionary to a Pandas Dataframe

Now, if you prefer to watch and listen to someone explaining how to make a dataframe from a Python dictionary here’s a YouTube video going through the steps as well as most of the other parts of this tutorial:

Bonus: Save the DataFrame as a CSV

Finally, and as a bonus, we will learn how to save the dataframe we have created from a Python dictionary to a CSV file:

df.to_csv('top5_prog_lang.csv')

That was simple, saving data as CSV with Pandas is quite simple. It is, of course, also possible to write the dataframe as an Excel (.xlsx) file with Pandas. Finally, here’s the Jupyter Notebook for the code examples from this post.

Summary

Most of the time, we import data to Pandas dataframes from CSV, Excel, or SQL file types. Moreover, we may also read data from Stata, SPSS, and SAS files. However, there are times when we have the data in a basic list or, as we’ve learned in this post, a dictionary. Now, using Pandas it is, of course, possible to create a dataframe from a Python dictionary.

The post How to Convert a Python Dictionary to a Pandas DataFrame appeared first on Erik Marsja.


from Planet Python
via read more

Weekly Python StackOverflow Report: (ccxvii) stackoverflow python report

These are the ten most rated questions at Stack Overflow last week.
Between brackets: [question score / answers count]
Build date: 2020-02-29 08:02:22 GMT

  1. How can I replace the first occurrence of a character in every word? - [18/5]
  2. Weird indexing using numpy - [16/2]
  3. Python vs Julia autocorrelation - [13/2]
  4. Django run tasks (possibly) in the far future - [7/0]
  5. Copy performance: list vs array - [6/1]
  6. Hours and minutes as labels in Altair plot spanning more than one day - [5/2]
  7. Spark: Why does Python significantly outperform Scala in my use case? - [5/2]
  8. How to convert several lists to a list of dicts in python? - [5/2]
  9. How do I make an inverse filled transparent rectangle with OpenCV? - [5/2]
  10. Is there a shorter way or a pythonic way to generate custom html that follows a pattern using BeautifulSoup? - [5/1]


from Planet Python
via read more

Friday, February 28, 2020

Andre Roberge: Implicit multiplication in Python - part 1

Quoting from a post from Guido van Rossum

    ... The power of visual processing really becomes apparent when you combine
    multiple operators. For example, consider the distributive law
       
mul(n, add(x, y)) == add(mul(n, x), mul(n, y))  (5)
    That was painful to write, and I believe that at first you won't see the
    pattern (or at least you wouldn't have immediately seen it if I hadn't
    mentioned this was the distributive law).
    Compare to
        n * (x + y) == n * x + n * y    (5a)
    Notice how this also uses relative operator priorities. Often
    mathematicians write this even more compact
        n(x+y) == nx + ny    (5b)
    but alas, that currently goes beyond the capacities of Python's parser.
    ...
    Now, programming isn't exactly the same activity as math, but we all know
    that Readability Counts, and this is where operator overloading in Python
    comes in.  ...
What if we could do something half-way between what Python currently allow
and what mathematicians would write by transforming something that is currently a SyntaxError into valid Python code?


    >>> from ideas.examples import implicit_multiplication as mul
    >>> hook = mul.add_hook()
    >>> from ideas import console
    >>> console.start()
    Configuration values for the console:
        callback_params: {'show_original': False, 
                          'show_transformed': False}
        transform_source from ideas.examples.implicit_multiplication
    --------------------------------------------------
    Ideas Console version 0.0.7a. [Python version: 3.7.3]

    ~>> 2(3 + 4)
    14
    ~>> a = 3
    ~>> b = 4
    ~>> 2a
    6
    ~>> a b
    12

All that is needed is to change the way the code is tokenized before the code is parsed by Python.

from Planet Python
via read more

Luke Plant: Double-checked locking with Django ORM

The double-checked locking pattern is one that is useful when:

  1. You need to restrict access to a certain resource to stop simultaneous processes from working on it at the same time.
  2. The locking patterns available to you have significant costs.

This post is about how we can implement this pattern in Django, using the ORM and database level locking features. The pattern applies if you are not using Django, or indeed any ORM, but I have only checked it for Django, and in fact only really verified it works as expected using PostgreSQL.

The situation

You have some database records that require ‘processing’ of some kind, but need to ensure that they are only processed once. For example, in your e-commerce system, you might want to send an email to your users when their order is shipped, but make sure you only send one. You’ve got something like this:

class Order(models.Model):
    shipped_at = models.DateTimeField(null=True)
    shipped_email_sent = models.BooleanField(default=False)

Email sending may take a little time, or fail, so we have some kind of background job to do this. We could use a job queue like Celery to do this and ensure that only one process at a time attempts to do the sending, but maybe we don’t have a queue like that, or maybe we don’t trust it to have been configured correctly etc.

We’re using shipped_email_sent to track whether we’ve sent the emails or not, but even if we filter on that, simultaneous processes launched at the same moment could end up sending emails twice, due to the delay between querying and updating the records. We could use select_for_update(), but want to avoid locking this important table anymore than absolutely necessary. What should we do?

Solution

I’ll present my solution, and then explain afterwards. But the notes are important — don’t just copy-paste this!

def send_pending_order_shipped_emails():
    orders_to_email = Order.objects.filter(
        shipped_at__isnull=False,
        shipped_email_sent=False,
    )

    for order in orders_to_email:
        with transaction.atomic():
            for order in (orders_to_email
                          .filter(id=order.id)
                          .select_for_update(skip_locked=True)):
                send_shipped_email(order)
                order.shipped_email_sent = True
                order.save()

Explanation

  1. This whole block of code should be executed outside an atomic block.
  2. Note that the outer orders_to_email block is therefore outside a transaction, and uses no locking. So, if this query return no results, the whole process does just a single read query, without locking, and exits. This is great for performance and avoiding contention on the DB.
  3. If there are items to process, we then start an atomic transaction block.
  4. Since the first query was outside a transaction, another process may have beaten us to it, we have to do another query to make sure the record still matches the criteria — the inner query.
  5. This time we use SELECT FOR UPDATE, so that no other process will be able to enter this block for this row at the same time.
  6. We use skip_locked so that if someone else does beat us to it, we just skip the record and try the next one.
  7. We set a flag that ensures that this record will no longer be found by the orders_to_email query.

The result is that we guarantee each record gets processed at most once.

Notes

  • I’ve only checked this with PostgreSQL and the default isolation level of READ COMMITTED.

  • Note the use of Django QuerySets: We define the correctly filtered query once, and then we re-use with chaining to execute it multiple times. We are relying on the fact that the additional filter etc. are creating a new, unevaluated QuerySet, which executes a new query when we loop over it with the second for loop.

  • Making sure you read the notes for select_for_update and use of parameter as appropriate.

  • We guarantee “at most once” — but that allows the possibility of zero times. If you have other, different processes that are also locking those rows in the table (not just multiple copies of this code executing this same code), then the skip_locked=True flag means this process could exit without having processed all the rows, and without any errors. If you don’t mind having to try multiple times to be sure, that should be OK. In other words, this code is assuming “everyone else is more important than me.”

    I think you could change this by using select_for_update(nowait=True) instead, combined with appropriate try/except/looping.

    For trying multiple times, we could:

    1. Leave that to the next time our background job attempts this, or
    2. Do some counting inside the two loops, and if the inner loop comes up short, we know that for some reason we skipped some rows (it could have been because someone else already processed the row, or because someone else locked the rows for a different reason). If so, recursively call send_pending_order_shipped_emails. This recursion will definitely terminate when orders_to_email comes up empty, or when we succeed to process everything in it.
  • Performance note: we are doing N+1 read queries to process all the pending records, plus N writes. You might need to be aware of that, compared to doing 1 read and 1 write if we did them all together and used some other mechanism to ensure we didn’t have multiple competing processes.

  • If you have multiple processes racing to process the pending records, the above code will naturally distribute the work between them approximately equally — you get work distribution for free.

  • I’ve tried to find ways to encapsulate this pattern more neatly in Django/Python, like with double_checked_locking(queryset) but so far had no luck at producing something materially better (like this in django-mailer, which works OK but has an awkward usage pattern). I think this one is better just doing every time, especially given some of the issues above.

Anything else? My understanding of how PostgreSQL isolation levels and transactions work, along with my experiments (using good ol’ time.sleep()) seem to confirm this works as per the description and notes above, but if I’ve missed something please add a comment!


from Planet Python
via read more

Gocept Weblog: Zope May Sprint

Earl Zope has settled down for a good while in Python 3 wonderland. He made friends with the inhabitants and other immigrants. He enjoys his new live.

The sunset of his original homelands took place as predicted by the beginning of January 2020. As Earl Zope was well prepared this was no longer a frightening date for him.

But even living in Python 3 wonderland is not only joy and relaxing. The Python 3 wonderland changes in a more rapid speed than the Python 2 land ever had before: Each year a new policy has to be fulfilled (aka new Python version release). Additionally it is time to drop the last connections to the old Python 2 land to ease the transformation in Python 3 wonderland to make developers and consumers happy.

Earl Zope is grateful for all the help he already gained: There where several Zope 4 releases and a first Zope 5 alpha version was just released. Even though Earl Zope still needs your help to:

  • prepare dependencies to ease transition to new Python versions (aka make repositories more uniform to ease updating to new Python versions.)
  • drop Python 2 support in repositories of dependencies
  • support and test with newer Python 3 versions (aka current 3.9 alpha)
  • improve and update the documentation

You are invited to the “Zope May sprint” located in Halle/Saale, 🇩🇪 from 13th till 15h of May 2020 hosted by gocept. In order to coordinate the participation for this sprint, we ask you to join us on Meetup. We can then coordinate the catering and requirements for space.


from Planet Python
via read more

Reuven Lerner: “Python Workout” is Manning’s “Deal of the Day”

I’m delighted to announce that my book, “Python Workout,” is Manning’s “Deal of the Day” for February 28th.

The book contains 50 complete exercises and solutions on all of the core aspects of Python — data structures, functions, comprehensions, objects, and iterators. It also has an additional 150 “beyond the exercise” problems to keep you thinking and practicing, even after you’ve completed an exercise.

One early reader said, “This is the best Python book I have ever reviewed and read in all my years working with Python. The challenges presented, the level of the programming, and the quality of the explanations by Reuven make this book a true Python jewel, a must have book in my Python library!”

The book is going through its final phases of editing and production. But you can already learn from it as a “MEAP” (Manning Early-Access Program) book online.

Get it for 50% off today, at https://www.manning.com/dotd! Just use the coupon code “dotd022820” at checkout.

The post “Python Workout” is Manning’s “Deal of the Day” appeared first on Reuven Lerner.


from Planet Python
via read more

Thursday, February 27, 2020

How To Create QR Codes

How To Create QR Codes with Python. For beginners. Some short and simple code to create QR bar codes that can be scanned on your smart phone to pass links, text or other alphanumeric data.

from Python Coder
via read more

Catalin George Festila: Python 3.6.9 : Google give a new tool for python users.

Today I discovered a real surprise gift made by the team from Google for the evolution of programmers. I say this because not everyone can afford hardware resources. This gift is a new tool called Colab and uses these versions of python and sys: Python version 3.6.9 (default, Nov 7 2019, 10:44:02) [GCC 8.3.0] Version info. sys.version_info(major=3, minor=6, micro=9, releaselevel='final',

from Planet Python
via read more

Matt Layman: A Week At A Time - Building SaaS #46

In this episode, we worked on a weekly view for the Django app. We made navigation that would let users click from one week to the next, then fixed up the view to pull time from that particular week. The first thing that I did was focus on the UI required to navigate to a new weekly view in the app. We mocked out the UI and talked briefly about the flexbox layout that is available to modern browsers.

from Planet Python
via read more

Test and Code: 102: Cosmic Python, TDD, testing and external dependencies - Harry Percival

Harry Percival has completed his second book, "Architecture Patterns with Python".
So of course we talk about the book, also known as "Cosmic Python".
We also discuss lots of testing topics, especially related to larger systems and systems involving third party interfaces and APIs.

Topics

  • Harry's new book, "Architecture Patterns with Python". a.k.a. Cosmic Python
  • TDD : Test Driven Development
  • Test Pyramid
  • Tradeoffs of different architectural choices
  • Mocks and their pitfalls
  • Avoiding mocks
  • Separating conceptual business logic
  • Dependency injection
  • Dependency inversion
  • Identifying external dependencies
  • Interface adapters to mimize the exposed surface area of external dependencies
  • London School vs Classic/Detroit School of TDD
  • Testing strategies for testing external REST APIs

Special Guest: Harry Percival.

Sponsored By:

Support Test & Code: Python Software Testing & Engineering

Links:

<p>Harry Percival has completed his second book, &quot;Architecture Patterns with Python&quot;.<br> So of course we talk about the book, also known as &quot;Cosmic Python&quot;.<br> We also discuss lots of testing topics, especially related to larger systems and systems involving third party interfaces and APIs.</p> <p>Topics </p> <ul> <li>Harry&#39;s new book, &quot;Architecture Patterns with Python&quot;. a.k.a. Cosmic Python </li> <li>TDD : Test Driven Development</li> <li>Test Pyramid</li> <li>Tradeoffs of different architectural choices</li> <li>Mocks and their pitfalls</li> <li>Avoiding mocks</li> <li>Separating conceptual business logic</li> <li>Dependency injection</li> <li>Dependency inversion</li> <li>Identifying external dependencies</li> <li>Interface adapters to mimize the exposed surface area of external dependencies</li> <li>London School vs Classic/Detroit School of TDD</li> <li>Testing strategies for testing external REST APIs</li> </ul><p>Special Guest: Harry Percival.</p><p>Sponsored By:</p><ul><li><a href="https://ift.tt/2HkDfmy" rel="nofollow">Oxylabs</a>: <a href="https://ift.tt/2HkDfmy" rel="nofollow">Visit oxylabs.io/testandcode to find out more about their services and to apply for a free trial of their Next-Generation Residential Proxies.</a></li></ul><p><a href="https://ift.tt/2tzXV5e" rel="payment">Support Test & Code: Python Software Testing & Engineering</a></p><p>Links:</p><ul><li><a href="https://ift.tt/2SKReIL" title="Cosmic Python - Simple Patterns for Building Complex Applications" rel="nofollow">Cosmic Python - Simple Patterns for Building Complex Applications</a></li><li><a href="https://amzn.to/39fZbve" title="Architecture Patterns with Python - on Amazon" rel="nofollow">Architecture Patterns with Python - on Amazon</a></li><li><a href="https://twitter.com/hjwp/" title="Harry Percival (@hjwp) / Twitter" rel="nofollow">Harry Percival (@hjwp) / Twitter</a></li><li><a href="https://twitter.com/bob_the_mighty" title="Bob Gregory (@bob_the_mighty) / Twitter" rel="nofollow">Bob Gregory (@bob_the_mighty) / Twitter</a></li><li><a href="https://ift.tt/387fppg" title="vcrpy · PyPI" rel="nofollow">vcrpy · PyPI</a></li><li><a href="https://ift.tt/2HYJYCX" title="Writing tests for external API calls" rel="nofollow">Writing tests for external API calls</a></li><li><a href="https://ift.tt/3c7eXL3" title="Stop Using Mocks (for a while) - Harry's PyCon talk" rel="nofollow">Stop Using Mocks (for a while) - Harry's PyCon talk</a></li></ul>

from Planet Python
via read more

Wednesday, February 26, 2020

Roberto Alsina: Python Meetup Buenos Aires 27/2/2020

Charla en el Buenos Aires Python Meetup el 7/11/2019

Algunos tips y comentarios sarcásticos para hacer que tu código Python sea más parecido a Python y menos parecido a otra cosa.


from Planet Python
via read more

EuroPython: EuroPython 2020: Call for Proposals opens on March 9th

We are happy to announce that the Call for Proposals will open on March 9. It will be left open for three weeks and then close on:

Sunday, March 29 23:59:59 CEST

While you wait for submissions to open, please check out the Call for Proposals details on our pre-launch website:

https://ep2020.europython.eu/call-for-proposals/

We’re looking for proposals on every aspect of Python: all levels of programming from novice to advanced, applications, frameworks, data science, Python projects, internals or topics which you’re excited about, your experiences with Python and its ecosystem, creative or artistic things you’ve done with Python, to name a few.

EuroPython is a community conference and we are eager to hear about your use of Python.

Since feedback shows that our audience is very interested in advanced topics, we’d appreciate more entries in this category for EuroPython 2020.

Please help spread word about Call for Proposals to anyone who might be interested. Thanks.

image

Enjoy,

EuroPython 2020 Team
https://ep2020.europython.eu/


from Planet Python
via read more

Wing Tips: Using Anaconda Environments with Wing Python IDE

Wing version 7.2 has been released, and we've been looking at the new features in this version. So far we've covered reformatting with Black and YAPF, Wing 7.2's expanded support for virtualenv, and using python -m with Wing.

This time we'll take a look at what Wing 7.2 provides for people that are using Anaconda environments created with conda create as an alternative to virtualenv.

What Wing 7.2 Adds

Wing 7.2 supports creating new Wing projects that use an existing Anaconda environment, so that the environment is automatically activated whenever the project is open. Debug processes, unit tests, the integrated Python Shell, and OS Commands all run in the activated environment.

Wing 7.2 also added the ability to create and configure a new Anaconda environment while creating a new Wing project.

Using an Existing Anaconda Environment

Wing tries to discover existing Anaconda environments and lists them in the drop down menu next to the Activated Env option under Python Executable in Project Properties and the New Project dialog, which are both in the Project menu:

/images/blog/anaconda-envs/discovered-envs.png

Selecting one of the listed Anaconda environments configures the project to automatically activate that environment whenever the project is open:

/images/blog/anaconda-envs/selected-env.png

If Wing cannot find your Anaconda environment automatically, you can instead manually enter the command that activates it.

Creating New Projects

Wing can also create a new Anaconda environment at the same time that a new Wing project is created. This is done by selected New Project from the Project menu and choosing Create New Anaconda Environment as the project type:

/images/blog/anaconda-envs/new-project.png

Wing will create the new environment, install packages, and then configure and save a project file. You can immediately start working in your new environment, which Wing automatically activates for you whenever you have the project open.

That's all there is to it!

For some additional details, see Using Wing with Anaconda.


That's it for now! We'll be back soon with more Wing Tips for Wing Python IDE.

As always, please don't hesitate to email support@wingware.com if you run into problems or have any questions.


from Planet Python
via read more

Reuven Lerner: Want to spend more time coding Python, and less time on Stack Overflow?

How many times a day do you visit Stack Overflow?  (If you’re like most programmers, the answer is “many.”)  Wouldn’t it be nice to just be able to write Python code, without interrupting your work every few hours to check (or double-check) something?

After all, whether you’re a data scientist, app developer, or just a hobbyist, your goal isn’t to search for answers to your problems. Your goal is to actually solve those problems.

Consider what would happen if you were able to use all of that search-for-answers time on actually solving problems:

  • You wouldn’t have to read bad and semi-bad answers before (finally) finding the right solution.
  • You wouldn’t have to mess with the answer you found, to make it appropriate for your situation.
  • You could take on bigger and more complex projects, because you’d be able to concentrate on the higher-level ideas and problems, doing the simpler stuff easily and quickly.
  • You would write shorter and more expressive code, impressing others and making future maintenance easier.
  • You would be able to delight your clients with faster turnaround time and more sophisticated solutions.

People are using Python for all sorts of amazing things nowadays. But you’re only able to do those amazing things when you’re solving problems, not when you’re dealing with the nuts and bolts, or searching for answers online:

  • Become a data scientist, contributing to everything from drug discovery to financial models to self-driving cars. (As you might know, Python is the leading language in data science and machine learning — so knowing it is the key to getting a job in this hot industry.)
  • Create Web applications, using Python-based frameworks such as Django and Flask, to create sites like Instagram, Pinterest, and Dropbox.
  • Automate your home or office on a Raspberry Pi, integrating systems such as temperature sensors to microcontrollers in a single program.
  • Use a single language to automate everything on your computer, instead of using such domain-specific languages as VBA and bash.
Image

On March 10th, I’m starting a cohort of Weekly Python Exercise, my 15-week course specifically designed to improve your Python fluency.   (This is cohort B1, one of three advanced cohorts I offer each year.)

This cohort is aimed at anyone with at least 6-8 months of Python under their belt, who wants to go beyond basic data structures, function definitions, and objects — learning about and getting better at such topics as:

  • iterators
  • generators
  • decorators
  • advanced object-oriented techniques
  • threads and processes

Learn more, get a WPE trial, and sign up for Weekly Python Exercise B1

Questions or comments? Just contact me via e-mail (reuven@lerner.co.il) or on Twitter (@reuvenmlerner)

The post Want to spend more time coding Python, and less time on Stack Overflow? appeared first on Reuven Lerner.


from Planet Python
via read more

8 Creators and Core Contributors Talk About Their Model Training Libraries From PyTorch Ecosystem

8 Creators and Core Contributors Talk About Their Model Training Libraries From PyTorch Ecosystem Jakub Czakon Senior Data Scientist I started using Pytorch to train my models back in early 2018 with 0.3.1 release. I got hooked by the Pythonic feel, ease of use and flexibility. It was just so much easier to do things […]

The post 8 Creators and Core Contributors Talk About Their Model Training Libraries From PyTorch Ecosystem appeared first on neptune.ai.


from Planet SciPy
read more

PyCharm: Webinar Recording: “Security Checks for Python Code” with Anthony Shaw

Last week we had a webinar on Python security with Anthony Shaw. He covered a number of places where Python code, including popular frameworks, run into security vulnerabilities. He also showed his PyCharm plugin for showing and fixing known vulnerabilities. The webinar recording is now available.

So much covered in this webinar! Anthony discussed common Python security vulnerabilities, how his plugin helps, how to run it in continuous integration, and more.

Timeline

  • 00:30: Demo the application being used
  • 01:30: Installing the plugin
  • 03:49: Show some reported vulnerabilities
  • 04:28: Running the checks manually
  • 05:15: First round of questions
  • 11:20: Investigate first vulnerability
  • 15:30: Second round of questions
  • 16:20: Browsing the shipped list of inspections/vulnerabilities
  • 20:58: Code inspection tool
  • 26:58: Third round of questions
  • 30:38: Django-specific app vulnerability
  • 36:35: Show documentation page with full list of vulnerabilities
  • 38:28: Fourth round of questions
  • 44:07: Running checks in continuous integration (CI) via Docker image, headless PyCharm
  • 47:07: Final round of questions
  • 51:18: Suppressing warnings on a specific line
  • 52:21: “View on Marketplace” for the GitHub Action


from Planet Python
via read more

Real Python: The Beginner's Guide to Python Turtle

When I was a kid, I used to learn Logo, a programming language that involved a turtle that you could move around the screen with just a few commands. I remember feeling like a computer genius as I controlled this little object on my screen, and this was what got me interested in programming in the first place. The Python turtle library comes with a similar interactive feature that gives new programmers a taste of what it’s like to work with Python.

In this tutorial, you will:

  • Understand what the Python turtle library is
  • Learn how to set turtle up on your computer
  • Program with the Python turtle library
  • Grasp some important Python concepts and turtle commands
  • Develop a short but entertaining game using what you’ve learned

If you’re a beginner to Python, then this tutorial will help you as you take your first steps into the world of programming with the help of the Python turtle library!

Free Bonus: Click here to get a Python Cheat Sheet and learn the basics of Python 3, like working with data types, dictionaries, lists, and Python functions.

Getting to Know the Python turtle Library

turtle is a pre-installed Python library that enables users to create pictures and shapes by providing them with a virtual canvas. The onscreen pen that you use for drawing is called the turtle and this is what gives the library its name. In short, the Python turtle library helps new programmers get a feel for what programming with Python is like in a fun and interactive way.

turtle is mainly used to introduce children to the world of computers. It’s a straightforward yet versatile way to understand the concepts of Python. This makes it a great avenue for kids to take their first steps in Python programming. That being said, the Python turtle library is not restricted to little ones alone! It’s also proved extremely useful for adults who are trying their hands at Python, which makes it great for Python beginners.

With the Python turtle library, you can draw and create various types of shapes and images. Here’s a sample of the kinds of drawings you can make with turtle:
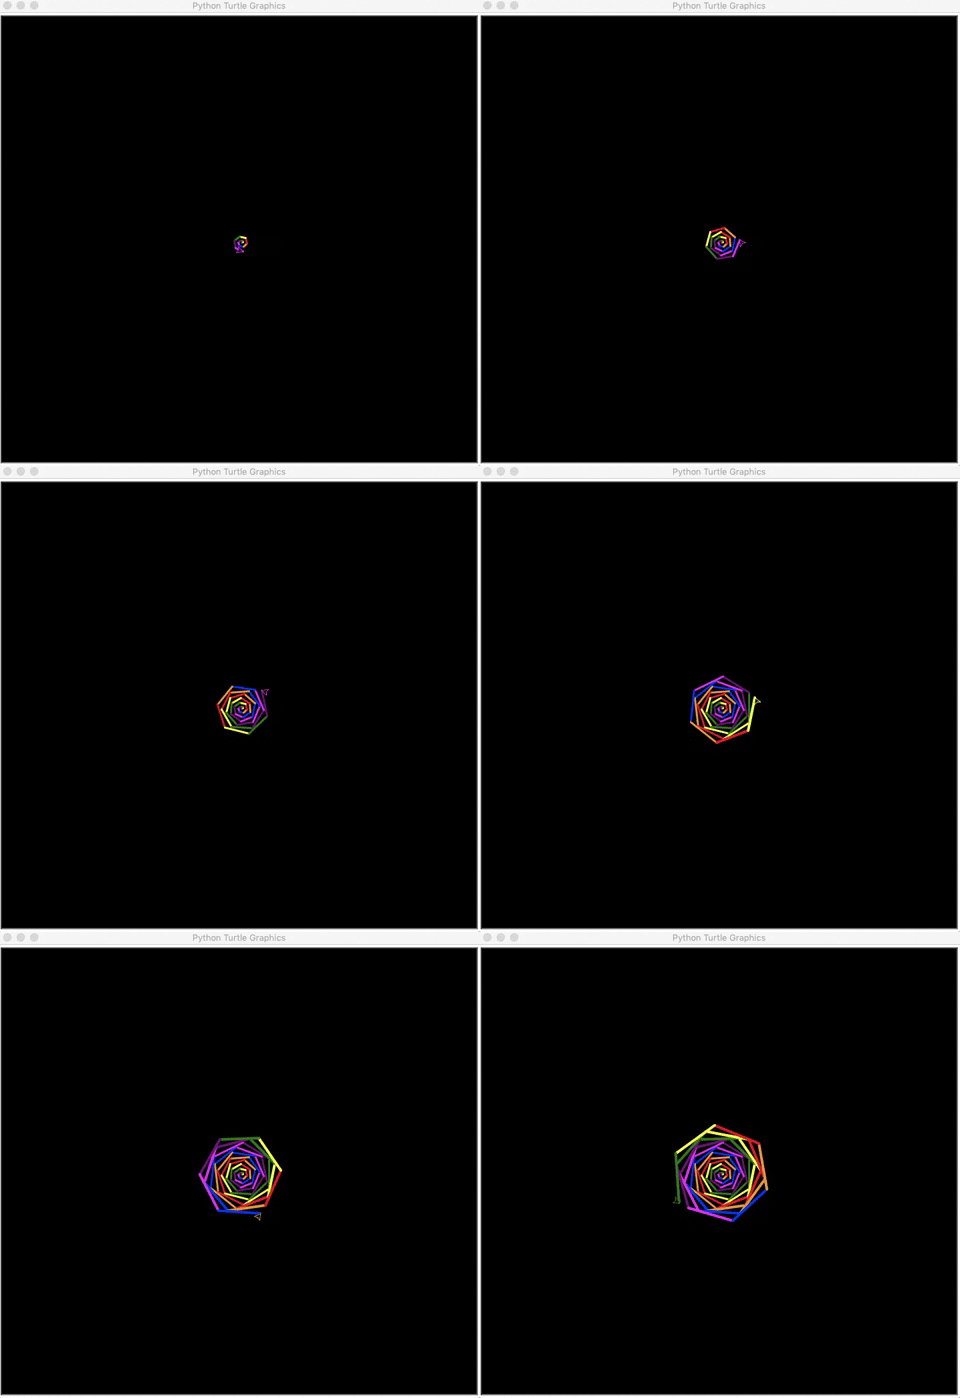
Python Turtle Initial Demo

Cool, right? This is just one of many different drawings you can make using the Python turtle library. Most developers use turtle to draw shapes, create designs, and make images. Others use turtle to create mini-games and animations, just like the one you saw above.

Getting Started With turtle

Before you continue, there are two important things that you’ll need to do to make the most of this tutorial:

  1. Python Environment: Make sure that you’re familiar with your programming environment. You can use applications like IDLE or Jupyter Notebook to program with turtle. However, if you’re not comfortable with them, then you can program with the REPL, which you’ll use in this tutorial.

  2. Python Version: Ensure that you have version 3 of Python on your computer. If not, then you can download it from the Python website. For help setting things up, check out Python 3 Installation & Setup Guide.

The good thing about turtle is that it’s a built-in library, so you don’t need to install any new packages. All you need to do is import the library into your Python environment, which in this case would be the REPL. Once you open your REPL application, you can run Python 3 on it by typing the following line of code:

>>>
>>> python3

This calls Python 3 into your REPL application and opens up the environment for you.

Before you begin your Python programming, you need to understand what a library is. In the non-computer world, a library is a place where different types of books are stored. You can access these books at any time, take whatever information you need from them, and return them to the same place.

In the computer world, a library works similarly. By definition, a library is a set of important functions and methods that you can access to make your programming easier. The Python turtle library contains all the methods and functions that you’ll need to create your images. To access a Python library, you need to import it into your Python environment, like this:

>>>
>>> import turtle

Now that you have turtle in your Python environment, you can begin programming with it. turtle is a graphical library, which means you’ll need to create a separate window (called the screen) to carry out each drawing command. You can create this screen by initializing a variable for it.

In Python, you use variables to store information that you’ll use later on in your program. You initialize a variable when you assign a starting value to it. Since the value of the variable isn’t constant, it can change several times during the execution of your program.

Now, to open the turtle screen, you initialize a variable for it in the following way:

>>>
>>> s = turtle.getscreen()

You should see a separate window open up:
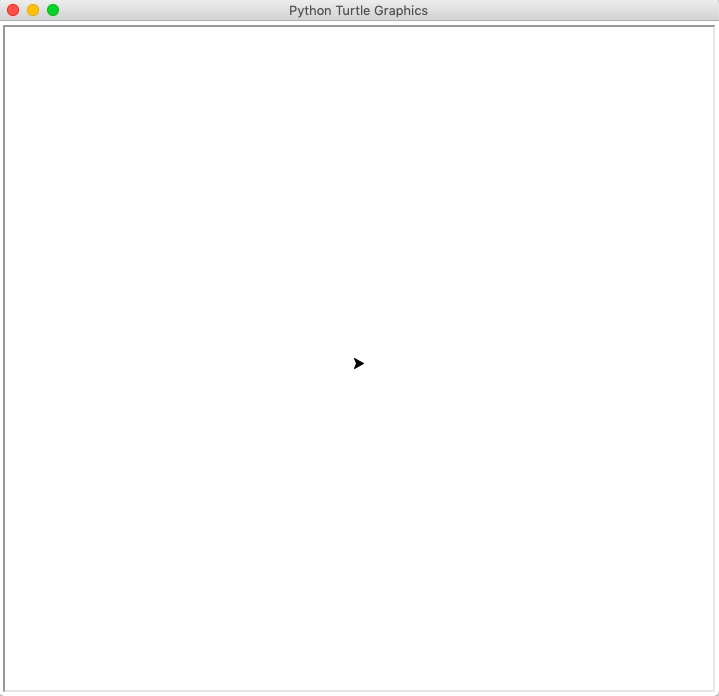
Python Turtle Initial Screen New

This window is called the screen. It’s where you can view the output of your code. The little black triangular shape in the middle of the screen is called the turtle.

Note: Keep in mind that when you name a variable, you need to pick a name that can be easily understood by anyone who’s looking at your program. However, you must also choose a name that’s convenient for you to use, especially because you’ll be calling it very often throughout your program!

For example, choosing a name like my_turtle_screen_name would be tedious to keep typing, while a name like Joe or a would appear to be very random. Using a single alphabet character, like s in this case, would be much more suitable. That’s because it’s short and sweet, and it’s clear to remember that the letter s refers to the screen.

Next, you initialize the variable t, which you’ll then use throughout the program to refer to the turtle:

>>>
>>> t = turtle.Turtle()

Just like for the screen, you can also give this variable another name like a or Jane or even my_turtle, but in this case, you’ll stick with t.

You now have your screen and your turtle. The screen acts as a canvas, while the turtle acts like a pen. You can program the turtle to move around the screen. The turtle has certain changeable characteristics, like size, color, and speed. It always points in a specific direction, and will move in that direction unless you tell it otherwise:

  • When it’s up, it means that no line will be drawn when it moves.
  • When it’s down, it means that a line will be drawn when it moves.

In the next section, you’ll explore the different ways of programming with the Python turtle library.

Programming With turtle

The first thing you’ll learn when it comes to programming with the Python turtle library is how to make the turtle move in the direction you want it to go. Next, you’ll learn how to customize your turtle and its environment. Finally, you’ll learn a couple of extra commands with which you can perform some special tasks.

Moving the Turtle

There are four directions that a turtle can move in:

  • Forward
  • Backward
  • Left
  • Right

The turtle moves .forward() or .backward() in the direction that it’s facing. You can change this direction by turning it .left() or .right() by a certain degree. You can try each of these commands like so:

>>>
>>> t.right(90)
>>> t.forward(100)
>>> t.left(90)
>>> t.backward(100)

When you run these commands, the turtle will turn right by ninety degrees, go forward by a hundred units, turn left by ninety degrees, and move backward by a hundred units. You can see how this looks in the image below:
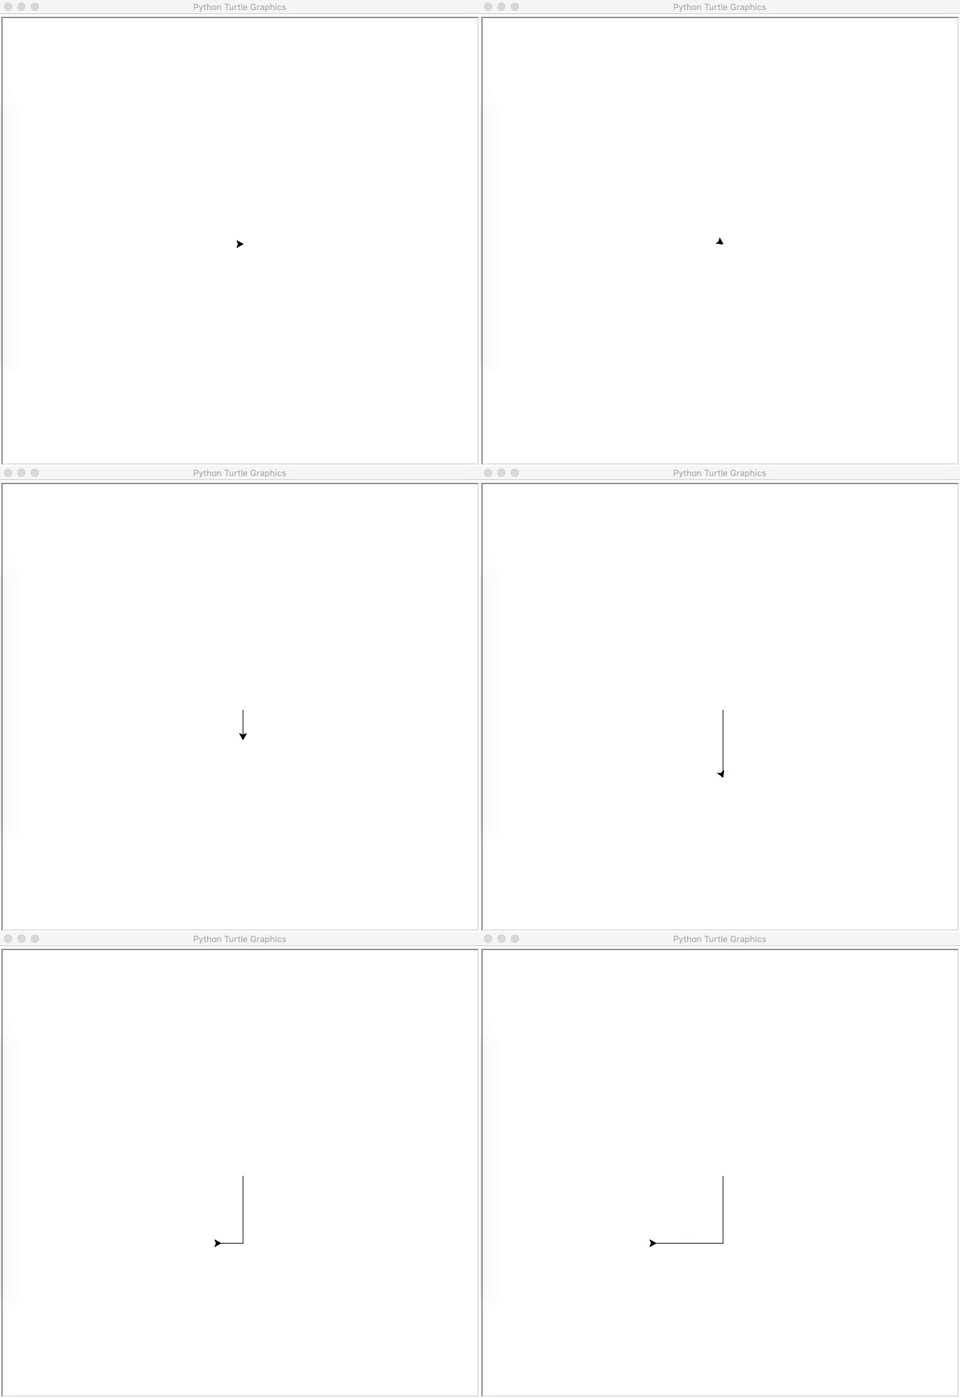
Python Turtle Moving Updated

You can use the shortened versions of these commands as well:

  • t.rt() instead of t.right()
  • t.fd() instead of t.forward()
  • t.lt() instead of t.left()
  • t.bk() instead of t.backward()

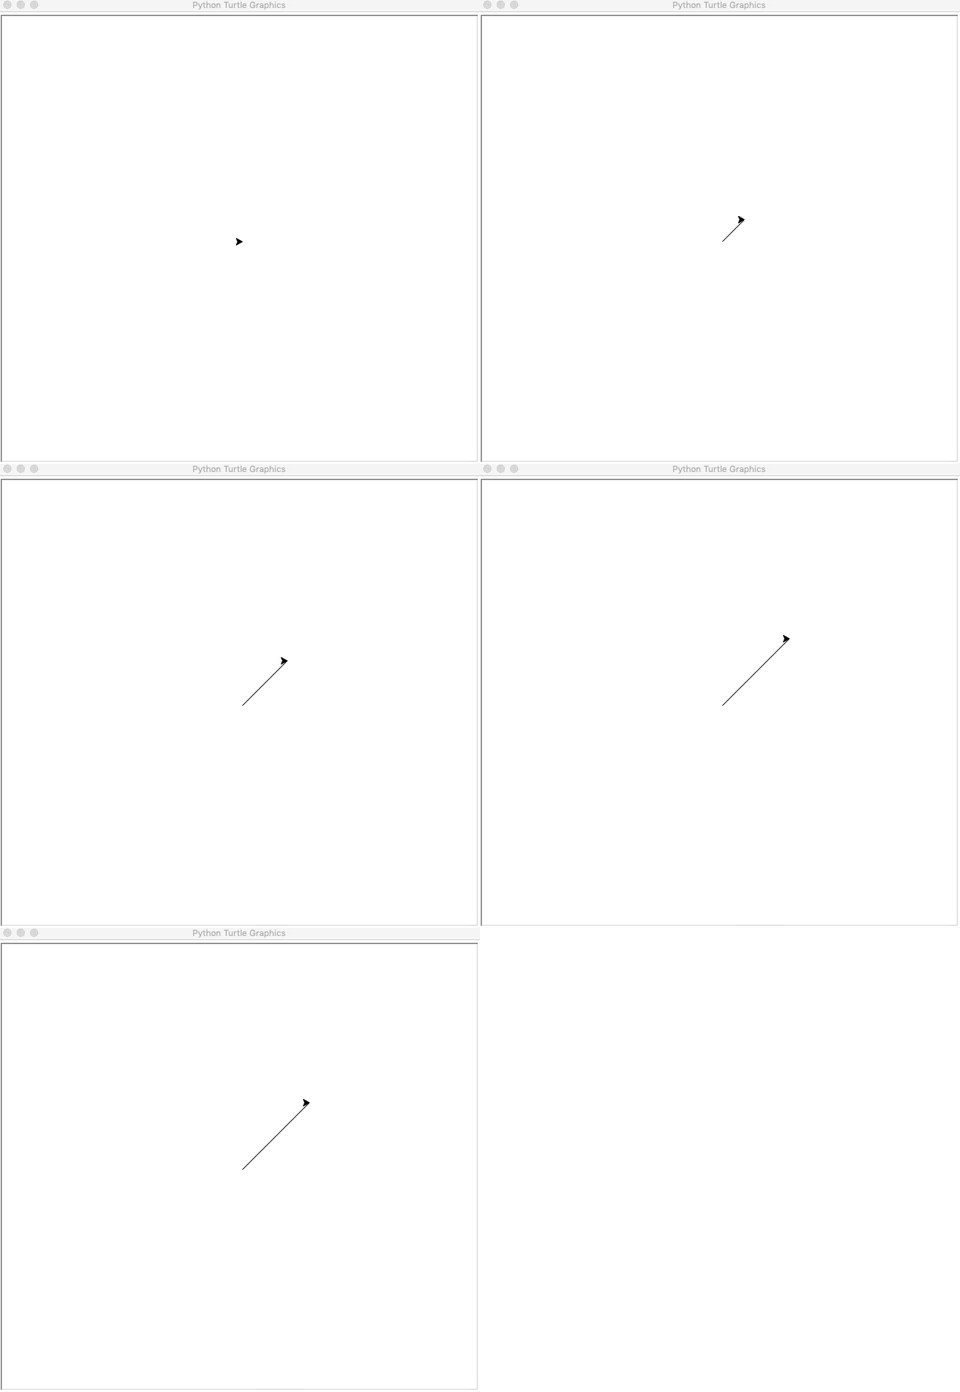
You can also draw a line from your current position to any other arbitrary position on the screen. This is done with the help of coordinates:
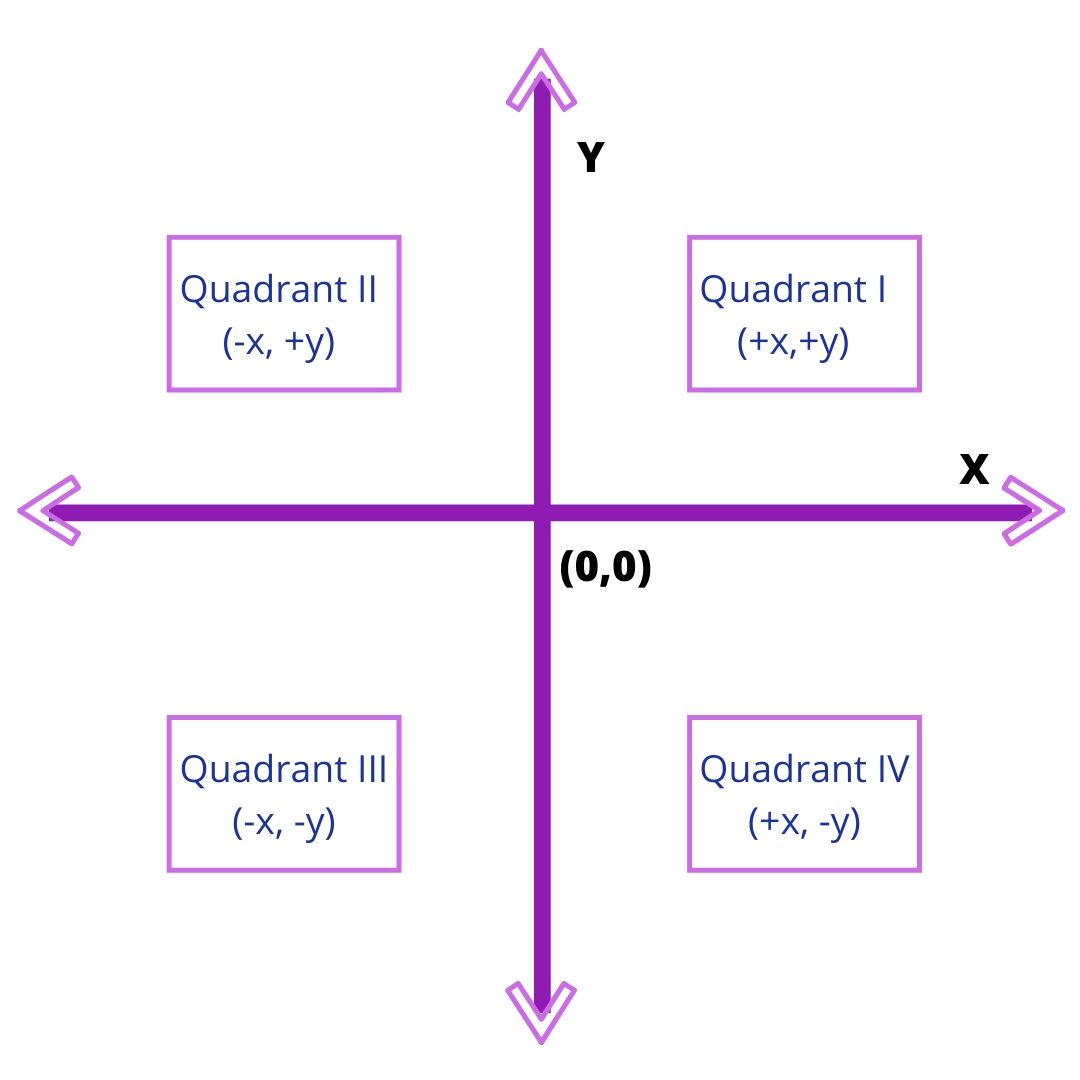
Python Turtle Coordinates New

The screen is divided into four quadrants. The point where the turtle is initially positioned at the beginning of your program is (0,0). This is called Home. To move the turtle to any other area on the screen, you use .goto() and enter the coordinates like this:

>>>
>>> t.goto(100,100)

Your output will look like this:

Python Turtle GOTO NEWER

You’ve drawn a line from your current position to the point (100,100) on the screen.

To bring the turtle back to its home position, you type the following:

>>>
>>> t.home()

This is like a shortcut command that sends the turtle back to the point (0,0). It’s quicker than typing t.goto(0,0).

Drawing a Shape

Now that you know the movements of the turtle, you can move on to making actual shapes. You can start by drawing polygons since they all consist of straight lines connected at certain angles. Here’s an example that you can try:

>>>
>>> t.fd(100)
>>> t.rt(90)
>>> t.fd(100)
>>> t.rt(90)
>>> t.fd(100)
>>> t.rt(90)
>>> t.fd(100)

Your output will look like this:
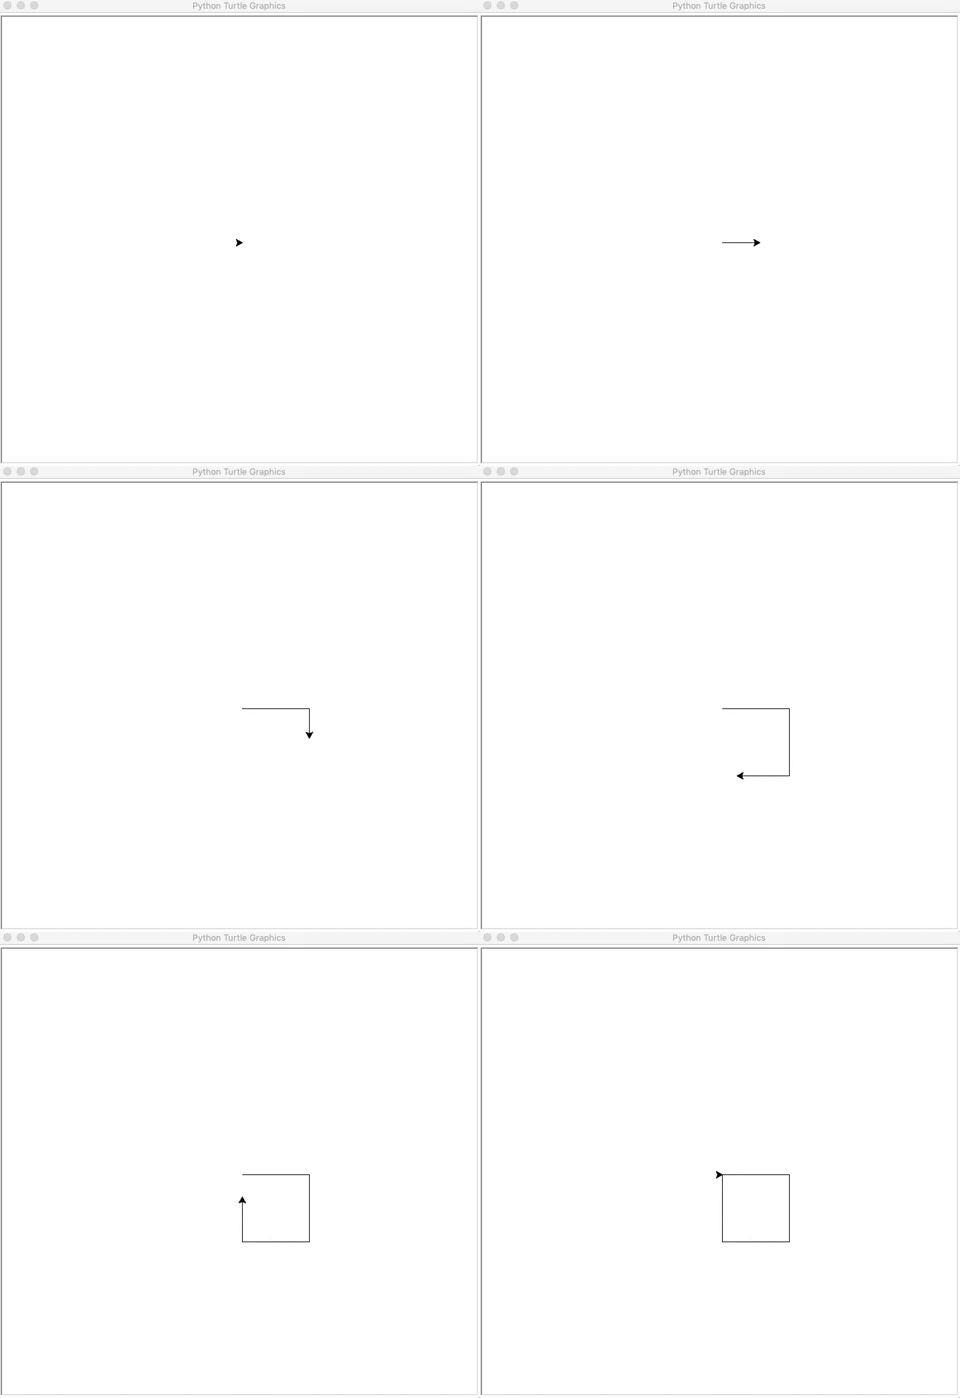
Python Turtle Square Edit Newer

Well done! You’ve just drawn a square. In this way, the turtle can be programmed to create different shapes and images.

Now, try drawing a rectangle, using this code as a template. Remember, in a rectangle, all four sides are not equal. You’ll need to change the code accordingly. Once you do that, you can even try creating other polygons by increasing the number of sides and changing the angles.

Drawing Preset Figures

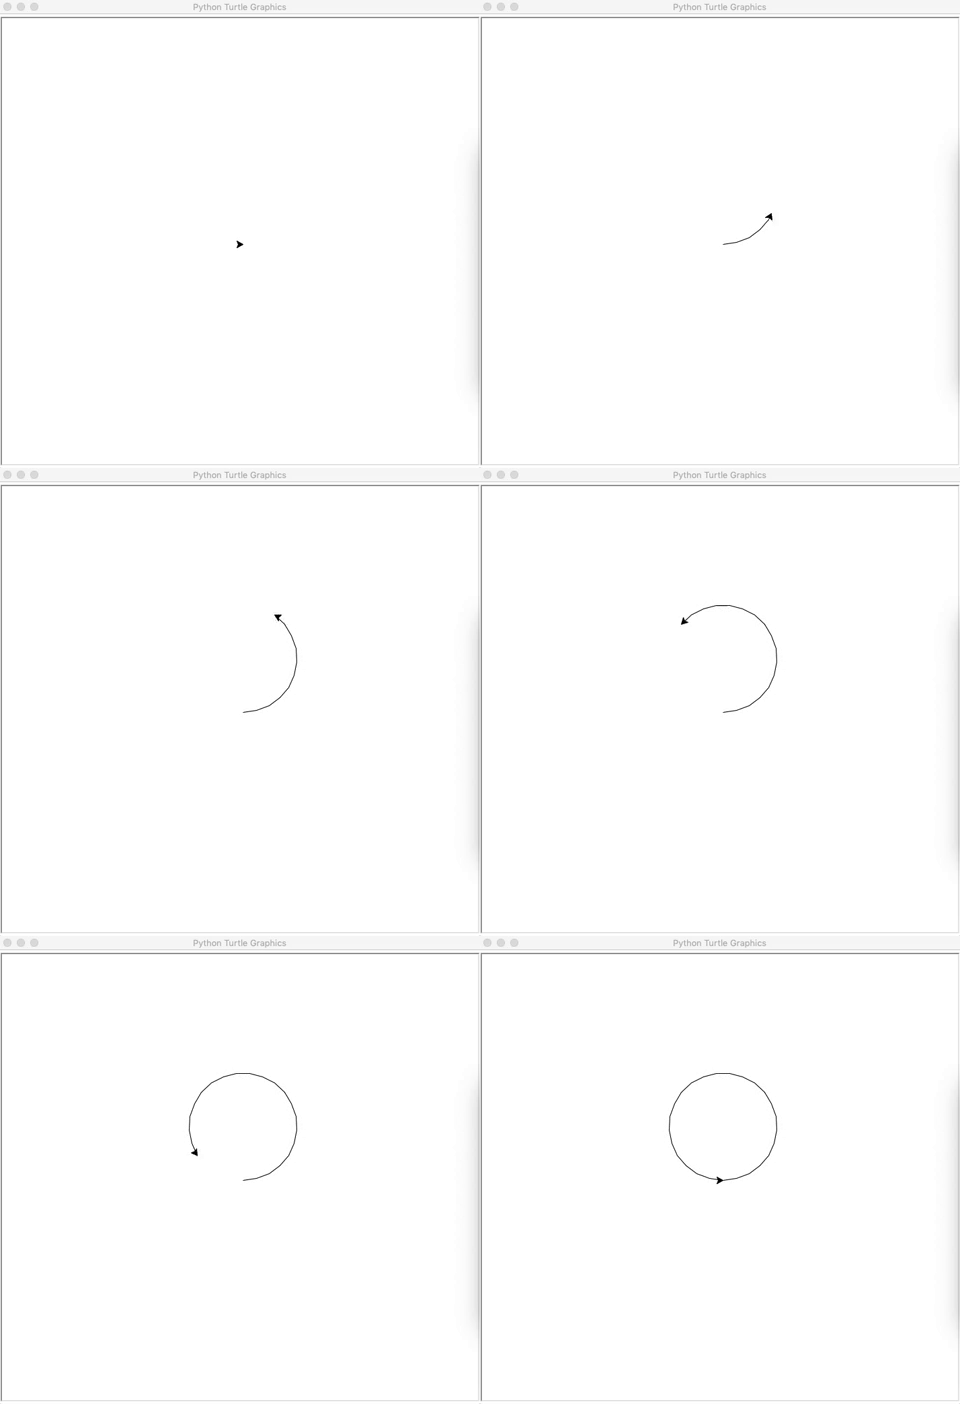
Suppose you want to draw a circle. If you attempt to draw it in the same way as you drew the square, then it would be extremely tedious, and you’d have to spend a lot of time just for that one shape. Thankfully, the Python turtle library provides a solution for this. You can use a single command to draw a circle:

>>>
>>> t.circle(60)

You’ll get an output like this:

Python Turtle Circle Updated

The number within the brackets is the radius of the circle. You can increase or decrease the size of the circle by changing the value of its radius.

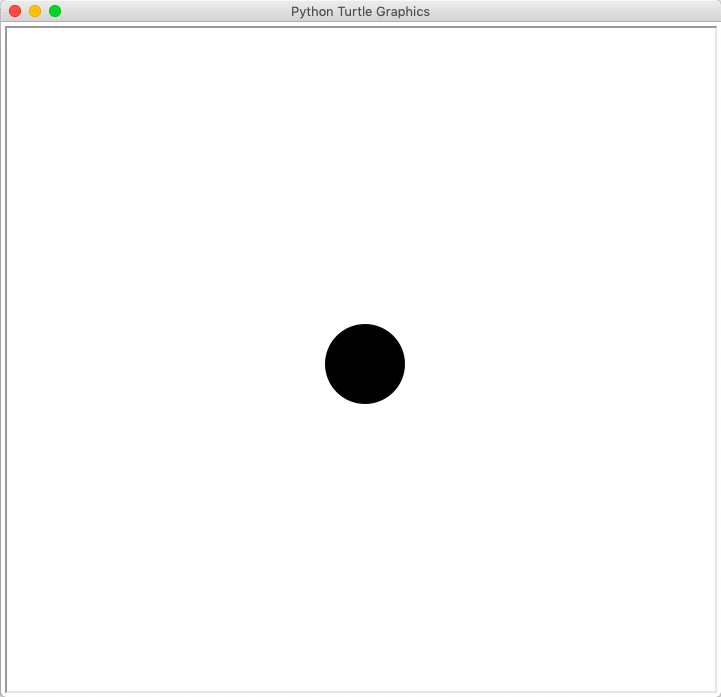
In the same way, you can also draw a dot, which is nothing but a filled-in circle. Type in this command:

>>>
>>> t.dot(20)

You’ll get a filled-in circle like this:
Python Turtle Dot Update

The number within the brackets is the diameter of the dot. Just like with the circle, you can increase or decrease the size of the dot by changing the value of its diameter.

Great job so far! You’ve learned how to move the turtle around and create different shapes with it. In the next few sections, you’ll see how you can customize your turtle and its environment, based on your requirements.

Changing the Screen Color

By default, turtle always opens up a screen with a white background. However, you can change the color of the screen at any time using the following command:

>>>
>>> turtle.bgcolor("blue")

You can replace "blue" with any other color. Try "green" or "red". You’ll get a result like this:
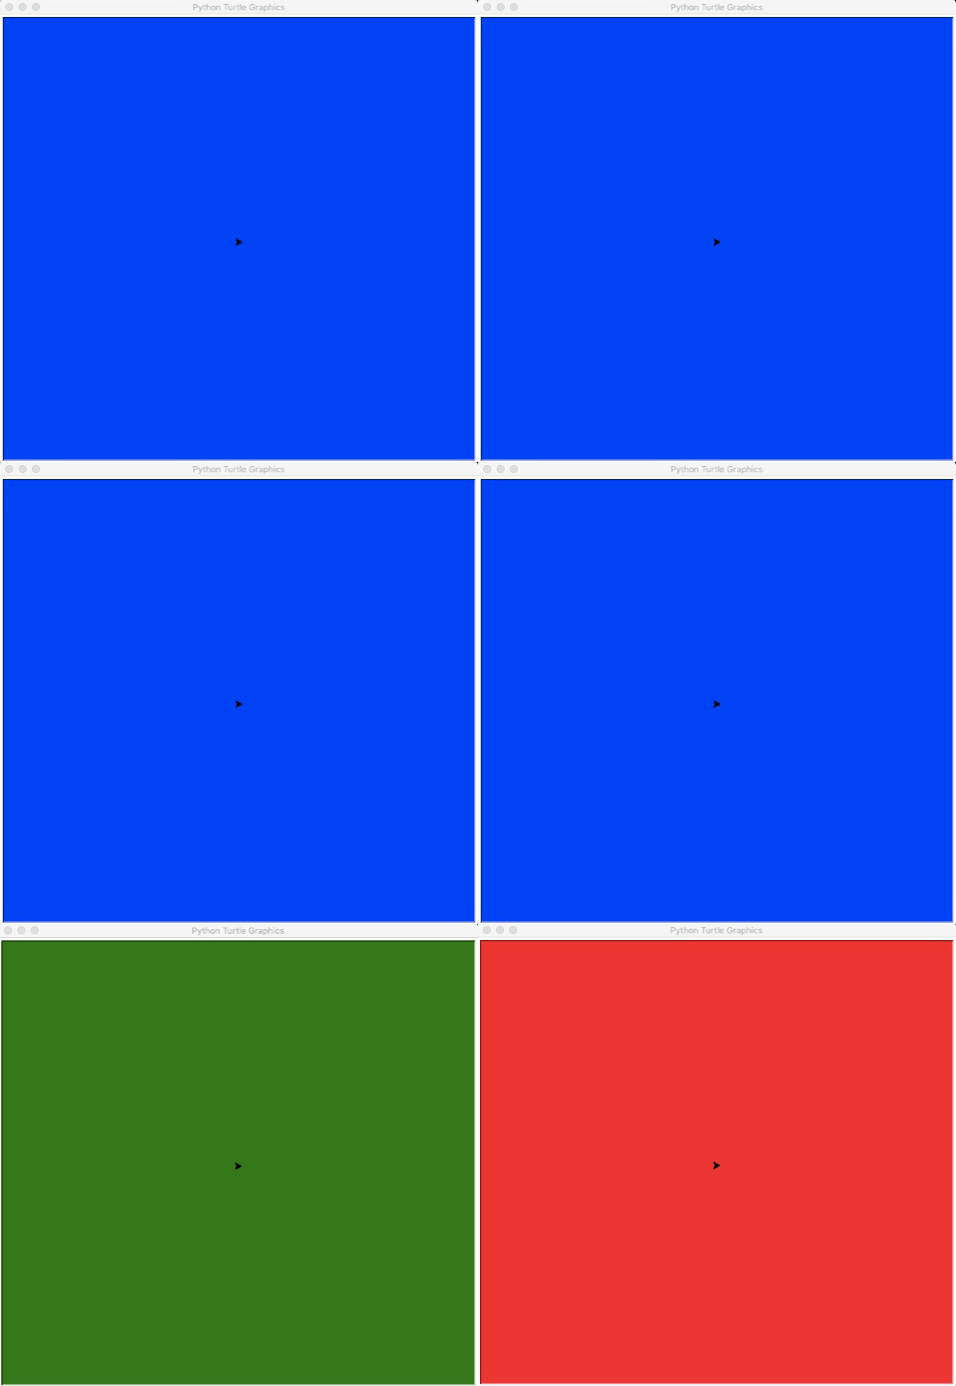
Python Turtle Background Color

You can use a variety of colors for your screen just by typing in their hex code number. To learn more about using different colors, check out the Python turtle library documentation.

Changing the Screen Title

Sometimes, you may want to change the title of your screen. You can make it more personal, like "My Turtle Program", or more suitable to what you’re working on, like "Drawing Shapes With Turtle". You can change the title of your screen with the help of this command:

>>>
>>> turtle.title("My Turtle Program")

Your title bar will now display this:
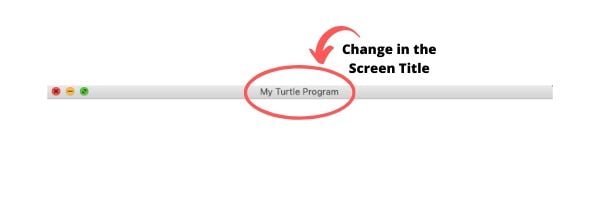
Python Turtle Screen Title Updated

In this way, you can change the heading of your screen according to your preference.

Changing the Turtle Size

You can increase or decrease the size of the onscreen turtle to make it bigger or smaller. This changes only the size of the shape without affecting the output of the pen as it draws on the screen. Try typing in the following commands:

>>>
>>> t.shapesize(1,5,10)
>>> t.shapesize(10,5,1)
>>> t.shapesize(1,10,5)
>>> t.shapesize(10,1,5)

Your outputs will look like this:
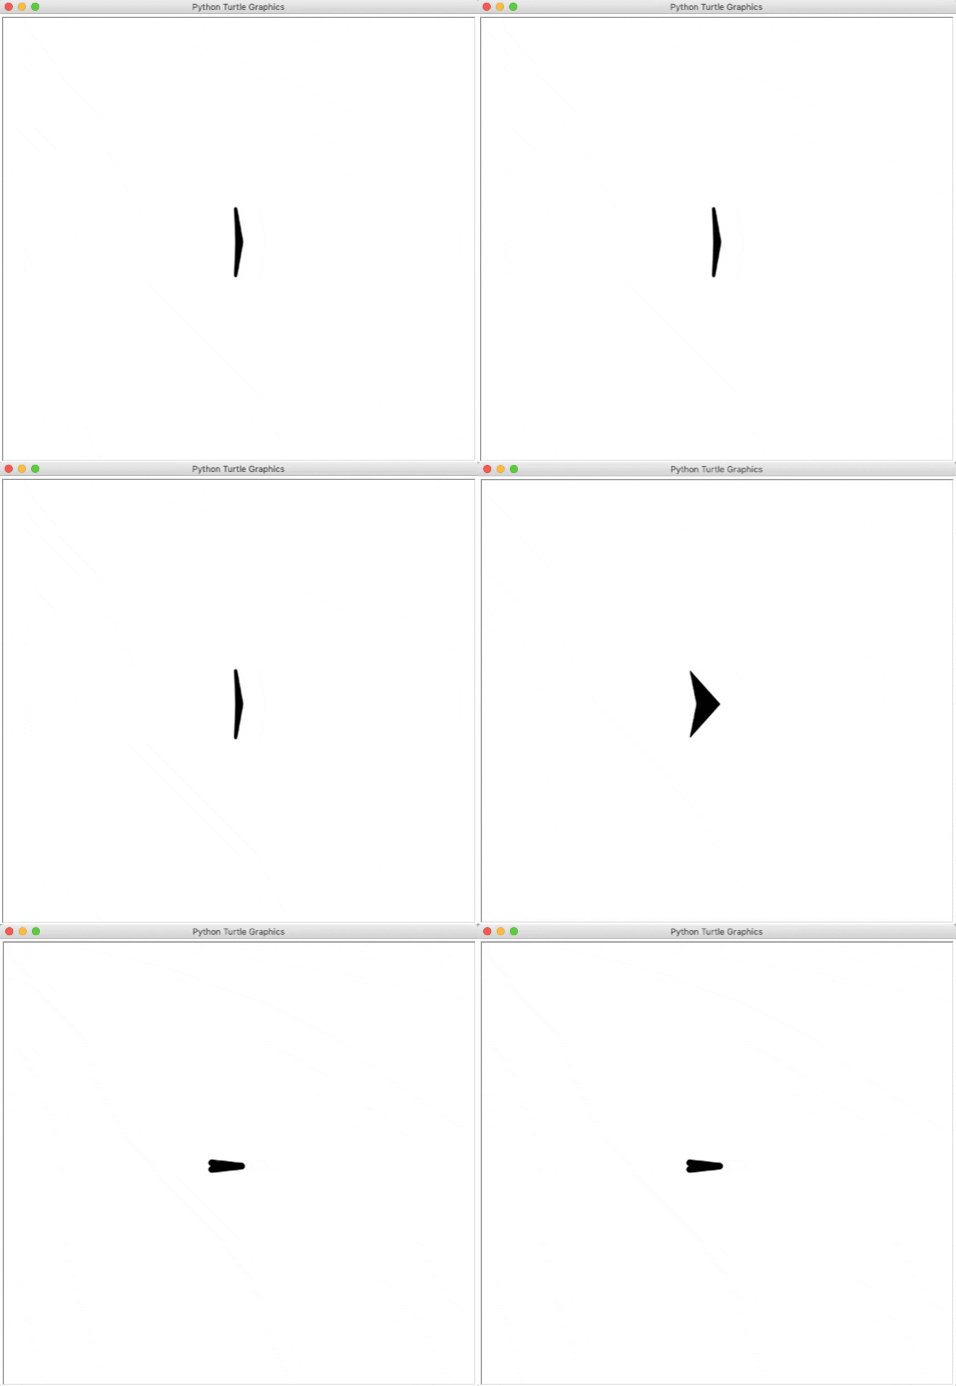
Python Turtle Shape Size Updated

The numbers given are the parameters for the size of the turtle:

  • Stretch length
  • Stretch width
  • Outline width

You can change these according to your preference. In the example given above, you can see a visible difference in the appearance of the turtle. For more information on how you can change the size of the turtle, check out the Python turtle library documentation.

Changing the Pen Size

The previous command changed the size of the turtle’s shape only. However, sometimes, you may need to increase or decrease the thickness of your pen. You can do this using the following command:

>>>
>>> t.pensize(5)
>>> t.forward(100)

This results in an outcome like this:
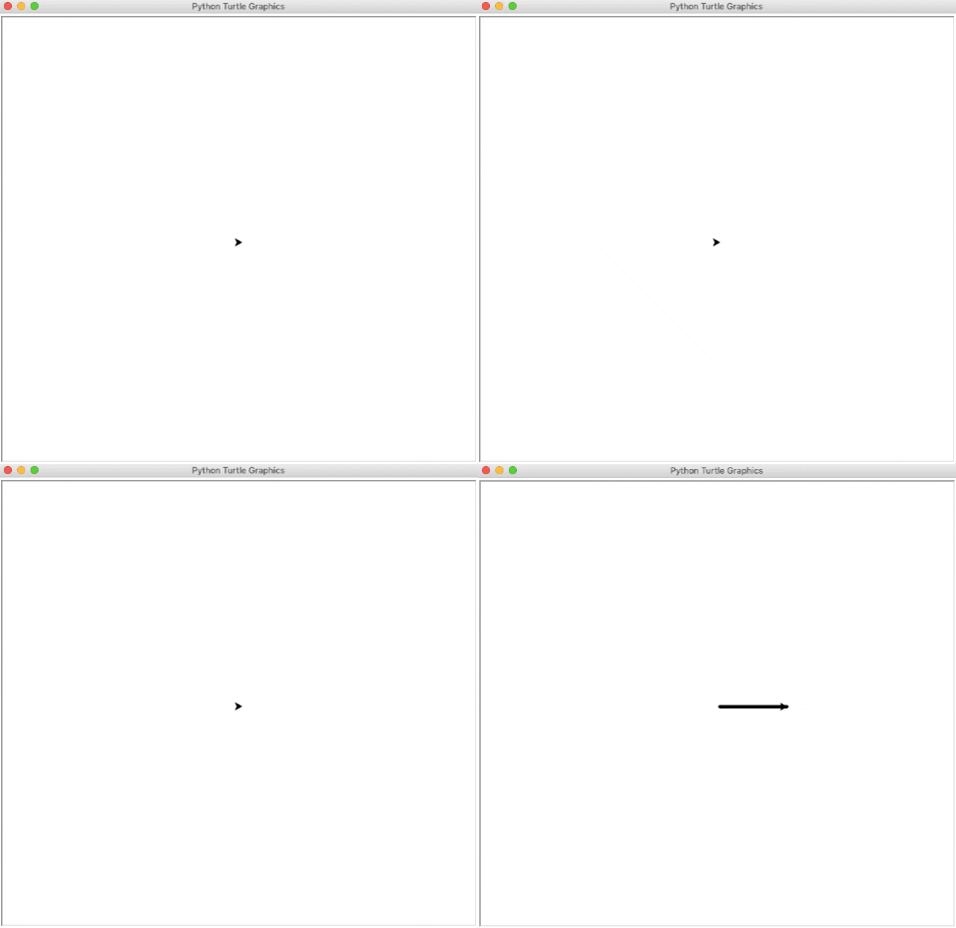
Python Turtle Pen Size More NEW

As you can see, the size of your pen is now five times the original size (which was one). Try drawing some more lines of various sizes, and compare the difference in thickness between them.

Changing the Turtle and Pen Color

When you first open a new screen, the turtle starts out as a black figure and draws with black ink. Based on your requirements, you can do two things:

  • Change the color of the turtle: This changes the fill color.
  • Change the color of the pen: This changes the outline or the ink color.

You can even choose both of these if you wish. Before you change the colors, increase the size of your turtle to help you see the color difference more clearly. Type in this code:

>>>
>>> t.shapesize(3,3,3)

Now, to change the color of the turtle (or the fill), you type the following:

>>>
>>> t.fillcolor("red")

Your turtle will look like this:
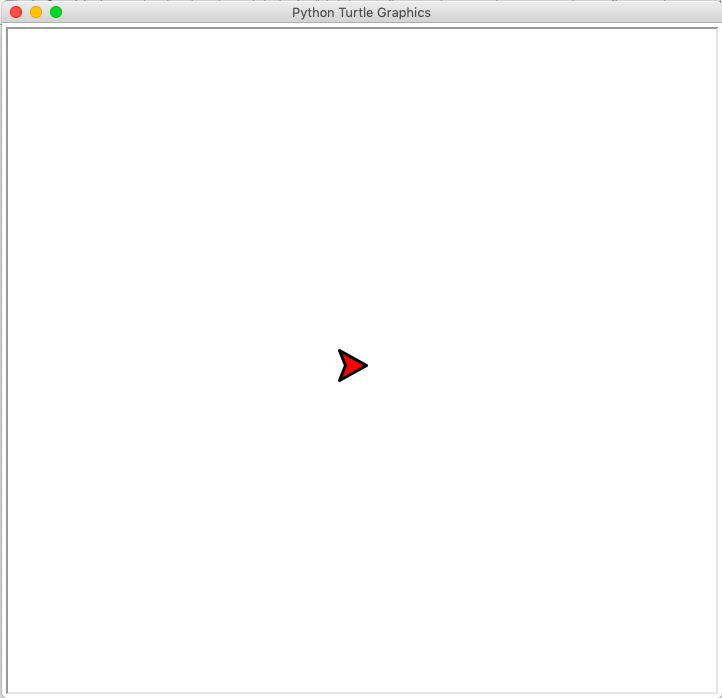
Python Turtle Fill Color Red

To change the color of the pen (or the outline), you type the following:

>>>
>>> t.pencolor("green")

Your turtle will look like this:
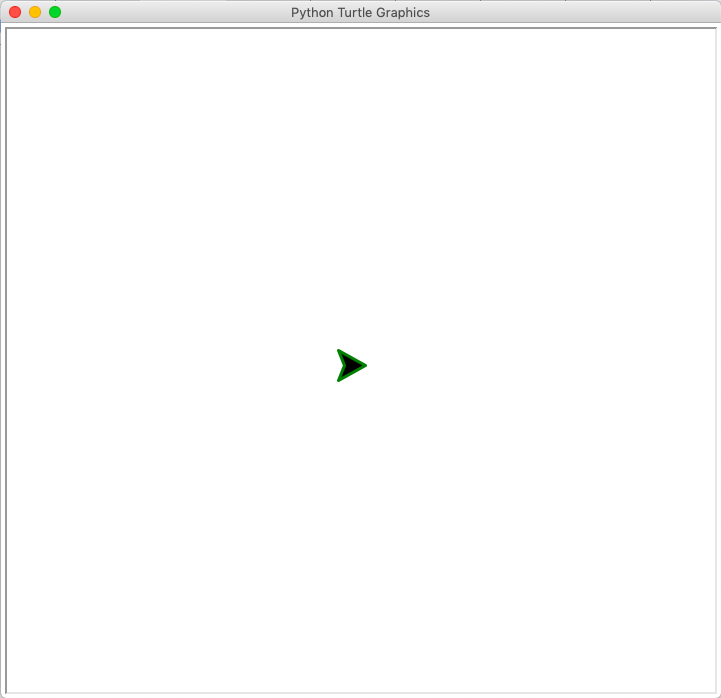
Python Turtle Pen Color Updated Green

To change the color of both, you type the following:

>>>
>>> t.color("green", "red")

Your turtle will look like this:
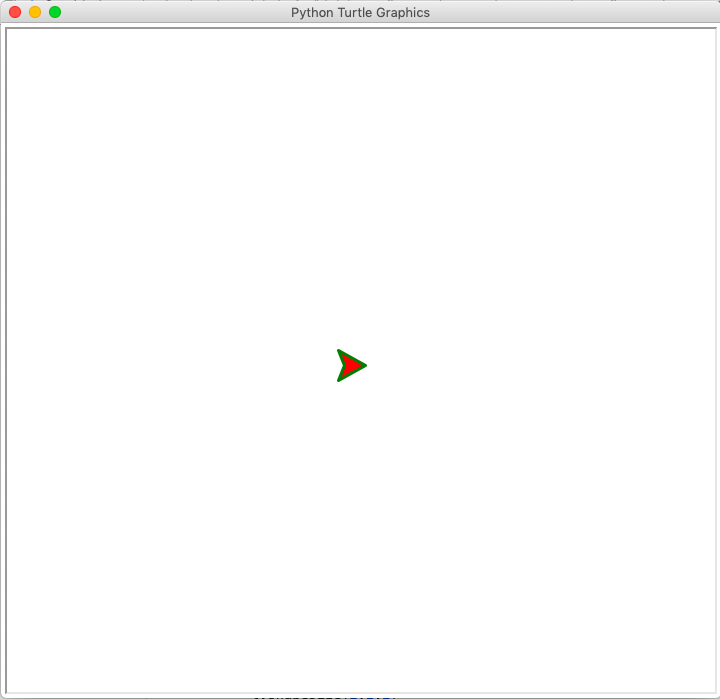
Python Turtle Color Single Line Updated

Here, the first color is for the pen, and the second is for the fill. Note that changing the color of the pen and the fill also changes the color of the onscreen turtle accordingly.

Filling in an Image

Coloring in an image usually makes it look better, doesn’t it? The Python turtle library gives you the option to add color to your drawings. Try typing in the following code and see what happens:

>>>
>>> t.begin_fill()
>>> t.fd(100)
>>> t.lt(120)
>>> t.fd(100)
>>> t.lt(120)
>>> t.fd(100)
>>> t.end_fill()

When you execute this code, you’ll get a triangle that’s filled in with a solid color, like this:
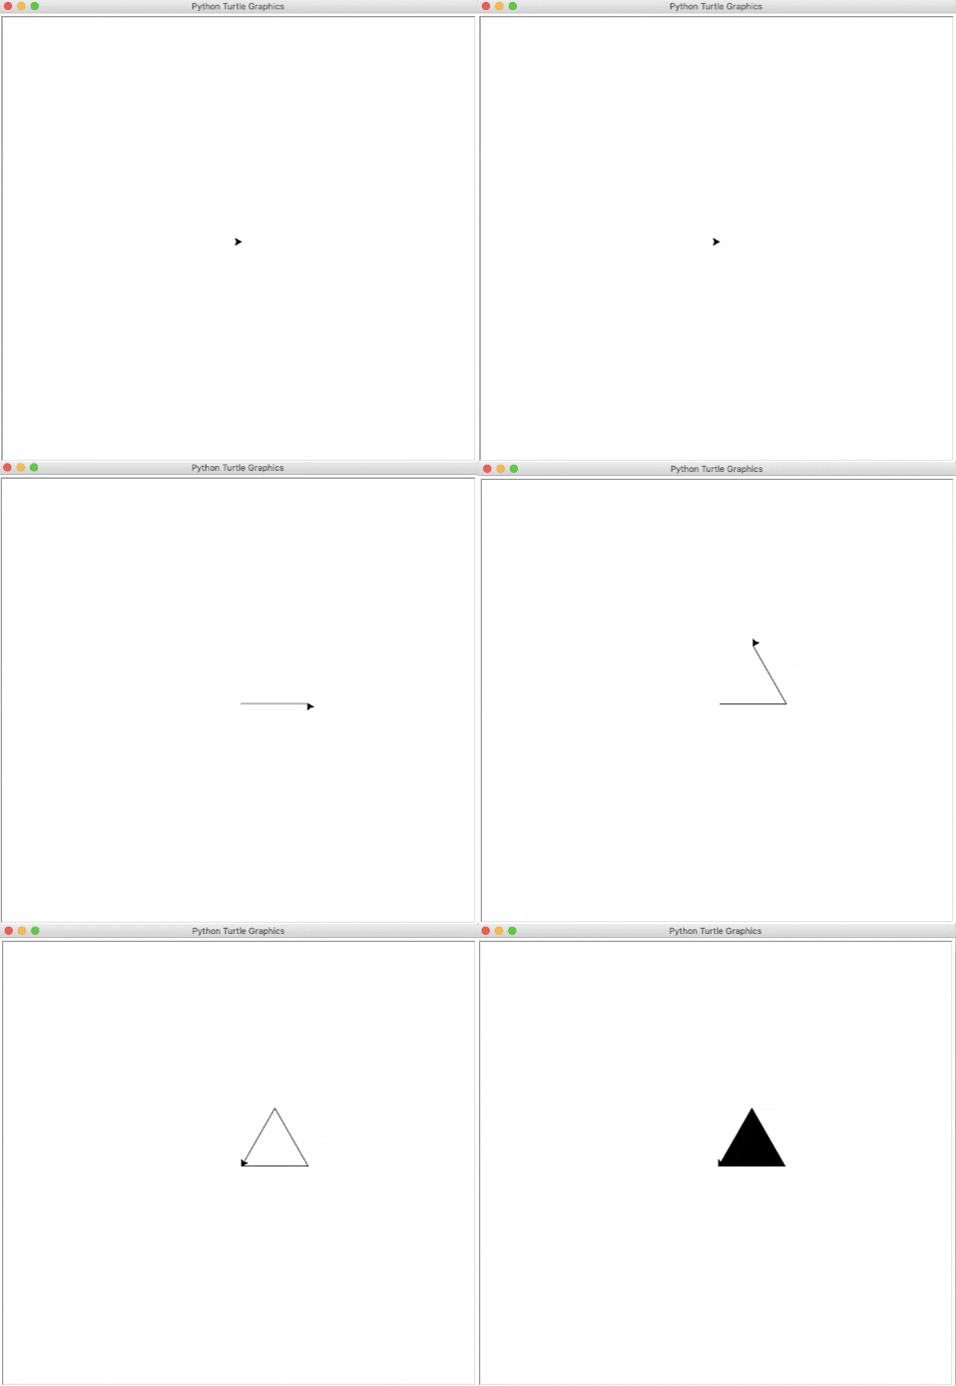
Python Turtle Begin Fill End Fill New

When you use .beginfill(), you’re telling your program that you’re going to be drawing a closed shape which will need to be filled in. Then, you use .endfill() to indicate that you’re done creating your shape and it can now be filled in.

Changing the Turtle Shape

The initial shape of the turtle isn’t really a turtle, but a triangular figure. However, you can change the way the turtle looks, and you do have a couple of options when it comes to doing so. You can have a look at some of them by typing in the following commands:

>>>
>>> t.shape("turtle")
>>> t.shape("arrow")
>>> t.shape("circle")

The shape of the turtle will change accordingly, like this:
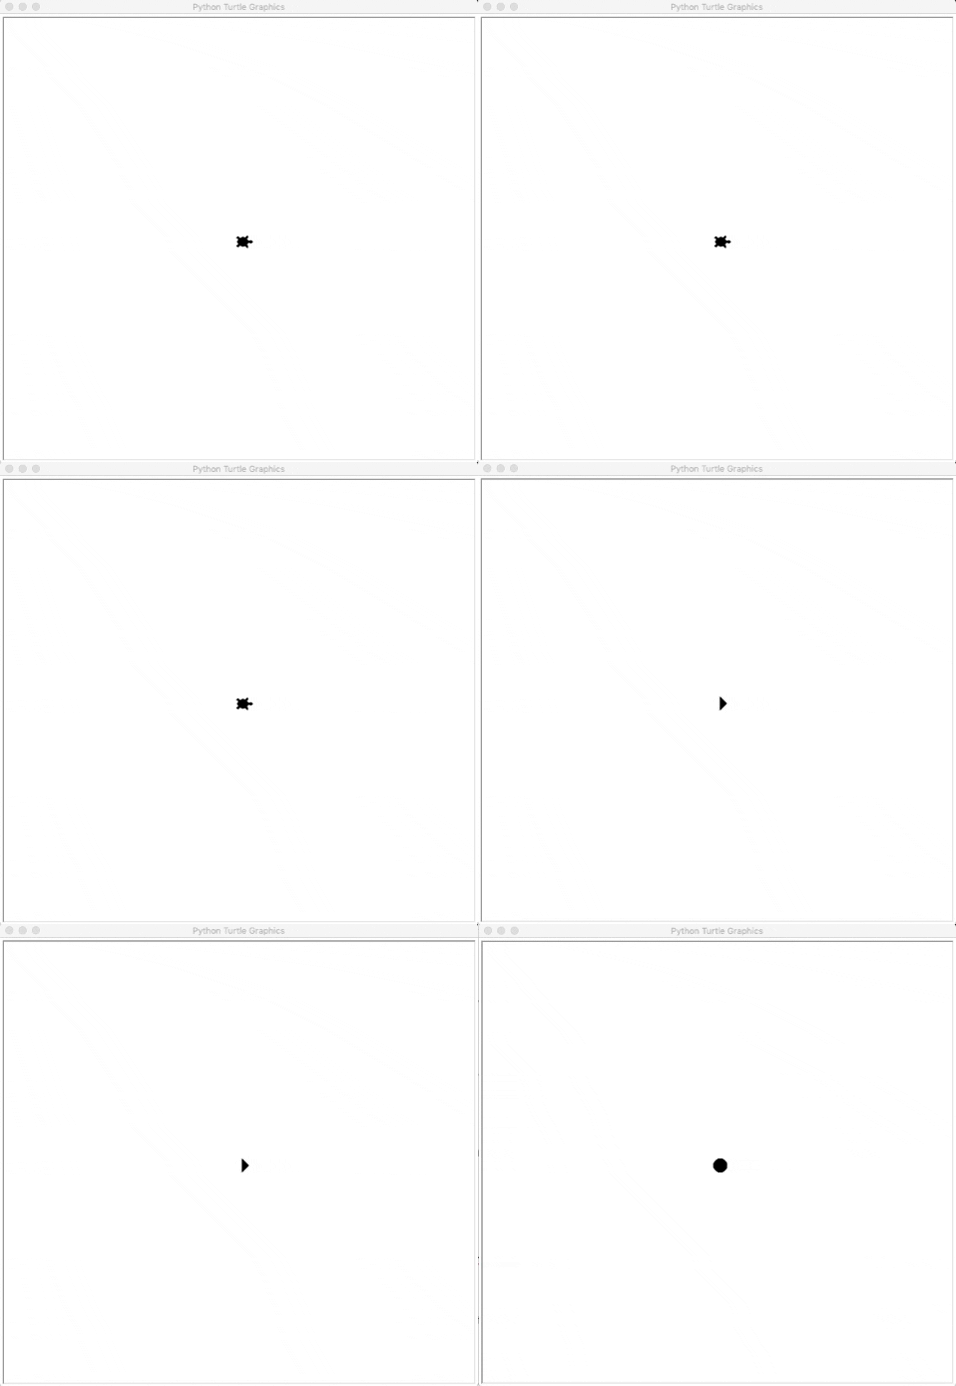
Python Turtle Shapes

You have a couple of other options that you can try as well:

  • Square
  • Arrow
  • Circle
  • Turtle
  • Triangle
  • Classic

The classic shape is the original shape. Check out the Python turtle library documentation to learn more about the types of shapes that you can use.

Changing the Pen Speed

The turtle generally moves at a moderate pace. If you want to decrease or increase the speed to make your turtle move slower or faster, then you can do so by typing the following:

>>>
>>> t.speed(1)
>>> t.forward(100)
>>> t.speed(10)
>>> t.forward(100)

This code will first decrease the speed and move the turtle forward, then increase the speed and move the turtle forward again, like this:
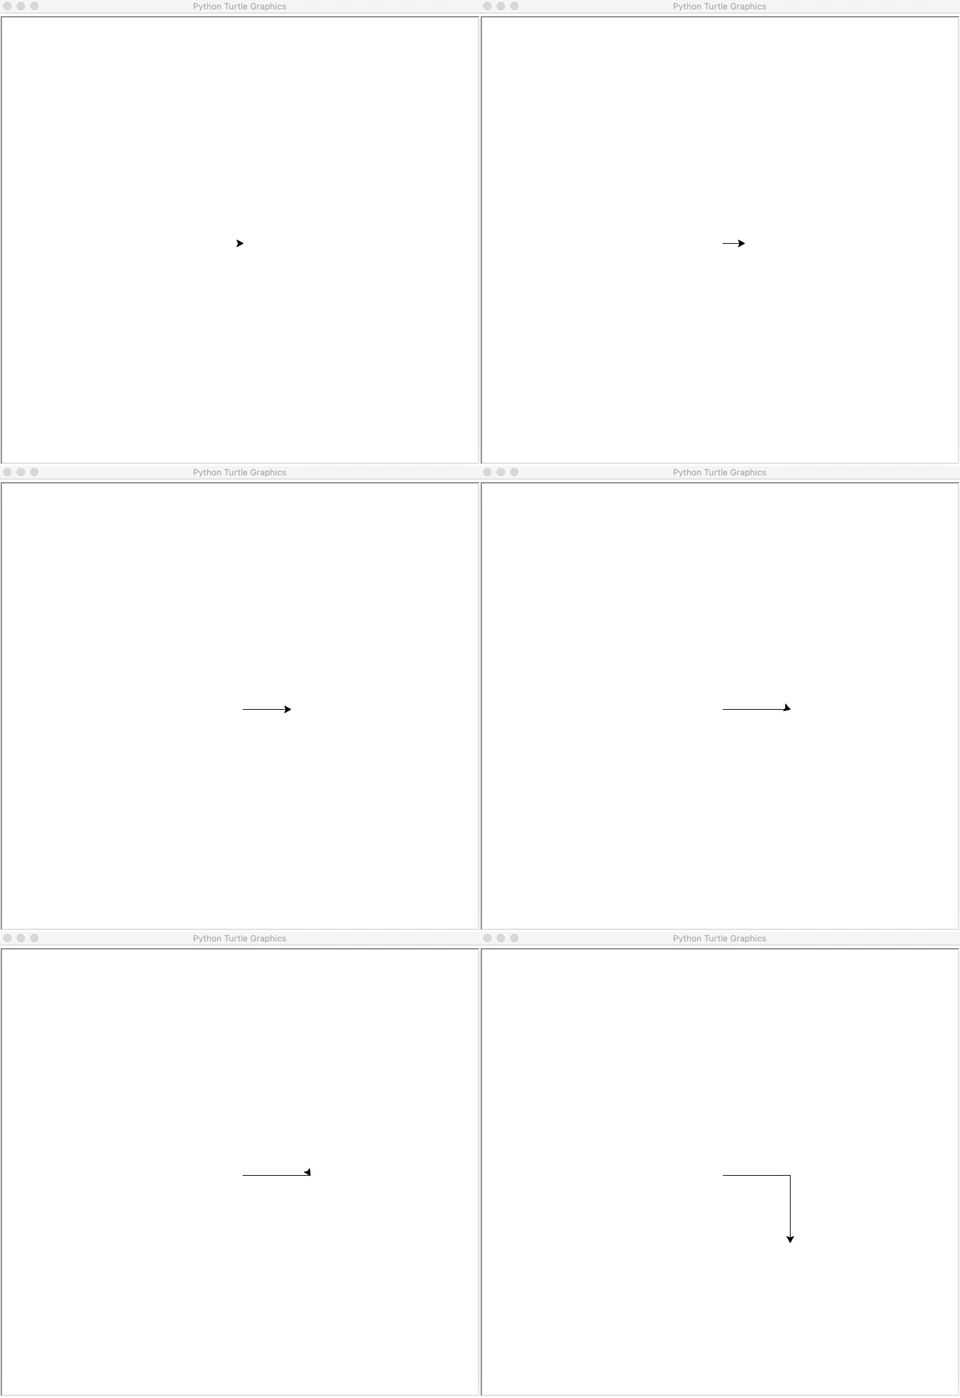
Python Turtle Speed Updated

The speed can be any number ranging from 0 (the slowest speed) to 10 (the highest speed). You can play around with your code to see how fast or slow the turtle will go.

Customizing in One Line

Suppose you want to set your turtle’s characteristics to the following:

  • Pen color: purple
  • Fill color: orange
  • Pen size: 10
  • Pen speed: 9

From what you’ve just learned, the code should look something like this:

>>>
>>> t.pencolor("purple")
>>> t.fillcolor("orange")
>>> t.pensize(10)
>>> t.speed(9)
>>> t.begin_fill()
>>> t.circle(90)
>>> t.end_fill()

It’s pretty long, but not that bad, right?

Now, just imagine if you had ten different turtles. Changing all of their characteristics would be extremely tiresome for you to do! The good news is that you can reduce your workload by altering the parameters in just a single line of code, like this:

>>>
>>> t.pen(pencolor="purple", fillcolor="orange", pensize=10, speed=9)
>>> t.begin_fill()
>>> t.circle(90)
>>> t.end_fill()

This will give you a result like this:
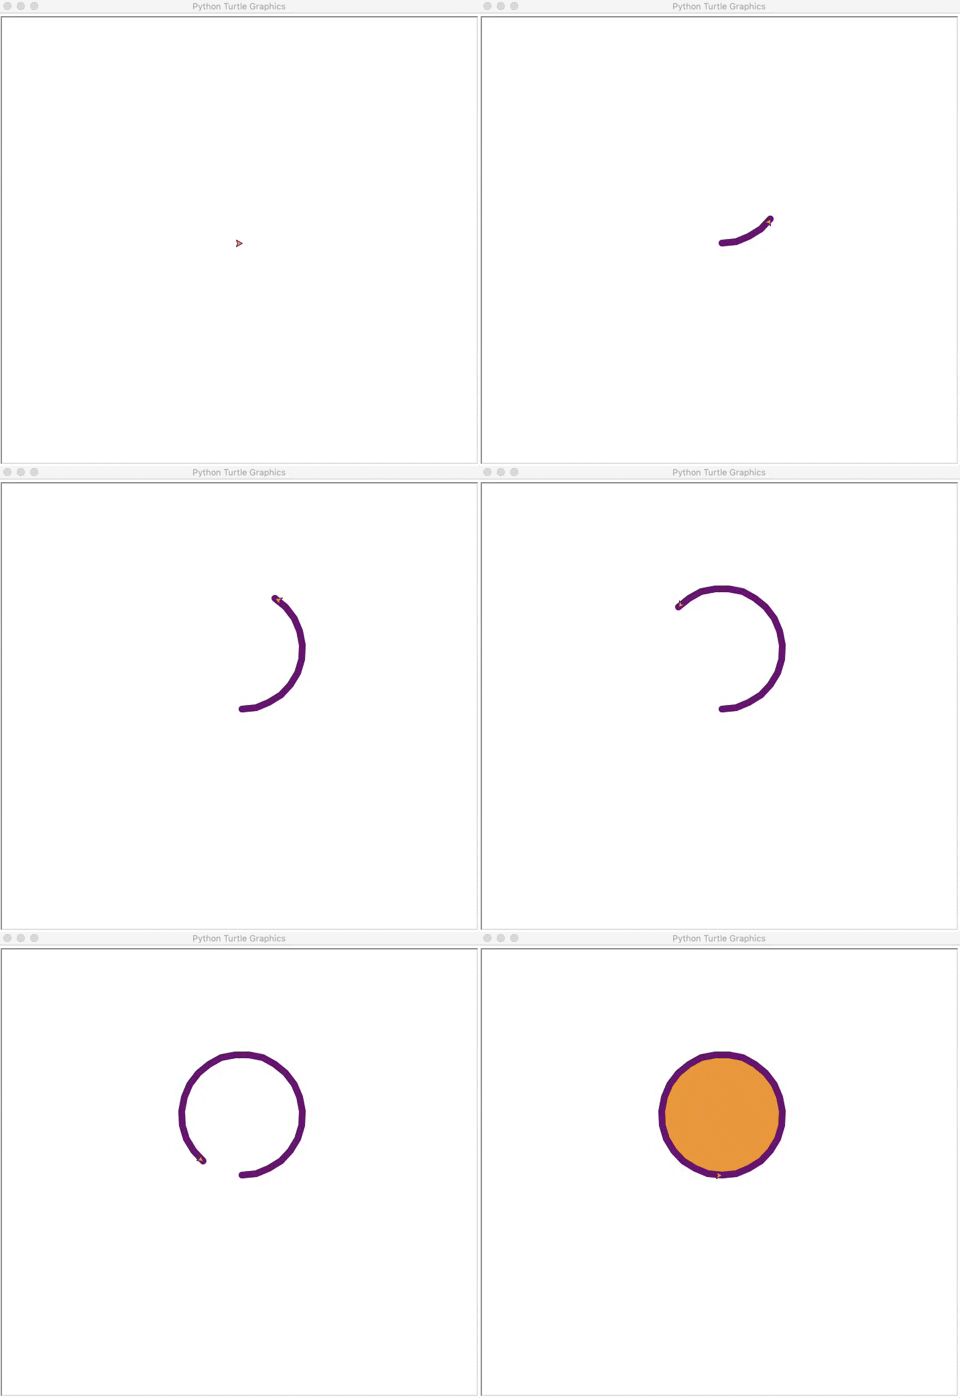
Python Turtle Single Line Pen Newer

This single line of code changed the entire pen, without you having to change each characteristic individually. To learn more about this command, check out the Python turtle library documentation.

Great job! Now that you’ve learned to customize your turtle and the screen, take a look at some other important commands that are required while drawing with the Python turtle library.

Picking the Pen Up and Down

Sometimes, you may want to move your turtle to another point on the screen without drawing anything on the screen itself. To do this, you use .penup(). Then, when you want to start drawing again, you use .pendown(). Give it a shot using the code that you used previously to draw a square. Try typing the following code:

>>>
>>> t.fd(100)
>>> t.rt(90)
>>> t.penup()
>>> t.fd(100)
>>> t.rt(90)
>>> t.pendown()
>>> t.fd(100)
>>> t.rt(90)
>>> t.penup()
>>> t.fd(100)
>>> t.pendown()

When you run this code, your output will look like this:
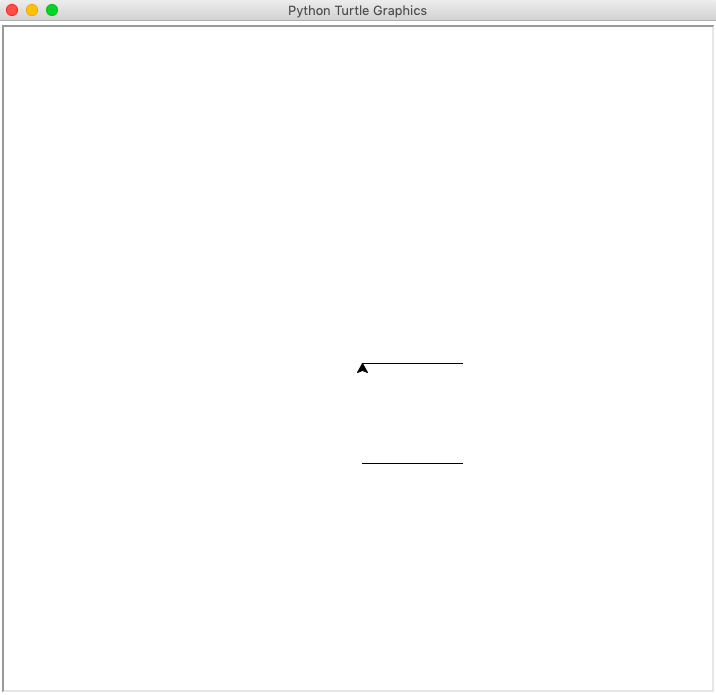
Python Turtle Pen Up Pen Down Edit

Here, you’ve obtained two parallel lines instead of a square by adding some extra commands in between the original program.

Undoing Changes

No matter how careful you are, there’s always a possibility of making a mistake. Don’t worry, though! The Python turtle library gives you the option to undo what you’ve done. If you want to undo the very last thing you did, then type in the following:

>>>
>>> t.undo()

This undoes the last command that you ran. If you want to undo your last three commands, then you would type t.undo() three times.

Clearing the Screen

Right now, you probably have a lot on your screen since you’ve started this tutorial. To make room for more, just type in the following command:

>>>
>>> t.clear()

This will clean up your screen so that you can continue drawing. Note here that your variables will not change, and the turtle will remain in the same position. If you have other turtles on your screen other than the original turtle, then their drawings will not be cleared out unless you specifically call them out in your code.

Resetting the Environment

You also have the option to start on a clean slate with a reset command. The screen will get cleared up, and the turtle’s settings will all be restored to their default parameters. All you need to to do is type in the following command:

>>>
>>> t.reset()

This clears the screen and takes the turtle back to its home position. Your default settings, like the turtle’s size, shape, color, and other features, will also be restored.

Now that you’ve learned the fundamentals of programming with the Python turtle library, you’ll check out some bonus features that you may want to use while programming.

Leaving a Stamp

You have the option of leaving a stamp of your turtle on the screen, which is nothing but an imprint of the turtle. Try typing in this code to see how it works:

>>>
>>> t.stamp()
8
>>> t.fd(100)
>>> t.stamp()
9
>>> t.fd(100)

Your output will look like this:
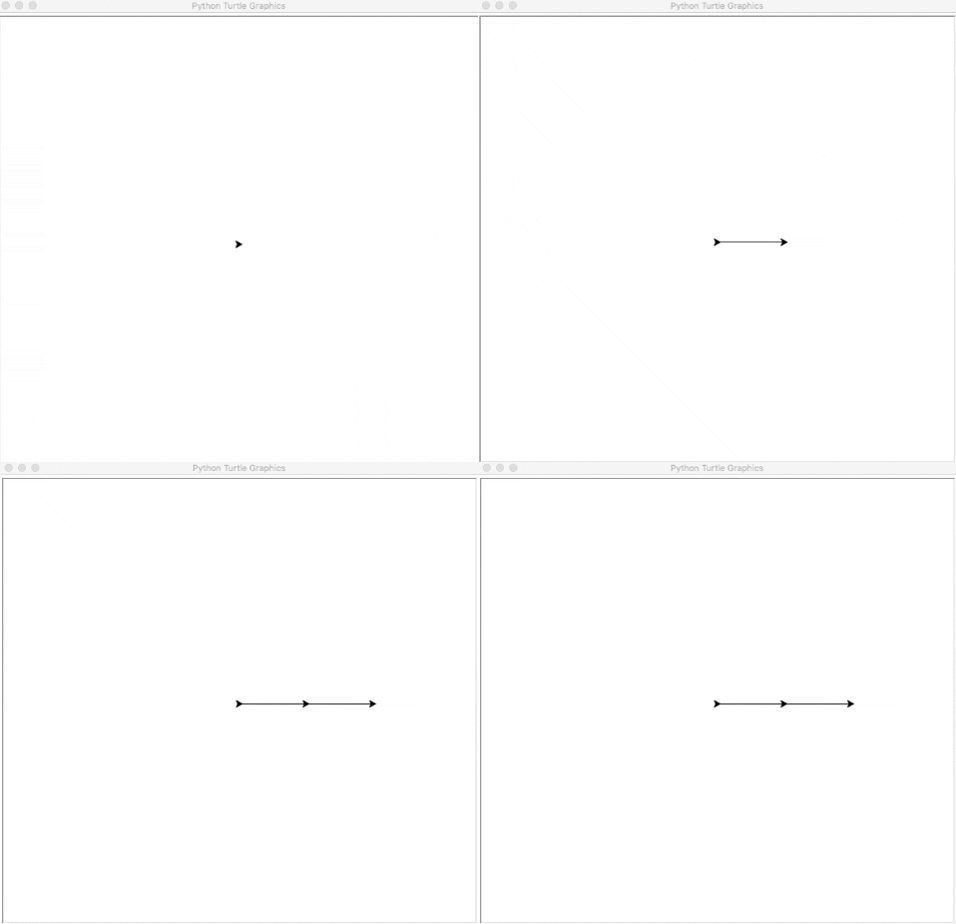
Python Turtle Stamps Edit

The numbers that appear are the turtle’s location or stamp ID. Now, if you want to remove a particular stamp, then just use the following:

>>>
>>> t.clearstamp(8)

This will clear the one with the stamp ID of 8.

Cloning Your Turtle

Sometimes, you may need to have more than one turtle on your screen. You’ll see an example of this later on in the final project. For now, you can get another turtle by cloning your current turtle into your environment. Try running this code to create a clone turtle, c, and then move both the turtles on the screen:

>>>
>>> c = t.clone()
>>> t.color("magenta")
>>> c.color("red")
>>> t.circle(100)
>>> c.circle(60)

The output will look like this:
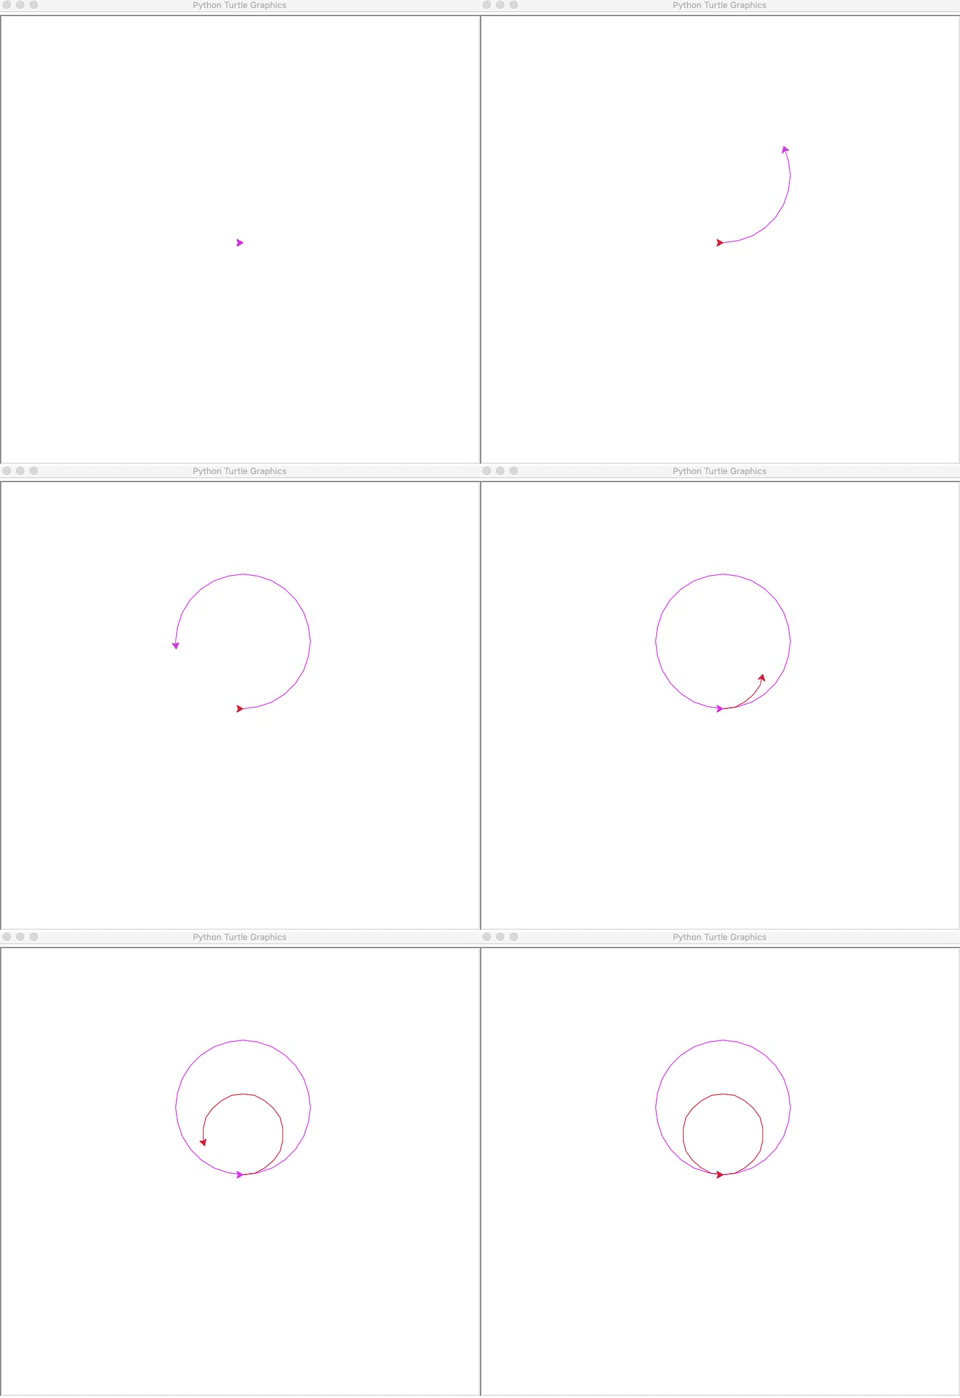
Python Turtle Clone NEWER

Awesome!

Now that you have an idea of some important commands from the Python turtle library, you’re ready to move on to a few more concepts that you’ll need to understand. These concepts are very much needed when it comes to programming in any language.

Using Loops and Conditional Statements

When you get into higher-level programming, you’ll find yourself using loops and conditional statements very often. That’s why, in this section, you’ll be going through a couple of turtle programs that make use of these types of commands. This will give you a practical approach when it comes to understanding these concepts. Before you begin, however, here are three definitions for you to keep in mind:

  1. Loops are a set of instructions that are continuously repeated until a particular condition is satisfied.
  2. Conditional statements carry out a certain task based on a condition that’s satisfied.
  3. Indentations are used to define blocks of code, especially when using loops and conditional statements. In general, you create an indentation by tapping the Tab key on the keyboard.

Now, let’s go ahead and explore these commands!

for Loops

Do you remember the program that you used to create a square? You had to repeat the same line of code four times, like this:

>>>
>>> t.fd(100)
>>> t.rt(90)
>>> t.fd(100)
>>> t.rt(90)
>>> t.fd(100)
>>> t.rt(90)
>>> t.fd(100)
>>> t.rt(90)

A much shorter way to do this is with the help of a for loop. Try running this code:

>>>
>>> for i in range(4):
...     t.fd(100)
...     t.rt(90)

Here, the i is like a counter that starts from zero and keeps increasing by 1. When you say in range(4), you’re telling the program that the value of this i should be less than 4. It will terminate the program before i reaches 4.

Here’s a breakdown of how the program works:

  1. At i = 0, the turtle moves forward by 100 units and then turns 90 degrees to the right.
  2. At i = 0 + 1 = 1, the turtle moves forward by 100 units and then turns 90 degrees to the right.
  3. At i = 1 + 1 = 2, the turtle moves forward by 100 units and then turns 90 degrees to the right.
  4. At i = 2 + 1 = 3, the turtle moves forward by 100 units and then turns 90 degrees to the right.

The turtle will then exit the loop. To check the value of i, type i and then press the Enter key. You’ll get the value of i equal to 3:

>>>
>>> i
3

Note that the whitespace that comes before line 2 and line 3 in the program is the indentation. This indicates that all 3 lines form a single block of code. To learn more about for loops in Python, check out Python “for” Loops (Definite Iteration).

while Loops

The while loop is used to perform a certain task while a condition is still satisfied. If the condition is no longer satisfied, then your code will terminate the process. You can use a while loop to create a series of circles by typing in this code:

>>>
>>> n=10
>>> while n <= 40:
...     t.circle(n)
...     n = n+10

When you run this code, you’ll see the circles appearing one after the other, and each new circle will be larger than the previous one:
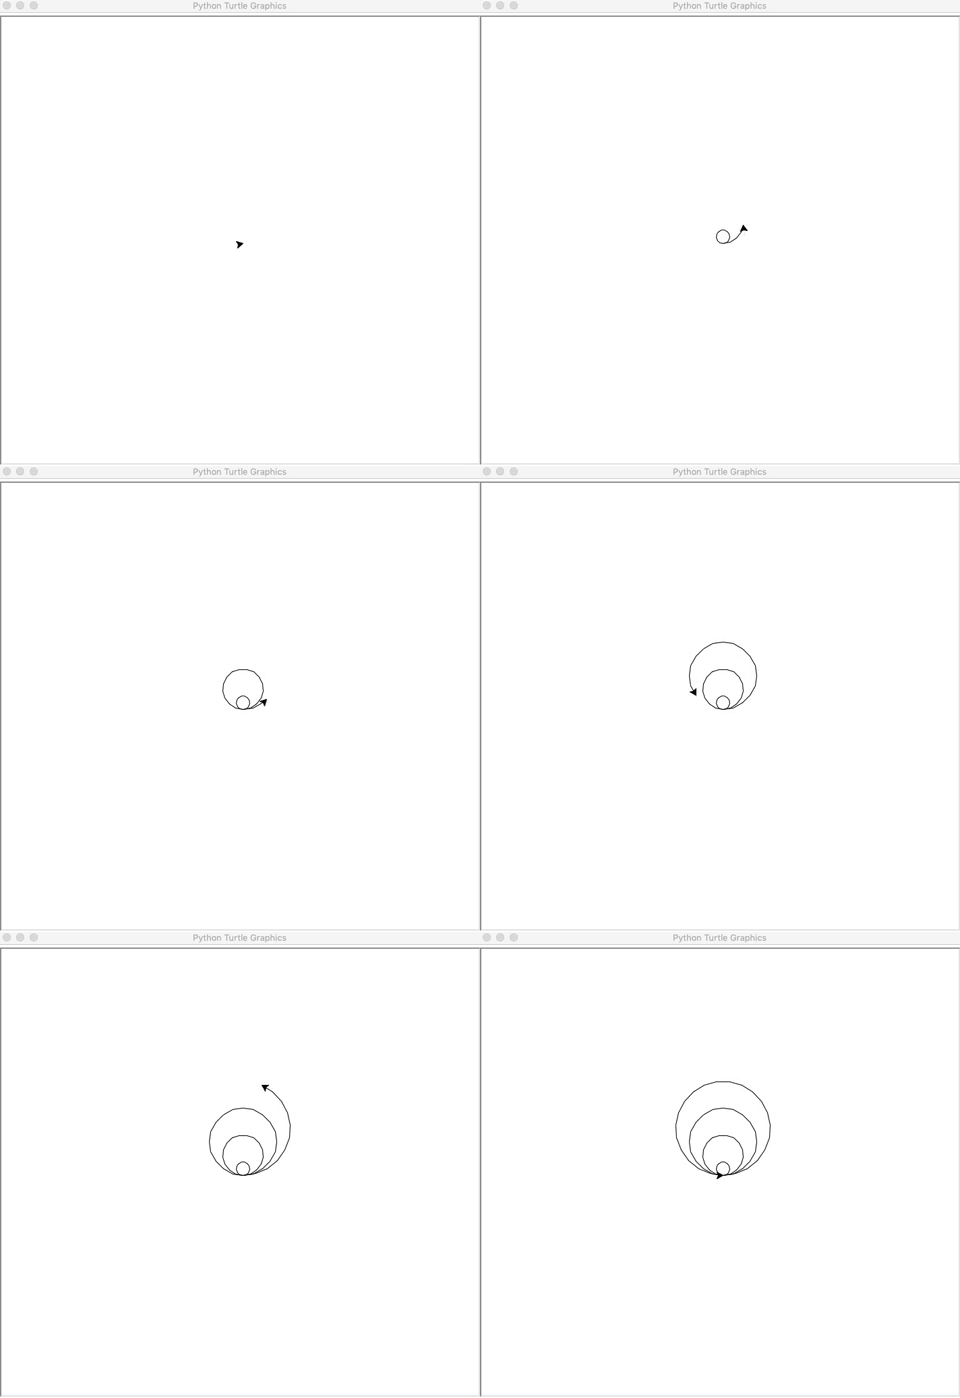
Python Turtle While Loop Edited Newer

Here, n is used as a counter. You’ll need to specify by how much you want the value of n to increase in each loop. Take a look at this mini walk-through to see how the program works:

  1. At n = 10, the turtle draws a circle with a radius of 10 units. After that, the value of n is increased by 10.
  2. At n = 20, the turtle draws a circle with a radius of 20 units. Once again, the value of n is increased by 10.
  3. At n = 30, the turtle draws a circle with a radius of 30 units. For the third time, the value of n is increased by 10.
  4. At n = 40, the turtle draws a circle with a radius of 40 units. For the last time, the value of n is increased by 10.
  5. At n = 50, n is no longer less than or equal to 40. The loop is terminated.

To read more about while loops, check out Python “while” Loops (Indefinite Iteration).

Conditional Statements

You use conditional statements to check if a given condition is true. If it is, then the corresponding command is executed. Try typing in this program:

>>>
>>> u = input("Would you like me to draw a shape? Type yes or no: ")
>>> if u == "yes":
...     t.circle(50)

input() is used to obtain input from the user. Here, it will store the user’s response under the variable u. Next, it will compare the value of u with the condition provided and check whether the value of u is "yes". If it’s "yes", then your program draws a circle. If the user types in anything else, then the program won’t do anything.

Note: The comparison operator == indicates a comparison. It’s used to check if the value of something is equal to something else. The assignment operator = is used to assign a value to something. To learn more about the differences between the two, check out Operators and Expressions in Python.

When you add an else clause to an if statement, you can specify two results based on whether the condition is true or false. Let’s see this in a program:

>>>
>>> u = input("Would you like me to draw a shape? Type yes or no: ")
>>> if u == "yes":
...     t.circle(50)
>>> else:
...     print("Okay")

Here, you tell the program to display a particular output even when the user does not say "yes". You use print() to display some pre-defined characters on the screen.

Note that the user doesn’t need to type "no". They can type anything else, in which case, the result will always be "Okay", because you’re not explicitly telling the program that the user needs to type "no". Not to worry, however, as that can be fixed. You can add an elif clause to provide the program with several conditions and their respective outputs, as you can observe here:

>>>
>>> u = input("Would you like me to draw a shape? Type yes or no: ")
>>> if u == "yes":
...     t.circle(50)
>>> elif u == "no":
...     print("Okay")
>>> else:
...     print("Invalid Reply")

As you can see, this program now has more than one outcome, depending on the input it receives. Here’s how this code works:

  • If you type in "yes", then the code processes the input and draws a circle, as per your instructions.
  • If you type in "no", then the code prints out "Okay" and your program is terminated.
  • If you type in anything else, like "Hello" or "Sandwich", then the code prints "Invalid Reply" and your program is terminated.

Note that this program is case-sensitive, so when you’re trying it out, be sure to put the strings in upper-case or lower-case accordingly.

To learn more about conditional statements, check out Conditional Statements in Python.

Final Project: The Python Turtle Race

So far, you’ve learned how to customize your turtle environment, program your turtle to move around the screen, and use loops and conditional statements to improve your code. Now it’s time for the most important part of your programming journey. In this section, you’ll be implementing all that you’ve learned into a single program by creating a fun game that you can play with your friends.

Before you begin, here’s what you need to know about the game:

  1. The Objective: The player whose turtle reaches its home first wins the game.

  2. How to Play:

    • Each player rolls a dice to get a number.
    • The player then moves their turtle by that many steps.
    • The players alternate turns until one of them wins.
  3. The Structure:

    • Each player had a turtle indicated by a different color. You can have more than two players, but for the sake of this tutorial, you’ll be creating a two-player game.
    • Each turtle has a home position that it must reach.
    • Each player uses a die to choose a value at random for their turn. In your program, the die is represented by a list of numbers from 1 to 6.

Now that you’ve understood the logic of the game, you can go ahead and begin creating it! First, you’ll need to set up the environment.

Setting Up the Game Environment

Start by importing the Python turtle library. After this, import the built-in random library, which you’ll use randomly select an item from a list:

>>>
>>> import turtle
>>> import random

Once these libraries are successfully called into your environment, you can proceed with the rest of your program.

Setting Up the Turtles and Homes

You now have to create the two turtles that will represent the players. Each turtle will be a different color, corresponding to the different players. Here, player one is green and player two is blue:

>>>
>>> player_one = turtle.Turtle()
>>> player_one.color("green")
>>> player_one.shape("turtle")
>>> player_one.penup()
>>> player_one.goto(-200,100)
>>> player_two = player_one.clone()
>>> player_two.color("blue")
>>> player_two.penup()
>>> player_two.goto(-200,-100)

One you’ve created the turtles, you place them at their starting positions and make sure that these positions are aligned. Note that you created player two’s turtle by cloning player one’s turtle, changing its color, and placing it at a different starting point.

You now need to set up homes for the turtles. These homes will act as the finishing points for each turtle. Each of the turtles’ homes will be represented by a circle. Here, you need to make sure that both homes are equidistant from the starting point:

>>>
>>> player_one.goto(300,60)
>>> player_one.pendown()
>>> player_one.circle(40)
>>> player_one.penup()
>>> player_one.goto(-200,100)
>>> player_two.goto(300,-140)
>>> player_two.pendown()
>>> player_two.circle(40)
>>> player_two.penup()
>>> player_two.goto(-200,-100)

After drawing the respective homes, you send the turtles back to their starting positions:
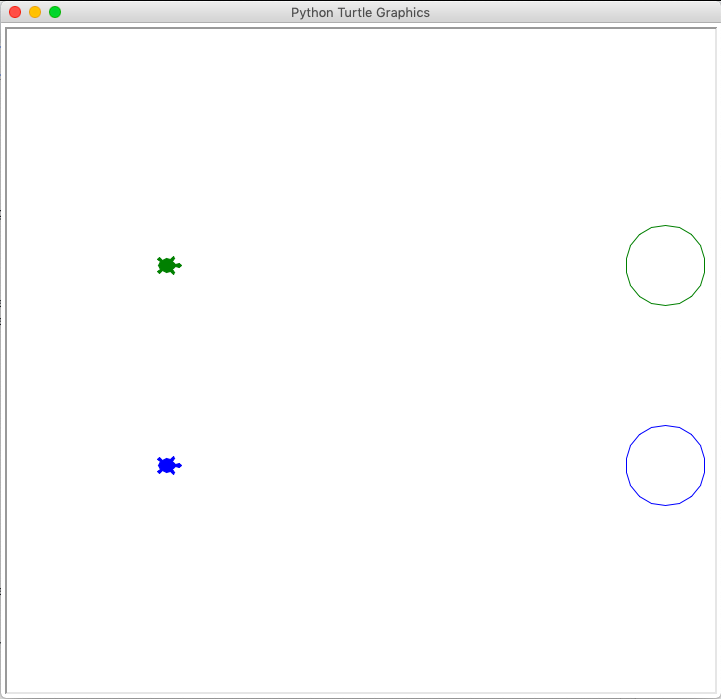
Python Turtle Race Setup Updated

Awesome! The visual aspects of your game are complete. You can now create the die that you’ll be using to play the game.

Creating the Die

You can create a virtual die for your game with a list, which is an ordered sequence of items. In real life, you might prepare grocery lists and to-do lists to help you stay organized. In Python, lists work in a similar way.

In this case, you’ll be using a list to create your die. First, you define your list of numbers in ascending order from 1 to 6. You can define a list by giving it a name and then enclosing its items within square brackets, like this:

>>>
>>> die = [1,2,3,4,5,6]

This list has now become your die. To roll the dice, all you have to do is program your system to randomly select a number from it. The number that is selected will be considered as the output of the die.

Developing the Game

It’s time to develop the code for the rest of the game. You’ll be using loops and conditional statements here, so you need to be careful with the indentations and spaces. To start, take a look at the steps your program will need to take to run the game:

  1. Step 1: You’ll start by telling your program to check if either turtle has reached its home.
  2. Step 2: If they haven’t, then you’ll tell your program to allow the players to continue trying.
  3. Step 3: In each loop, you tell your program to roll the die by randomly picking a number from the list.
  4. Step 4: You then tell it to move the respective turtle accordingly, with the number of steps based on the outcome of this random selection.

The program keeps repeating this process, and stops once one of the turtles reaches the goal. Here’s how the code looks:

>>>
 1 >>> for i in range(20):
 2 ...     if player_one.pos() >= (300,100):
 3 ...             print("Player One Wins!")
 4 ...             break
 5 ...     elif player_two.pos() >= (300,-100):
 6 ...             print("Player Two Wins!")
 7 ...             break
 8 ...     else:
 9 ...             player_one_turn = input("Press 'Enter' to roll the die ")
10 ...             die_outcome = random.choice(die)
11 ...             print("The result of the die roll is: ")
12 ...             print(die_outcome)
13 ...             print("The number of steps will be: ")
14 ...             print(20*die_outcome)
15 ...             player_one.fd(20*die_outcome)
16 ...             player_two_turn = input("Press 'Enter' to roll the die ")
17 ...             d = random.choice(die)
18 ...             print("The result of the die roll is: ")
19 ...             print(die_outcome)
20 ...             print("The number of steps will be: ")
21 ...             print(20*die_outcome)
22 ...             player_two.fd(20*die_outcome)

Your final output will look a little something like this:
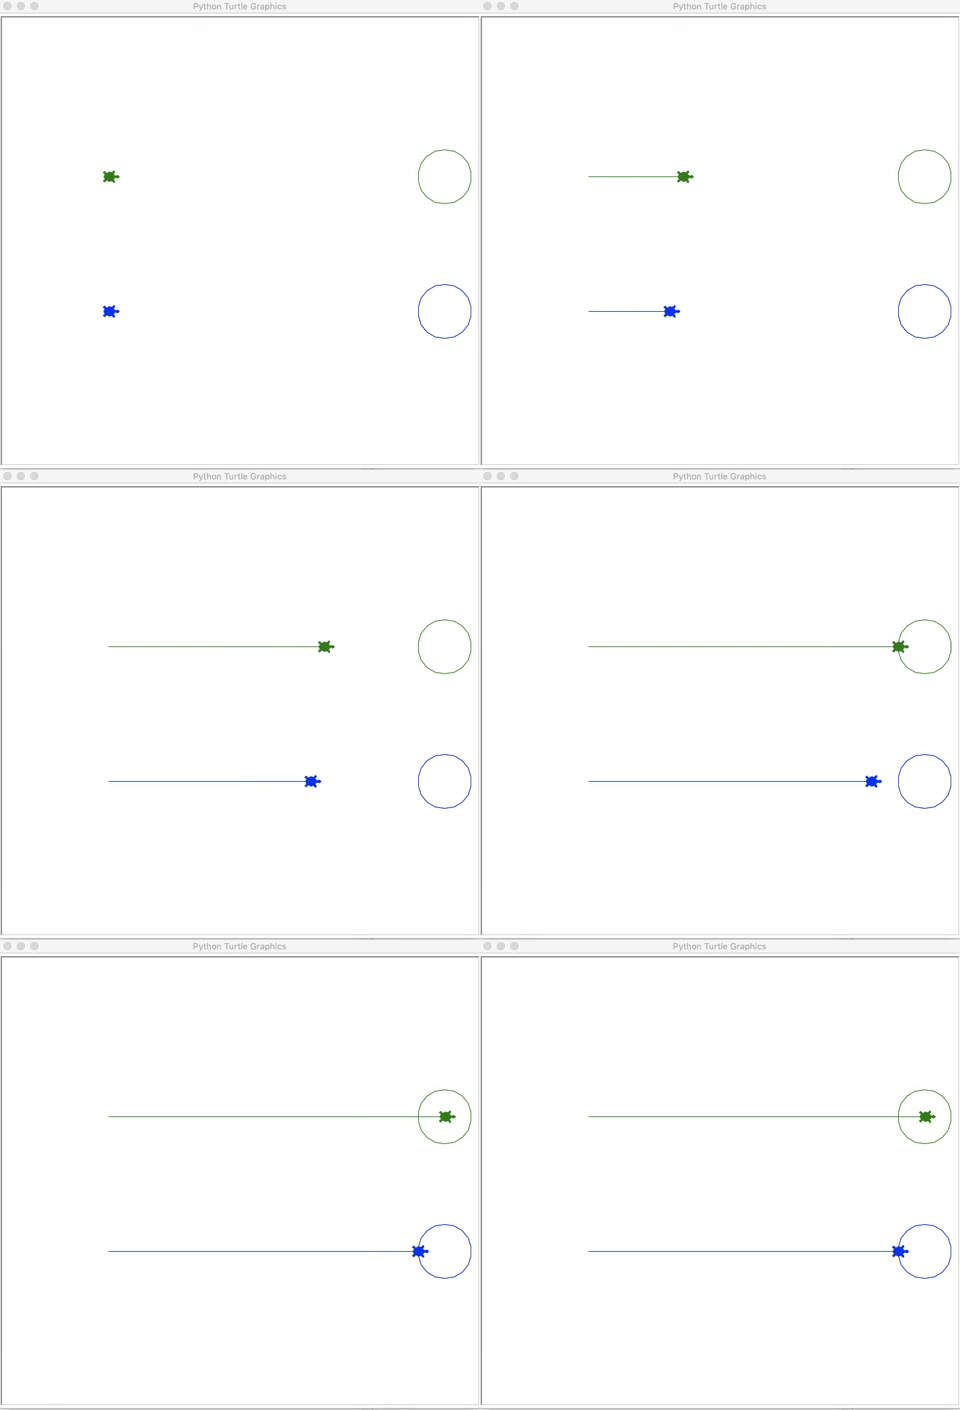
Python Turtle Race Updated

In summary, this is what the code is doing:

  1. Line 1 sets up a for loop with a range from 1 to 20.

  2. Lines 2 through 7 check if either player has reached their goal. If one of them has, then the program prints out the corresponding statement and breaks the loop.

  3. Line 8 moves the program on to the next set of steps if neither player has won.

  4. Line 9 prints out a statement asking player one to press the Enter key to roll the die.

  5. Line 10 takes a random value from the list die and stores it in dice_outcome.

  6. Line 11 prints a statement prior to displaying the outcome of the dice roll.

  7. Line 12 prints the dice outcome.

  8. Line 14 multiplies this value by 20 to reduce the overall number of steps required to complete the game.

  9. Line 15 moves player one’s turtle forward by this number of steps.

  10. Lines 16 to 22 repeat these steps for player two.

The entire for loop is repeated until one of the player’s turtles reaches the final position.

Note: In Python, you use the asterisk (*) to indicate multiplication. This is known as an arithmetic operator. You can also use the plus sign (+) for addition, the minus sign (-) for subtraction, and a slash (/) for division. To learn more about arithmetic operators, check out the Arithmetic Operators section of Operators and Expressions in Python.

Remember, you can customize the game however you want, so go ahead and play around with it! You can add more turtles, change the colors, change the speed, or even create some obstacles to challenge your players. It’s all up to you as the developer of the game!

Conclusion

In this tutorial, you’ve learned how to program with the Python turtle library and grasped some very important programming concepts. You know how to deal with variable initialization, loops, conditional statements, indentations, lists, and operators. This is a great start for you, especially if you’re new to the Python programming language!

Now you can:

  • Set up the Python turtle library
  • Move your turtle around
  • Customize your turtle and its environment
  • Program your turtle
  • Use basic programming concepts
  • Create a game that you can play with friends

Now you’re ready to venture into some higher-level Python programming. To progress further in your Python journey, check out Introduction to Python and 11 Beginner Tips for Learning Python Programming. Just remember to work hard and keep practicing, and you’ll find that you’re a Python expert in no time!


[ Improve Your Python With 🐍 Python Tricks 💌 – Get a short & sweet Python Trick delivered to your inbox every couple of days. >> Click here to learn more and see examples ]


from Planet Python
via read more
TestDriven.io: Working with Static and Media Files in Django

This article looks at how to work with static and media files in a Django project, locally and in production. from Planet Python via read...