Are you learning or helping someone else learn Python, why not make a game out of it? TwilioQuest is a game that doesn't treat you with kid-gloves while teaching you Python. Using your editor of choice, write code on your machine, and still play the game to solve Python challenges.
from Planet Python
via read more
Thursday, January 30, 2020
Test and Code: 99: Software Maintenance and Chess
I play a form of group chess that has some interesting analogies to software development and maintenance of existing systems. This episode explains group chess and explores a few of those analogies.
Sponsored By:
- Raygun: Detect, diagnose, and destroy Python errors that are affecting your customers. With smart Python error monitoring software from Raygun.com, you can be alerted to issues affecting your users the second they happen.
Support Test & Code: Python Software Testing & Engineering
<p>I play a form of group chess that has some interesting analogies to software development and maintenance of existing systems. This episode explains group chess and explores a few of those analogies.</p><p>Sponsored By:</p><ul><li><a href="https://ift.tt/34ZzBsU" rel="nofollow">Raygun</a>: <a href="https://ift.tt/34ZzBsU" rel="nofollow">Detect, diagnose, and destroy Python errors that are affecting your customers. With smart Python error monitoring software from Raygun.com, you can be alerted to issues affecting your users the second they happen.</a></li></ul><p><a href="https://ift.tt/2tzXV5e" rel="payment">Support Test & Code: Python Software Testing & Engineering</a></p>from Planet Python
via read more
We’ve Reached a Milestone: pandas 1.0 Is Here
Today the pandas project announced the release of pandas 1.0.0. For more on what’s changed, read through the extensive release notes. We’re particularly excited about Numba-accelerated window operations and the new nullable boolean and string…
The post We’ve Reached a Milestone: pandas 1.0 Is Here appeared first on Anaconda.
from Planet SciPy
read more
Continuum Analytics Blog: We’ve Reached a Milestone: pandas 1.0 Is Here
Today the pandas project announced the release of pandas 1.0.0. For more on what’s changed, read through the extensive release notes. We’re particularly excited about Numba-accelerated window operations and the new nullable boolean and string…
The post We’ve Reached a Milestone: pandas 1.0 Is Here appeared first on Anaconda.
from Planet Python
via read more
Wingware: Wing Python IDE 7.2.1 - January 29, 2020
Wing 7.2.1 fixes debug process group termination, avoids failures seen when pasting some Python code, prevents crashing in vi browse mode when the first line of the file is blank, and fixes some other usability issues.

Download Wing 7.2.1 Now: Wing Pro | Wing Personal | Wing 101 | Compare Products
 What's New in Wing 7.2
Auto-Reformatting with Black and YAPF (Wing Pro)
Wing 7.2 adds support for Black and YAPF for code reformatting, in addition to the previously available built-in autopep8 reformatting. To use Black or YAPF, they must first be installed into your Python with pip, conda, or other package manager. Reformatting options are available from the Source > Reformatting menu group, and automatic reformatting may be configured in the Editor > Auto-reformatting preferences group.
See Auto-Reformatting for details.
Improved Support for Virtualenv
Wing 7.2 improves support for virtualenv by allowing the command that activates the environment to be entered in the Python Executable in Project Properties, Launch Configurations, and when creating new projects. The New Project dialog now also includes the option to create a new virtualenv along with the new project, optionally specifying packages to install.
See Using Wing with Virtualenv for details.
Support for Anaconda Environments
Similarly, Wing 7.2 adds support for Anaconda environments, so the conda activate command can be entered when configuring the Python Executable and the New Project dialog supports using an existing Anaconda environment or creating a new one along with the project.
See Using Wing with Anaconda for details.
And More
Wing 7.2 also makes it easier to debug modules with python -m, simplifies manual configuration of remote debugging, allows using a command line for the configured Python Executable, and fixes a number of usability issues.
For details see the change log.
For a complete list of new features in Wing 7, see What's New in Wing 7.
Try Wing 7.2 Now!
Wing 7.2 is an exciting new step for Wingware's Python IDE product line. Find out how Wing 7.2 can turbocharge your Python development by trying it today.
Downloads: Wing Pro | Wing Personal | Wing 101 | Compare Products
See Upgrading for details on upgrading from Wing 6 and earlier, and Migrating from Older Versions for a list of compatibility notes.
from Planet Python
via read more
Erik Marsja: Random Forests (and Extremely) in Python with scikit-learn
The post Random Forests (and Extremely) in Python with scikit-learn appeared first on Erik Marsja.
In this guest post, you will learn by example how to do two popular machine learning techniques called random forest and extremely random forests. In fact, this post is an excerpt (adapted to the blog format) from the forthcoming Artificial Intelligence with Python – Second Edition: Your Complete Guide to Building Intelligent Apps using Python 3.x and TensorFlow 2. Now, before you will learn how to carry out random forests in Python with scikit-learn, you will find some brief information about the book.
Artificial Intelligence with Python – Second Edition
The new edition of this book, which will guide you to artificial intelligence with Python, is now updated to Python 3.x and TensorFlow 2. Furthermore, it has new chapters that, besides random forests, cover recurrent neural networks, artificial intelligence and Big Data, fundamental use cases, chatbots, and more. Finally, artificial Intelligence with Python – Second Edition is written by two experts in the field of artificial intelligence; Alberto Artasanches and Pratek Joshi (more information about the authors can be found towards the end of the post).
Now, in the next section of this post, you will learn what random forests and extremely random forests are. After that, there’s a code example on how to set up a script to do these types of classification with Python and scikit-learn learn.
What are Random Forests and Extremely Random Forests?
A random forest is an instance of ensemble learning where individual models are constructed using decision trees. This ensemble of decision trees is then used to predict the output value. We use a random subset of training data to construct each decision tree. This will ensure diversity among various decision trees. In the first section, we discussed that one of the most important attributes when building good ensemble learning models is that we ensure that there is diversity among individual models.
Advantages of Random Forests
One of the advantages of random forests is that they do not overfit. Overfitting is a frequent problem in machine learning. Overfitting is more likely with nonparametric and nonlinear models that have more flexibility when learning a target function. By constructing a diverse set of decision trees using various random subsets, we ensure that the model does not overfit the training data. During the construction of the tree, the nodes are split successively, and the best thresholds are chosen to reduce the entropy at each level. This split doesn’t consider all the features in the input dataset. Instead, it chooses the best split among the random subset of the features that are under consideration. Adding this randomness tends to increase the bias of the random forest, but the variance decreases because of averaging. Hence, we end up with a robust model.
Extremely Random Forests
Extremely random forests take randomness to the next level. Along with taking a random subset of features, the thresholds are chosen randomly as well. These randomly generated thresholds are chosen as the splitting rules, which reduce the variance of the model even further. Hence, the decision boundaries obtained using extremely random forests tend to be smoother than the ones obtained using random forests. Some implementations of extremely random forest algorithms also enable better parallelization and can scale better.
Building Random Forest and Extremely Random Forest Classifiers
Let’s see how we can build a classifier based on random forests and extremely random forests. The way to construct both classifiers is very similar, so an input flag is used to specify which classifier needs to be built.
Create a new Python file and import the following packages:
import argparse

import numpy as np

import matplotlib.pyplot as plt

from sklearn.metrics import classification_report

from sklearn.ensemble import RandomForestClassifier, ExtraTreesClassifier

from sklearn.model_selection import train_test_split

from sklearn.metrics import classification_report


from utilities import visualize_classifier
Constructing a Random Forest Classifier in Python
Define an argument parser for Python so that we can take the classifier type as an input parameter. Depending on this parameter, we can construct a random forest classifier or an extremely random forest classifier:
# Argument parser

def build_arg_parser():

    parser = argparse.ArgumentParser(description='Classify data using \

            Ensemble Learning techniques')

    parser.add_argument('--classifier-type', dest='classifier_type',

            required=True, choices=['rf', 'erf'], help="Type of classifier \

                    to use; can be either 'rf' or 'erf'")

    return parser
Define the main function and parse the input arguments:
code class="lang-py">if __name__=='__main__':

    # Parse the input arguments

    args = build_arg_parser().parse_args()

    classifier_type = args.classifier_type
In this random forest in Python example, data is loaded from the data_random_forests.txt file. Each line in this file contains comma-separated values. The first two values correspond to the input data and the last value corresponds to the target label. We have three distinct classes in this dataset. Let’s load the data from that file:
    # Load input data

    input_file = 'data_random_forests.txt'

    data = np.loadtxt(input_file, delimiter=',')

    X, y = data[:, :-1], data[:, -1]
A side note, on this blog there are many guides, and tutorials, on how to import data with Python. In some cases, the data may be stored in CSV or Excel files. Here are two posts by the author of this blog if you need to import data from other formats:
Separate the input data into three classes:
    # Separate input data into three classes based on labels

    class_0 = np.array(X[y==0])

    class_1 = np.array(X[y==1])

    class_2 = np.array(X[y==2])
Let’s visualize the input data:
    # Visualize input data

    plt.figure()

    plt.scatter(class_0[:, 0], class_0[:, 1], s=75, facecolors='white',

                    edgecolors='black', linewidth=1, marker='s')

    plt.scatter(class_1[:, 0], class_1[:, 1], s=75, facecolors='white',

                    edgecolors='black', linewidth=1, marker='o')

    plt.scatter(class_2[:, 0], class_2[:, 1], s=75, facecolors='white',

                    edgecolors='black', linewidth=1, marker='^')

    plt.title('Input data')
Split the data into training and testing datasets:
    # Split data into training and testing datasets

    X_train, X_test, y_train, y_test = train_test_split(

            X, y, test_size=0.25, random_state=5)
Define the parameters to be used when we construct the classifier. The n_estimators parameter refers to the number of trees that will be constructed. The max_depth parameter refers to the maximum number of levels in each tree. The random_state parameter refers to the seed value of the random number generator needed to initialize the random forest classifier algorithm:
# Ensemble Learning classifier params = {'n_estimators': 100, 'max_depth': 4, 'random_state': 0}
Depending on the input parameter, we either construct a random forest classifier or an extremely random forest classifier:
    if classifier_type == 'rf':

        classifier = RandomForestClassifier(**params)

    else:

        classifier = ExtraTreesClassifier(**params)
Visualize a Random Forest Classifier in Python
Train and visualize the classifier:
    classifier.fit(X_train, y_train)

    visualize_classifier(classifier, X_train, y_train, 'Training dataset')
Compute the output based on the test dataset and visualize it:
    y_test_pred = classifier.predict(X_test)

    visualize_classifier(classifier, X_test, y_test, 'Test dataset')
Evaluate the performance of the classifier by printing the classification report:
 # Evaluate classifier performance

    class_names = ['Class-0', 'Class-1', 'Class-2']

    print("\n" + "#"*40)

    print("\nClassifier performance on training dataset\n")

    print(classification_report(y_train, classifier.predict(X_train), target_names=class_names))

    print("#"*40 + "\n")


    print("#"*40)

    print("\nClassifier performance on test dataset\n")

    print(classification_report(y_test, y_test_pred, target_names=class_names))

    print("#"*40 + "\n")
Running a Random Forest Classifier in Python
If you were to save the code in the file random_forests.py file. Let’s run the code with the random forest classifier using the rf flag in the input argument. Run the following command:
$ python3 random_forests.py --classifier-type rf
You will see a few figures pop up. The first screenshot is the input data:
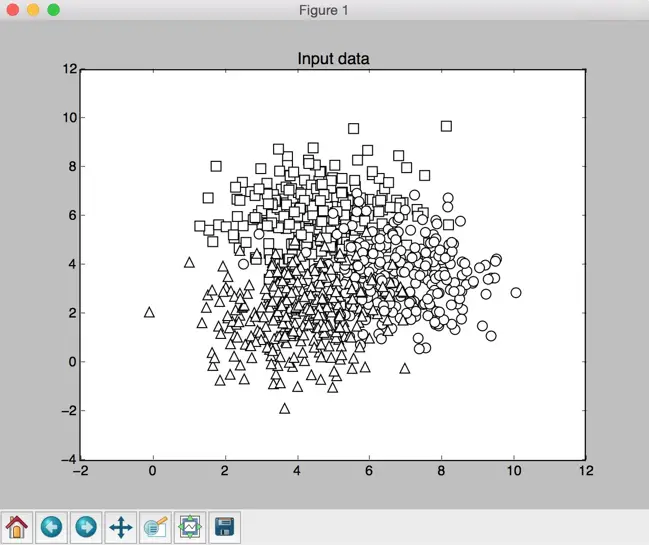 Visualization of input data
In the preceding screenshot, the three classes are being represented by squares, circles, and triangles. We see that there is a lot of overlap between classes, but that should be fine for now. The second screenshot shows the classifier boundaries:
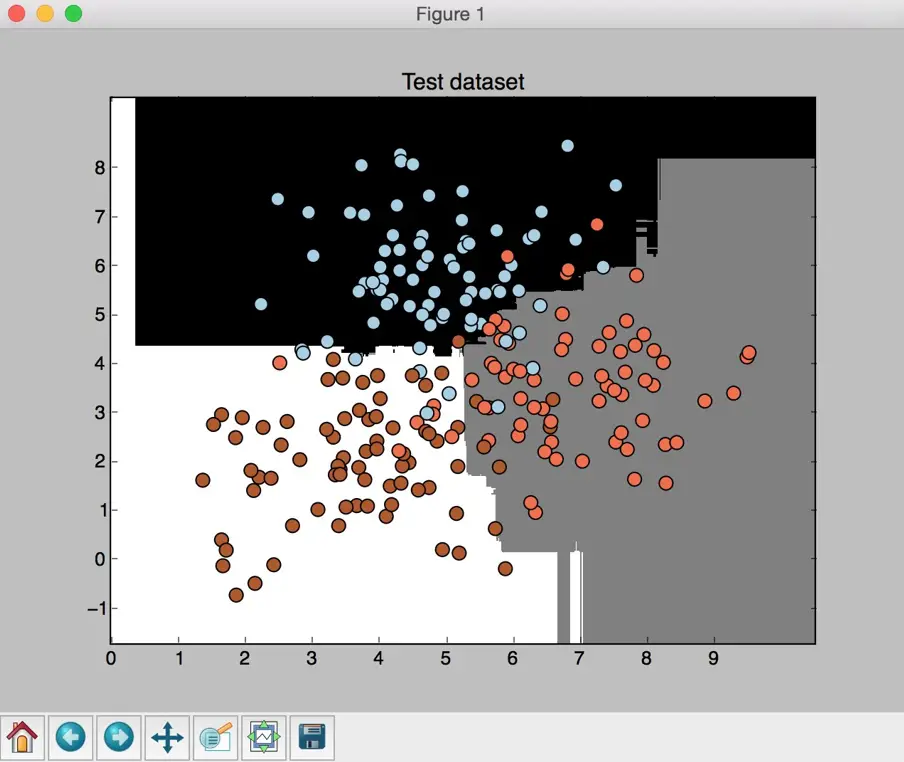 Classifier boundaries on the test dataset
Extremely Random Forest in Python
Now let’s run the code with the extremely random forest classifier by using the erf flag in the input argument. Run the following command:
$ python3 random_forests.py --classifier-type erf
You will see a few figures pop up. We already know what the input data looks like. The second screenshot shows the classifier boundaries:
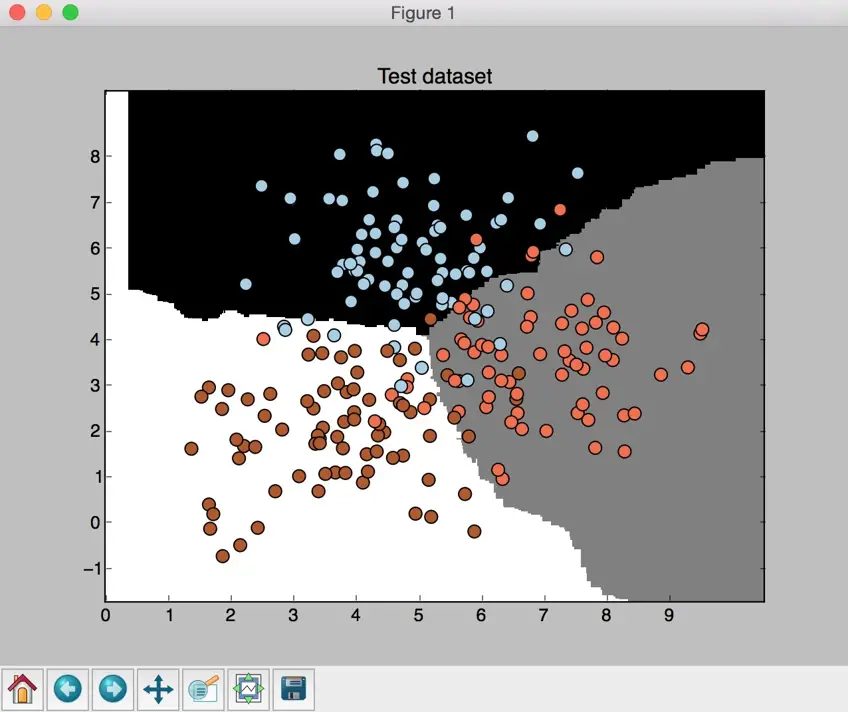 Classifier boundaries on the test dataset
If you compare the preceding screenshot with the boundaries obtained from the random forest classifier, you will see that these boundaries are smoother. The reason is that extremely random forests have more freedom during the training process to come up with good decision trees, hence they usually produce better boundaries.
Summary: Random Forests in Python
Now, to summarize, in this post, you have learned about the forthcoming new edition of the book Artificial Intelligence with Python. To fully get all you can from this book you need basic Python programming experience and awareness of machine learning concepts and techniques.
However, the most important part of this blog post, and maybe the take-home message, was to learn how to do random forests in Python using scikit-learn.
Authors Biography
Alberto Artasanchez is a data scientist with over 25 years of consulting experience with Fortune 500 companies as well as startups. He has an extensive background in artificial intelligence and advanced algorithms. Mr. Artasanchez holds 8 AWS certifications including the Big Data Specialty and the Machine Learning Specialty certifications. He is an AWS Ambassador and publishes frequently in a variety of data science blogs. He is often tapped as a speaker on topics ranging from Data Science, Big Data and Analytics, underwriting optimization and fraud detection. Alberto has a strong and extensive track record of designing and building end-to-end machine learning platforms at scale. He graduated with a Master of Science degree from Wayne State University and a Bachelor of Arts degree from Kalamazoo College. Alberto is particularly interested in using Artificial Intelligence to build Data Lakes at scale. Finally, he is married to his lovely wife Karen and is addicted to CrossFit.
Prateek Joshi is the founder of Plutoshift and a published author of 9 books on Artificial Intelligence. He has been featured on Forbes 30 Under 30, NBC, Bloomberg, CNBC, TechCrunch, and The Business Journals. He has been an invited speaker at conferences such as TEDx, Global Big Data Conference, Machine Learning Developers Conference, and Silicon Valley Deep Learning. His tech blog (www.prateekjoshi.com) has received more than 2M+ page views from 200+ countries and has 7,500+ followers. Apart from Artificial Intelligence, some of the topics that excite him are number theory, cryptography, and quantum computing. His greater goal is to make Artificial Intelligence accessible to everyone so that it can impact billions of people around the world.

The post Random Forests (and Extremely) in Python with scikit-learn appeared first on Erik Marsja.
from Planet Python
via read more
Wednesday, January 29, 2020
Wingware: Wing Python IDE 7.2.1 - January 28, 2020
Wing 7.2.1 fixes debug process group termination, avoids failures seen when pasting some Python code, prevents crashing in vi browse mode when the first line of the file is blank, and fixes some other usability issues.
Download Wing 7.2.1 Now: Wing Pro | Wing Personal | Wing 101 | Compare Products
What's New in Wing 7.2
Auto-Reformatting with Black and YAPF (Wing Pro)
Wing 7.2 adds support for Black and YAPF for code reformatting, in addition to the previously available built-in autopep8 reformatting. To use Black or YAPF, they must first be installed into your Python with pip, conda, or other package manager. Reformatting options are available from the Source > Reformatting menu group, and automatic reformatting may be configured in the Editor > Auto-reformatting preferences group.
See Auto-Reformatting for details.
Improved Support for Virtualenv
Wing 7.2 improves support for virtualenv by allowing the command that activates the environment to be entered in the Python Executable in Project Properties, Launch Configurations, and when creating new projects. The New Project dialog now also includes the option to create a new virtualenv along with the new project, optionally specifying packages to install.
See Using Wing with Virtualenv for details.
Support for Anaconda Environments
Similarly, Wing 7.2 adds support for Anaconda environments, so the conda activate command can be entered when configuring the Python Executable and the New Project dialog supports using an existing Anaconda environment or creating a new one along with the project.
See Using Wing with Anaconda for details.
And More
Wing 7.2 also makes it easier to debug modules with python -m, simplifies manual configuration of remote debugging, allows using a command line for the configured Python Executable, and fixes a number of usability issues.
For details see the change log.
For a complete list of new features in Wing 7, see What's New in Wing 7.
Try Wing 7.2 Now!
Wing 7.2 is an exciting new step for Wingware's Python IDE product line. Find out how Wing 7.2 can turbocharge your Python development by trying it today.
Downloads: Wing Pro | Wing Personal | Wing 101 | Compare Products
See Upgrading for details on upgrading from Wing 6 and earlier, and Migrating from Older Versions for a list of compatibility notes.
from Planet Python
via read more
testmon: Hidden test dependencies

Tests should be independent, isolated and repeatable. When they are, it's easy to run just one of them, run all of them in parallel or use pytest-testmon. But we don't live in an ideal world and many times we end up with a test suite with unwanted hidden test dependencies. In this article I am describing a couple of tips and tricks which allow us to find and fix the problems.
Continue reading: Hidden test dependencies
from Planet Python
via read more
Sumana Harihareswara - Cogito, Ergo Sumana: MOSS Video, BSSw Honorable Mention, and The Maintainership Book I Am Writing
Video
Mozilla interviewed me about the Python Package Index (PyPI), a USD$170,000 Mozilla Open Source Support award I helped the Python Software Foundation get in 2017, and how we used that money to revamp PyPI and drive it forward in 2017 and 2018.From that interview, they condensed a video (2 minutes, 14 seconds) featuring, for instance, slo-mo footage of me making air quotes. Their tweet calls me "a driving force behind" PyPI, and given how many people were working on it way before I was, that's quite a compliment!
I will put a transcript in the comments of this blog post.
(Please note that they massively condensed this video from 30+ minutes of interview. In the video, I say, "the site got popular before the code got good". In the interview, I did not just say that without acknowledging the tremendous effort of past volunteers who worked on the previous iteration of PyPI and kept the site going through massive infrastructure challenges, but that's been edited (for brevity, I assume).)
This video is the first in a series meant to encourage people to apply for MOSS funding. I mentioned MOSS in my grants roundup last month. If you want to figure out whether to apply for MOSS funding for your open source software project, and you need help, ping me for a free 20-minute chat or phone call and I can give you some quick advice. (Offer limited in case literally a hundred people contact me, which is unlikely.)
BSSw
![]() The Better Scientific Software (BSSw) Fellowship Program "gives recognition and funding to leaders and advocates of high-quality scientific software." I'm one of three Honorable Mentions for 2020.
The Better Scientific Software (BSSw) Fellowship Program "gives recognition and funding to leaders and advocates of high-quality scientific software." I'm one of three Honorable Mentions for 2020.
The main goal of the BSSw Fellowship program is to foster and promote practices, processes, and tools to improve developer productivity and software sustainability of scientific code. We also anticipate accumulating a growing community of BSSw Fellowship alums who can serve as leaders, mentors, and consultants to increase the visibility of those involved in scientific software production and sustainability in the pursuit of scientific discovery.
 That's why I'll be at the Exascale Computing Project Annual Meeting next week in Houston, so if you're there, I hope to meet you. In particular I'd like to meet the leaders of open source projects who want help streamlining contribution processes, growing more maintainers, managing communications with stakeholders, participating in internship projects like Google Summer of Code and Outreachy, expediting releases, and getting more out of hackathons. My consulting firm provides these services, and at ECPAM I can give you some free advice.
Book
And here's the project I'm working on -- why I received this honor.
In 2020, I am writing the first draft of a book teaching the skills open source software maintainers need, aimed at those working scientists and other contributors who have never managed public-facing projects before.
More than developer time, maintainership -- coordination, leadership, and management -- is a bottleneck in software sustainability. The lack of skilled managers is a huge blocker to the sustainability of Free/Libre Open Source Software (FLOSS) infrastructure.
Many FLOSS project maintainers lack management experience and skill. This textbook/self-help guide for new and current maintainers of existing projects ("brownfield projects") will focus on teaching specific project management skills in the context of FLOSS. This will provide scalable guidance, enabling existing FLOSS contributors to become more effective maintainers.
Existing "how to run a FLOSS project" documentation (such as Karl Fogel's Producing Open Source Software) addresses fresh-start "greenfield" projects rather than more common "brownfield", and doesn't teach specific project management skills (e.g., getting to know a team, creating roadmaps, running asynchronous meetings, managing budgets, and writing email memos). Existing educational pathways for scientists and developers (The Carpentries, internships and code schools) don't cover FLOSS-specific management skills.
So I'm writing a sequel to Karl's book -- with his blessing -- and I'm excited to see how I can more scalably share the lessons I've learned in more than a decade of leading open source projects.
I don't yet have a full outline, a publisher, or a length in mind. I'll be posting more here as I grow my plans. Thanks to BSSw and all my colleagues and friends who have encouraged me.
from Planet Python
via read more
Introducing Anaconda Team Edition: Secure Open-Source Data Science for the Enterprise
I’m very excited to announce a new addition to Anaconda’s product line — Anaconda Team Edition! For the last few years, Anaconda has offered two products: our free Anaconda Distribution, meant for individual practitioners, and…
The post Introducing Anaconda Team Edition: Secure Open-Source Data Science for the Enterprise appeared first on Anaconda.
from Planet SciPy
read more
PyCharm: Webinar: “Security Checks for Python Code” with Anthony Shaw
Software has security issues, Python is software, so how do Python developers avoid common traps? In this webinar, Anthony Shaw discusses the topic of security vulnerabilities, how code quality tools can help, and demonstrates the PyCharm plugin he wrote to let the IDE help.
– Wednesday, February 19th
– 5:00 PM – 6:00 PM CET (11:00 AM – 12:00 PM EST)
– Register here
– Aimed at intermediate Python developers

Speaker
Anthony Shaw is a Python researcher from Australia. He publishes articles about Python, software, and automation to over 1 million readers annually. Anthony is an open-source software advocate, Fellow of the Python Software Foundation, and a member of the Apache Software Foundation.
from Planet Python
via read more
Real Python: Python '!=' Is Not 'is not': Comparing Objects in Python
There’s a subtle difference between the Python identity operator (is) and the equality operator (==). Your code can run fine when you use the Python is operator to compare numbers, until it suddenly doesn’t. You might have heard somewhere that the Python is operator is faster than the == operator, or you may feel that it looks more Pythonic. However, it’s crucial to keep in mind that these operators don’t behave quite the same.
The == operator compares the value or equality of two objects, whereas the Python is operator checks whether two variables point to the same object in memory. In the vast majority of cases, this means you should use the equality operators == and !=, except when you’re comparing to None.
In this tutorial, you’ll learn:
- What the difference is between object equality and identity
- When to use equality and identity operators to compare objects
- What these Python operators do under the hood
- Why using
isandis notto compare values leads to unexpected behavior - How to write a custom
__eq__()class method to define equality operator behavior
Python Pit Stop: This tutorial is a quick and practical way to find the info you need, so you’ll be back to your project in no time!
Free Bonus: Click here to get a Python Cheat Sheet and learn the basics of Python 3, like working with data types, dictionaries, lists, and Python functions.
Comparing Identity With the Python is and is not Operators
The Python is and is not operators compare the identity of two objects. In CPython, this is their memory address. Everything in Python is an object, and each object is stored at a specific memory location. The Python is and is not operators check whether two variables refer to the same object in memory.
Note: Keep in mind that objects with the same value are usually stored at separate memory addresses.
You can use id() to check the identity of an object:
>>>
>>> help(id)
Help on built-in function id in module builtins:

id(obj, /)
    Return the identity of an object.

    This is guaranteed to be unique among simultaneously existing objects.
    (CPython uses the object's memory address.)

>>> id(id)
2570892442576
The last line shows the memory address where the built-in function id itself is stored.
There are some common cases where objects with the same value will have the same id by default. For example, the numbers -5 to 256 are interned in CPython. Each number is stored at a singular and fixed place in memory, which saves memory for commonly-used integers.
You can use sys.intern() to intern strings for performance. This function allows you to compare their memory addresses rather than comparing the strings character-by-character:
>>>
>>> from sys import intern
>>> a = 'hello world'
>>> b = 'hello world'
>>> a is b
False
>>> id(a)
1603648396784
>>> id(b)
1603648426160

>>> a = intern(a)
>>> b = intern(b)
>>> a is b
True
>>> id(a)
1603648396784
>>> id(b)
1603648396784
The variables a and b initially point to two different objects in memory, as shown by their different IDs. When you intern them, you ensure that a and b point to the same object in memory. Any new string with the value 'hello world' will now be created at a new memory location, but when you intern this new string, you make sure that it points to the same memory address as the first 'hello world' that you interned.
Note: Even though the memory address of an object is unique at any given time, it varies between runs of the same code, and depends on the version of CPython and the machine on which it runs.
Other objects that are interned by default are None, True, False, and simple strings. Keep in mind that most of the time, different objects with the same value will be stored at separate memory addresses. This means you should not use the Python is operator to compare values.
When Only Some Integers Are Interned
Behind the scenes, Python interns objects with commonly-used values (for example, the integers -5 to 256) to save memory. The following bit of code shows you how only some integers have a fixed memory address:
>>>
>>> a = 256
>>> b = 256
>>> a is b
True
>>> id(a)
1638894624
>>> id(b)
1638894624

>>> a = 257
>>> b = 257
>>> a is b
False

>>> id(a)
2570926051952
>>> id(b)
2570926051984
Initially, a and b point to the same interned object in memory, but when their values are outside the range of common integers (ranging from -5 to 256), they’re stored at separate memory addresses.
When Multiple Variables Point to the Same Object
When you use the assignment operator (=) to make one variable equal to the other, you make these variables point to the same object in memory. This may lead to unexpected behavior for mutable objects:
>>>
>>> a = [1, 2, 3]
>>> b = a
>>> a
[1, 2, 3]
>>> b
[1, 2, 3]

>>> a.append(4)
>>> a
[1, 2, 3, 4]
>>> b
[1, 2, 3, 4]

>>> id(a)
2570926056520
>>> id(b)
2570926056520
What just happened? You add a new element to a, but now b contains this element too! Well, in the line where b = a, you set b to point to the same memory address as a, so that both variables now refer to the same object.
If you define these lists independently of each other, then they’re stored at different memory addresses and behave independently:
>>>
>>> a = [1, 2, 3]
>>> b = [1, 2, 3]
>>> a is b
False
>>> id(a)
2356388925576
>>> id(b)
2356388952648
Because a and b now refer to different objects in memory, changing one doesn’t affect the other.
Comparing Equality With the Python == and != Operators
Recall that objects with the same value are often stored at separate memory addresses. Use the equality operators == and != if you want to check whether or not two objects have the same value, regardless of where they’re stored in memory. In the vast majority of cases, this is what you want to do.
When Object Copy Is Equal but Not Identical
In the example below, you set b to be a copy of a (which is a mutable object, such as a list or a dictionary). Both variables will have the same value, but each will be stored at a different memory address:
>>>
>>> a = [1, 2, 3]
>>> b = a.copy()
>>> a
[1, 2, 3]
>>> b
[1, 2, 3]

>>> a == b
True
>>> a is b
False

>>> id(a)
2570926058312
>>> id(b)
2570926057736
a and b are now stored at different memory addresses, so a is b will no longer return True. However, a == b returns True because both objects have the same value.
How Comparing by Equality Works
The magic of the equality operator == happens in the __eq__() class method of the object to the left of the == sign.
Note: This is the case unless the object on the right is a subclass of the object on the left. For more information, check the official documentation.
This is a magic class method that’s called whenever an instance of this class is compared against another object. If this method is not implemented, then == compares the memory addresses of the two objects by default.
As an exercise, make a SillyString class that inherits from str and implement __eq__() to compare whether the length of this string is the same as the length of the other object:
class SillyString(str):
    # This method gets called when using == on the object
    def __eq__(self, other):
        print(f'comparing {self} to {other}')
        # Return True if self and other have the same length
        return len(self) == len(other)
Now, a SillyString 'hello world' should be equal to the string 'world hello', and even to any other object with the same length:
>>>
>>> # Compare two strings
>>> 'hello world' == 'world hello'
False

>>> # Compare a string with a SillyString
>>> 'hello world' == SillyString('world hello')
comparing world hello to hello world
True

>>> # Compare a SillyString with a list
>>> SillyString('hello world') == [1, 2, 3, 4, 5, 6, 7, 8, 9, 10, 11]
comparing hello world to [1, 2, 3, 4, 5, 6, 7, 8, 9, 10, 11]
True
This is, of course, silly behavior for an object that otherwise behaves as a string, but it does illustrate what happens when you compare two objects using ==. The != operator gives the inverse response of this unless a specific __ne__() class method is implemented.
The example above also clearly shows you why it is good practice to use the Python is operator for comparing with None, instead of the == operator. Not only is it faster since it compares memory addresses, but it’s also safer because it doesn’t depend on the logic of any __eq__() class methods.
Comparing the Python Comparison Operators
As a rule of thumb, you should always use the equality operators == and !=, except when you’re comparing to None:
-
Use the Python
==and!=operators to compare object equality. Here, you’re generally comparing the value of two objects. This is what you need if you want to compare whether or not two objects have the same contents, and you don’t care about where they’re stored in memory. -
Use the Python
isandis notoperators when you want to compare object identity. Here, you’re comparing whether or not two variables point to the same object in memory. The main use case for these operators is when you’re comparing toNone. It’s faster and safer to compare toNoneby memory address than it is by using class methods.
Variables with the same value are often stored at separate memory addresses. This means that you should use == and != to compare their values and use the Python is and is not operators only when you want to check whether two variables point to the same memory address.
Conclusion
In this tutorial, you’ve learned that == and != compare the value of two objects, whereas the Python is and is not operators compare whether two variables refer to the same object in memory. If you keep this distinction in mind, then you should be able to prevent unexpected behavior in your code.
If you want to read more about the wonderful world of object interning and the Python is operator, then check out Why you should almost never use “is” in Python. You could also have a look at how you can use sys.intern() to optimize memory usage and comparison times for strings, although the chances are that Python already automatically handles this for you behind-the-scenes.
Now that you’ve learned what the equality and identity operators do under the hood, you can try writing your own __eq__() class methods, which define how instances of this class are compared when using the == operator. Go and apply your newfound knowledge of these Python comparison operators!
[ Improve Your Python With 🐍 Python Tricks 💌 – Get a short & sweet Python Trick delivered to your inbox every couple of days. >> Click here to learn more and see examples ]
from Planet Python
via read more
Webinar: “Security Checks for Python Code” with Anthony Shaw
Software has security issues, Python is software, so how do Python developers avoid common traps? In this webinar, Anthony Shaw discusses the topic of security vulnerabilities, how code quality tools can help, and demonstrates the PyCharm plugin he wrote to let the IDE help.
– Wednesday, February 19th
– 5:00 PM – 6:00 PM CET (11:00 AM – 12:00 PM EST)
– Register here
– Aimed at intermediate Python developers
Speaker
Anthony Shaw is a Python researcher from Australia. He publishes articles about Python, software, and automation to over 1 million readers annually. Anthony is an open-source software advocate, Fellow of the Python Software Foundation, and a member of the Apache Software Foundation.
from PyCharm Blog
read more
Python '!=' Is Not 'is not': Comparing Objects in Python
There’s a subtle difference between the Python identity operator (is) and the equality operator (==). Your code can run fine when you use the Python is operator to compare numbers, until it suddenly doesn’t. You might have heard somewhere that the Python is operator is faster than the == operator, or you may feel that it looks more Pythonic. However, it’s crucial to keep in mind that these operators don’t behave quite the same.
The == operator compares the value or equality of two objects, whereas the Python is operator checks whether two variables point to the same object in memory. In the vast majority of cases, this means you should use the equality operators == and !=, except when you’re comparing to None.
In this tutorial, you’ll learn:
- What the difference is between object equality and identity
- When to use equality and identity operators to compare objects
- What these Python operators do under the hood
- Why using
isandis notto compare values leads to unexpected behavior - How to write a custom
__eq__()class method to define equality operator behavior
Python Pit Stop: This tutorial is a quick and practical way to find the info you need, so you’ll be back to your project in no time!
Free Bonus: Click here to get a Python Cheat Sheet and learn the basics of Python 3, like working with data types, dictionaries, lists, and Python functions.
Comparing Identity With the Python is and is not Operators
The Python is and is not operators compare the identity of two objects. In CPython, this is their memory address. Everything in Python is an object, and each object is stored at a specific memory location. The Python is and is not operators check whether two variables refer to the same object in memory.
Note: Keep in mind that objects with the same value are usually stored at separate memory addresses.
You can use id() to check the identity of an object:
>>>
>>> help(id)
Help on built-in function id in module builtins:

id(obj, /)
    Return the identity of an object.

    This is guaranteed to be unique among simultaneously existing objects.
    (CPython uses the object's memory address.)

>>> id(id)
2570892442576
The last line shows the memory address where the built-in function id itself is stored.
There are some common cases where objects with the same value will have the same id by default. For example, the numbers -5 to 256 are interned in CPython. Each number is stored at a singular and fixed place in memory, which saves memory for commonly-used integers.
You can use sys.intern() to intern strings for performance. This function allows you to compare their memory addresses rather than comparing the strings character-by-character:
>>>
>>> from sys import intern
>>> a = 'hello world'
>>> b = 'hello world'
>>> a is b
False
>>> id(a)
1603648396784
>>> id(b)
1603648426160

>>> a = intern(a)
>>> b = intern(b)
>>> a is b
True
>>> id(a)
1603648396784
>>> id(b)
1603648396784
The variables a and b initially point to two different objects in memory, as shown by their different IDs. When you intern them, you ensure that a and b point to the same object in memory. Any new string with the value 'hello world' will now be created at a new memory location, but when you intern this new string, you make sure that it points to the same memory address as the first 'hello world' that you interned.
Note: Even though the memory address of an object is unique at any given time, it varies between runs of the same code, and depends on the version of CPython and the machine on which it runs.
Other objects that are interned by default are None, True, False, and simple strings. Keep in mind that most of the time, different objects with the same value will be stored at separate memory addresses. This means you should not use the Python is operator to compare values.
When Only Some Integers Are Interned
Behind the scenes, Python interns objects with commonly-used values (for example, the integers -5 to 256) to save memory. The following bit of code shows you how only some integers have a fixed memory address:
>>>
>>> a = 256
>>> b = 256
>>> a is b
True
>>> id(a)
1638894624
>>> id(b)
1638894624

>>> a = 257
>>> b = 257
>>> a is b
False

>>> id(a)
2570926051952
>>> id(b)
2570926051984
Initially, a and b point to the same interned object in memory, but when their values are outside the range of common integers (ranging from -5 to 256), they’re stored at separate memory addresses.
When Multiple Variables Point to the Same Object
When you use the assignment operator (=) to make one variable equal to the other, you make these variables point to the same object in memory. This may lead to unexpected behavior for mutable objects:
>>>
>>> a = [1, 2, 3]
>>> b = a
>>> a
[1, 2, 3]
>>> b
[1, 2, 3]

>>> a.append(4)
>>> a
[1, 2, 3, 4]
>>> b
[1, 2, 3, 4]

>>> id(a)
2570926056520
>>> id(b)
2570926056520
What just happened? You add a new element to a, but now b contains this element too! Well, in the line where b = a, you set b to point to the same memory address as a, so that both variables now refer to the same object.
If you define these lists independently of each other, then they’re stored at different memory addresses and behave independently:
>>>
>>> a = [1, 2, 3]
>>> b = [1, 2, 3]
>>> a is b
False
>>> id(a)
2356388925576
>>> id(b)
2356388952648
Because a and b now refer to different objects in memory, changing one doesn’t affect the other.
Comparing Equality With the Python == and != Operators
Recall that objects with the same value are often stored at separate memory addresses. Use the equality operators == and != if you want to check whether or not two objects have the same value, regardless of where they’re stored in memory. In the vast majority of cases, this is what you want to do.
When Object Copy Is Equal but Not Identical
In the example below, you set b to be a copy of a (which is a mutable object, such as a list or a dictionary). Both variables will have the same value, but each will be stored at a different memory address:
>>>
>>> a = [1, 2, 3]
>>> b = a.copy()
>>> a
[1, 2, 3]
>>> b
[1, 2, 3]

>>> a == b
True
>>> a is b
False

>>> id(a)
2570926058312
>>> id(b)
2570926057736
a and b are now stored at different memory addresses, so a is b will no longer return True. However, a == b returns True because both objects have the same value.
How Comparing by Equality Works
The magic of the equality operator == happens in the __eq__() class method of the object to the left of the == sign.
Note: This is the case unless the object on the right is a subclass of the object on the left. For more information, check the official documentation.
This is a magic class method that’s called whenever an instance of this class is compared against another object. If this method is not implemented, then == compares the memory addresses of the two objects by default.
As an exercise, make a SillyString class that inherits from str and implement __eq__() to compare whether the length of this string is the same as the length of the other object:
class SillyString(str):
    # This method gets called when using == on the object
    def __eq__(self, other):
        print(f'comparing {self} to {other}')
        # Return True if self and other have the same length
        return len(self) == len(other)
Now, a SillyString 'hello world' should be equal to the string 'world hello', and even to any other object with the same length:
>>>
>>> # Compare two strings
>>> 'hello world' == 'world hello'
False

>>> # Compare a string with a SillyString
>>> 'hello world' == SillyString('world hello')
comparing world hello to hello world
True

>>> # Compare a SillyString with a list
>>> SillyString('hello world') == [1, 2, 3, 4, 5, 6, 7, 8, 9, 10, 11]
comparing hello world to [1, 2, 3, 4, 5, 6, 7, 8, 9, 10, 11]
True
This is, of course, silly behavior for an object that otherwise behaves as a string, but it does illustrate what happens when you compare two objects using ==. The != operator gives the inverse response of this unless a specific __ne__() class method is implemented.
The example above also clearly shows you why it is good practice to use the Python is operator for comparing with None, instead of the == operator. Not only is it faster since it compares memory addresses, but it’s also safer because it doesn’t depend on the logic of any __eq__() class methods.
Comparing the Python Comparison Operators
As a rule of thumb, you should always use the equality operators == and !=, except when you’re comparing to None:
-
Use the Python
==and!=operators to compare object equality. Here, you’re generally comparing the value of two objects. This is what you need if you want to compare whether or not two objects have the same contents, and you don’t care about where they’re stored in memory. -
Use the Python
isandis notoperators when you want to compare object identity. Here, you’re comparing whether or not two variables point to the same object in memory. The main use case for these operators is when you’re comparing toNone. It’s faster and safer to compare toNoneby memory address than it is by using class methods.
Variables with the same value are often stored at separate memory addresses. This means that you should use == and != to compare their values and use the Python is and is not operators only when you want to check whether two variables point to the same memory address.
Conclusion
In this tutorial, you’ve learned that == and != compare the value of two objects, whereas the Python is and is not operators compare whether two variables refer to the same object in memory. If you keep this distinction in mind, then you should be able to prevent unexpected behavior in your code.
If you want to read more about the wonderful world of object interning and the Python is operator, then check out Why you should almost never use “is” in Python. You could also have a look at how you can use sys.intern() to optimize memory usage and comparison times for strings, although the chances are that Python already automatically handles this for you behind-the-scenes.
Now that you’ve learned what the equality and identity operators do under the hood, you can try writing your own __eq__() class methods, which define how instances of this class are compared when using the == operator. Go and apply your newfound knowledge of these Python comparison operators!
[ Improve Your Python With 🐍 Python Tricks 💌 – Get a short & sweet Python Trick delivered to your inbox every couple of days. >> Click here to learn more and see examples ]
from Real Python
read more
Tuesday, January 28, 2020
Continuum Analytics Blog: Introducing Anaconda Team Edition: Secure Open-Source Data Science for the Enterprise
I’m very excited to announce a new addition to Anaconda’s product line — Anaconda Team Edition! For the last few years, Anaconda has offered two products: our free Anaconda Distribution, meant for individual practitioners, and…
The post Introducing Anaconda Team Edition: Secure Open-Source Data Science for the Enterprise appeared first on Anaconda.
from Planet Python
via read more
PyCoder’s Weekly: Issue #405 (Jan. 28, 2020)
#405 – JANUARY 28, 2020
View in Browser »

Python GUI Programming With Tkinter
In this article, you’ll learn the basics of GUI programming with Tkinter, the de-facto Python GUI framework. Master GUI programming concepts such as widgets, geometry managers, and event handlers. Then, put it all together by building two applications: a temperature converter and a text editor.
REAL PYTHON
Pythonic Code Review [2016]
“In this article I’ll focus on my personal experience in authoring and reviewing Python code from both psychological and technical perspectives. And I’ll do so keeping in mind the ultimate goal of striking a balance between code reviews being enjoyable and technically fruitful.”
ILYA ETINGOF
Profile and Optimize Python Apps Performance with Blackfire.io

You can’t improve what you can’t measure. Profile and understand Python code’s behaviour and performance. Build faster applications. Blackfire.io is now available as Public Beta. Signup, install and find optimizations in minutes →
BLACKFIRE sponsor
pip 20.0 Released
Default to doing a user install (as if --user was passed) when the main site-packages directory is not writeable and user site-packages are enabled, cache wheels built from Git requirements, and more.
PYPA.IO
Python 3.9 Compatibility Changes
“With the EoL of Python 2 being in line with development of Python 3.9 there were changes made to Python 3.9 that broke a lot of packages since many deprecation warnings became errors.”
KARTHIKEYAN SINGARAVELAN
Quick-And-Dirty Guide on How to Install Packages for Python
“If you just want to start poking at Python and want to avoid the pitfalls to installing packages globally, it only takes 3 steps to do the right thing.”
BRETT CANNON
Python 3.9.0a3 Now Available for Testing
Changelog at the link.
PYTHONINSIDER.BLOGSPOT.COM
Python Jobs
Python Developer (Malta)
Python Web Developer (Remote) (Remote)
Senior Software Developer (Vancouver, BC, Canada)
Software Engineer (Bristol, UK)
Articles & Tutorials
Understand Django: URLs Lead the Way
How does a Django site know where to send requests? You have to tell it! In this article you’ll look at URLs and how to let your users get to the right place.
MATT LAYMAN • Shared by Matt Layman
RIP Pipenv: Tried Too Hard. Do What You Need With pip-tools
An opinionated look at Pipenv and its future as a Python packaging tool. More about pip-tools here.
NICK TIMKOVICH
Learn the Skills You Need to Land a Job in Data Science, Guaranteed

As a student in Springboard’s Data Science Career Track, you’ll work one-on-one with an expert data science mentor to complete real-world projects, build your portfolio, and gain the skills necessary to get hired. Springboard’s team will work with you from the start to help you land your dream data science role. Learn more →
SPRINGBOARD sponsor
Python Modules and Packages: An Introduction
In this course, you’ll explore Python modules and Python packages, two mechanisms that facilitate modular programming. See how to write and import modules so you can optimize the structure of your own programs and make them more maintainable.
REAL PYTHON course
Using Markdown to Create Responsive HTML Emails
This article describes how to use Python to transform a Markdown text file into a response HTML email and static page on a Pelican blog.
CHRIS MOFFITT
A Tiny Python Called Snek
Snek is a version of Python targeting embedded processors developed by Keith Packard.
JAKE EDGE
Projects & Code
gitfilesplit: Split One File Into Several, Preserving Git History
GITHUB.COM/IDLESIGN • Shared by pythonz
Events
Pravega Hackathon 2020
February 1 to February 3, 2020
PRAVEGA.ORG
FOSDEM 2020: Python Dev Room
February 1 to February 2, 2020
FOSDEM.ORG
PyDelhi User Group Meetup
February 1, 2020
MEETUP.COM
Melbourne Python Users Group, Australia
February 3, 2020
J.MP
Dominican Republic Python User Group
February 4, 2020
PYTHON.DO
Heidelberg Python Meetup
February 5, 2020
MEETUP.COM
PyRana General Body Meeting
February 5, 2020
PYRANA.ORG
Happy Pythoning!
This was PyCoder’s Weekly Issue #405.
View in Browser »
[ Subscribe to 🐍 PyCoder’s Weekly 💌 – Get the best Python news, articles, and tutorials delivered to your inbox once a week >> Click here to learn more ]
from Planet Python
via read more
Subscribe to:
Comments (Atom)
-
Podcasts are a great way to immerse yourself in an industry, especially when it comes to data science. The field moves extremely quickly, an...
-
Dialogs are useful GUI components that allow you to communicate with the user (hence the name dialog ). They are commonly used for file Ope...
-
Have you ever wanted to use your python and web development skills to build cross platform desktop GUI apps? if yes then welcome to this tut...

