Thursday, October 31, 2019

Mike Driscoll: The Demos for PySimpleGUI

The PySimpleGUI project has a lot of interesting demos included with their project that you can use to learn how to use PySimpleGUI. The demos cover all the basic widgets as far as I can tell and they also cover the recommended design patterns for the package. In addition, there are a couple of games and other tiny applications too, such as a version of Pong and the Snake game.

In this article, you will see a small sampling of the demos from the project that will give you some idea of what you can do with PySimpleGUI.


Seeing the Available Widgets

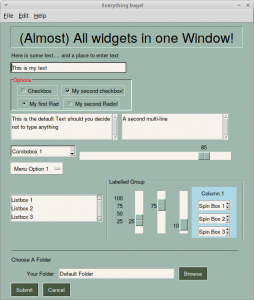
PySimpleGUI has a nice little demo called Demo_All_Widgets.py that demonstrates almost all the widgets that PySimpleGUI supports currently. PySimpleGUI has wrapped all of Tkinter’s core widgets, but not the ttk widgets.

This is what the demo looks like when you run it:

All PySimple GUI Widgets

Let’s take a quick look at the code for this demo:

#!/usr/bin/env python
'''
Example of (almost) all widgets, that you can use in PySimpleGUI.
'''
 
import PySimpleGUI as sg
 
sg.change_look_and_feel('GreenTan')
 
# ------ Menu Definition ------ #
menu_def = [['&File', ['&Open', '&Save', 'E&xit', 'Properties']],
            ['&Edit', ['Paste', ['Special', 'Normal', ], 'Undo'], ],
            ['&Help', '&About...'], ]
 
# ------ Column Definition ------ #
column1 = [[sg.Text('Column 1', background_color='lightblue', justification='center', size=(10, 1))],
           [sg.Spin(values=('Spin Box 1', '2', '3'),
                    initial_value='Spin Box 1')],
           [sg.Spin(values=('Spin Box 1', '2', '3'),
                    initial_value='Spin Box 2')],
           [sg.Spin(values=('Spin Box 1', '2', '3'), initial_value='Spin Box 3')]]
 
layout = [
    [sg.Menu(menu_def, tearoff=True)],
    [sg.Text('(Almost) All widgets in one Window!', size=(
        30, 1), justification='center', font=("Helvetica", 25), relief=sg.RELIEF_RIDGE)],
    [sg.Text('Here is some text.... and a place to enter text')],
    [sg.InputText('This is my text')],
    [sg.Frame(layout=[
        [sg.CBox('Checkbox', size=(10, 1)),
         sg.CBox('My second checkbox!', default=True)],
        [sg.Radio('My first Radio!     ', "RADIO1", default=True, size=(10, 1)),
         sg.Radio('My second Radio!', "RADIO1")]], title='Options',
             title_color='red',
             relief=sg.RELIEF_SUNKEN,
             tooltip='Use these to set flags')],
    [sg.MLine(default_text='This is the default Text should you decide not to type anything', size=(35, 3)),
     sg.MLine(default_text='A second multi-line', size=(35, 3))],
    [sg.Combo(('Combobox 1', 'Combobox 2'), size=(20, 1)),
     sg.Slider(range=(1, 100), orientation='h', size=(34, 20), default_value=85)],
    [sg.OptionMenu(('Menu Option 1', 'Menu Option 2', 'Menu Option 3'))],
    [sg.Listbox(values=('Listbox 1', 'Listbox 2', 'Listbox 3'), size=(30, 3)),
     sg.Frame('Labelled Group', [[
         sg.Slider(range=(1, 100), orientation='v', size=(5, 20), default_value=25, tick_interval=25),
         sg.Slider(range=(1, 100), orientation='v', size=(5, 20), default_value=75),
         sg.Slider(range=(1, 100), orientation='v', size=(5, 20), default_value=10),
         sg.Col(column1, background_color='lightblue')]])
    ],
    [sg.Text('_' * 80)],
    [sg.Text('Choose A Folder', size=(35, 1))],
    [sg.Text('Your Folder', size=(15, 1), justification='right'),
     sg.InputText('Default Folder'), sg.FolderBrowse()],
    [sg.Submit(tooltip='Click to submit this form'), sg.Cancel()]]
 
window = sg.Window('Everything bagel', layout,
    default_element_size=(40, 1), grab_anywhere=False)
 
event, values = window.read()
sg.popup('Title',
         'The results of the window.',
         'The button clicked was "{}"'.format(event),
         'The values are', values)

PySimpleGUI lays out their widgets by using Python lists. You can also see that this demo uses lists for generating the menus too. Then you create a Window object and pass in the layout, which is your list of lists of Elements or widgets.

Let’s see what else you can do!


Graphing with PySimpleGUI

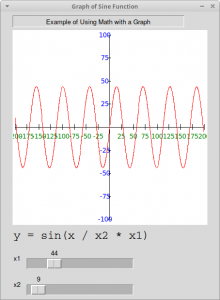
PySimpleGUI also supports creating graphs. One such example can be found in Demo_Graph_Element_Sine_Wave.py. This demo shows the developer how to use the Graph widget.

This is what the demo looks like when you run it:

Graphing with PySimpleGUI

Here is what the code looks like:

import PySimpleGUI as sg
import math
 
# Yet another usage of Graph element.
 
SIZE_X = 200
SIZE_Y = 100
NUMBER_MARKER_FREQUENCY = 25
 
 
def draw_axis():
    graph.draw_line((-SIZE_X, 0), (SIZE_X, 0))                # axis lines
    graph.draw_line((0, -SIZE_Y), (0, SIZE_Y))
 
    for x in range(-SIZE_X, SIZE_X+1, NUMBER_MARKER_FREQUENCY):
        graph.draw_line((x, -3), (x, 3))                       # tick marks
        if x != 0:
            # numeric labels
            graph.draw_text(str(x), (x, -10), color='green')
 
    for y in range(-SIZE_Y, SIZE_Y+1, NUMBER_MARKER_FREQUENCY):
        graph.draw_line((-3, y), (3, y))
        if y != 0:
            graph.draw_text(str(y), (-10, y), color='blue')
 
 
# Create the graph that will be put into the window
graph = sg.Graph(canvas_size=(400, 400),
                 graph_bottom_left=(-(SIZE_X+5), -(SIZE_Y+5)),
                 graph_top_right=(SIZE_X+5, SIZE_Y+5),
                 background_color='white',
                 key='graph')
# Window layout
layout = [[sg.Text('Example of Using Math with a Graph', justification='center', size=(50, 1), relief=sg.RELIEF_SUNKEN)],
          [graph],
          [sg.Text('y = sin(x / x2 * x1)', font='COURIER 18')],
          [sg.Text('x1'), sg.Slider((0, 200), orientation='h',
                                 enable_events=True, key='-SLIDER-')],
          [sg.Text('x2'), sg.Slider((1, 200), orientation='h', enable_events=True, key='-SLIDER2-')]]
 
window = sg.Window('Graph of Sine Function', layout)
 
while True:
    event, values = window.read()
    if event is None:
        break
    graph.erase()
    draw_axis()
    prev_x = prev_y = None
 
    for x in range(-SIZE_X, SIZE_X):
        y = math.sin(x/int(values['-SLIDER2-']))*int(values['-SLIDER-'])
        if prev_x is not None:
            graph.draw_line((prev_x, prev_y), (x, y), color='red')
        prev_x, prev_y = x, y
 
window.close()

To make the graph work correctly, you need to erase the graph and redraw it in the while loop above. Play around with the code a bit and see what you can do. There are several other graph related demos in the demo folder that you should check out as well.

PySimpleGUI also supports matplotlib integration. A fun one to play around with is Demo_Matplotlib_Animated.py.

When I ran it, the demo ended up looking like this:

PythonSimpleGUI with Matplotlib

Now let’s check out another demo!


Creating Pong with PySimpleGUI

As I mentioned earlier in this article, you can also create the Pong game pretty easily using PySimpleGUI. You can check out Demo_Pong.py for full details.

Here is what the code creates when you run it:

PySimpleGUI Pong Game

The code for this game is a bit long, but not too hard to follow. At the time of writing, the game is written using 183 lines of code in a single module.

Wrapping Up

There are 150+ demos in PySimpleGUI’s Demo folder. I did discover a few that didn’t work on Linux due to using OS-specific code. However most of the examples seem to work and they are a great way to see what you can do with this project. Check them out to get some ideas of how you could use PySimpleGUI for your own projects or demos.


Related Reading

The post The Demos for PySimpleGUI appeared first on The Mouse Vs. The Python.


from Planet Python
via read more

Python Code Snippets Vol. 39

Python Code Snippets Vol. 39. 191-Generate Melodies, 192-Face-Counter, 193-Check For Internet Connection, 194-Centre Text On Image, 195-Log All Text From Clipboard.

from Python Coder
via read more

The 2019 Python Developer Survey is here, take a few minutes to complete the survey!

It is that time of year and we are excited to start the official Python Developers Survey for 2019!

In 2018, the Python Software Foundation together with JetBrains conducted an official Python Developers Survey for the second time. Over 20,000 developers from almost 150 different countries participated..

With this third iteration of the official Python Developers Survey, we aim to identify how the Python development world looks today and how it compares to the last two years. The results of the survey will serve as a major source of knowledge about the current state of the Python community and how it is changing over the years, so we encourage you to participate and make an invaluable contribution to this community resource. The survey takes approximately 10 minutes to complete.

Please take a few minutes to complete the 2019 Python Developers Survey!

Your valuable opinion and feedback will help us better understand how Python developers use Python, related frameworks, tools, and technologies. We also hope you'll have fun going through the questions.

The survey is organized in partnership between the Python Software Foundation and JetBrains. The Python Software Foundation distributes this survey through community channels only (such as this blog, Twitter, mailing lists, etc). After the survey is over, we will publish the aggregated results and randomly select 100 winners (those who complete the survey in its entirety), who will each receive an amazing Python Surprise Gift Pack.


from Python Software Foundation News
via read more

Reuven Lerner: Want to improve your Python fluency? Join Weekly Python Exercise!

A new cohort of Weekly Python Exercise, my family of courses to improve your Python fluency, starts on November 5th.

This time, it’s an advanced-level cohort. We’ll explore topics such as iterators, generators, decorators, objects, and threads.

The course’s structure is simple:

  • Every Tuesday, you get a new question, along with “pytest” tests to check yourself
  • On the following Monday, you get the solution and explanation
  • In between, you can discuss your solutions (and problems) with others in your cohort, on our private forum
  • I also hold live video office hours, where you can ask me questions about the exercises

Questions or comments? Or perhaps you’re eligible for one of my discounts? Read more at http://WeeklyPythonExercise.com/, or send me e-mail at reuven@lerner.co.il.

But don’t delay, because November 5th is coming up soon. And why miss out on improving your Python knowledge and fluency?

The post Want to improve your Python fluency? Join Weekly Python Exercise! appeared first on Reuven Lerner.


from Planet Python
via read more

Python Software Foundation: The 2019 Python Developer Survey is here, take a few minutes to complete the survey!

It is that time of year and we are excited to start the official Python Developers Survey for 2019!

In 2018, the Python Software Foundation together with JetBrains conducted an official Python Developers Survey for the second time. Over 20,000 developers from almost 150 different countries participated..

With this third iteration of the official Python Developers Survey, we aim to identify how the Python development world looks today and how it compares to the last two years. The results of the survey will serve as a major source of knowledge about the current state of the Python community and how it is changing over the years, so we encourage you to participate and make an invaluable contribution to this community resource. The survey takes approximately 10 minutes to complete.

Please take a few minutes to complete the 2019 Python Developers Survey!

Your valuable opinion and feedback will help us better understand how Python developers use Python, related frameworks, tools, and technologies. We also hope you'll have fun going through the questions.

The survey is organized in partnership between the Python Software Foundation and JetBrains. The Python Software Foundation distributes this survey through community channels only (such as this blog, Twitter, mailing lists, etc). After the survey is over, we will publish the aggregated results and randomly select 100 winners (those who complete the survey in its entirety), who will each receive an amazing Python Surprise Gift Pack.


from Planet Python
via read more

CubicWeb: implementing the langserver protocol for RQL

One of our next project for cubicweb and its ecosystem is to implement the langserver protocol for the RQL language that we are using in CW. The langserver protocol is an idea to solve one problem: to integrate operation for various languages, most IDE/tools needs to reimplement the wheel all the time, doing custom plugin etc... To solve this issue, this protocol has been invented with one idea: make one server for a language, then all IDE/tools that talks this protocol will be able to integrate it easily.

language server protocol matrice illustration

You can find the website here: https://langserver.org/

So the idea is simple: let's build our own server for RQL so we'll be able to integrate it everywhere and build tools for it.

One of the goal is to have something similar than that for RQL: https://developer.github.com/v4/explorer/ rql being extremely similar to graphql

github graphql explorer

So this post has several objectives:

  • gather people that would be motivate to work on that subject, for now there is Laurent Wouters and me :)
  • explain to you in more details (not all) how the language server protocol works
  • show what is already existing for both langserver in python and rql
  • show the first roadmap we've discussed with Laurent Wouters on how we think we can do that :)
  • be a place to discuss this project, things aren't fixed yet :)

So, what is the language server protocol (LSP)?

It's a JSON-RPC based protocol where the IDE/tool talks to the server. JSON-RPC, said simply, is a bi-directional protocol in json.

In this procotol you have 2 kind of exchanges:

  • requests: where the client (or server) ask the server (or the server ask the client) something and a reply is expected. For example: where is the definition of this function?
  • notifications: the same but without an expected reply. For example: linting information or error detection

language server protocol example schema

The LSP specifications has 3 bigs categories:

  • everything about initialization/shutdown the server etc...
  • everything regarding text and workspace synchronization between the server and the client
  • the actual things that interest us: a list of languages features that the server supports (you aren't in the obligation to implement everything)

Here is the simplified list of possible languages features that the website present:

  • Code completion
  • Hover
  • Jump to def
  • Workspace symbols
  • Find references
  • Diagnostics

The specification is much more detailed but way less comprehensive (look at the "language features" on the right menu for more details):

  • completion/completion resolve
  • hover (when you put your cursor on something)
  • signatureHelp
  • declaration (go to...)
  • definition (go to...)
  • typeDefinition (go to...)
  • implementation (go to...)
  • references
  • documentHighlight (highlight all references to a symbol)
  • documentSymbol ("symbol" is a generic term for variable, definitions etc...)
  • codeAction (this one is interesting)
  • codeLens/codeLens resolve
  • documentLink/documentLink resolve
  • documentColor/colorPresentation (stuff about picking colors)
  • formatting/rangeFormatting/onTypeFormatting (set tab vs space)
  • rename/prepareRename
  • foldingRange

(Comments are from my current understanding of the spec, it might not be perfect)

The one that is really interesting here (but not our priority right now) is "codeAction", it's basically a generic entry point for every refactoring kind of operations as some examples from the spec shows:

Example extract actions: - Extract method - Extract function - Extract variable - Extract interface from class

Example inline actions:

  • Inline function
  • Inline variable
  • Inline constant

Example rewrite actions:

  • Convert JavaScript function to class
  • Add or remove parameter
  • Encapsulate field
  • Make method static
  • Move method to base class

But I'm not expecting us to have direct need for it but that really seems one to keep in mind.

One question that I frequently got was: is syntax highlight included in the langserver protocol? Having double checked with Laurent Wouters, it's actually not the case (I thought documentSymbol could be used for that but actually no).

But we already have an implementation for that in pygments: https://hg.logilab.org/master/rql/file/d30c34a04ebf/rql/pygments_ext.py

rql pygments syntax highlight

What is currently existing for LSP in python and rql

The state is not great in the python ecosystem but not a disaster. Right now I haven't been able to find any generic python implementation of LSP that we could really reuse and integrate.

There is, right now and to my knowledge, only 2 maintained implementation of LSP in python. One for python and one for ... Fortran x)

Palantir's one makes extensive use of advanced magic code doesn't seems really necessary but it is probably of higher quality code since the Fortran one doesn't seems very idiomatic but looks much simpler.

So we'll ever need to extract the needed code from one of those of implement our own, not so great.

On the RQL side, everything that seems to be useful for our current situation is located in the RQL package that we maintain: https://hg.logilab.org/master/rql

Roadmap

After a discussion with Laurent Wouters, a first roadmap looks like this:

  • extract the code from either palantir or fortran LSP implementation and come with a generic implementation (I'm probably going to do it but Laurent told me he his going to take a look too) When I'm talking about a generic implementation I'm talking about everything listed in the big category of the protocol that isn't related to language features which we don't really want to rewrite again.

Once that's done, start implementing the language features for RQL:

  • the easiest is the syntax errors detection code, we just need to launch to parser on the code and handle the potential errors
  • do that with pretty specific red underline
  • play with RQL AST to extract the symbols and start doing things like codeLens and hover
  • much more complex (and for later): autocompletion (we'll either need a demi compiler or to modify the current one for that)

Side note

To better understand the motivation behind this move, it is part of the more global move of drop the "Web" from CubicWeb and replace all the front end current implementation by reactjs+typescript views. In this context CubicWeb (or Cubic?) will only serves as a backend provide with which we will talk in... RQL! Therefor writing and using RQL will be much more important than right now.


from Planet Python
via read more

John Cook: Generating Python code from SymPy

Yesterday I wrote about Householder’s higher-order generalizations of Newton’s root finding method. For n at least 2, define

H_n(x) = x + (n-1) \frac{\left( \frac{1}{f(x)}\right)^{(n-2)}}{\left( \frac{1}{f(x)}\right)^{(n-1)}}

and iterate Hn to find a root of f(x). When n = 2, this is Newton’s method. In yesterday’s post I used Mathematica to find expressions for H3 and H4, then used Mathematica’s FortranForm[] function to export Python code. (Mathematica doesn’t have a function to export Python code per se, but the Fortran syntax was identical in this case.)

Aaron Muerer pointed out that it would have been easier to generate the Python code in Python using SymPy to do the calculus and labdify() to generate the code. I hadn’t heard of lambdify before, so I tried out his suggestion. The resulting code is nice and compact.

    from sympy import diff, symbols, lambdify

    def f(x, a, b):
        return x**5 + a*x + b

    def H(x, a, b, n):
        x_, a_, b_ = x, a, b
        x, a, b = symbols('x a b')
        expr = diff(1/f(x,a,b), x, n-2) / \
               diff(1/f(x,a,b), x, n-1)
        g = lambdify([x,a,b], expr)
        return x_ + (n-1)*g(x_, a_, b_)

This implements all the Hn at once. The previous post implemented three of the Hn separately.

The first couple lines of H require a little explanation. I wanted to use the same names for the numbers that the function H takes and the symbols that SymPy operated on, so I saved the numbers to local variables.

This code is fine for a demo, but in production you’d want to generate the function g once (for each n) and save the result rather than generating it on every call to H.


from Planet Python
via read more

PyCharm: 2019.3 EAP 7

A new Early Access Program (EAP) version for PyCharm 2019.3 is now available! If you wish to try it out do so by downloading it from our website.

New for this version

R plugin support

We are happy to announce that PyCharm now supports the R language and development environment plugin to perform statistical computing as part of our scientific tools offering. Perform data wrangling, manipulation and visualization with the library tools that R has available. To start using it download the R language, install the R plugin in PyCharm and configure the R interpreter.

After doing this you can start creating .R files (that you can easily identify by the py_r_logo icon) for which we will provide code assistance like: error and syntax highlighting, code completion and refactoring, creation of comment lines, intention actions and quick fixes.

To make the most out of this scientific tool you will have available a console, graphic tool window, and packages, HTML and table views to work with:

Screenshot 2019-10-31 at 2.32.41 PM

Want to know more? Visit our R plugin support documentation to get detailed information on installation and usage.

Further improvements

  • An issue causing Docker remote interpreters not to reflect updated libraries in PyCharm was fixed. Now every time you update your Docker packages they will be auto updated as well in PyCharm.
  • The PEP8 warnings showing incorrectly for assignment expressions were solved.
  • For more see the release notes

Interested?

Download this EAP from our website. Alternatively, you can use the JetBrains Toolbox App to stay up to date throughout the entire EAP.

If you’re on Ubuntu 16.04 or later, you can use snap to get PyCharm EAP, and stay up to date. You can find the installation instructions on our website.


from Planet Python
via read more

Dataquest: Python Datetime Tutorial: Manipulate Times, Dates, and Time Spans

Learn to manipulate times, dates, and time series data in Python and become a master of the datetime module in this Dataquest tutorial.

The post Python Datetime Tutorial: Manipulate Times, Dates, and Time Spans appeared first on Dataquest.


from Planet Python
via read more

Wingware Blog: Efficient Flask Web Development with Wing 7

Wing can develop and debug Python code running under Flask, a web framework that is quick to get started with and easy to extend as your web application grows.

To create a new project, use New Project in Wing's Project menu and select the project type Flask. If Flask is not installed into your default Python, you may also need to set Python Executable to the full path of the python or python.exe you want to use. This is the value of sys.executable (after import sys) in the desired Python installation or virtualenv.

Next, add your files to the project with Add Existing Directory in the Project menu.

Debugging Flask in Wing

To debug Flask in Wing you need to turn off Flask's built-in debugger, so that Wing's debugger can take over reporting exceptions. This is done by setting the debug attribute on the Flask application to False:

app.debug = False

Then use Set Current as Main Entry Point in the Debug menu to set your main entry point, so you can start debugging from the IDE even if the main entry point file is not visible in the editor.

Once debug is started, you can load pages from a browser to reach breakpoints or exceptions in your code. Output from the Flask process is shown in Wing's Debug I/O tool.

Example

Here's an example of a complete "Hello World" Flask application that can be debugged with Wing:

import os
from flask import Flask
app = Flask(__name__)

@app.route("/")
def hello():
    return "<h3>Hello World!</h3><p>Your app is working.</p>"

if __name__ == "__main__":
    if 'WINGDB_ACTIVE' in os.environ:
        app.debug = False
    app.run()

To try it, start debugging it in Wing and use the URL printed to the Debug I/O tool to load the page in a web browser. Setting a breakpoint on the return statement will stop there whenever the page is reloaded in the browser.

Setting up Auto-Reload with Wing Pro

With the above configuration, you will need to restart Flask whenever you make a change to your code, either with Restart Debugging in the Debug menu or with the restart toolbar icon.

If you have Wing Pro, you can avoid the need to restart Flask by telling it to auto-restart when code changes on disk, and configuring Wing to automatically debug the restarted process.

Flask is configured by adding a keyword argument to your app.run() line:

app.run(use_reloader=True)

Wing is configured by enabling Debug Child Processes under the Debug/Execute tab in Project Properties, from the Project menu. This tells Wing Pro to debug also child processes created by Flask, including the reloader process.

Now Flask will automatically restart on its own whenever you save an already-loaded source file to disk, and Wing will debug the restarted process. You can add additional files for Flask to watch as follows:

watch_files = ['/path/to/file1', '/path/to/file2']
app.run(use_reloader=True, extra_files=watch_files)


That's it for now! We'll be back soon with more Wing Tips for Wing Python IDE.

As always, please don't hesitate to email support@wingware.com if you run into problems or have any questions.


from Planet Python
via read more

2019.3 EAP 7

A new Early Access Program (EAP) version for PyCharm 2019.3 is now available! If you wish to try it out do so by downloading it from our website.

New for this version

R plugin support

We are happy to announce that PyCharm now supports the R language and development environment plugin to perform statistical computing as part of our scientific tools offering. Perform data wrangling, manipulation and visualization with the library tools that R has available. To start using it download the R language, install the R plugin in PyCharm and configure the R interpreter.

After doing this you can start creating .R files (that you can easily identify by the py_r_logo icon) for which we will provide code assistance like: error and syntax highlighting, code completion and refactoring, creation of comment lines, intention actions and quick fixes.

To make the most out of this scientific tool you will have available a console, graphic tool window, and packages, HTML and table views to work with:

Screenshot 2019-10-31 at 2.32.41 PM

Want to know more? Visit our R plugin support documentation to get detailed information on installation and usage.

Further improvements

  • An issue causing Docker remote interpreters not to reflect updated libraries in PyCharm was fixed. Now every time you update your Docker packages they will be auto updated as well in PyCharm.
  • The PEP8 warnings showing incorrectly for assignment expressions were solved.
  • For more see the release notes

Interested?

Download this EAP from our website. Alternatively, you can use the JetBrains Toolbox App to stay up to date throughout the entire EAP.

If you’re on Ubuntu 16.04 or later, you can use snap to get PyCharm EAP, and stay up to date. You can find the installation instructions on our website.


from PyCharm Blog
read more

Matt Layman: Configurama - Building SaaS #36

In this episode, we turned our attention to handling settings and configuration. We discussed different techniques for handling settings, looked at available tools, and started integrating one of the tools into the project. The initial discussion in the stream focused on different ways of doing settings. I talked about what I view as a difference between configuration (mostly static stuff) and settings (dynamic parts of the app). I also discussed where to get settings from.

from Planet Python
via read more

Zato Blog: Bash completion in Zato commands

This is a quick tip on how to quickly and easily enable Bash completion for Zato commands - each time you press Tab when typing a Zato command, its arguments and parameters will be auto-completed.

Prerequisites

First off, note that when you install Zato from a .deb or .rpm package, it already ships with the Bash completion functionality and what is needed next is its activation as such.

Thus, there is only one prerequisite, core package needed. For example, this command installs core Bash completion in Ubuntu and Debian:

$ sudo apt-get install bash-completion

Enable Bash completion

Again, each operating system will have its own procedure to enable Bash completion.

For Ubuntu and Debian, edit file ~/.bashrc and add the commands below if they do not exist yet.

# Enable bash completion in interactive shells
if ! shopt -oq posix; then
  if [ -f /usr/share/bash-completion/bash_completion ]; then
    . /usr/share/bash-completion/bash_completion
  elif [ -f /etc/bash_completion ]; then
    . /etc/bash_completion
  fi
fi

Afterwards, Bash completion will be enabled in every future session and you will be able to use it in the zato command, e.g.:

$ zato st[tab] # This will suggest either 'zato start' or 'zato stop'
$ zato start /path/to/[tab] # This will suggest a file-system path to use


from Planet Python
via read more

Test and Code: 93: Software Testing, Book Writing, Teaching, Public Speaking, and PyCarolinas - Andy Knight

Andy Knight is the Automation Panda.

Andy Knight is passionate about software testing, and shares his passion through public speaking, writing on automationpanda.com, teaching as an adjunct professor, and now also through writing a book and organizing a new regional Python conference.

Topics of this episode include:

  • Andy's book on software testing
  • Being an adjunct professor
  • Public speaking and preparing talk proposals
    • including tips from Andy about proposals and preparing for talks
  • PyCarolinas

Special Guest: Andy Knight.

Sponsored By:

Support Test & Code

Links:

<p>Andy Knight is the Automation Panda. </p> <p>Andy Knight is passionate about software testing, and shares his passion through public speaking, writing on automationpanda.com, teaching as an adjunct professor, and now also through writing a book and organizing a new regional Python conference.</p> <p>Topics of this episode include:</p> <ul> <li>Andy&#39;s book on software testing</li> <li>Being an adjunct professor</li> <li>Public speaking and preparing talk proposals <ul> <li>including tips from Andy about proposals and preparing for talks</li> </ul></li> <li>PyCarolinas</li> </ul><p>Special Guest: Andy Knight.</p><p>Sponsored By:</p><ul><li><a href="https://ift.tt/34ZzBsU" rel="nofollow">Raygun</a>: <a href="https://ift.tt/34ZzBsU" rel="nofollow">Detect, diagnose, and destroy Python errors that are affecting your customers. With smart Python error monitoring software from Raygun.com, you can be alerted to issues affecting your users the second they happen.</a></li></ul><p><a href="https://ift.tt/2tzXV5e" rel="payment">Support Test & Code</a></p><p>Links:</p><ul><li><a href="https://ift.tt/2YTySG1" title="Automation Panda" rel="nofollow">Automation Panda</a></li><li><a href="https://ift.tt/2r1NcAB" title="Andy's Speaking events" rel="nofollow">Andy's Speaking events</a></li><li><a href="http://pycarolinas.org" title="PyCarolinas 2020" rel="nofollow">PyCarolinas 2020</a></li></ul>

from Planet Python
via read more

Wednesday, October 30, 2019

Roberto Alsina: Episodio 15: Python más rápido en 5 segundos!

¿Python es lento? ¡Mentira! Estrategias para hacer que tu código Python, SIN MODIFICAR sea 2 veces, 10 veces ... ¡100 veces más rápido!


from Planet Python
via read more

TechBeamers Python: Python Write File/ Read File

This tutorial covers the following topic – Python Write File/Read File. It describes the syntax of the writing to a file in Python. Also, it explains how to write to a text file and provides several examples for help. For writing to a file in Python, you would need a couple of functions such as Open(), Write(), and Read(). All these are built-in Python functions and don’t require a module to import. There are majorly two types of files you may have to interact with while programming. One is the text file that contains streams of ASCII or UNICODE (UTF-8)

The post Python Write File/ Read File appeared first on Learn Programming and Software Testing.


from Planet Python
via read more

CPython Core Developer Sprint 2019

During the week of September 9th to September 13th, 34 core CPython committers gathered together in the Bloomberg London headquarters for the 2019 Python core developer sprint. The core developer sprint is an annual week-long meeting in which the CPython core team has the opportunity to meet each other in person in order to work together free from distractions. Having this many core developers in the same room allows us to work efficiently on several aspects of the Python language and CPython (the default implementation). This can include topics such as future designs and in-process PEPs (Python Enhancement Proposals), prototyping exciting changes that we may see in the future,  various core development processes such as issue triaging and pull request reviewing, and much more! This is a very exhausting week for everyone, but also a very productive one, as these meetings are known for generating a much-needed boost in core development, especially close to new releases.

CPython Core Developers in attendance at 2019 Sprint

This year’s core developer sprint was funded thanks to the Python Software Foundation (PSF) and the donation of PyLondinium 2019 ticket proceeds, which were gathered specifically to support this event. This helped the PSF cover the cost of travel and accommodation for all core developers attending. Additionally, some companies covered their employees’ expenses, such as Microsoft, Facebook, Google and Red Hat. Bloomberg provided the venue, infrastructure and catering, as well as some events that happened during the week.

Major Achievements


One of the main advantages of having the core developers together in the same room is how much smoother the iteration and design process is. For example, major achievements were made around the release of Python 3.8 (and older versions) in terms of stability and documentation and many exciting things were prepared for future releases. Some highlights include:


  • More than 120 pull requests were merged in the CPython repository. We had a friendly competition in which attending core developers were ranked based on the number of pull requests merged (only those pull requests created by others were considered). In the end, the winners received a poster with all of the attendees’ names created specifically for the sprint.
  • Discussions around PEP 602: Python 3.9 release schedule, including gathering user feedback about several aspects of the PEP.
  • Work on improving the bugs.python.org interface and feature set, including updating the infrastructure to the latest roundup version and reworking the CSS to give a friendlier face to the site.
  • API design and discussion around PEP 416 -- Add a frozendict built-in type.
  • Draft design on a future PEP to implement an exception hierarchy to support TaskGroups and cancel scopes.
  • Work towards multiple interpreters: major efforts are needed before we have one GIL per interpreter. This included starting to refactor the existing global state into per-interpreter structures and developing tests that avoid new global state bleeding.
  • Work on a PEG-based parser prototype to substitute the current parser in order to improve maintenance and allow dropping the LL(1) restriction in the future.
  • Several pull requests to squash some complex bugs in multiprocessing.
  • Work on a possible implementation to introduce a Control Flow Graph (CFG) optimizer in CPython.
  • Work on the CI process. AppVeyor was dropped and replaced with Azure Pipelines.
  • Major improvements in the unittest.mock module, such as perfecting the new AsyncMock and related documentation, work on a prototype to add a WaitableMock class that can be joined (for threaded scenarios), as well as bug squashing around the module.


As you can imagine, with this level of activity, the buildbots were at maximum capacity and many issues were found and fixed both during and after the sprint.

Friday Event


As part of the core dev sprint, an event was organized with the help of Bloomberg in order to let the community know about the work done during the core developer sprint, why these events are important, and the impact they have on the future of the language. The event consisted of 4 lightning talks about some of the things worked on during the sprint:

Moderated panel discussion at the CPython Core Developer Sprint Friday Event


  • Work in AsyncMock - Lisa Roach
  • Removing dead batteries in the standard library - Christian Heimes
  • Sub-Interpreters support in the standard library - Eric Snow and Joannah Nanjekye
  • Improving bugs.python.org - Ezio Melotti


There was also a moderated Q&A session about the core development sprint and, more generally, Python’s future direction. 


We hope that events like this will help communicate more transparently what the core developers do at the sprints and how much impact these events have on maintenance, processes, and the language itself.

Mentorees


As part of the ongoing effort to improve mentoring and growing the core dev team, two mentees who have been contributing for a long period of time and have previously been awarded triaging privileges were invited to the sprint. Joannah Nanjekye was being mentored by Eric Snow, while Karthikeyan Singaravelan was being mentored by Yury Selivanov (and remotely by Andrew Svetlov). Mentoring is a very important part of core development, as it helps to grow the core dev team and allows us to have more impact and scalability in the different areas that are the responsibilities of the core dev team. As a result of this mentoring process, Joannah Nanjekye was been promoted to a core developer a few weeks after the core dev sprint! 

Other Blogs


Some of the other attendees have posted their own blogs describing their experiences at the sprints (this list may be updated over time as additional updates are published by other core devs).


Thank you!


A huge thanks to all the participants who attended, the various companies who sponsored parts of the event, and the PSF for covering the majority of travel expenses. We also thank those core developers who could not attend this year. 

CPython Core Developers in attendance at 2019 Sprint

Attendees: Christian Heimes, Ezio Melotti, Ned Deily, Benjamin Peterson, Mark Shannon, Michael Foord, Joannah Nanjekye, Karthikeyan Singaravelan, Emily Morehouse, Jason R. Coombs, Julien Palard, Stéphane Wirtel, Zachary Ware, Petr Viktorin, Łukasz Langa, Davin Potts, Yury Selivanov, Steve Holden, Stefan Behnel, Larry Hastings, Guido van Rossum, Carol Willing, Gregory P. Smith, Thomas Wouters, Dino Viehland, Mark Dickinson, Vinay Sajip, Paul Ganssle, Steve Dower, Lisa Roach, Eric Snow, Brett Cannon, Pablo Galindo

Written by: Pablo Galindo


from Python Software Foundation News
via read more

qutebrowser development blog: 2019 qutebrowser crowdfunding with shirts, stickers and more!

I'm very happy to announce that the next qutebrowser crowdfunding went live today! o/

This time, I'm focused on recurring donations via GitHub Sponsors. Those donations will allow me to work part-time on qutebrowser! Thanks to the GitHub Matching Fund, all donations (up to $5000 in the first year) will …


from Planet Python
via read more

Python Software Foundation: CPython Core Developer Sprint 2019

During the week of September 9th to September 13th, 34 core CPython committers gathered together in the Bloomberg London headquarters for the 2019 Python core developer sprint. The core developer sprint is an annual week-long meeting in which the CPython core team has the opportunity to meet each other in person in order to work together free from distractions. Having this many core developers in the same room allows us to work efficiently on several aspects of the Python language and CPython (the default implementation). This can include topics such as future designs and in-process PEPs (Python Enhancement Proposals), prototyping exciting changes that we may see in the future,  various core development processes such as issue triaging and pull request reviewing, and much more! This is a very exhausting week for everyone, but also a very productive one, as these meetings are known for generating a much-needed boost in core development, especially close to new releases.

CPython Core Developers in attendance at 2019 Sprint

This year’s core developer sprint was funded thanks to the Python Software Foundation (PSF) and the donation of PyLondinium 2019 ticket proceeds, which were gathered specifically to support this event. This helped the PSF cover the cost of travel and accommodation for all core developers attending. Additionally, some companies covered their employees’ expenses, such as Microsoft, Facebook, Google and Red Hat. Bloomberg provided the venue, infrastructure and catering, as well as some events that happened during the week.

Major Achievements


One of the main advantages of having the core developers together in the same room is how much smoother the iteration and design process is. For example, major achievements were made around the release of Python 3.8 (and older versions) in terms of stability and documentation and many exciting things were prepared for future releases. Some highlights include:


  • More than 120 pull requests were merged in the CPython repository. We had a friendly competition in which attending core developers were ranked based on the number of pull requests merged (only those pull requests created by others were considered). In the end, the winners received a poster with all of the attendees’ names created specifically for the sprint.
  • Discussions around PEP 602: Python 3.9 release schedule, including gathering user feedback about several aspects of the PEP.
  • Work on improving the bugs.python.org interface and feature set, including updating the infrastructure to the latest roundup version and reworking the CSS to give a friendlier face to the site.
  • API design and discussion around PEP 416 -- Add a frozendict built-in type.
  • Draft design on a future PEP to implement an exception hierarchy to support TaskGroups and cancel scopes.
  • Work towards multiple interpreters: major efforts are needed before we have one GIL per interpreter. This included starting to refactor the existing global state into per-interpreter structures and developing tests that avoid new global state bleeding.
  • Work on a PEG-based parser prototype to substitute the current parser in order to improve maintenance and allow dropping the LL(1) restriction in the future.
  • Several pull requests to squash some complex bugs in multiprocessing.
  • Work on a possible implementation to introduce a Control Flow Graph (CFG) optimizer in CPython.
  • Work on the CI process. AppVeyor was dropped and replaced with Azure Pipelines.
  • Major improvements in the unittest.mock module, such as perfecting the new AsyncMock and related documentation, work on a prototype to add a WaitableMock class that can be joined (for threaded scenarios), as well as bug squashing around the module.


As you can imagine, with this level of activity, the buildbots were at maximum capacity and many issues were found and fixed both during and after the sprint.

Friday Event


As part of the core dev sprint, an event was organized with the help of Bloomberg in order to let the community know about the work done during the core developer sprint, why these events are important, and the impact they have on the future of the language. The event consisted of 4 lightning talks about some of the things worked on during the sprint:

Moderated panel discussion at the CPython Core Developer Sprint Friday Event


  • Work in AsyncMock - Lisa Roach
  • Removing dead batteries in the standard library - Christian Heimes
  • Sub-Interpreters support in the standard library - Eric Snow and Joannah Nanjekye
  • Improving bugs.python.org - Ezio Melotti


There was also a moderated Q&A session about the core development sprint and, more generally, Python’s future direction. 


We hope that events like this will help communicate more transparently what the core developers do at the sprints and how much impact these events have on maintenance, processes, and the language itself.

Mentorees


As part of the ongoing effort to improve mentoring and growing the core dev team, two mentees who have been contributing for a long period of time and have previously been awarded triaging privileges were invited to the sprint. Joannah Nanjekye was being mentored by Eric Snow, while Karthikeyan Singaravelan was being mentored by Yury Selivanov (and remotely by Andrew Svetlov). Mentoring is a very important part of core development, as it helps to grow the core dev team and allows us to have more impact and scalability in the different areas that are the responsibilities of the core dev team. As a result of this mentoring process, Joannah Nanjekye was been promoted to a core developer a few weeks after the core dev sprint! 

Other Blogs


Some of the other attendees have posted their own blogs describing their experiences at the sprints (this list may be updated over time as additional updates are published by other core devs).


Thank you!


A huge thanks to all the participants who attended, the various companies who sponsored parts of the event, and the PSF for covering the majority of travel expenses. We also thank those core developers who could not attend this year. 

CPython Core Developers in attendance at 2019 Sprint

Attendees: Christian Heimes, Ezio Melotti, Ned Deily, Benjamin Peterson, Mark Shannon, Michael Foord, Joannah Nanjekye, Karthikeyan Singaravelan, Emily Morehouse, Jason R. Coombs, Julien Palard, Stéphane Wirtel, Zachary Ware, Petr Viktorin, Łukasz Langa, Davin Potts, Yury Selivanov, Steve Holden, Stefan Behnel, Larry Hastings, Guido van Rossum, Carol Willing, Gregory P. Smith, Thomas Wouters, Dino Viehland, Mark Dickinson, Vinay Sajip, Paul Ganssle, Steve Dower, Lisa Roach, Eric Snow, Brett Cannon, Pablo Galindo

Written by: Pablo Galindo


from Planet Python
via read more

Tuesday, October 29, 2019

Talk Python to Me: #236 Scaling data science across Python and R

Do you do data science? Imagine you work with over 200 data scientists. Many of whom have diverse backgrounds or have come from non-CS backgrounds. Some of them want to use Python. Others are keen to work with R.

from Planet Python
via read more

Python Bytes: #154 Code, frozen in carbon, on display for all


from Planet Python
via read more

The No Title® Tech Blog: New project: Nice Telescope Planner

And now, for something different, I have just dived into Java. I am sharing with you the first (pre-)release of Nice Telescope Planner, a simple cross-platform desktop utility for amateur astronomy hobbyists, written in Java. The aim is to provide an easy to use tool to help planning sky observation sessions, suggesting some of the interesting objects you may be able to watch at naked eye, or using amateur equipment (binoculars or small to medium size telescopes) in a given date/time and place.


from Planet Python
via read more

Zero-with-Dot (Oleg Żero): Colaboratory + Drive + Github -> the workflow made simpler

Introduction

This post is a continuation of our earlier attempt to make the best of the two worlds, namely Google Colab and Github. In short, we tried to map the usage of these tools in a typical data science workflow. Although we got it to work, the process had its drawbacks:

  • It relied on relative imports, which made our code unnecessarily cumbersome.
  • We didn’t quite get the Github part to work. The workspace had to be saved offline.

In this post, we will show you a simpler way organize the workspace without these flaws. All you will need to proceed is a Gmail and Github account. Let’s get to work.

What goes where?

/assets/colab-github-workflow/triangle.png Figure 1. Three parts of our simple "ecosystem".

Typically, we have four basic categories of files in our workspace:

  • notebooks (.ipynb) - for interactive development work,
  • libraries (.py) - for code that we use and reuse,
  • models - things we try to build,
  • data - ingredients we build it from.

Since Colab backend is not persistent, we need a permanent storage solution. In addition to that, we also need a version control system so we can keep track of changes. Finally, we would appreciate if we won’t have to think of this machinery any more than necessary.

Colab integrates easily with Google Drive, which makes it a natural choice for storage space. We will use it for storing our data and models. At the same time, Github is better suited for code, thus we will use it for notebooks and libraries. Now, the question arises, how we can interface the two from the position of our notebook, which will make our workflow as painless as possible?

Github

We assume that you already have a Github account and created a repository for your project. Unless your repository is public, you will need to generate a token to interact with it through a command line. Here is a short guide on how to create one.

Google Drive

Next thing is to organize our non-volatile storage space for both models and data. If you have a Gmail account you are halfway there. All you need to do is to create an empty directory in the Drive and that’s it.

Colaboratory - operational notebook

To keep things organized, we define one separate notebook that is to be our operational tool. We will use its cells exclusively for manipulating of our space, letting the other notebooks take care of more interesting things such as exploratory data analysis, feature engineering or training. All notebooks, including this one, will be revisioned, but with command stored in the operational notebook.

The workflow

The workflow is a simple three-step process:

  1. First, after connecting to the Colab runtime, we need to mount Google Drive and update our space using Github.
  2. We work with the notebooks and the rest of the files (our modules, libraries, etc.). In this context, we simply call it editing.
  3. We save our work, by synchronizing our Drive with Github using the operational notebook.

Connecting, mounting and updating

1
2
3
4
5
6
7
8
9
10
11
12
13
14
15
16
17
18
19
20
21
22
from google.colab import drive
from os.path import join

ROOT = '/content/drive'     # default for the drive
PROJ = 'My Drive/...'       # path to your project on Drive

GIT_USERNAME = "OlegZero13" # replace with yours
GIT_TOKEN = "XXX"           # definitely replace with yours
GIT_REPOSITORY = "yyy"      # ...nah


drive.mount(ROOT)           # we mount the drive at /content/drive

PROJECT_PATH = join(ROOT, PROJ)
!mkdir "{PROJECT_PATH}"I    # in case we haven't created it already   

GIT_PATH = "https://{GIT_TOKEN}@github.com/{GIT_USERNAME}/{GIT_REPOSITORY}.git"
!mkdir ./temp
!git clone "{GIT_PATH}"
!mv ./temp/* "{PROJECT_PATH}"
!rm -rf ./temp
!rsync -aP --exclude=data/ "{PROJECT_PATH}"/*  ./

The above snippet mounts the Google Drive at /content/drive and creates our project’s directory. It then pulls all the files from Github and copies them over to that directory. Finally, it collects everything that belongs to the Drive directory and copies it over to our local runtime.

A nice thing about this solution is that it won’t crash if executed multiple times. Whenever executed, it will only update what is new and that’s it. Also, with rsync we have the option to exclude some of the content, which may take too long to copy (…data?).

Editing, editing, and editing

Development, especially in data science, means trying multiple times before we finally get things right. At this stage, editing to the external files/libraries can be done by:

  1. substituting or changing files on Drive and then transferring them to the local runtime of each notebook using rsync, or
  2. using the so-called IPython magic commands.

Suppose you want quickly change somefile.py, which is one of your library files. You can write the code for that file and tell Colab to save it using %%writefile command. Since the file resides locally, you can use simply the import statement to load its new content again. The only thing is to remember to execute %reload_ext somefile command first, to ensure that Colab knows of the update.

Here is an example:

/assets/colab-github-workflow/imports.png Figure 2. Importing, editing and importing again. All done through the cells.

Saving, calling it a day

Once you wish to make a backup of all of your work, all you need to do is to copy all the files to the storage and push them to Github.

Copying can be done using !cp -r ./* "{PROJECT_PATH}" executed in a notebook cell, which will update the Drive storage. Then, pushing to Github requires creating a temporary working directory and configuring local git repo just for the time being. Here are the commands to execute:

1
2
3
4
5
6
7
8
9
10
11
12
!mkdir ./temp
!git clone "https://{GIT_TOKEN}@github.com/{GIT_USERNAME}/{GIT_REPOSITORY}.git ./temp
!rsync -aP --exclude=data/ "{PROJECT_PATH}"/* ./temp

%cd ./temp
!git add .
!git commit -m '"{GIT_COMMIT_MESSAGE}"'
!git config --global user.email "{GIT_EMAIL}"
!git config --global user.name "{GIT_NAME}"
!git push origin "{GIT_BRANCH_NAME}"
%cd /content
!rm -rf ./temp

Obviously, you need to define the strings in "{...}" yourself.

/assets/colab-github-workflow/github.png Figure 3. Successful upload of the content to Github. Calling it a day.

Conclusion

In this post, we have shown how to efficiently use Google Drive and Github together when working with Google Colab. The improved workflow is much simpler than the one presented earlier.

If you would like to share any useful tricks or propose some improvements, please do so in the comments. Your feedback is really helpful.


from Planet Python
via read more

TestDriven.io: Working with Static and Media Files in Django

This article looks at how to work with static and media files in a Django project, locally and in production. from Planet Python via read...