Saturday, August 31, 2019

Weekly Python StackOverflow Report: (cxcii) stackoverflow python report

These are the ten most rated questions at Stack Overflow last week.
Between brackets: [question score / answers count]
Build date: 2019-08-31 22:41:03 GMT


  1. Fill NaN based on previous value of row - [13/2]
  2. Group by consecutive index numbers - [12/4]
  3. Sort dictionary of lists by key value pairs - [12/3]
  4. Add 2 new columns to existing dataframe using apply - [12/2]
  5. Implement the function Fast Modular Exponentiation - [11/1]
  6. Condition statement without loops - [7/4]
  7. Why do these two functions have the same bytecode when disassembled under dis.dis? - [7/2]
  8. Schrodinger equation for the hydrogen atom: why is numpy displaying a wrong solution while scipy isn't? - [7/2]
  9. replace words and strings pandas - [7/1]
  10. Numpy Array: First occurence of N consecutive values smaller than threshold - [6/3]


from Planet Python
via read more

PyCon: PyCon 2020 Conference Site is here!


After 2 successful years in Cleveland, OH, PyCon 2020 and PyCon 2021 will be moving to Pittsburgh, PA!


Head over to us.pycon.org/2020 to check out the look for PyCon 2020.
Our bold design includes the Roberto Clemente Bridge, also known as the Sixth Street Bridge, which spans the Allegheny River in downtown Pittsburgh. The Pittsburgh Steelmark, was originally created for United States Steel Corporation to promote the attributes of steel: yellow lightens your work; orange brightens your leisure; and blue widens your world. The PPG Building, is a complex in downtown Pittsburgh, consisting of six buildings within three city blocks and five and a half acres. Named for its anchor tenant, PPG Industries, who initiated the project for its headquarters, the buildings are all of matching glass design consisting of 19,750 pieces of glass. Also included in the design are a fun snake, terminal window, and hardware related items.

Sponsor Opportunities

Sponsors help keep PyCon affordable and accessible to the widest possible audience. Sponsors are what make this conference possible. From low ticket prices to financial aid, to video recording, the organizations who step forward to support PyCon, in turn, support the entire Python community. They make it possible for so many to attend, for so many to be presenters, and for the people at home to watch along.

As with any sponsorship, the benefits go both ways. Organizations have many options for sponsorship packages, and they all benefit from exposure to an ever growing audience of Python programmers, from those just getting started to 20 year veterans and every walk of life in between. If you're hiring, the Job Fair puts your organization within reach of a few thousand dedicated people who came to PyCon looking to sharpen their skills.

For more details on sponsorship opportunities go to the Sponsor Prospectus. If you are interested in becoming a PyCon sponsor go to the application form.

We look forward to sharing more news on the call for proposals, financial aid applications, registration, and more, so stay tuned! Also follow us here on the PyCon Blog and @PyCon on Twitter.


from Planet Python
via read more

Kushal Das: Announcing lymworkbook project

In 2017, I started working on a new book to teach Linux command line in our online summer training. The goal was to have the basics covered in the book, and the same time not to try to explain things which can be learned better via man pages (yes, we encourage people to read man pages).

Where to practice

This one question always came up, many times, the students managed to destroy their systems by doing random things. rm -rf is always one of the various commands in this regard.

Introducing lymworkbook

Now, the book has a new chapter, LYM Workbook, where the reader can set up VMs in the local machine via Vagrant, and go through a series of problems in those machines. One can then verify if the solution they worked on is correct or not. For example:

sudo lymsetup copypaste
sudo lymverify copypaste

We are starting with only a few problems, but I (and a group of volunteers) will slowly add many more problems. We will also increase the complexity by increasing the number of machines and having setup more difficult systems. This will include the basic system administration related tasks.

How can you help

Have a look at the issues, feel free to pick up any open issue or create issues with various problems which you think are good to learn. Things can be as easy as rsync a directory to another system, or setting up Tor Project and use it as a system proxy.

Just adding one problem as an issue is also a big help, so please spend 5 minutes of your free time, and add any problem you like.


from Planet Python
via read more

IslandT: Combine two strings with Python method

In this example, we are going to create a method which will do the followings:-

  1. Extract unique characters from two strings then group them into two separate lists.
  2. Create a new list consists of the characters in those two lists. The character within the list must only appear once and only consists of lowercase a-z characters.

Below is the solution.

  1. Create two lists with non-repeated characters from the given two strings.
  2. Loop through all the lowercase characters (from a-z) and if this character appears within any of those two lists then appends them to a new character list.
  3. Turn that new list into a string and then returns that new string.
import string
def longest(s1, s2):
    
    s1 = list(set(s1))
    s2 = list(set(s2))
    s3 = []

    for character in string.ascii_lowercase:
        if character in s1 or character in s2:
            s3.append(character)
    return ''.join(s3)

We will use the string module ascii_lowercase list property to save all the typing we need in order to create the lowercase letters list.

Homework :

Create a new string which only consists of non-repeated digits in the ascending order from two given strings. For example, s1 = “agy569” and s2 = “gyou5370” will produce s3 = “035679”. Write your solution in the comment box below this article.

Do you finish the homework all by your own?


from Planet Python
via read more

IslandT: Find the maximum value within a string with Python

In this chapter we are going to solve the above problem with a Python method. Given a string which consists of words and numbers, we are going to extract out the numbers that are within those words from that string, then compare and return the largest number within the given string.

These are the steps we need to do.

  1. Turn the string into a list of words.
  2. Create a string which only consists of digits separated by empty space that replaces the words within the digits.
  3. Create a new list only consists of digits then returns the maximum digit.
def solve(s):
    
    s_list = list(s)
    str = ''
    for e in s_list:
        if e.isdigit():
            str += e
        else:
            str += ' '
    n_list = str.split(' ')
    e_list = []
    for x in n_list:
        if x.isdigit(): 
            e_list.append(int(x))
    return max(e_list)

The max method will return the maximum digit within a list.


from Planet Python
via read more

Friday, August 30, 2019

Python Bytes: #145 The Python 3 “Y2K” problem


from Planet Python
via read more

PyCharm: PyCharm 2019.2.2 Preview

PyCharm 2019.2.2 Preview is now available!

Fixed in this Version

  • Some code insight fixes were implemented for Python 3.8:
    • Now the “continue” and “finally” clauses are allowed to be used.
    • Support for unicode characters in the re module was added.
  • An error on the Python Console that was not showing documentation for functions was resolved.
  • Some issues were solved for IPython that were causing the debugger not to work properly.
  • We had some regression issues with the debugger causing breakpoints to be ignored and/or throw exceptions and the data viewer not to show the proper information and those were solved.
  • A problem that caused PyCharm to stall when a Docker server was configured as remote python interpreter was fixed.
  • Jupyter Notebooks got some fixes: kernel specification selection is now based on the Python version for the module where a new notebook is created and in case the kernel specification is missing from the metadata a proper error message will be shown.
  • An issue that caused one remote interpreter not be used from two different machines was solved as well.
  • And many more fixes, see the release notes for more information.

Getting the New Version

Download the Preview from Confluence.


from Planet Python
via read more

PyCharm 2019.2.2 Preview

PyCharm 2019.2.2 Preview is now available!

Fixed in this Version

  • Some code insight fixes were implemented for Python 3.8:
    • Now the “continue” and “finally” clauses are allowed to be used.
    • Support for unicode characters in the re module was added.
  • An error on the Python Console that was not showing documentation for functions was resolved.
  • Some issues were solved for IPython that were causing the debugger not to work properly.
  • We had some regression issues with the debugger causing breakpoints to be ignored and/or throw exceptions and the data viewer not to show the proper information and those were solved.
  • A problem that caused PyCharm to stall when a Docker server was configured as remote python interpreter was fixed.
  • Jupyter Notebooks got some fixes: kernel specification selection is now based on the Python version for the module where a new notebook is created and in case the kernel specification is missing from the metadata a proper error message will be shown.
  • An issue that caused one remote interpreter not be used from two different machines was solved as well.
  • And many more fixes, see the release notes for more information.

Getting the New Version

Download the Preview from Confluence.


from PyCharm Blog
read more

Python Insider: Python 3.8.0b4 is now available for testing

It's time for the last beta release of Python 3.8. Go find it at:
https://www.python.org/downloads/release/python-380b4/ 

This release is the last of four planned beta release previews. Beta release previews are intended to give the wider community the opportunity to test new features and bug fixes and to prepare their projects to support the new feature release. The next pre-release of Python 3.8 will be 3.8.0c1, the first release candidate, currently scheduled for 2019-09-30.
 

Call to action

We strongly encourage maintainers of third-party Python projects to test with 3.8 during the beta phase and report issues found to the Python bug tracker as soon as possible. Please note this is the last beta release, there is not much time left to identify and fix issues before the release of 3.8.0. If you were hesitating trying it out before, now is the time.
While the release is planned to be feature complete entering the beta phase, it is possible that features may be modified or, in rare cases, deleted up until the start of the release candidate phase (2019-09-30). Our goal is have no ABI changes after beta 3 and no code changes after 3.8.0c1, the release candidate. To achieve that, it will be extremely important to get as much exposure for 3.8 as possible during the beta phase.
Please keep in mind that this is a preview release and its use is not recommended for production environments. 

Acknowledgments

Many developers worked hard for the past four weeks to squash remaining bugs, some requiring non-obvious decisions. Many thanks to the most active, namely Raymond Hettinger, Steve Dower, Victor Stinner, Terry Jan Reedy, Serhiy Storchaka, Pablo Galindo Salgado, Tal Einat, Zackery Spytz, Ronald Oussoren, Neil Schemenauer, Inada Naoki, Christian Heimes, and Andrew Svetlov.

3.8.0 would not reach the Last Beta without you. Thank you!


from Planet Python
via read more

Python 3.8.0b4 is now available for testing

It's time for the last beta release of Python 3.8. Go find it at:
https://www.python.org/downloads/release/python-380b4/ 

This release is the last of four planned beta release previews. Beta release previews are intended to give the wider community the opportunity to test new features and bug fixes and to prepare their projects to support the new feature release. The next pre-release of Python 3.8 will be 3.8.0c1, the first release candidate, currently scheduled for 2019-09-30.
 

Call to action

We strongly encourage maintainers of third-party Python projects to test with 3.8 during the beta phase and report issues found to the Python bug tracker as soon as possible. Please note this is the last beta release, there is not much time left to identify and fix issues before the release of 3.8.0. If you were hesitating trying it out before, now is the time.
While the release is planned to be feature complete entering the beta phase, it is possible that features may be modified or, in rare cases, deleted up until the start of the release candidate phase (2019-09-30). Our goal is have no ABI changes after beta 3 and no code changes after 3.8.0c1, the release candidate. To achieve that, it will be extremely important to get as much exposure for 3.8 as possible during the beta phase.
Please keep in mind that this is a preview release and its use is not recommended for production environments. 

Acknowledgments

Many developers worked hard for the past four weeks to squash remaining bugs, some requiring non-obvious decisions. Many thanks to the most active, namely Raymond Hettinger, Steve Dower, Victor Stinner, Terry Jan Reedy, Serhiy Storchaka, Pablo Galindo Salgado, Tal Einat, Zackery Spytz, Ronald Oussoren, Neil Schemenauer, Inada Naoki, Christian Heimes, and Andrew Svetlov.

3.8.0 would not reach the Last Beta without you. Thank you!


from Python Insider
read more

Thursday, August 29, 2019

Canaries Can Tweet: Preview New Features with Conda Canary

Conda-canary is the pre-defaults-release channel for conda — it has the most recent version of conda. On occasion it will also have the latest pre-defaults-release of conda-build and other conda dependencies such as ruamel.yaml. Normally,…

The post Canaries Can Tweet: Preview New Features with Conda Canary appeared first on Anaconda.


from Planet SciPy
read more

Continuum Analytics Blog: Canaries Can Tweet: Preview New Features with Conda Canary

Conda-canary is the pre-defaults-release channel for conda — it has the most recent version of conda. On occasion it will also have the latest pre-defaults-release of conda-build and other conda dependencies such as ruamel.yaml. Normally,…

The post Canaries Can Tweet: Preview New Features with Conda Canary appeared first on Anaconda.


from Planet Python
via read more

Thibauld Nion: 7 years of Django in 7-ish days

Spring was quite an "interesting time" for my personal project: WaterOnMars.

Indeed I started to work on adding a new feature (a first in a while but maybe the topic of another post) but each time I was pushing or deploying code I was suddenly getting back warnings unrelated to my changes but pointing at core components like, err... Python or Django versions being deprecated.

So kudos for Python and github developers for making a clever use of warnings and, yes, I admit that using Python2.7 (ending its life in 2020) and Django1.4 (published 7 years ago) in 2019 is lame.

So... migrations !

Read more… (3 min remaining to read)


from Planet Python
via read more

py.CheckIO: New Python on CheckiO


from Planet Python
via read more

Ned Batchelder: Don’t omit tests from coverage

There’s a common idea out there that I want to refute. It’s this: when measuring coverage, you should omit your tests from measurement. Searching GitHub shows that lots of people do this.

This is a bad idea. Your tests are real code, and the whole point of coverage is to give you information about your code. Why wouldn’t you want that information about your tests?

You might say, “but all my tests run all their code, so it’s useless information.” Consider this scenario: you have three tests written, and you need a fourth, similar to the third. You copy/paste the third test, tweak the details, and now you have four tests. Except oops, you forgot to change the name of the test.

Tests are weird: you have to name them, but the names don’t matter. Nothing calls the name directly. It’s really easy to end up with two same-named tests. Which means you only have one test, because the new one overwrites the old. Coverage would alert you to the problem.

Also, if your test suite is large, you likely have helper code in there as well as straight-up tests. Are you sure you need all that helper code? If you run coverage on the tests (and the helpers), you’d know about some weird clause in there that is never used. That’s odd, why is that? It’s probably useful to know. Maybe it’s a case you no longer need to consider. Maybe your tests aren’t exercising everything you thought.

The only argument against running coverage on tests is that it “artificially” inflates the results. True, it’s much easier to get 100% coverage on a test file than a product file. But so what? Your coverage goal was chosen arbitrarily anyway. Instead of aiming for 90% coverage, you should include your tests and aim for 95% coverage. 90% doesn’t have a magical meaning.

What’s the downside of including tests in coverage? “People will write more tests as a way to get the easy coverage.” Sounds good to me. If your developers are trying to game the stats, they’ll find a way, and you have bigger problems.

True, it makes the reports larger, but if your tests are 100% covered, you can exclude those files from the report with [report] skip_covered setting.

Your tests are important. You’ve put significant work into them. You want to know everything you can about them. Coverage can help. Don’t omit tests from coverage.


from Planet Python
via read more

Wednesday, August 28, 2019

IslandT: Find the maximum value within a string with Python

In this chapter we are going to solve the above problem with a Python method. Given a string which consists of words and numbers, we are going to extract out the numbers that are within those words from that string, then compare and return the largest number within the given string.

These are the steps we need to do.

  1. Turn the string into a list of words.
  2. Create a string which only consists of digits separated by empty space that replaces the words within the digits.
  3. Create a new list only consists of digits then returns the maximum digit.
def solve(s):
    
    s_list = list(s)
    str = ''
    for e in s_list:
        if e.isdigit():
            str += e
        else:
            str += ' '
    n_list = str.split(' ')
    e_list = []
    for x in n_list:
        if x.isdigit(): 
            e_list.append(int(x))
    return max(e_list)

The max method will return the maximum digit within a list.


from Planet Python
via read more

Talk Python to Me: #227 Maintainable data science: Tips for non-developers

Did you come to software development outside of traditional computer science? This is common, and even how I got into programming myself. I think it's especially true for data science and scientific computing. That's why I'm thrilled to bring you an episode with Daniel Chen about maintainable data science tips and techniques.

from Planet Python
via read more

PyPI Security Q4 2019 Request for Information period opens.

The Python Software Foundation Packaging Working Group has received funding from Facebook research to develop and deploy of enhanced security features to PyPI.
PyPI is a foundational component of the Python ecosystem and broader computer software and technology landscape. This project aims to improve the security and accessibility of PyPI for all users worldwide, whether they are direct users like project maintainers and pip installers or indirect users. The impact of this work will be highly visible and improve crucial features of the service.

Specifically, this project aims to implement verifiable cryptographic signing of artifacts and infrastructure to support automated detection of malicious uploads to the index.
We plan to begin the project in December 2019. Because of the size of the project, funding has been allocated to secure one or more contractors to complete the development, testing, verification, and assist in the rollout of necessary features.
Register Interest
To receive notification when our Request for Information period closes and the Request for Proposals period opens, please register your interest here.

What is the Request for Information period?

A Request for Information (RFI) is a process intended to allow us (The Python Software Foundation) and potential contractors to openly share information to improve the scope and definition of the project at hand. Also, we encourage stakeholders in the community with expertise in the project areas to contribute their viewpoints on open questions for the scope of the work.
We hope that it will help potential contractors better understand the work to be completed and develop better specified proposals. Additionally we have designed the RFI with an open nature in order to expose the project to multiple perspectives and help shape the direction for some choices in the project.
The Request for Information period opens today, August 28, 2019, and is scheduled to close September 18, 2019.
After the RFI period closes, we will use the results of the process to prepare and open a Request for Proposals to solicit proposals from contractors to complete the work.

More Information

The full version of our Request for Information document can be found here.

Participate!

Our RFI will be conducted on the Python Community Discussion Forum. Participants will need to create an account in order to propose new topics of discussion or respond to existing topics.
All discussions will remain public and available for review by potential proposal authors who do not wish to or cannot create an account to participate directly.


from Python Software Foundation News
via read more

Python Software Foundation: PyPI Security Q4 2019 Request for Information period opens.

The Python Software Foundation Packaging Working Group has received funding from Facebook research to develop and deploy of enhanced security features to PyPI.
PyPI is a foundational component of the Python ecosystem and broader computer software and technology landscape. This project aims to improve the security and accessibility of PyPI for all users worldwide, whether they are direct users like project maintainers and pip installers or indirect users. The impact of this work will be highly visible and improve crucial features of the service.

Specifically, this project aims to implement verifiable cryptographic signing of artifacts and infrastructure to support automated detection of malicious uploads to the index.
We plan to begin the project in December 2019. Because of the size of the project, funding has been allocated to secure one or more contractors to complete the development, testing, verification, and assist in the rollout of necessary features.
Register Interest
To receive notification when our Request for Information period closes and the Request for Proposals period opens, please register your interest here.

What is the Request for Information period?

A Request for Information (RFI) is a process intended to allow us (The Python Software Foundation) and potential contractors to openly share information to improve the scope and definition of the project at hand. Also, we encourage stakeholders in the community with expertise in the project areas to contribute their viewpoints on open questions for the scope of the work.
We hope that it will help potential contractors better understand the work to be completed and develop better specified proposals. Additionally we have designed the RFI with an open nature in order to expose the project to multiple perspectives and help shape the direction for some choices in the project.
The Request for Information period opens today, August 28, 2019, and is scheduled to close September 18, 2019.
After the RFI period closes, we will use the results of the process to prepare and open a Request for Proposals to solicit proposals from contractors to complete the work.

More Information

The full version of our Request for Information document can be found here.

Participate!

Our RFI will be conducted on the Python Community Discussion Forum. Participants will need to create an account in order to propose new topics of discussion or respond to existing topics.
All discussions will remain public and available for review by potential proposal authors who do not wish to or cannot create an account to participate directly.


from Planet Python
via read more

Stack Abuse: Introduction to the Python Pyramid Framework

Introduction

In this tutorial, we're going to learn how to use the Pyramid framework in Python. It is an open source web development framework which uses the Model-View-Controller (MVC) architecture pattern and is based on Web Server Gateway Interface (WSGI). The Pyramid framework has a lot of useful add-on packages that make web development a lot more convenient. Some other popular alternatives for web development in Python include Django and Flask.

Prerequisites

You need to have basic knowledge of HTML for this tutorial. If you do not have any prior experience with it, do not worry about it, you can still follow this tutorial and understand how Pyramid works, but to develop real world web applications you will have to go back and learn HTML.

Architecture

Before we move on and see the code, let's first understand WSGI and MVC.

WSGI is basically a standard which defines the way in which a Python based web application interacts with a server. It governs the process of sending requests to a server, and receiving responses from a server.

MVC is an architectural pattern which modularizes your application; the model contains the data and business logic of your application, the view displays the relevant information to the user, and the controller is responsible for the interaction between the model and the view.

Google Maps is a perfect example of the MVC architecture. When we use the route-finding feature in Google Maps, the model contains the code for the algorithm which finds the shortest path from location A to location B, the view is the screen that is shown to you containing the map labeled with the route, and the controller contains the code that uses the shortest path found by the model and displays it to the user through the view. You can also view controller, as the code which receives a request from the view (by the user), forwards it to the model to generate a response, and then displays the response from the model back to the user through a view.

Besides WSGI and MVC, there are two more terms that you should be familiar with, which are "routes" and "scripts". Routes allow your website to be divided into different webpages, with each webpage performing a different function.

Let's consider Facebook as an example. If you wish to view your messages, a new webpage with a different view is opened up for that, if you wish to view your own profile, a new webpage is opened for that, but they are all connected to your main website. That's done through routes. Each time you click on a button or link, you are redirected to a new webpage as specified by the routes in our application.

As for scripts, they simply include configuration settings for our application, and help in managing it.

We will learn more about all these terms when we create a basic web application using Pyramid. So, let's begin.

Installation

Whenever we develop a web application that is to be deployed online, it is always considered a good practice to make a virtual environment first. The virtual environment contains all the libraries, or frameworks and all the other dependencies that are necessary for running the web app. This way, when you deploy your app to a server, you can simply re-install all those libraries on the server, for your application to run smoothly.

Let's create a virtual environment before we move forward. Install virtual environment module by running the command below in your terminal:

$ pip install virtualenv

To test that your installation was successful, run the following command:

$ virtualenv --version

If you see a version number printed to the console then the installation was successful (or virtualenv was already installed on your system).

To create a virtual environment, first navigate to the folder where you wish to create it, and then run the following command:

$ virtualenv myvenv

Note: You can name your virtual environment anything you want. Here we're using "myenv" for demonstration purposes only.

The last step is to activate your virtual environment. On Mac, run the following command in the terminal:

$ source myvenv/bin/activate

On a Windows machine, you can activate the environment with the following command:

'Installation folder'\myvenv\Scripts\activate.bat

Now that you have your virtual environment set up, let's install Pyramid in it. We will use the pip package manager for that:

$ pip install pyramid

Note: When you are done with working with the application and wish to deactivate your virtual environment, run the following command in the terminal:

$ deactivate

Coding Exercise

In this section, we will start off by coding a skeleton app to understand how the Pyramid apps are structured and how they communicate at a basic level. After that, we will see how to create applications with multiple views.

A Simple Example of Python Pyramid

# intro.py
# Import necessary functions to run our web app

from wsgiref.simple_server import make_server
from pyramid.config import Configurator
from pyramid.response import Response

# This function receives a request from the user, and returns a response
def intro(request):
    return Response('Hi, My name is Junaid Khalid')

# This function will start a server on our computer (localhost), define the
# routes for our application, and also add a view to be shown to the user
def main():
    with Configurator() as config:

        config.add_route('intro', '/')
        config.add_view(intro, route_name='intro')
        application = config.make_wsgi_app()

    # 8000 is the port number through which the requests of our app will be served
    server = make_server('0.0.0.0', 8000, application)
    server.serve_forever()

main()

Note: The Configurator module is being used to connect a particular view to a specific route. For instance, on Facebook, the "My Profile" view would be different than the "News Feed" view, and they both have different URLs as well. This is exactly what a configurator does; connecting a specific URL/route to a particular view.

Then make_server methods is used to run our application on a local HTTP server on our machine, with an assigned port number.

The intro function is used to process the requests received from the user, process them, and return the response to the view. Any processing of the request before sending a response, can be done inside this function.

To run the above application on your workstation, go to the terminal and run the .py file we just created:

$ python3 intro.py

In my case, the filename is intro.py, but yours could be different depending on what you decided to name it.

Then open any web browser on your PC, and go to this address: http://localhost:8000. You should see a webpage with "Hi, My name is Junaid Khalid" written in a very aesthetically displeasing way. To make it look more pleasant, you can return HTML code as a response as well. For a simple example, let's edit intro function:

def intro(request):
    return Response('<h2 style="text-align: center; font-family: verdana; color: blue;">Hi, My name is Junaid Khalid.</h2>')

Replace the intro function with the one above, and see the output now. A lot better, right? This was just an example. You can make it a lot better.

Note: When you make any change in the code, the server is not automatically going to log that. You will have to stop the server, and then restart it to see your changes take effect. To do that, open your terminal where the server is running and press Control+C, this will terminate the server. Then you can restart your server as usual to see the changes.

Separating and Displaying Multiple Views

In this section, we will add a few more views as well as remove our views from the main file (i.e. 'intro.py' file), and put them all in a new separate file ('all_views.py'). This will modularize our code, make it look cleaner, and will also allow us to add new views more easily. So, let's do it.

# all_views.py
# Import necessary functions to run our web app
from pyramid.compat import escape
from pyramid.response import Response
from pyramid.view import view_config

# view_config functions tells Pyramid which route's view is going to be defined in the function that follows
# the name of the function does not matter, you can name it whatever you like

@view_config(route_name='intro')
def home_page(request):
    header = '<h2 style="text-align: center;">Home Page</h2>'
    body = '<br><br><p style="text-align: center; font-family: verdana; color: blue;">Hi, My name is Junaid Khalid.</p>'
    body += '<p style="text-align: center; font-family: verdana;"> This is my portfolio website.</p>'
    footer = '<p style="text-align: center; font-family: verdana;">Checkout my <a href="/jobs">previous jobs</a>.</p>'

    # In the 'a' tag, notice that the href contains '/jobs', this route will be defined in the intro.py file
    # It is simply telling the view to navigate to that route, and run whatever code is in that view

    return Response(header + body + footer)

@view_config(route_name='jobs')
def job_history(request):
    header = '<h2 style="text-align: center;">Job History</h2>'
    job1 = '<p style="text-align: center; font-family: verdana;">Jr. Software Developer at XYZ</p>'

    return Response(header + job1)

Note: At the beginner level, you can write the HTML code by following the strategy used above i.e. declare tags in different variables and simply concatenate them when sending back the response. At some point you'll likely want to use a templating engine, like Jinja to make HTML generation much simpler.

Our application won't run just yet, we need to edit the intro.py file as well.

# intro.py
# Import necessary functions to run our web app

from wsgiref.simple_server import make_server
from pyramid.config import Configurator
from pyramid.response import Response

def main():
    with Configurator() as config:
        # In add_route function, the first parameter defines the name of the route
        # and the second parameter defines the 'route' or the page location
        config.add_route('intro', '/')
        config.add_route('jobs', '/jobs')

        # The scan function scans our project directory for a file named all_views.py
        # and connects the routes we provided above with their relevant views
        config.scan('all_views')

        application = config.make_wsgi_app()

    # The following lines of code configure and start a server which hosts our
    # website locally (i.e. on our computer)
    server = make_server('0.0.0.0', 8000, application)
    server.serve_forever()

main()

As you can see, we have removed the code for our previous view. If we had declared all these views in a single file, the file would have looked a lot more cluttered. Both files look very clean now, and each file now serves a single purpose. Let's see what our web app looks like right now.

Output:

In the image above, we can see our home page. It is located at the route 'http://localhost:8000'. It does not look very aesthetically pleasing, but as stated at the start of the tutorial, this was not our aim anyways. If we want to make it look aesthetic, we can add a lot of styling to it using HTML style attribute, or CSS, or use templates from Bootstrap.

Moving on, you can also see a hyperlink which has been named 'previous jobs'. Clicking that would take you to a new webpage with a different route. We will see the output of that in the next image.

Output:

The above image shows our Jobs page. It is located at the route http://localhost:8000/jobs. We specified this route in our 'intro.py' file. I have only added one job to show as an example.

Conclusion

Pyramid is a Python based Web Development Framework to build web apps with ease. In this tutorial, we learned how to install Pyramid inside a virtual environment and make a basic Web Application using Pyramid which runs on a locally created server on our computer.

If you would like to go into more details, visit Pyramid's documentation - it is quite elaborate and beginner friendly.


from Planet Python
via read more

Ruslan Spivak: Let’s Build A Simple Interpreter. Part 17: Call Stack and Activation Records

You may have to fight a battle more than once to win it.” — Margaret Thatcher

In 1968 during the Mexico City Summer Olympics, a marathon runner named John Stephen Akhwari found himself thousands miles away from his home country of Tanzania, in East Africa. While running the marathon at the high altitude of Mexico City he got hit by other athletes jockeying for position and fell to the ground, badly wounding his knee and causing a dislocation. After receiving medical attention, instead of pulling out of the competition after such a bad injury, he stood up and continued the race.

Mamo Wolde of Ethiopia, at 2:20:26 into the race, crossed the finish line in first place. More than an hour later at 3:25:27, after the sun had set, Akhwari, hobbling, with a bloody leg and his bandages dangling and flapping in the wind, crossed the finish line, in last place.

When a small crowd saw Akhwari crossing the line, they cheered him in disbelief, and the few remaining reporters rushed onto the track to ask him why he continued to run the race with his injuries. His response went down in history: “My country did not send me 5,000 miles to start the race. They sent me 5,000 miles to finish the race.”

This story has since inspired many athletes and non-athletes alike. You might be thinking at this point, “That’s great, it’s an inspiring story, but what does it have to do with me?” The main message for you and me is this: “Keep going!” This has been a long series spun over a long period of time and at times it may feel daunting to go along with it, but we’re approaching an important milestone in the series, so we need to keep going.

Okay, let’s get to it!

We have a couple of goals for today:

  1. Implement a new memory system that can support programs, procedure calls, and function calls.

  2. Replace the interpreter’s current memory system, represented by the GLOBAL_MEMORY dictionary, with the new memory system.

Let’s start by answering the following questions:

  1. What is a memory system?

  2. Why do we need a new memory system?

  3. What does the new memory system look like?

  4. Why would we want to replace the GLOBAL_MEMORY dictionary?


1. What is a memory system?

To put it simply, it is a system for storing and accessing data in memory. At the hardware level, it is the physical memory (RAM) where values are stored at particular physical addresses. At the interpreter level, because our interpreter stores values according to their variable names and not physical addresses, we represent memory with a dictionary that maps names to values. Here is a simple demonstration where we store the value of 7 by the variable name y, and then immediately access the value associated with the name y:

>>> GLOBAL_MEMORY = {}
>>>
>>> GLOBAL_MEMORY['y'] = 7   # store value by name
>>>
>>> GLOBAL_MEMORY['y']       # access value by name
7
>>>


We’ve been using this dictionary approach to represent global memory for a while now. We’ve been storing and accessing variables at the PROGRAM level (the global level) using the GLOBAL_MEMORY dictionary. Here are the parts of the interpreter concerned with the “memory” creation, handling assignments of values to variables in memory and accessing values by their names:

class Interpreter(NodeVisitor):
    def __init__(self, tree):
        self.tree = tree
        self.GLOBAL_MEMORY = {}

    def visit_Assign(self, node):
        var_name = node.left.value
        var_value = self.visit(node.right)
        self.GLOBAL_MEMORY[var_name] = var_value

    def visit_Var(self, node):
        var_name = node.value
        var_value = self.GLOBAL_MEMORY.get(var_name)
        return var_value

Now that we’ve described how we currently represent memory in our interpreter, let’s find out an answer to the next question.

2. Why do we need a new memory system for our interpreter?

It turns out that having just one dictionary to represent global memory is not enough to support procedure and function calls, including recursive calls.

To support nested calls, and a special case of nested calls, recursive calls, we need multiple dictionaries to store information about each procedure and function invocation. And we need those dictionaries organized in a particular way. That’s the reason we need a new memory system. Having this memory system in place is a stepping-stone for executing procedure calls, which we will implement in future articles.

3. What does the new memory system look like?

At its core, the new memory system is a stack data structure that holds dictionary-like objects as its elements. This stack is called the “call stack” because it’s used to track what procedure/function call is being currently executed. The call stack is also known as the run-time stack, execution stack, program stack, or just “the stack”. The dictionary-like objects that the call stack holds are called activation records. You may know them by another name: “stack frames”, or just “frames”.

Let’s go into more detail about the call stack and activation records.

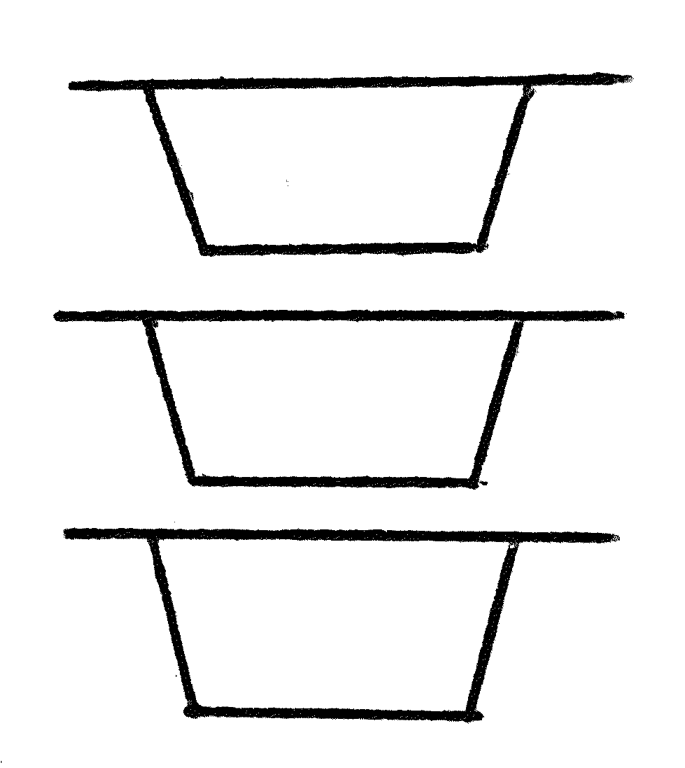
What is a stack? A stack is a data structure that is based on a “last-in-first-out” policy (LIFO), which means that the most recent item added to the stack is the first one that comes out. It’s like a collection of plates where you put (“push”) a plate on the top of the plate stack and, if you need to take a plate, you take one off the top of the plate stack (you “pop” the plate):

Our stack implementation will have the following methods:

- push (to push an item onto the stack)

- pop (to pop an item off the stack)

- peek (to return an item at the top of the stack without removing it)


And by our convention our stack will be growing upwards:

How would we implement a stack in code? A very basic implementation could look like this:

class Stack:
    def __init__(self):
        self.items = []

    def push(self, item):
        self.items.append(item)

    def pop(self):
        return self.items.pop()

    def peek(self):
        return self.items[-1]

That’s pretty much how our call stack implementation will look as well. We’ll change some variable names to reflect the fact that the call stack will store activation records and add a __str__() method to print the contents of the stack:

class CallStack:
    def __init__(self):
        self._records = []

    def push(self, ar):
        self._records.append(ar)

    def pop(self):
        return self._records.pop()

    def peek(self):
        return self._records[-1]

    def __str__(self):
        s = '\n'.join(repr(ar) for ar in reversed(self._records))
        s = f'CALL STACK\n{s}\n'
        return s

    def __repr__(self):
        return self.__str__()

The __str__() method generates a string representation of the contents of the call stack by iterating over activation records in reverse order and concatenating a string representation of each record to produce the final result. The __str__() method prints the contents in the reverse order so that the standard output shows our stack growing up.

Now, what is an activation record? For our purposes, an activation record is a dictionary-like object for maintaining information about the currently executing invocation of a procedure or function, and also the program itself. The activation record for a procedure invocation, for example, will contain the current values of its formal parameters and its local variables.

Let’s take a look at how we will represent activation records in code:

class ARType(Enum):
    PROGRAM   = 'PROGRAM'


class ActivationRecord:
    def __init__(self, name, type, nesting_level):
        self.name = name
        self.type = type
        self.nesting_level = nesting_level
        self.members = {}

    def __setitem__(self, key, value):
        self.members[key] = value

    def __getitem__(self, key):
        return self.members[key]

    def get(self, key):
        return self.members.get(key)

    def __str__(self):
        lines = [
            '{level}: {type} {name}'.format(
                level=self.nesting_level,
                type=self.type.value,
                name=self.name,
            )
        ]
        for name, val in self.members.items():
            lines.append(f'   {name:<20}: {val}')

        s = '\n'.join(lines)
        return s

    def __repr__(self):
        return self.__str__()

There are a few things worth mentioning:

a. The ActivationRecord class constructor takes three parameters:

  • the name of the activation record (AR for short); we’ll use a program name as well as a procedure/function name as the name for the corresponding AR

  • the type of the activation record (for example, PROGRAM); these are defined in a separate enumeration class called ARType (activation record type)

  • the nesting_level of the activation record; the nesting level of an AR corresponds to the scope level of the respective procedure or function declaration plus one; the nesting level will always be set to 1 for programs, which you’ll see shortly

b. The members dictionary represents memory that will be used for keeping information about a particular invocation of a routine. We’ll cover this in more detail in the next article

c. The ActivationRecord class implements special __setitem__() and __getitem__() methods to give activation record objects a dictionary-like interface for storing key-value pairs and for accessing values by keys: ar[‘x’] = 7 and ar[‘x’]

d. The get() method is another way to get a value by key, but instead of raising an exception, the method will return None if the key doesn’t exist in the members dictionary yet.

e. The __str__() method returns a string representation of the contents of an activation record

Let’s see the call stack and activation records in action using a Python shell:

>>> from spi import CallStack, ActivationRecord, ARType
>>> stack = CallStack()
>>> stack
CALL STACK


>>> ar = ActivationRecord(name='Main', type=ARType.PROGRAM, nesting_level=1)
>>>
>>> ar
1: PROGRAM Main
>>>
>>> ar['y'] = 7
>>>
>>> ar
1: PROGRAM Main
   y                   : 7
>>>
>>> stack
CALL STACK


>>> stack.push(ar)
>>>
>>> stack
CALL STACK
1: PROGRAM Main
   y                   : 7

>>>


In the picture below, you can see the description of the contents of the activation record from the interactive session above:

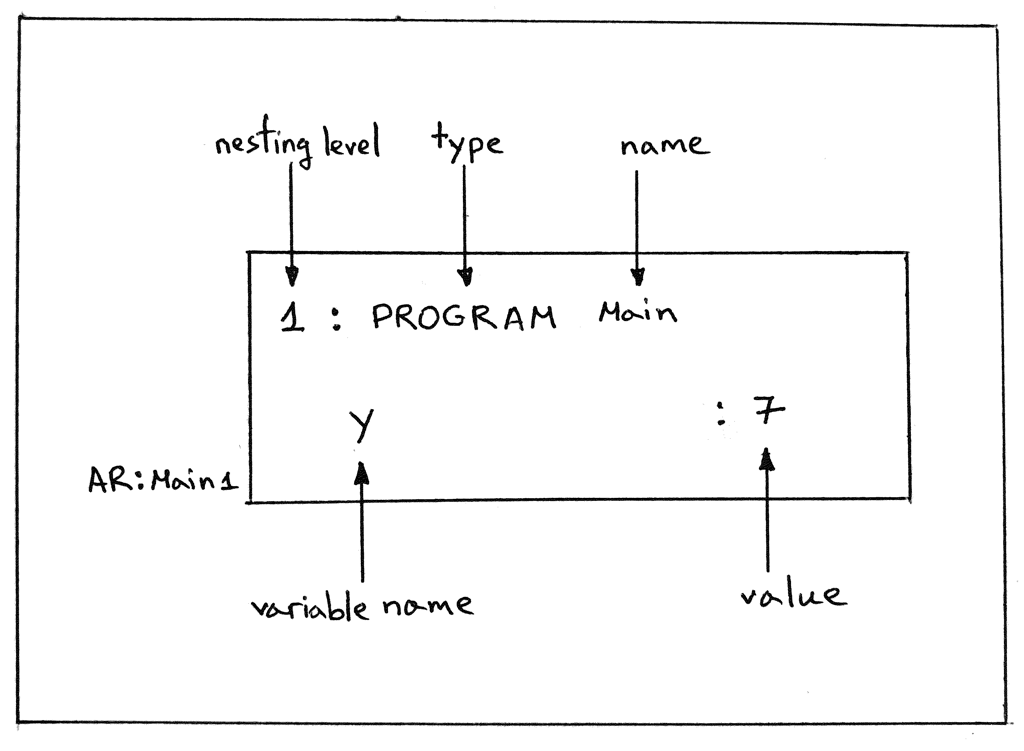
AR:Main1 denotes an activation record for the program named Main at nesting level 1.

Now that we’ve covered the new memory system, let’s answer the following question.


4. Why would we want to replace the GLOBAL_MEMORY dictionary with the call stack?

The reason is to simplify our implementation and to have unified access to global variables defined at the PROGRAM level as well as to procedure and function parameters and their local variables.

In the next article we’ll see how it all fits together, but for now let’s get to the Interpreter class changes where we put the call stack and activation records described earlier to good use.


Here are all the interpreter changes we’re going to make today:

1. Replace the GLOBAL_MEMORY dictionary with the call stack

2. Update the visit_Program method to use the call stack to push and pop an activation record that will hold the values of global variables

3. Update the visit_Assign method to store a key-value pair in the activation record at the top of the call stack

4. Update the visit_Var method to access a value by its name from the activation record at the top of the call stack

5. Add a log method and update the visit_Program method to use it to print the contents of the call stack when interpreting a program

Let’s get started, shall we?

1. First things first, let’s replace the GLOBAL_MEMORY dictionary with our call stack implementation. All we need to do is change the Interpreter constructor from this:

class Interpreter(NodeVisitor):
    def __init__(self, tree):
        self.tree = tree
        self.GLOBAL_MEMORY = {}

to this:

class Interpreter(NodeVisitor):
    def __init__(self, tree):
        self.tree = tree
        self.call_stack = CallStack()

2. Now, let’s update the visit_Program method:

Old code:

def visit_Program(self, node):
    self.visit(node.block)

New code:

def visit_Program(self, node):
    program_name = node.name

    ar = ActivationRecord(
        name=program_name,
        type=ARType.PROGRAM,
        nesting_level=1,
    )
    self.call_stack.push(ar)

    self.visit(node.block)

    self.call_stack.pop()

Let’s unpack what’s going on in the updated method above:

  • First, we create an activation record, giving it the name of the program, the PROGRAM type, and the nesting level 1

  • Then we push the activation record onto the call stack; we do this before anything else so that the rest of the interpreter can use the call stack with the single activation record at the top of the stack to store and access global variables

  • Then we evaluate the body of the program as usual. Again, as our interpreter evaluates the body of the program, it uses the activation record at the top of the call stack to store and access global variables

  • Next, right before exiting the visit_Program method, we pop the activation record off the call stack; we don’t need it anymore because at this point the execution of the program by the interpreter is over and we can safely discard the activation record that is no longer used

3. Up next, let’s update the visit_Assign method to store a key-value pair in the activation record at the top of the call stack:

Old code:

def visit_Assign(self, node):
    var_name = node.left.value
    var_value = self.visit(node.right)
    self.GLOBAL_MEMORY[var_name] = var_value

New code:

def visit_Assign(self, node):
    var_name = node.left.value
    var_value = self.visit(node.right)

    ar = self.call_stack.peek()
    ar[var_name] = var_value

In the code above we use the peek() method to get the activation record at the top of the stack (the one that was pushed onto the stack by the visit_Program method) and then use the record to store the value var_value using var_name as a key.

4. Next, let’s update the visit_Var method to access a value by its name from the activation record at the top of the call stack:

Old code:

def visit_Var(self, node):
    var_name = node.value
    var_value = self.GLOBAL_MEMORY.get(var_name)
    return var_value

New code:

def visit_Var(self, node):
    var_name = node.value

    ar = self.call_stack.peek()
    var_value = ar.get(var_name)

    return var_value

Again as you can see, we use the peek() method to get the top (and only) activation record - the one that was pushed onto the stack by the visit_Program method to hold all the global variables and their values - and then get a value associated with the var_name key.

5. And the last change in the Interpreter class that we’re going to make is to add a log method and use the log method to print the contents of the call stack when the interpreter evaluates a program:

def log(self, msg):
    if _SHOULD_LOG_STACK:
        print(msg)

def visit_Program(self, node):
    program_name = node.name
    self.log(f'ENTER: PROGRAM {program_name}')

    ar = ActivationRecord(
        name=program_name,
        type=ARType.PROGRAM,
        nesting_level=1,
    )
    self.call_stack.push(ar)

    self.log(str(self.call_stack))

    self.visit(node.block)

    self.log(f'LEAVE: PROGRAM {program_name}')
    self.log(str(self.call_stack))

    self.call_stack.pop()

The messages will be logged only if the global variable _SHOULD_LOG_STACK is set to true. The variable’s value will be controlled by the “—stack” command line option. First, let’s update the main function and add the “—stack” command line option to turn the logging of the call stack contents on and off:

def main():
    parser = argparse.ArgumentParser(
        description='SPI - Simple Pascal Interpreter'
    )
    parser.add_argument('inputfile', help='Pascal source file')
    parser.add_argument(
        '--scope',
        help='Print scope information',
        action='store_true',
    )
    parser.add_argument(
        '--stack',
        help='Print call stack',
        action='store_true',
    )
    args = parser.parse_args()

    global _SHOULD_LOG_SCOPE, _SHOULD_LOG_STACK

    _SHOULD_LOG_SCOPE, _SHOULD_LOG_STACK = args.scope, args.stack


Now, let’s take our updated interpreter for a test drive. Download the interpreter from GitHub and run it with the -h command line option to see available command line options:

$ python spi.py -h
usage: spi.py [-h] [--scope] [--stack] inputfile

SPI - Simple Pascal Interpreter

positional arguments:
  inputfile   Pascal source file

optional arguments:
  -h, --help  show this help message and exit
  --scope     Print scope information
  --stack     Print call stack

Download the following sample program from GitHub or save it to file part17.pas

program Main;
var x, y : integer;
begin { Main }
   y := 7;
   x := (y + 3) * 3;
end.  { Main }

Run the interpreter with the part17.pas file as its input file and the “—stack” command line option to see the contents of the call stack as the interpreter executes the source program:

$ python spi.py part17.pas --stack
ENTER: PROGRAM Main
CALL STACK
1: PROGRAM Main


LEAVE: PROGRAM Main
CALL STACK
1: PROGRAM Main
   y                   : 7
   x                   : 30


Mission accomplished! We have implemented a new memory system that can support programs, procedure calls, and function calls. And we’ve replaced the interpreter’s current memory system, represented by the GLOBAL_MEMORY dictionary, with the new system based on the call stack and activation records.


That’s all for today. In the next article we’ll extend the interpreter to execute procedure calls using the call stack and activation records. This will be a huge milestone for us. So stay tuned and see you next time!


Resources used in preparation for this article (some links are affiliate links):

  1. Language Implementation Patterns: Create Your Own Domain-Specific and General Programming Languages (Pragmatic Programmers)
  2. Writing Compilers and Interpreters: A Software Engineering Approach
  3. Programming Language Pragmatics, Fourth Edition
  4. Lead with a Story
  5. A Wikipedia article on John Stephen Akhwari


from Planet Python
via read more

TestDriven.io: Working with Static and Media Files in Django

This article looks at how to work with static and media files in a Django project, locally and in production. from Planet Python via read...