Tuesday, January 17, 2017

Big Data Experiments - Running Apache Spark on Windows 7

It is a different thing to run Spark on Linux and a very different experience to run Spark in Windows. Last few days had been very frustrating for me from the perspective that I have been trying hard to setup Apache Spark on my desktop and run a very simple example and finally it completed today. In the following post I will be documenting my experience and how anyone else can avoid these problems.

First let me explain my environment:
OS: Windows 7 64 Bit
Processor: i5
RAM: 8 GB

Based on a project requirement I wanted to test I chose the following version of Spark which I downloaded from Spark Website.
spark-1.6.0-bin-hadoop2.6.tgz
As a pre-requisite I had the following version of Oracle Java
java version "1.8.0_25" and JAVA_HOME was setup appropriately.
I use a batch script for the setup which is very handy.
jdk1.8.bat 
 @echo off
echo Setting JAVA_HOME
set JAVA_HOME=C:\jdk1.8.0_25-windows\java-windows
echo setting PATH
set PATH=%JAVA_HOME%\bin;%PATH%
echo Display java version
java -version

And then I setup Scala & SBT which I downloaded from the following links.
scala version 2.11.0-M8 
sbt 0.13.13
Downloaded the winutils.exe based on the advice of this stack overflow answer
http://stackoverflow.com/questions/25481325/how-to-set-up-spark-on-windows
winutils.exe link 
And then setup the necessary access for c:\tmp\hive based on advice from this blog


Then created a batch script to set it up all
envscala.bat 
@echo off
REM set SPARK & Scala related Dirs
set USERNAME=pridash4
set HADOOP_HOME=c:\rcs\hadoop-2.6.5
set SCALA_HOME=C:\scala-2.11.0-M8\scala-2.11.0-M8
set SPARK_HOME=C:\spark-1.6.0-bin-hadoop2.6
set SBT_HOME=C:\sbt-launcher-packaging-0.13.13
set PATH=%HADOOP_HOME%\bin;%SCALA_HOME%\bin;%SBT_HOME%\bin;%SPARK_HOME%\bin;%PATH%
Then I followed the following command:
>jdk1.8.bat
>envscala.bat
>spark-shell.bat

All started but again all stopped at one error:
    The root scratch dir: /tmp/hive on HDFS should be writable. Current permissions are: rw-rw-rw- 
This almost wasted one full day and despite trying all the steps I still got this error.

Then I re-read and found this stack overflow post "http://stackoverflow.com/questions/40409838/the-root-scratch-dir-tmp-hive-on-hdfs-should-be-writable-current-permissions" which gave the idea to install hadoop binaries itself and run the below command.

hadoop fs -chmod -R 777 /tmp/hive/;
Thus started my new adventure to install hadoop 2.6 based on the below Apache documentation:
https://wiki.apache.org/hadoop/Hadoop2OnWindows

I downloaded the binaries from Apache website and tried extracting the binaries and copied the winutils.exe to the hadoop bin directory. And though I ran the above hadoop command but when I ran spark-shell again I started getting new errors. And with lot of searching I restored back to the below binaries for Hadoop 2.6 and installed Microsoft Visual C++ 2010 Redistributable Package (x86) package for the correct Microsoft DLL binding for winutils to reflect. And then I re-ran the steps as in the above apache documentation.

Though Hadoop did not start but spark-shell started and I was able to use it.

Now I know this is not as detailed or as concrete an experiment as one would expect but this was helpful where I did not have to rebuild spark & hadoop from scratch for my system.

Hoping that this will be of help to others bye bye and have a great day. 
Monday, January 16, 2017

2017 Is the year of Backbenchers ... & Shall I say generalists

Today I read this inspiring article from the Shradha Sharma Founder and Chief Editor of YourStory. And it was titled 2017 is the year of Back benchers. Personally I should call myself a backbencher who became a middle bencher then came to the front and then in last years has faded to the back. Yes I talk a lot, I question a lot, I have an air about myself and also slog a lot to learn what ever is there around in tech industry that excites me. But I also feel I am lost and hence when I heard the word Generalist I liked it. Because I am one of them. I am sure many of us are. If we observe closely much of the enterprise in India always calls for specialists. But in truth when they get recruited they do the work so unrelated that end of the day their specialization is diluted. They sometimes publish a generalist role but in our Industry we always want a Specialist. Take for an example of a call today. They wanted some one who knows Jquery, Java, Angular, Big Data, Ruby, Python, Jenkin, Docker, Devops and God knows what and yet the final question they asked me you know it all and are you comfortable to switch back to Java. My though was here the question again comes back they need a specialist not a generalist. Let me explain who is a Generalist for the ignorant. A person who is jack of all trades and master of none is not a generalist. Rather generalist is a jack of all trades and master of some and who has a passion to learn/master any new skill as the situation demands. As given in the article like back benchers even generalists toil hard to gain skills and even hard for them to unlearn it if required but they are never appreciated, they are overlooked and people with fancy titles are sought. 

Yes you may say I am sulking but the truth is its the case with many who have multiple skills but can never utilize it. One reason can be that they are never given a chance to showcase it or their bosses think that what they are currently doing that is safe for them for who will replace them. That is one reason also why in our country innovation is stunted. We are doing the cheap work which world does not want to do. And when I speak about Entrepreneurship and putting the effort in creating value for ourselves many defend the necessity for job citing the fear of risk and the comfort zone that they have created around themselves. What I rather feel is that be it this year or any year for India to truly grow and pose a significant sustainable financial power the generalists has to come out and contribute to add value as Entrepreneurs and break the vicious cycles of stereotypes and dogmas that plague our businesses and enterprise.

At the end I can only say we should learn from the informal economy which this government is so hell bent to destroy. This is the economy of  Entrepreneurs, a shared economy who work hard to bring value to us middle class and support our food, transport and labor demands. They and generalists like us should come ahead and add value to the growth of our motherland.

Tuesday, January 3, 2017

Raspberry Pi Experiments - OpenVPN for secure network

In my previous blog http://priyabgeek.blogspot.in/2016/08/raspberry-pi-experiment-ssh-reverse.html I talked about opening a reverse proxy to access Raspberry Pi using a AWS EC2 instance. While the above solution was only good for exposing some web services or even ssh but I wanted a more robust solution where I wanted to experiment using a VPN solution where a Virtual Private network will from between Raspberry Pi's that I have and any other computers that I would want to connect from anywhere and will work just as the LAN that we operate in our house.

As a solution I wanted to use OpenVPN and used partly instructions from https://dotslashnotes.wordpress.com/2013/08/05/how-to-set-up-a-vpn-private-internet-access-in-raspberry-pi/http://www.pivpn.io/ to setup my VPN server.

I also referred the below blogs to get some more info about OpenVPN.
http://readwrite.com/2014/04/10/raspberry-pi-vpn-tutorial-server-secure-web-browsing/
http://www.bbc.com/news/technology-33548728
http://www.instructables.com/id/Host-Your-Own-Virtual-Private-Network-VPN-with-O/

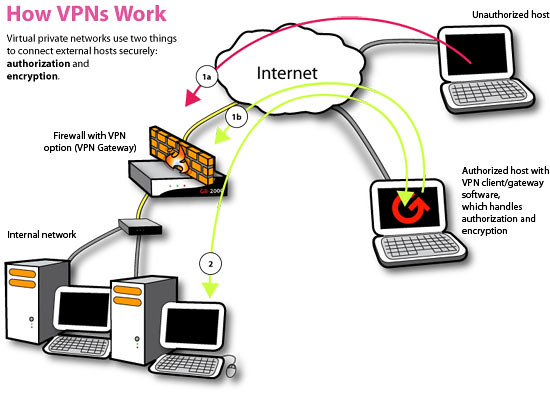
At a high level the below diagram explains the concept of a VPN:


VPNFR3X8GTHIW8FOTM

Now in OpenVPN there is a VPN server that help to generate the necessary keys and the necessary VPN configuration files and runs the VPN daemon creating a VPN network gateway to which all the other computers connect via a VPN gateway using a VPN client.

In my case I have configured my Raspberry PI as a VPN Gateway server and let other computers in my home and laptops connect to it. But the biggest issues were the bandwidth and also the necessary setup that I need to do in my router which DHCP setup for incoming connections to discover my Raspberry PI server. But many ISP providers do not support reverse connections to our home network and as it needs a static IP I was not sure if I can get such a setup. So I chose to setup my VPN on my AWS EC2 instance. With this setup  I was able to connect to my Rapsberry PI with a secure VPN network same as I may connect from my home network.

I followed the below steps to get the setup completed.

1. First I connected to my AWS instance via SSH:
ssh -i <AWS PEM File>.pem ubuntu@ec2<Server>.compute.amazonaws.com

2. Then I installed PiVPN which makes the setup of OpenVPN server a breeze. To run the setup please run:
sudo curl -L https://install.pivpn.io | bash 
Please make sure just to followup with the default setup and once done you will get a message like

Raspberry1.ovpn has been copied to /home/ubuntu/ovpns

(Note: While doing the above setup it will ask you to give a private pass phrase. Please remember that as you will be using it to log into your VPN server from the client)

3.  After that please restart the server and once you re-login you can check the openvpn server as given below:

ps -ef | grep openvpn
Output will be something like this:
nobody    1033     1  0 Jan02 ?        00:00:01 /usr/sbin/openvpn --writepid /run/openvpn/server.pid --daemon ovpn-server --cd /etc/openvpn --config /etc/openvpn/server.conf --script-security 2
4. Now to connect to your VPN server from Raspberry Pi log into your Raspberry Pi via SSH
ssh pi@<Your Raspberry PI IP Address>
5. Next install OpenVPN
sudo apt-get install openvpn
6. Next copy the  .ovpn from the VPN Server

scp -r -i <AWS Security Key>.pem ubuntu@<EC2 Server Name>.compute.amazonaws.com:/home/ubuntu/ov* .
7. Next create a pass.txt and add the following value which we put in step 2 as secret passphrase.
password 
 8. Add the following line at the end of Raspberry1.ovpn or the .ovpn file that you download:
askpass /home/pi/ovpns/pass.txt
So the output of the file should look like:
-----END OpenVPN Static key V1-----
</tls-auth>
askpass /home/pi/ovpns/pass.txt


9. Call the following command:
sudo openvpn /home/pi/openvpn/Raspberry1_wrk.ovpn
10. Finally you should be able to establish VPN connectivity and check it.
  ifconfig

You should see like below:
tun0      Link encap:UNSPEC  HWaddr 00-00-00-00-00-00-00-00-00-00-00-00-00-00-00
-00
          inet addr:10.8.0.3  P-t-P:10.8.0.3  Mask:255.255.255.0
          UP POINTOPOINT RUNNING NOARP MULTICAST  MTU:1500  Metric:1
          RX packets:218 errors:0 dropped:0 overruns:0 frame:0
          TX packets:271 errors:0 dropped:0 overruns:0 carrier:0
          collisions:0 txqueuelen:100
          RX bytes:21911 (21.3 KiB)  TX bytes:30389 (29.6 KiB)
11. Finally you can test if the ssh is working over VPN by giving ssh command live below:

ssh -i <AWS Server Key>.pem ubuntu@10.8.0.1
And you should be able to connect to it as in step 1.

Hope this post was helpful hope to share more such posts.

(Note: You can skip step 1 and 2 and can use other VPN service providers who provide OpenVPN service please refer the below links for more details:
https://www.bestvpn.com/best-vpn-openvpn/
https://securitygladiators.com/2014/09/27/5-best-free-openvpn-service-providers-2014/
https://securethoughts.com/3-best-vpns-for-open-vpn/
http://in.pcmag.com/software/38911/guide/the-best-vpn-services-of-2017
)

TestDriven.io: Working with Static and Media Files in Django

This article looks at how to work with static and media files in a Django project, locally and in production. from Planet Python via read...